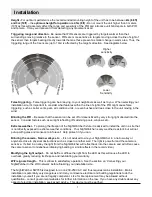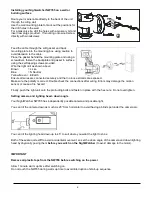
background image


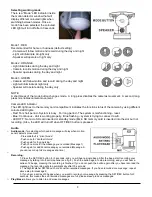
Selecting working mode 

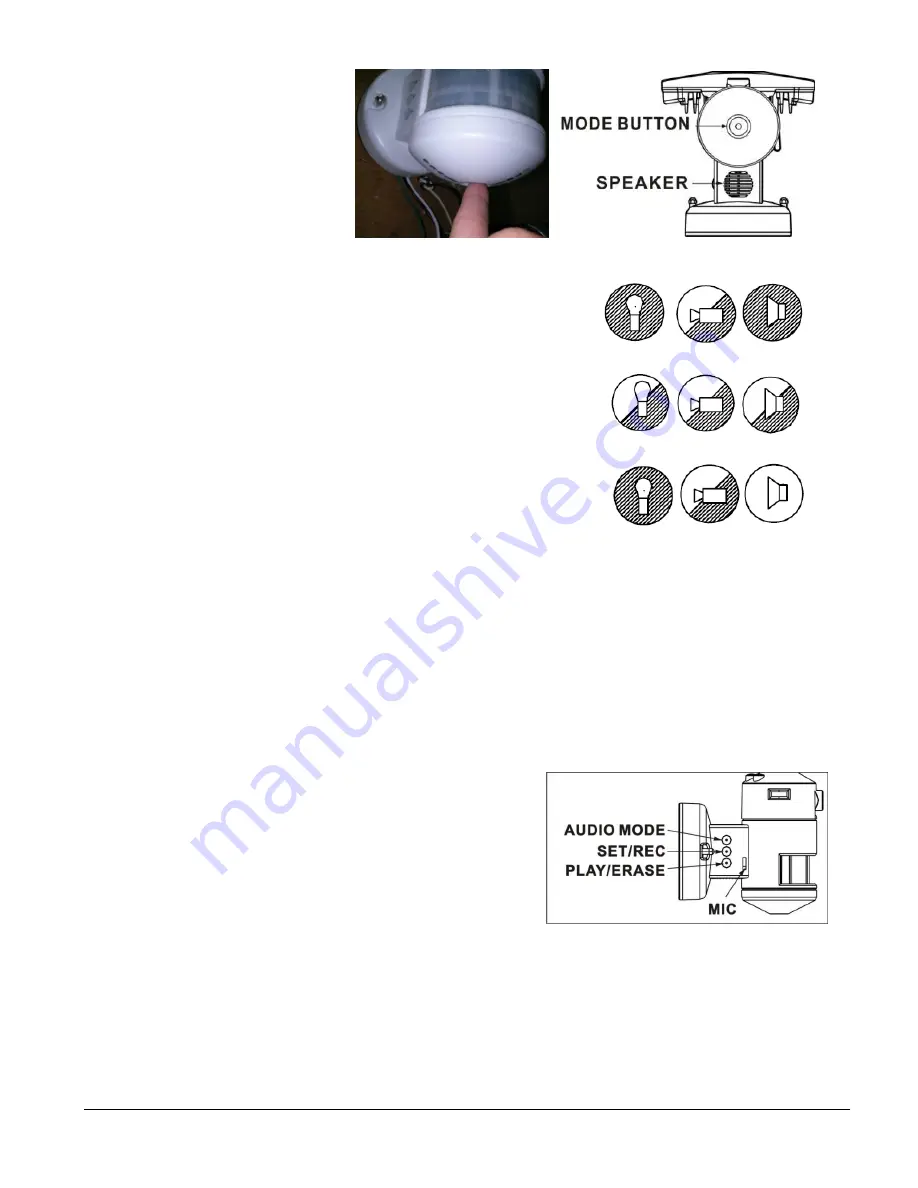
There is a “Mode” LED indicator inside 
the motion detector window that will  
display different coloured lights when  
switching between modes. Once a  
mode has been selected, the coloured  
LED light will turn off after 30 seconds. 


Mode 1: RED 
Recommended for home or business (default setting) 
 - Camera will follow motion and record during the day and night           
 - Light will illuminate at night only 
 - Speaker will operate at night only 
 
Mode 2: ORANGE 
- Light illuminates during the day and night 
- Camera records motion during the day and night 
- Speaker operates during the day and night 
 
Mode 3: GREEN 
- Camera will follow motion and record during the day and night  
- Light will illuminate at night only 
- Speaker will operate during the day only 
 
NOTE: 
A short press of the mode button changes mode.  A long press disables the cameras movement.  A second, long 
press re-enables camera movement. 
 
Camera LED indicator 
The LED light next to the memory card compartment indicates the function status of the camera by using different 
coloured LED lights. 
- Red: For short period - System is busy.  For long period - The system is malfunctioning - reset. 
- Blue: Continuous - Unit is working properly.  Blue flashing 

– system is trying to connect to wifi. 

- LED OFF: No micro SD card inserted or standby mode (Micro SD memory card is inserted into the slot but not 
recording.) Also, the LED will turn off when OFF/REC button is pressed. 
 

Audio 

□ 

Audio mode:

 for selecting which audio message will play when motion 

sensor detects movement. 

- Pre-set 

default is “silent mode” 

Push once for “doorbell chime” 

Push again for “dog barking” 

- Push once more for the message you recorded (Message 1) 
- Push again for additional message you recorded (Message 2- 
you can record up to 2 messages at a time)  

□ 

 
Recording: 

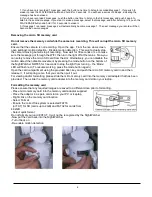
1. Press the SET/REC button for 3 seconds, and you will hear a single beep. After the beep, start recording your 
message by talking into the microphone (see fig. 9). Push the button again to stop recording, and you will hear a 
series of 2 beeps, meaning the recording is finished. If you do not push the button again after you have recorded the 
message, the recording will stop automatically after 10 seconds. 
2. The NightWatcher NW765 can hold 2 custom-recorded messages. If you have recorded one message, repeat 
above step for message 2. 
3. If you hear a series of 3 beeps when you want to record your message by pressing the SET/REC button for 3 
seconds, this means the self-recorded messages are full, please erase previous messages. 

□ 

Play/Erase: 

allows you to listen to and erase messages 

Summary of Contents for NW765

Page 1: ...0 CAN WE HELP Questions problems missing parts Before returning to the store please call NightWatcher Customer Service 0345 900 6764 Local rate call Or Email support nightwatcher co uk OS Windows 2000 XP Vista 7 8 10 MAC Micro SD Memory card 1GB SD 32GB SDHC max Class 4 min ...

Page 2: ...2 ...

Page 3: ...3 PACKAGE CONTENTS D E F A Part Description Quantity A Screw nut 2 B Backplate screw 2 C EVA Gasket 1 D Memory card and memory card adaptor 1 E User manual 1 F Antenna 1 Pre installation ...

Page 4: ...an of the NightWatcher fixture it is advised to install the unit in a site that is not directly exposed to extreme weather conditions Your NightWatcher is very weather resistant but will not put up with gales and monsoon rain forever Help protect it if you can Blinding the camera Narrow alleys etc It is not advised to site your NightWatcher in a narrow alley or anywhere close to physical obstructi...

Page 5: ...ds are exposed Make sure the polarity is correct Double check the connections after wiring Errors may damage the motion sensor or cause a fire hazard Finally push the light unit onto the protruding bolts and fasten in place with the hex nuts Do not overtighten Setting camera and lighting head down angle Your NightWatcher NW765 has independently posable camera and posable light You can tilt the cam...

Page 6: ...g properly Blue flashing system is trying to connect to wifi LED OFF No micro SD card inserted or standby mode Micro SD memory card is inserted into the slot but not recording Also the LED will turn off when OFF REC button is pressed Audio Audio mode for selecting which audio message will play when motion sensor detects movement Pre set default is silent mode Push once for doorbell chime Push agai...

Page 7: ...urn the light off at the mains Now you can safely remove the micro SD card from the slot Alternatively you can disable the motion detect then disable movement by pressing the mode button on the bottom of the NightWatcher NW765 for 3 seconds to stop the light from turning the Mode LED will flash red To resume working press the mode button again Open the card compartment using the provided Allen key...

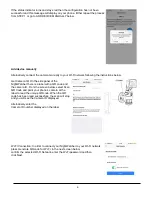
Page 8: ...er and less dense materials like wooden floors and stud walls do not limit range as much Installation Summary The installation process involves the following steps After installation power up the NightWatcher Press and hold the Mode button on the base of the NW765 to disable the light movement The light in the PIR will flash Open the SD card flap using the Allen key provided and insert the Micro S...

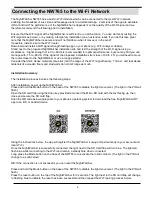
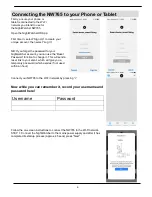
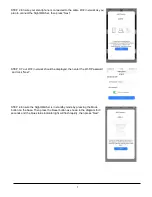
Page 9: ...o change it This will send a reset link to your email which will give you a temporary password which expires if not used within an hour Connect your NW765 to the Wi Fi network by pressing Now while you can remember it record your username and password here Username Password Follow the on screen instructions to connect the NW765 to the Wi Fi network STEP 1 Connect the NightWatcher to the mains powe...

Page 10: ... Next STEP 3 Your Wi Fi network should be displayed then enter the Wi Fi Password and click Next STEP 4 Ensure the NightWatcher is in standby mode by pressing the Mode button on the base Then press the Reset button as shown in the diagram for 3 seconds and the blue status indicator light will flash rapidly then press Next ...

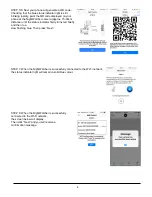
Page 11: ...istance until the status indicator firstly turns red briefly and then to a slow flashing blue Then press Next STEP 7 When the NightWatcher is successfully connected to the Wi Fi network the status indicator light will remain a solid blue colour STEP 8 When the NightWatcher is successfully connected to the Wi Fi network the screen below will display Then click Next and you will receive a confirmati...

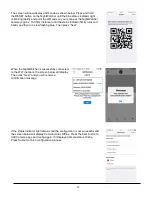
Page 12: ... the NightWatcher there is a label with a QR code and the camera ID From the screen below select Scan QR Code and point your phone s camera at the label to read the unique QR code When the QR code has been read successfully the scan will stop and you will see the Camera ID displayed Alternatively enter the Camera ID number displayed on the label Wi Fi Connection In order to connect your NightWatch...

Page 13: ...s red briefly and then to a slow flashing blue Then press Next When the NightWatcher is successfully connected to the Wi Fi network the screen below will display Then click Next and you will receive a confirmation message If the status indicator light remains red the configuration is not successful and the screen below will display Camera status Offline Press the back button to Add Camera page and...

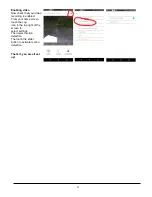
Page 14: ...our video recording is enabled From your home screen touch the cog icon in the top right of the screen to select settings Then select motion detection The touch the slider button to activate motion detection That s it you are all set up ...

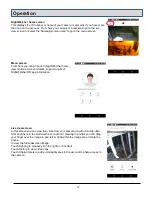
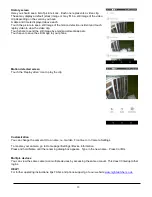
Page 15: ...ils support or about NightWatcher HD app information Live view screen In this screen you can view live video from your camera via wifi of mobile data from anywhere in the world with a connection Viewing in portrait you can drag your finger over the image to pan left or right within the image are or rotate the phone to view the full widescreen image Touch Lighting to manually turn the light on if i...

Page 16: ...l media app etc Touch save to save the still image to your phone Motion detected screen Touch the Replay video icon to play the clip Customization You can change the camera ID to a name i e Garden Front etc in Camera Settings To rename your camera go to Home page Settings Device Information Press and hold Name until the renaming dialog box appears Type in the new name Press Confirm Multiple device...

Page 17: ...up but replacing default password within time limit as directed onscreen 5 Not getting push notifications a Push notifications disabled go to Settings Notifications b Check NightWatcher wifi connection c Check mobile signal d Check data is enabled on mobile phone if outside wifi zone e Check that push notification has not been disabled on the app preferences in Android on your phone 6 Cannot acces...

Page 18: ...alid IP address and cause the WI FI connection to fail 5 Check permissions on your mobile phone app Check that it is allowed to use data and connect to wifi 6 The router has a hidden Wi Fi setting the NightWatcherHD camera does not support a hidden SSID please ensure the SSID is not hidden Account ID issues 1 App displays message This device has been added to another account In order to protect th...

Page 19: ...D currently support The NightWatcherHD App currently supports iOS 8 0 and higher and Android 4 4 0 and higher Specification questions 1 How does the night vision feature work The camera has High power lightning LED it will be triggered when someone s moving and the light is less than 3 lux within 10 meters 2 How many trigger events can be stored on the SD card 3 What happens when the SD card is fu...

Reviews: