background image

93

R

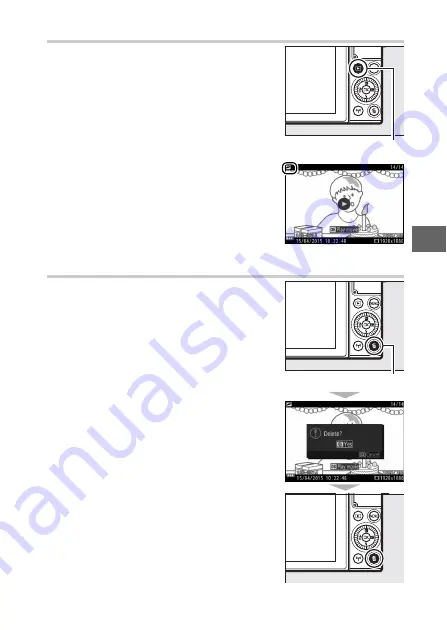
Viewing Motion Snapshots

Deleting Motion Snapshots

To delete the current Motion Snapshot,
press 

O

. A confirmation dialog will be dis-

played; press 

O

 again to delete the photo

and movie and return to playback, or
press 

K

 to exit without deleting the file.

Note that once deleted, Motion Snapshots
can not be recovered

.

Press 

K

 and use the multi selector to dis-

play a Motion Snapshot (

0

37; Motion

Snapshots are indicated by a 

z

 icon).

Pressing the 

J

 button or tapping the 

M

icon when a Motion Snapshot is dis-
played plays back the movie portion in
slow motion over a period of about 4 s,
followed by the photo; playback is
accompanied by the audio track selected
using the 

Audio

 option (

0

92). To end

playback and return to shooting mode,
press the shutter-release button halfway.

K

 button

O

 button

Summary of Contents for 1J5

Page 1: ...l En Nikon Manual Viewer 2 Install the Nikon Manual Viewer 2appon your smartphone or tablet to view Nikon digital cameramanuals anytime anywhere Nikon Manual Viewer 2 can be downloaded free of chargefrom the AppStore and Google Play ...

Page 2: ...the information you need the following sym bols and conventions are used The 1 3 4 and 2 symbols represent up down left and right on the multi selector D This icon marks cautions information that should be read before use to prevent damage to the camera A This icon marks notes information that should be read before using the camera 0 This icon marks references to other pages in this manual A For Y...

Page 3: ...ng and Viewing Photographs 0 33 yRecording and Viewing Movies 0 42 ROther Shooting Modes 0 58 tMore on Photography 0 94 TWi Fi 0 114 IMore on Playback 0 125 QConnections 0 140 oThe Playback Menu 0 149 iThe Shooting Menu 0 158 gThe Setup Menu 0 193 nTechnical Notes 0 202 ...

Page 4: ...riety of other operations 0 16 In addition to the functions listed above touch controls can be used to adjust settings and navigate the menus Touch Controls Photographs Movies Shooting 3 12 2 12 4 12 Viewing Playback Zoom Thumbnail Playback Focus Playback ...

Page 5: ...33 Viewing Photographs 37 Deleting Pictures 38 Recording and Viewing Movies 42 Recording Movies 42 Taking Photographs During Movie Recording 45 Viewing Movies 46 Deleting Movies 47 v Advanced Movie Options 49 Filming Time Lapse Movies 52 Filming Slow Motion Movies 55 Other Shooting Modes 58 w Choosing a Creative Mode 58 Choosing a Mode That Matches the Subject or Situation 59 HDR 62 Easy Panorama ...

Page 6: ... View 81 Letting the Camera Choose the Moment Smart Photo Selector 83 z Combining Photos with Brief Movie Vignettes Motion Snapshot Mode 88 Viewing Motion Snapshots 93 Deleting Motion Snapshots 93 More on Photography 94 Live Image Control 94 Continuous Mode 97 Self Timer Modes 99 Exposure Compensation 101 The Built in Flash 102 Auto Pop up Modes 102 Manual Pop up Modes 104 Self Portraits 108 Tap S...

Page 7: ...Smart Device 124 More on Playback 125 Photo Information 125 Thumbnail Playback 129 Calendar Playback 130 Playback Zoom 131 Viewing Bursts 132 Deleting Pictures 134 Deleting the Current Picture 134 The Playback Menu 134 Glamour Retouch 135 Slide Shows 137 Connections 140 Copying Pictures to a Computer 140 Installing ViewNX i 140 Copying Pictures to the Computer 141 Viewing Pictures on TV 144 High D...

Page 8: ...Options 161 Exposure Mode 161 Image Quality 162 Image Size 162 Frame Size Frame Rate 165 Metering 166 White Balance 167 Fine Tuning White Balance 168 Preset Manual 169 ISO Sensitivity 172 Picture Control 173 Modifying Picture Controls 173 Auto Distortion Control 177 Color Space 177 Active D Lighting 178 Long Exposure NR 179 High ISO Noise Reduction 179 Movie Sound Options 180 Auto Image Capture 18...

Page 9: ...Flash Control 192 Flash Compensation 192 The Setup Menu 193 Format Memory Card 195 Slot Empty Release Lock 195 Image Review 195 Display 196 Display Brightness 196 Grid Display 196 Shooting 196 Playback 196 Sound Settings 197 Auto Power Off 197 Self Portrait Mode 197 Flicker Reduction 198 Reset File Numbering 198 Time Zone and Date 199 Auto Image Rotation 200 Pixel Mapping 201 ...

Page 10: ...06 Caring for the Camera and Battery Cautions 207 Defaults 211 Memory Card Capacity 213 Troubleshooting 214 Battery Display 214 Shooting All Modes 215 Shooting P S A and M Modes 216 Movies 217 Tap Shooting Options 217 Playback 217 Wi Fi Wireless Networks 218 Miscellaneous 218 Error Messages 219 Specifications 222 Nikon 1 J5 Digital Camera 222 Battery Life 241 Index 242 ...

Page 11: ...kon authorized service center for inspection ADo not use in the presence of flammable gas Do not use electronic equipment in the presence of flammable gas as this could result in explosion or fire AKeepdry Do not immerse in or expose to water or handle with wet hands Failure to keep the product dry could result in damage to the product fire or electric shock while handling the product with wet han...

Page 12: ...touching the skin or entering the eyes or mouth ADo not carry tripods with a lens or camera attached You could trip or accidentally strike others resulting in injury ADo not touch the moving parts of the lens Failure to observe this precaution could result in injury AObserveproperprecautionswhenhandling batteries Batteries may leak overheat rupture or catch fire if improperly handled Observe the f...

Page 13: ...he charger Dust on or near the metal parts of the plug should be removed with a dry cloth Continued use could result in fire Do not go near the charger during thunderstorms Failure to observe this precaution could result in elec tric shock Do not handle the plug or charger with wet hands Failure to observe this precaution could result in injury or product malfunction due to fire or electric shock ...

Page 14: ...ctronic equipment is to be col lected separately The following apply only to users in European countries This product is designated for sepa rate collection at an appropriate col lection point Do not dispose of as household waste Separate collection and recycling helps conserve natural resources and prevent negative consequences for human health and the environ ment that might result from incor re...

Page 15: ...et on a circuit different from that to which the receiver is connected Consult the dealer or an experienced radio television technician for help CAUTIONS Modifications The FCC requires the user be notified that any changes or modifications made to this device that are not expressly approved by Nikon Corpo ration may void the user s authority to operate the equipment InterfaceCables Use the interfa...

Page 16: ...The copying or reproduction of stamps issued by the government and of certified documents stipu lated by law is prohibited Cautions on certain copies and reproduc tions The government has issued cautions on copies or reproductions of securi ties issued by private companies shares bills checks gift certificates etc commuter passes or coupon tickets except when a minimum of necessary copies are to b...

Page 17: ... avoid injury when physically destroying data storage devices AVC Patent Portfolio License THIS PRODUCT IS LICENSED UNDER THE AVC PATENT PORTFOLIO LICENSE FOR THE PERSONAL AND NON COMMERCIAL USE OF A CONSUMER TO i ENCODE VIDEO IN COMPLIANCE WITH THE AVC STANDARD AVC VIDEO AND OR ii DECODE AVC VIDEO THAT WAS ENCODED BY A CONSUMER ENGAGED IN A PERSONAL AND NON COMMERCIAL ACTIVITY AND OR WAS OBTAINED...

Page 18: ...eered and proven to operate within the operational and safety requirements of this electronic cir cuitry The use of non Nikon electronic accessories could damage the camera and may void your Nikon warranty The use of third party rechargeable Li ion batteries not bearing the Nikon holo graphic seal shown at right could interfere with normal operation of the cam era or result in the batteries overhe...

Page 19: ...cluded when the camera is inspected or serviced ABefore Taking Important Pictures Before taking pictures on important occasions such as at weddings or before taking the camera on a trip take a test shot to ensure that the camera is functioning normally Nikon will not be held liable for dam ages or lost profits that may result from product malfunction ALife Long Learning As part of Nikon s Life Lon...

Page 20: ...ent FCC Radio Frequency Interference Statement Note This equipment has been tested and found to comply with the limits for a Class B digital device pursuant to part 15 of the FCC Rules These limits are designed to provide reasonable protection against harmful interference in a residential installation This equipment generates uses and can radiate radio frequency energy and if not installed and use...

Page 21: ...posures have not found any biological effects Some studies have sug gested that some biological effects might occur but such findings have not been confirmed by additional research The 1 J5 which is equipped with a DW092 FCC ID EW4DW092 IC ID 4634A 3149EC wireless LAN module has been tested and found to comply with FCC IC radiation exposure limits set forth for an uncontrolled environment and meet...

Page 22: ...of low level RF exposures have not found any biological effects Some studies have sug gested that some biological effects might occur but such findings have not been confirmed by additional research The 1 J5 which is equipped with a DW092 FCC ID EW4DW092 IC ID 4634A 3149EC wireless LAN module has been tested and found to comply with FCC IC radiation exposure limits set forth for an uncontrolled en...

Page 23: ...1 s s Introduction Before using your camera for the first time confirm that the package contains the items listed in the User s Manual Before You Begin ...

Page 24: ... record button 43 53 56 3 Shutter release button 39 45 77 82 84 89 4 Mode dial 6 5 Microphone 180 6 Focal plane mark E 187 7 Eyelet for camera strap 21 8 Flash pop up button 104 9 Connector cover 10 AF assist illuminator 191 Self timer lamp 100 Red eye reduction lamp 103 105 11 Lens release button 27 12 Dust shield 206 207 13 Lens mount 26 187 14 Fn button 13 15 N Mark NFC antenna 119 16 Mounting ...

Page 25: ...ting self timer 74 97 99 6 O delete button 38 134 7 Power connector cover for optional power connector 204 8 Battery chamber memory card slot cover 23 25 204 9 Battery chamber memory card slot cover latch 23 25 204 10 Tripod socket 11 Speaker 12 Memory card access lamp 25 35 13 Memory card slot 23 14 Battery latch 23 25 204 AHolding the Camera When framing photographs hold the camera as shown belo...

Page 26: ...y 162 12 Focus mode 184 13 AF area mode 188 14 Face priority 40 191 15 Focus area 34 188 16 AF area brackets 184 17 Flash compensation 192 18 Exposure compensation 101 19 Flash ready indicator 106 20 k appears when memory remains for over 1000 exposures 32 21 Number of exposures remaining 32 Number of shots remaining before memory buffer fills 75 98 White balance recording indicator 170 Card warni...

Page 27: ...5 s ARecording Area The area recorded when electronic vibration reduction 0 183 is in effect during movie recording is shown by a frame in the shoot ing display Area recorded ...

Page 28: ...r release button is pressed Choose for sporting events and other scenes with fast moving subjects w Creative mode 0 58 Use special effects or match settings to the scene P Pop Q Retro R High contrast monochrome S Nostalgic sepia 5 HDR q Soft p Easy panorama r Miniature effect s Selective color 6 Cross process 7 Toy camera effect T Cross screen U Fisheye V Skin softening j Night landscape o Night p...

Page 29: ...the scene plays back in slow motion or Smart Photo Selector to let the camera pick the best shot based on composition and movement z Motion Snapshot mode 0 88 Each time the shutter is released the camera records a still image and about 1 6 s of movie footage When the resulting Motion Snapshot is viewed on the camera the movie will play back in slow motion over approximately 4 s followed by the sti...

Page 30: ...u navigation 1 Move cursor up Settings C View continuous shooting self timer menu 0 74 97 99 Menu navigation 4 Return to previous menu Select highlighted item Settings E View exposure com pensation menu 0 101 Menu navigation 2 Selecthighlighteditem or display sub menu Settings M View flash mode menu 0 102 104 Menu navigation 3 Move cursor down AThe Multi Selector Items can be highlighted by rotati...

Page 31: ...s D Playback menu 0 149 C w P S A M a v u z Shooting menu 0 158 B Setup menu 0 193 v Wi Fi menu 0 114 Menu options Options in current menu Slider shows position in current menu AUsing the Menus The items listed may vary with camera settings Items displayed in gray are not currently available To exit the menus and return to shooting mode press the shutter release button halfway 0 39 ...

Page 32: ... to navigate the playback shooting setup and Wi Fi menus Multi selector Press 1 or 3 to highlight tabs and press 2 to position the cursor in the highlighted menu Press 1 or 3 to highlight menu items and press 2 to view options for the highlighted item ATouch Controls Slide up or down to scroll and tap menu items or icons to select options or adjust set tings 0 19 ...

Page 33: ...ay the feature menu and adjust camera settings or access playback options press feature on the multi selector menu shooting mode menu playback Use the multi selector to highlight an item and press J to display options to exit the menu press the shutter release button halfway as described on page 39 or highlight 1 and press J ...

Page 34: ...tents vary with camera set tings or the type of image displayed options that are currently unavail able are shown in gray The menu is not available in auto or sports mode A Menu Touch Controls Items in the menu can also be selected by tapping the monitor ...

Page 35: ... during shoot ing To choose the role played by the Fn button select Assign Fn button in the setup menu 0 193 and choose from the following options Fn button Exposure compensation 0 101 Metering 0 166 White balance 0 167 ISO sensitivity 0 172 Picture Control 0 173 AF area mode 0 188 Focus mode 0 184 ...

Page 36: ... monitor is normally used in storage position Low angle shots Tilt the monitor up to frame shots with the camera close to the ground Once in the low angle position the monitor can be fur ther lowered High angle shots Tilt the monitor down to frame shots while holding the camera over your head ...

Page 37: ... use force Failure to observe these precautions could damage the camera or monitor If the camera is mounted on a tripod care should be taken to ensure that the monitor does not contact the tripod Do not touch the area to the rear of the monitor Failure to observe this precaution could cause product malfunction Be particularly careful not to touch these areas ...

Page 38: ...following operations Tap Flick Slide Stretch Pinch Using the Touch Screen Tap the monitor Flick a finger a short distance across the monitor Slide a finger over the monitor Place two fingers on the monitor and move them apart or pinch them together ...

Page 39: ...esting on it in second location It may not recognize other gestures if your touch is too soft your fingers are moved too quickly or too short a distance or do not remain in contact with the screen or if the movement of the two fin gers in a pinch or stretch is not correctly coordinated AEnabling or Disabling Touch screen Controls Touch controls can be enabled or disabled using the Touch screen con...

Page 40: ...ettings Tap 0 to save changes and exit or tap 2 to exit to the previous display with out saving changes ATap Shooting Options Tap shooting options can be adjusted by tapping the icon shown at right 0 111 View other images Flick left or right to view other images View movies orpanoramas Tap the on screen guide to start movie or panorama playback movies are indicated by a 1 icon Tap the display to p...

Page 41: ... and double tap again to exit zoom 0 131 View thumbnails To zoom out to a thumbnail view 0 129 use a pinch gesture in full frame playback Use pinch and stretch to choose the number of images displayed from 4 9 or 16 frames View other months Flick left or right to view other months in the calendar display 0 130 Use on screen guides Various operations can be per formed by tapping on screen guides Sc...

Page 42: ... settings Tap menu items to display options and tap icons or sliders to change Tap 2 to exit to the previ ous display without changing set tings Select items adjust settings Tap menu items to display options and tap icons or sliders to change Tap 0 to save changes and exit or tap 2 to exit to the previous display without chang ing settings ...

Page 43: ...attery when charging is complete First Steps AThe Plug Adapter Depending on the country or region of purchase a plug adapter may be sup plied with the charger The shape of the adapter varies with the country or region of purchase If a plug adapter is supplied raise the wall plug and connect the plug adapter as shown at right making sure the plug is fully inserted Attempting to forcibly remove the ...

Page 44: ...rge if its tempera ture is below 0 C 32 F or above 60 C 140 F Charge the battery at ambient temperatures between 5 C 41 F and 35 C 95 F If the CHARGE lamp flashes quickly during charging cease use immediately and take battery and charger to your retailer or a Nikon authorized service representative Do not move the charger or touch the battery during charging Fail ure to observe this precaution cou...

Page 45: ... the battery or memory cards check that they are in the correct orientation Using the battery to keep the orange battery latch pressed to one side slide the battery in until it latches and then slide in the memory card until it clicks into place Do not attempt to insert the card at an angle failure to observe this precaution could damage the product 16GB Front ...

Page 46: ...ery and memory cards AFormatting Memory Cards If this is the first time the memory card will be used in the camera or if the card has been formatted in another device select Format memory card in the setup menu and follow the on screen instruc tions to format the card 0 195 Note that this permanently deletes any data the card may contain Be sure to copy any photographs and other data you wish to k...

Page 47: ...popping from the camera when ejected DMemory Cards Do not remove memory cards from the camera turn the camera off or remove or disconnect the power source during formatting or while data are being recorded deleted or copied to a com puter Failure to observe these precautions could result in loss of data or in damage to the camera or card Do not touch the card terminals with your fingers or metal o...

Page 48: ...r body cap is removed The lens generally used in this manual for illustrative purposes is a 1 NIKKOR VR 10 30mm f 3 5 5 6 PD ZOOM Remove the rear lens cap Remove the camera body cap Mounting mark camera Mounting mark lens Keeping the mounting marks aligned position the lens on the camera ...

Page 49: ...nt lens cap ALenses with Retractable Lens Barrel Buttons Lenses with retractable lens barrel but tons can not be used when retracted To unlock and extend the lens readying the camera for use keep the retractable lens barrel button pressed q while rotating the zoom ring as shown w The lens can be retracted and the zoom ring locked by pressing the button and rotating the ring in the opposite directi...

Page 50: ... off AAuto Power Off If no operations are performed for about a minute the display will turn off and the power lamp will start to flash if desired the delay before the display turns off automatically can be changed using the Auto power off option in the setup menu 0 197 The camera can be reactivated by operating the shutter release button If no oper ations are performed for about three minutes aft...

Page 51: ...en the lens barrel is locked in the case of 1 NIKKOR VR 10 30mm f 3 5 5 6 and 1 NIKKOR VR 30 110mm f 3 8 5 6 lenses firmware version 1 10 or later is required if locking the lens barrel is to turn the camera off when the monitor is off for information on updating lens firmware visit the Nikon website for your area A language selection dialog will be displayed the first time the camera is turned on...

Page 52: ...one and press J Press 1 or 3 to highlight date format and press J Press 1 or 3 to highlight daylight saving time option and press J Press 4 or 2 to highlight items and press 1 or 3 to change Press Jtoexittoshootingdisplaywhen setup is complete Note Languageand clockcan bechangedatany timeusing Language 0 194 and Time zone and date 0 199 options in setup menu ...

Page 53: ...nt rechargeable power source which is charged as necessary when the main bat tery is installed or the camera is powered by an optional power connector and AC adapter 0 204 Three days of charging will power the clock for about a month If a message warning that the clock is not set is displayed when the camera is turned on the clock battery is exhausted and the clock has been reset Set the clock to ...

Page 54: ...es between 1200 and 1299 are shown as 1 2 k If a warning is displayed stating that there is not enough memory for additional images insert another memory card 0 23 or delete some photos 0 134 Display Description NO ICON Battery fully charged or partially discharged level shown by L or K icon in detailed display 0 196 H Low battery Ready fully charged battery or prepare to charge battery Cannot tak...

Page 55: ...e steps below to take photographs in auto mode a point and shoot mode in which the camera automatically detects the subject type and adjusts settings according to the subject and situation 1Turn the camera on 2Select C mode Point and Shoot Photography Auto Mode Rotate the power switch to turn the camera on Rotate the mode dial to C auto ...

Page 56: ...t is moving If the camera is unable to focus the focus area will be displayed in red Hold the camera securely with both hands being careful not to obstruct the lens AF assist illuminator or microphone Rotate the camera as shown at lower right when taking pic tures in tall portrait orientation Shutter speeds slow when lighting is poor use of the built in flash 0 102 or a tripod is recommended Posit...

Page 57: ...ame to focus and release the shutter After the shutter is released the memory card access lamp will light and the photograph will be dis played in the monitor for a few seconds the photo will automatically clear from the display when the shut ter release button is pressed halfway Do not eject the memory card or remove the battery until the lamp has gone out and recording is complete Memory card ac...

Page 58: ...d A framing grid can be displayed by selecting On for Display Grid display in the setup menu 0 196 ASee Also See page 197 for information on silencing the beep that sounds when the camera focuses or the shutter is released ...

Page 59: ...iew additional pictures You can also scroll through pictures by flicking left or right 0 18 To zoom in on the center of the current image rotate the command dial to the right 0 131 Rotate left to zoom out you can also zoom in or out using touch controls place two fingers on the moni tor and spread them apart to zoom in or pinch them together to zoom out To view multiple images rotate the dial left...

Page 60: ... be recovered 1Display the photograph Display the photograph you wish to delete as described on the preceding page 2Press O 3Delete the photograph A confirmation dialog will be dis played O button Press O again to delete the picture and return to playback or press K to exit without deleting the picture ...

Page 61: ...phs without refocusing by keeping the shutter release button pressed halfway between shots AAutomatic Scene Selection In auto mode the camera automatically ana lyzes the subject and selects the appropriate scene The selected scene is shown in the monitor Scene icon c Portrait Human portrait subjects d Landscape Landscapes and cityscapes f Night portrait Portrait subjects framed against dark backgr...

Page 62: ... and to W to zoom out The speed with which the camera zooms in and out varies with how far you slide the switch The zoom position is shown by the zoom guide in the display Zoom guide AFace Priority The camera detects and focuses on portrait subjects face priority A double yellow bor der will be displayed if a portrait subject is detected facing the camera if multiple faces up to a maximum of five ...

Page 63: ...41 z ADeleting Multiple Pictures The Delete option in the playback menu 0 134 can be used to delete all or selected pictures ASee Also For information on toggling photo info on or off see page 196 ...

Page 64: ...e 3Frame the opening shot Recording Movies Rotate the power switch to turn the camera on Rotate the mode dial to any of the positions shown at right Frame the opening shot with your subject in the center of the display AThe0 Icon A 0 icon indicates that movies can not be recorded ...

Page 65: ... focuses contin uously to avoid recording focus noise select Single AF for Focus mode in the movie menu 0 184 Movie record button Recording indicator Time elapsed Time available Press the movie record button again to end recording Recording will end automatically when the maximum length is reached 0 165 the mem ory card is full another mode is selected the lens is removed or the camera becomes hot...

Page 66: ... that the selected effect is not applied in the cases of 5 HDR q Soft p Easy panorama r Miniature effect 7 Toy camera effect T Cross screen and V Skin softening a Sports mode 0 74 Record HD movies in exposure mode P P S P S A and M modes 0 67 A M v Advanced movie mode 0 49 Choose an exposure mode 0 161 and record HD movies at a selected shutter speed or aperture or record movies in slow or fast mo...

Page 67: ...ase note that photographs can not be taken with slow motion 4K or time lapse movies in advanced movie mode AFocus Lock If Single AF is selected for Focus mode in the shooting menu for advanced movie mode 0 184 focus will lock while the shutter release button is pressed halfway 0 189 Note that focus lock is not available when h Scene auto selector is selected for Exposure mode in the shooting menu ...

Page 68: ...n at the top of the display Playback can also be paused by tapping the monitor Play J Resume playback when the movie is paused or during rewind advance Advance rewind Press 4 to rewind 2 to advance Speed increases with each press from 2 to 4 to 8 to 16 If playback is paused the movie rewinds or advances one frame at a time keep the button pressed for continuous rewind or advance Adjust volume Rota...

Page 69: ...e the current movie press O A confirmation dialog will be displayed press O again to delete the movie and return to playback or press K to exit without deleting the movie Note that once deleted movies can not be recovered O button ...

Page 70: ... at high speed through frame flicker and banding can be reduced by choosing a Flicker reduction option that matches the frequency of the local AC power supply as described on page 198 but note that the slowest shutter speed avail able is 1 100 s at 50 Hz 1 60 s at 60 Hz flicker reduction is not available with slow motion movies Bright light sources may leave after images when the camera is panned ...

Page 71: ...mode of your choice 0 161 z 4K movie Record movies at a frame size of 3840 2160 pixels and a frame rate of 15 fps 8 Time lapse movie The camera automatically takes photographs at selected intervals and joins them together in a silent time lapse movie y Slow motion Record up to about three seconds of silent slow motion footage Slow motion movies are recorded at 400 fps and play back at about 30 fps...

Page 72: ...us A4K Movies 4K movies can be viewed on a computer and edited using ViewNX i the latest version of which is available for download from the website listed below Note that a high performance system is required for information see the website below http downloadcenter nikonimglib com When the camera is connected to a 4K movie compatible television using an HDMI cable 4K movies will play back in Ful...

Page 73: ... 173 White balance 167 Frame size frame rate 165 Slow motion 57 Interval 52 AE lock 53 ARecording Time The following table lists the approximate maximum recording times for individual movies shot at the default frame rate in each shooting mode Auto creative P S A M sports modes 17 minutes Advanced movie mode HD movie 17 minutes 4K movie 10 minutes Time lapse movie 25 minutes Slow motion 3 seconds ...

Page 74: ...movie 1Select advanced movie mode 2Select Time lapse movie 3Choose the interval between shots Rotate the mode dial to v Press feature on the multi selector to display the menu Highlight Advanced movie and press J to dis play advanced movie options then highlight Time lapse movie and press J Highlight Interval in the menu and press J then highlight the desired interval and press J ...

Page 75: ...art of recording OFF Exposure is metered separately for each frame Press the shutter release button half way to focus Press the movie record button to start filming The camera will take photo graphs at the interval selected in Step 3 All controls except the power switch and the J button are disabled during filming Movie record button Press the J button to end filming and record the movie to the me...

Page 76: ...but if the interval between shots is 30 s when the camera is operating on battery power the monitor will turn off and the power lamp will flash green For consistent coloration choose a white balance setting other than v auto 0 167 Time lapse movies are recorded at a frame size of 1920 1080 pixels and play back at 30 fps If recording ends before 30 frames have been recorded the final frame will be ...

Page 77: ...rded at 400 fps and play back at about 30 fps 1Select advanced movie mode 2Select Slow motion 3Frame the opening shot Rotate the mode dial to v Press feature on the multi selector to display the menu Highlight Advanced movie and press J to dis play advanced movie options then highlight Slow motion and press J Frame the opening shot with your subject in the center of the display ...

Page 78: ... displayed while recording is in progress The camera focuses on the subject at the center of the dis play face detection 0 40 is not avail able and focus and exposure can not be adjusted Movie record button Recording indicator time elapsed Time available Press the movie record button again to end filming Filming will end auto matically after 3 seconds or when the memory card is full Movie record b...

Page 79: ... the frame size Option Frame size pixels Bit rate 1 Maximum length shooting 1 Maximum length playback 1 2 120 fps 1280 720 12 Mbps 3 seconds 12 seconds 400 fps 800 296 3 Mbps 40 seconds 1200 fps 400 144 1 Mbps 120 seconds 1 All figures are approximate 2 Slow motion movies will play back over a period of about 4 120 fps 13 400 fps or 40 1200 fps times the recording time ...

Page 80: ...hots or combine photos with brief movie vignettes Choose creative mode to match settings to the subject or situa tion or take photos using special effects 1Select w mode 2Choose an option w Choosing a Creative Mode Rotate the mode dial to w creative Press feature on the multi selector to display the menu then highlight Creative and press J Highlight an option suited to your subject and cre ative i...

Page 81: ... sub ject is detected Filter strength Choose from I high J normal and K low Portrait If L is selected and the camera detects portrait subjects up to three softening will be adjusted to make them stand out If M is selected softening will be applied equally to the portrait subject and the background Easy panorama p Shoot panoramas for later viewing on the camera 0 63 Miniature effect r The top and b...

Page 82: ...ength The level of the fisheye effect Choose from p high q normal and r low Skin softening V Soften the look of skin for up to three portrait sub jects at a time The amount of softening can be selected using the Filter strength option in the menu choose from P high Q normal and R low Night landscape j Capture poorly lit landscapes and cityscapes Night portrait o Choose for portraits taken against ...

Page 83: ...ion selected for creative mode 0 59 1 Shooting mode 6 2 Creative 58 3 Shutter speed 68 70 4 Aperture 69 70 5 ISO sensitivity 172 6 AF area mode 188 Focus mode 184 Metering 166 Picture Control 173 White balance 167 Image size 162 Select color 66 Filter strength 59 60 Portrait 59 Hue 59 Saturation 60 Vignetting 60 1 2 3 4 5 6 ...

Page 84: ...ilt in flash does not fire Some time may be required to process the pictures the final photograph will be displayed when processing is complete First exposure darker Second exposure brighter Combined HDR image DFraming HDR Photographs The edges of the image will be cropped out The desired results may not be achieved if the camera or subject moves during shooting Depending on the scene shading may ...

Page 85: ...utton halfway Guides will appear in the display 2Start shooting Press the shutter release button the rest of the way down and then lift your fin ger from the button 1 3 4 and 2 icons will appear in the display to indicate the possible pan directions 3Pan the camera Slowly pan the camera up down left or right as shown below Shooting will start when the camera detects the pan direction and a progres...

Page 86: ...ly or unsteadily Note that because panoramas are composed of multiple images the joins between images may be visible and the desired results may not be achieved with moving subjects or with neon lights or other subjects that exhibit rapid changes in color or brightness subjects that are too close to the camera poorly lit sub jects and subjects such as the sky or sea that are a solid color or con t...

Page 87: ...n The following operations can be performed Guide To Use Description Pause Pause playback A navigation window will appear at the bottom of the display Play J Resume playback when the panorama is paused or during rewind advance Advance rewind Press 4 to rewind 2 to advance If playback is paused the panorama rewinds or advances a segment at a time keep the button pressed for continuous rewind or adv...

Page 88: ...ose a color 3Take pictures Press the shutter release button all the way down to take pic tures Only the selected hue will appear in color all other hues will be recorded in shades of gray Press to display the feature menu then highlight Select color and press J Use the multi selector to choose a color and press J ...

Page 89: ...he camera will produce optimal results you can also choose from other com binations that will produce the same expo sure flexible program Rotate the command dial to the right for large aper tures low f numbers that blur background details or fast shutter speeds that freeze motion Rotate the dial to the left for small apertures high f numbers that increase depth of field or slow shutter speeds that...

Page 90: ... fast shutter speeds to freeze motion Choosing a Shutter Speed Rotate the command dial to choose from shutter speeds between 30 s and 1 16 000 s Rotate the dial to the right for faster shut ter speeds to the left for slower shutter speeds Fast shutter speed 1 1600 s Slow shutter speed 1 s AContinuous Shooting The selected shutter speed may change when a frame rate of 10 fps or faster is selected i...

Page 91: ...ers increase depth of field bringing out details in the background and foreground Short field depths are generally used in portraits to blur back ground details long field depths in landscape photographs to bring the foreground and background into focus Choosing an Aperture Rotate the multi selector counterclock wise for larger apertures lower f num bers clockwise for smaller apertures higher f nu...

Page 92: ...ster shutter speeds or smaller apertures higher f numbers to the left for slower shutter speeds and larger apertures lower f numbers Shut ter speeds can be set to values as fast as 1 16 000 s or as slow as 30 s or to Bulb to hold the shutter open indefinitely for a long time exposure 0 72 Aperture can be set to values between the minimum and maximum for the lens AContinuous Shooting The selected s...

Page 93: ...odes When an auto option is selected for ISO sensitivity 0 172 the cam era will automatically adjust sensitivity within the selected range if optimal exposure can not be achieved at the selected shutter speed or aperture AThe Feature Menu 0 11 Pressing in mode P S A or M displays the items listed below 1 Shooting mode 6 2 Shutter speed 68 70 3 Aperture 69 70 4 ISO sensitivity 172 5 AF area mode 18...

Page 94: ...ra on a tripod or place it on a stable level sur face To prevent loss of power before the exposure is com plete use a fully charged battery or an optional AC adapter and power connector Note that noise bright spots ran domly spaced bright pixels or fog may be present in long exposures Bright spots and fog can be reduced by choosing On for Long exposure NR in the shooting menu 0 179 2Choose a shutt...

Page 95: ...on all the way down Keep the shutter release button pressed until the exposure is complete 4Close the shutter Take your finger off the shutter release button Shooting ends automatically after about two minutes Note that some time may be required to record long exposures ...

Page 96: ... rate is expressed in terms of the number of frames recorded per second fps choose from frame rates of approximately 5 10 20 30 and 60 fps I Q R S and T respectively Except when I is selected the maximum number of shots that can be recorded in a single burst is 20 4Compose the shot and start shooting a Photographing Subjects in Motion Sports Mode Rotate the mode dial to a Press 4 C to display rele...

Page 97: ...ecorded the shutter release will be disabled and the remaining images transferred to the memory card AViewing Photographs Each burst plays back as a group This can be changed using the Sequence display options item in the playback menu 0 152 ABuffer Size The camera is equipped with a memory buf fer for temporary storage allowing shooting to continue while photographs are being saved to the memory ...

Page 98: ...ack in slow motion slow view or let the camera choose the best shot based on composition and movement Smart Photo Selector Choosing a Shot Manually Active Selection Choose up to 20 shots from 20 frames recorded shortly before or after the shutter release button is pressed all the way down 1Select u mode u Choosing the Moment Best Moment Capture Rotate the mode dial to u best moment capture ...

Page 99: ...y the menu Highlight Best moment cap ture and press J then highlight Active Selection and press J Compose the photograph with your subject in the center of the frame Press the shutter release button half way to focus 0 34 A icon will be displayed as the camera begins recording images to the memory buf fer ...

Page 100: ...ack Smoothly press the shutter release button the rest of the way down The 20 frames recorded to the buffer in the moments before and after the shutter release button was pressed all the way down will be copied to temporary storage and an indicator will appear at the top of the display Press 4 or 2 to scroll through the frames and press 1 or 3 to select or deselect the number of frames selected by...

Page 101: ...ing The camera captures the 10 preceding frames and 10 fol lowing frames ACapture 20 Frames Over The Capture 20 frames over option in the menu is used to choose whether the frames are captured over 1 3s a frame rate of 60 fps or 1 s 20 fps AActive Selection At default settings the frame recorded at the moment the shutter release button was pressed all the way down is automatically marked with a p ...

Page 102: ...Shooting mode 6 2 Best moment capture 76 Exposure mode 161 3 Shutter speed 68 70 4 Aperture 69 70 5 ISO sensitivity 172 6 On release record 79 Capture 20 frames over 79 Frames saved default 78 Number of shots saved 84 ABest Moment Capture Mode Movies can not be recorded and pressing the movie record button has no effect The flash can not be used 1 2 6 3 4 5 ...

Page 103: ... back in slow motion so that you can choose the precise moment for a photograph 1Select u mode 2Select Slow view 3Frame the photograph Rotate the mode dial to u best moment capture Press feature to display the menu Highlight Best moment cap ture and press J then highlight Slow view and press J Compose the photograph with your subject in the center of the frame ...

Page 104: ...fway A icon is displayed in the monitor Progress indicator When the desired frame is displayed press the shutter release button the rest of the way down to record the cur rent frame and discard the remaining images The selected frame will be dis played for a few seconds when record ing is complete To delete the buffer contents and exit without recording a photograph release the button with out pre...

Page 105: ...uch as group photos in party scenes Each time the shutter is released the camera automatically selects the best shot and four best shot candidates based on composition and motion 1Select u mode 2Choose Smart Photo Selector Rotate the mode dial to u best moment capture Press feature to display the menu Highlight Best moment cap ture and press J then highlight Smart Photo Selector and press J ...

Page 106: ...a single group If Y is selected for Number of shots saved in the feature menu the camera will instead save only the best shot The best shot is displayed in the mon itor when recording is complete note that some time may be required Compose the photograph with your subject in the center of the frame Press the shutter release button half way to focus 0 34 A icon will be displayed as the camera begin...

Page 107: ...d all the way down DSmart Photo Selector Files Do not delete the NCSPSLST LST file from the NCFL folder on the memory card or change the file names of images taken with the Smart Photo Selector The camera will no longer recognize the affected files as Smart Photo Selector images and will instead handle them as inde pendent photographs Shutter release button pressed halfway to focus Shutter release...

Page 108: ...dates with the result that the next pic ture displayed will not have a file number that immediately follows that of the cur rent picture To end playback and return to shooting mode press the shutter release button halfway K button When a photograph taken with the Smart Photo Selector is displayed you can choose the best shot by pressing 3 Press 4 or 2 to view the other pictures in the sequence and...

Page 109: ... Individual Photographs Pressing the O button in the best shot selec tion dialog displays the following options highlight an option using the multi selector and press J to select This image Delete the current photo note that the picture currently selected as the best shot can not be deleted Allexceptbestshot Delete the best shot candidates but not picture cur rently selected as the best shot A con...

Page 110: ...en the resulting Motion Snap shot is viewed on the camera the movie will play back in slow motion over approximately 4 s followed by the still image 1Select z mode 2Frame the picture z Combining Photos with Brief Movie Vignettes Motion Snapshot Mode Rotate the mode dial to z Motion Snapshot Compose the photograph with your subject in the center of the frame ...

Page 111: ...hen recording is complete the pho tograph will be displayed for a few seconds Press the shutter release button half way to focus 0 34 A icon will be displayed as the camera begins recording footage to the memory buf fer ABuffering Buffering begins when the shutter release button is pressed halfway and ends after about 90 seconds or when the shutter release button is pressed all the way down Shutte...

Page 112: ...utton and the flash can not be used AThe Feature Menu 0 11 Pressing in Motion Snapshot mode displays the following items 1 Shooting mode 6 2 Exposure mode 161 3 Shutter speed 68 70 4 Aperture 69 70 5 ISO sensitivity 172 6 Movie before after 91 File format 92 Audio 92 1 2 6 3 4 5 ...

Page 113: ... the last frame of the movie 1 0 s 0 6 s Movie footage starts about a second before the shutter release button is pressed all the way down and ends about 0 6 s after 1 6 s 0 s The camera records about 1 6 s of movie footage ending when the shutter release button is pressed all the way down Shutter release button pressed halfway Shutter release button pressed all the way down 1 0 s 0 6 s Movie foot...

Page 114: ...corded as a MOV file about 10 s long that can be viewed in a variety of computer applica tions The Motion Snapshot is not displayed automatically when shooting ends 0 89 for information on viewing Motion Snapshot movies see page 46 To record about four seconds of sound with Motion Snapshots beginning at the start of movie recording use the multi selector and J button to select Ambient for Audio in...

Page 115: ...ts can not be recovered Press K and use the multi selector to dis play a Motion Snapshot 0 37 Motion Snapshots are indicated by a z icon Pressing the J button or tapping the M icon when a Motion Snapshot is dis played plays back the movie portion in slow motion over a period of about 4 s followed by the photo playback is accompanied by the audio track selected using the Audio option 0 92 To end pl...

Page 116: ... image controls apply to HD fast motion jump cut and 4 second movies In best moment capture mode live image controls apply to Active Selection and slow view but the Y Active D Lighting control is not available 1Choose a live image control 2Choose a setting Live Image Control Press J in the shooting display then highlight an option and press J to view the selected control For more information see p...

Page 117: ...ound softening Soften back ground details to make your subject stand out or bring both background and foreground into focus Sharpen background Soften background Background sharp Background softened 6 Motion control auto mode only Sug gest motion by blurring moving objects or freeze motion to capture moving objects clearly Freeze motion Blur motion Freeze motion Blur motion ...

Page 118: ...visible in the monitor and changes gradually as the palette is rotated to reset the palette tap Reset while the creative palette cursor is displayed Photographs and movies will be recorded with the selected effect but note that tap shooting options are not available when the creative palette is displayed 0 111 DLive Image Control Continuous shooting is not available 0 97 and the built in flash can...

Page 119: ...per second fps choose from frame rates of approximately 5 10 20 30 and 60 fps I Q R S and T respectively Except when I is selected the maximum number of shots that can be recorded in a single burst is 20 4Frame your subject and shoot Continuous Mode Press 4 C to display release mode options Highlight I continuous and press 2 to display frame rate options Press the shutter release button all the wa...

Page 120: ...apshot mode AViewing Pictures Taken in Continuous Mode Each burst plays back as a group This can be changed using the Sequence display options item in the playback menu 0 152 ABuffer Size The camera is equipped with a memory buf fer for temporary storage allowing shooting to continue while photographs are being saved to the memory card The approximate number of images that can be stored in the mem...

Page 121: ...ease mode options 2Select E 3Select the desired self timer option 4Mount the camera on a tripod Mount the camera on a tripod or place the camera on a sta ble level surface Self Timer Modes Press 4 C to display release mode options Highlight E self timer and press 2 to display self timer options Use the multi selector to highlight c or a and press J ...

Page 122: ...in to sound Two sec onds before the photo is taken the lamp will stop flashing and the beep ing will become more rapid AMovie Mode To record movies using the self timer select advanced movie mode and use the movie record button to start the timer Movie recording ends when the movie record button is pressed a second time ARaising the Flash In P S A or M mode press the flash pop up button to raise t...

Page 123: ...ure Compensation 1 EV No compensation 1 EV Press 2 E to display exposure com pensation options Use the multi selector to choose from values between 3 EV underexpo sure and 3 EV overexposure in increments of 1 3 EV In general posi tive values make the image brighter while negative values make it darker AExposure Compensation Exposure compensation is most effective when used with center weighted or ...

Page 124: ... when an option other than HDR 5 easy panorama p night landscape j or landscape l is selected in w creative mode the flash will pop up automatically and fire when required 1Choose a flash mode 2Take pictures The Built in Flash Press 3 N on the multi selector to display a list of flash modes then use the multi selector to highlight the desired mode and press J to select Press the shutter release bu...

Page 125: ...s backlit the flash pops up automatically when the shutter release but ton is pressed halfway and fires as required n auto with red eye reduction Use for portraits The flash pops up and fires as required but before it fires the red eye reduction lamp lights to help reduce red eye s off The flash does not fire ...

Page 126: ...lash 2Choose a flash mode 3Take pictures Press the flash pop up button to raise the flash Flash pop up button Press 3 N on the multi selector to display a list of flash modes then use the multi selector to highlight the desired mode and press J to select The flash will fire with every shot To disable the flash press it gently down ward until it latches ...

Page 127: ...nd A Np fill flash slow sync As for fill flash above except that shutter speed slows automatically to capture background lighting at night or under low light Use when you want to cap ture both subject and background Available only in modes P and A Nr rear curtain slow sync As for rear curtain sync below except that shutter speed slows automatically to capture back ground lighting at night or under...

Page 128: ...in Flash To save power when the flash is not in use press it gently downward until the latch clicks into place Do not use force Failure to observe this precaution could result in prod uct malfunction AThe Flash Ready Indicator The flash ready indicator N lights to show that the flash is fully charged when the shutter release button is pressed halfway ...

Page 129: ... avoid vignetting remove lens hoods and shoot at ranges of at least 0 6 m 2 ft Some lenses may cause vignetting at greater distances or obstruct the red eye reduction lamp interfering with red eye reduc tion The following illustrations show the effect of vignetting caused by shadows cast by the lens when the built in flash is used Shadow Vignetting ASee Also See page 192 for information on adjusti...

Page 130: ...108 t To frame self portraits in the monitor reverse it as shown and fol low the steps below 1Reverse the monitor Self Portraits The camera will select self portrait mode ...

Page 131: ...e previewed in the monitor E Self timer Tap to cycle through self timer settings as fol lows 2 s timer 10 s timer and self timer off E Exposure compensation Tap the exposure indicator to adjust exposure compensation 0 101 and tap 0 to exit when adjustments are complete Tap the monitor to focus on the selected subject and shoot or press the shutter release button halfway to focus and all the way do...

Page 132: ...are dis abled use the flash pop up button to raise the flash as required The flash fires in n auto red eye reduction mode Photographs taken in self portrait mode with NEF RAW or NEF RAW JPEG fine selected for image quality will be recorded as fine quality JPEG images If Off is selected for Self portrait mode in the setup menu 0 197 the camera will not enter self portrait mode when the monitor is r...

Page 133: ...g and focus mode 3 When you tap a subject in the display the camera will focus and take a picture 4 Tap the monitor to position the focus area when Night land scape Landscape or Close up is selected in creative mode To focus press the shutter release button halfway 7 Tapping the display during shooting has no effect 4 Tap the monitor to position the focus area To focus press the shutter release bu...

Page 134: ...camera will focus and take a picture 4 Tap the display to position the focus area when single point AF is selected for AF area mode 0 188 To focus press the shutter release button halfway 6 Tap a subject to start tracking when subject tracking is selected for AF area mode 0 188 7 Tapping the display during shooting has no effect 3 When you tap the display the camera will take a picture without fir...

Page 135: ... shooting has no effect DUnsupported Modes Tap shooting options are not available in best moment capture and Motion Snapshot modes or when 4K movie is selected in advanced movie mode DTaking Pictures Using Tap Shooting Options Avoid tapping too hard The camera may move when the shutter is released blurring photographs The shutter release button can be used to focus and take pictures even when the ...

Page 136: ...1 Find the app On the smart device connect to the Google Play service the App Store or another app marketplace and search for Wireless Mobile Utility For more information see the instructions provided with the smart device 2 Install the app Read the app description and install the app A pdf manual for the Wireless Mobile Utility is available for download at the following URLs Android http nikonimg...

Page 137: ...Security Select Wi Fi connection type in the Wi Fi menu Select Authentication encryption to display encryption options Highlight WPA2 PSK AES and press J to enable wireless security A password will now be required when connect ing to the camera the default pass word is NIKON_J5 the current password can be viewed at any time by selecting Current settings in the Wi Fi menu To allow connection withou...

Page 138: ... password area or rotate the command dial to move the cursor To enter a new character at the current cursor position tap the keys in the key board area or highlight characters using the multi selector and press J To switch between lower and upper case numbers and sym bols press the Fn button or tap the shift key Passwords can be from 8 to 36 charac ters long After entering the password tap N The p...

Page 139: ...curity is enabled AWi Fi Connection Type In addition to authentication encryption and password options the Wi Fi connec tion type menu contains the following items SSID Choose the camera SSID network name The process for entering the SSID is the same as that for editing the password Channel The wireless channel used for wireless connections Press 1 or 3 to choose from channels 1 through 11 and pre...

Page 140: ...rt device select Settings Wi Fi and select the camera SSID to connect via Wi Fi If this is the first time you have connected since changing password settings 0 116 enter the new password when prompted 3Launch the Wireless Mobile Utility Launch the copy of Wireless Mobile Utility installed on the smart device See Wireless Mobile Utility manual for details 0 114 Connecting via Wi Fi The camera SSID ...

Page 141: ...ovided with the smart device To connect via NFC touch the camera H N Mark logo to the smart device NFC antenna for the location of the NFC antenna see the documentation provided with the smart device Main tain contact until the camera displays a message stating that an NFC device has been detected Once the smart device has been detected a Wi Fi connection will be established and the Wireless Mobil...

Page 142: ...n read the warnings on pages xviii to xx to prevent loss of power while connected you should also charge the camera battery Do not use Wi Fi in settings in which its use is prohib ited Note that the camera Wi Fi function can not be used when a USB cable is connected ATerminating Wi Fi Connections Wi Fi will terminate automatically if the smart device does not initiate a connection within five minu...

Page 143: ...a SSID will be displayed in the monitor 3Select the camera SSID On the smart device select Settings Wi Fi and select the camera SSID to connect via Wi Fi If this is the first time you have connected since changing password settings 0 116 enter the new password when prompted 4Download the photo to the smart device Launch the Wireless Mobile Utility on the smart device and follow the instructions on...

Page 144: ...Press J Press J to complete the operation The camera SSID will be displayed in the monitor Press the G button to display the menus Highlight Upload from cam era in the Wi Fi menu and press 2 G button Press 4 or 2 to scroll through pic tures and press 3 to select or dese lect You can also tap the monitor to select or deselect photos Selected photos are indicated by a icon ...

Page 145: ...oad the selected photos Uploading Photos via NFC Photos displayed full frame or highlighted in the thumbnail list can be uploaded via NFC 0 119 1Display or highlight the desired photo Display the photo full frame or highlight it in the thumbnail list 2Connect Touch the camera H N Mark logo to the smart device NFC antenna until the camera displays a message stating that an NFC device has been detec...

Page 146: ...ish a Wi Fi connection with the camera 0 118 119 and select View photos in the Wireless Mobile Utility A confirmation dialog will be displayed select OK to download the pictures selected with the camera Android OS iOS Downloading Selected Pictures to the Smart Device ...

Page 147: ...oto Information Still images Movies 1 2 3 9 8 5 4 7 6 2 11 10 12 1 3 9 8 7 5 4 6 1 Shooting mode 2 Protect status 152 3 Frame number total number of images 4 Image quality 162 Frame rate 57 165 5 Image size 162 Frame size 57 165 6 Folder number file number 127 7 Time of recording 30 199 8 Date of recording 30 199 9 Battery indicator 32 10 Movie length 46 11 Audio recording indicator 180 12 On scre...

Page 148: ...or 153 154 155 Movie edit indicator 156 6 Histogram showing distribution of tones in image 127 7 ISO sensitivity 172 8 Focal length 229 9 Flash mode 103 105 10 Flash control 192 11 Flash compensation 192 12 Exposure compensation 101 13 Metering 166 14 Creative mode 58 Exposure mode 161 15 Shutter speed 68 70 16 Aperture 69 70 17 Picture Control 173 18 Active D Lighting indicator 178 19 HDR indicat...

Page 149: ...y when file number ing reaches 9999 or the number of images in the current folder reaches 999 Folder number File number AHistograms 0 126 Camera histograms are intended only as a guide and may differ from those in imaging applications Sample histograms are shown below If brightness varies evenly across the image the distribution of tones will be relatively even If the image is dark tone distribu t...

Page 150: ...ollowing options can be accessed by pressing during playback Photographs Movies 1 6 2 3 4 5 7 1 3 8 1 Start slide show 137 2 Wi Fi upload 114 3 Protect 152 4 Crop 155 5 Resize 154 6 D Lighting 153 7 Glamour retouch 135 8 Edit movie 156 ...

Page 151: ...e the number of images displayed Display fewer images Rotate the command dial right to decrease the number of images displayed To view the highlighted image full frame rotate the dial right when 4 images are displayed Highlight images Use the multi selector to highlight images You can delete 0 134 the highlighted image or zoom in for a closer look 0 131 View highlighted image J Press J to view the...

Page 152: ...and dial left when 16 images are displayed Exit to thumbnail playback To return to the 16 image display rotate the command dial right when the calendar is displayed Highlight date Use multi selector to highlight date in cal endar display View pictures taken on highlighted date J Press J to view the first picture taken on the highlighted date Delete pictures taken on highlighted date O Press O to d...

Page 153: ...s can be performed Playback Zoom To Use Description Zoom in Rotate the command dial right to zoom in left to zoom out When ever you zoom in or out a navigation win dow will briefly appear with the area currently visible in the display indicated by a yellow border Press 1 3 4 or 2 to scroll the image Zoom out Viewother areas of image Exit zoom J Return to full frame playback ...

Page 154: ...key frame is displayed in full frame playback the pic tures in the series can be displayed by pressing 3 The following operations can be performed Viewing Bursts To Use Description View other images Press 4 or 2 or rotate the multi selector to view the other images in the series Zoom in Rotate the command dial right to zoom in on the current picture Zoom out Rotate the command dial left to zoom ou...

Page 155: ... the key frame or best shot DMaintaining Burst Files Removing the NCCONLST LST file from the NCFL folder on the memory card or renaming the individual files in a burst or series will break the link between the files and the key frame or best shot The affected files will play back as individual images unassociated with a burst or series ASee Also See page 152 for information on choosing how bursts ...

Page 156: ...elect Yes to delete the images note that some time may be required if a large number of images is selected Deleting Pictures To delete the picture currently displayed in full frame playback or selected in the thumbnail list press O A confirmation dialog will be displayed press O again to delete the picture and return to playback or press K to exit without deleting the picture O button Delete selec...

Page 157: ...d to Step 3 Glamour Retouch 1 Skin softening Make skin look softer 2 Small face Make faces smaller 3 Big eyes Make eyes larger 4 Brighten faces Make faces brighter 5 Hide eye bags Conceal dark patches under the eyes 6 Whiten eyes Make eyes brighter 7 Whiten teeth Make teeth whiter 8 Redden cheeks Mimic the effect of any of 12 colors of rouge Display the desired picture and press on the multi selec...

Page 158: ...d unavailable Retouch options Press 4 or 2 to choose the effect Repeat Steps 3 and 4 as desired to apply additional effects Press J to preview the result once effects have been adjusted to your satisfaction to adjust settings after viewing the pre view press 4 Effect Effect off AImage Quality Copies created from JPEG photos are the same quality as the original 0 162 NEF RAW photos can not be retou...

Page 159: ...s Display still images only Images taken using Easy panorama will be displayed in panorama mode 0 65 Movies Display movies and Motion Snapshots recorded with MOV file selected for File format 0 92 Motion Snapshot Display Motion Snapshots recorded with NMS files selected for File format 0 92 Only the movie por tion will be played the associated photographs are not displayed Select images by date Di...

Page 160: ...ie before displaying the next slide Audio Mute audio playback or select Movie sound tracks to play audio recorded with movies and with Motion Snapshots recorded with Ambient selected for Audio 0 92 No sound is played for still images Highlight Start and press J to start the slide show AViewing Bursts Bursts 0 132 may be represented in slide shows by a key frame or each image in the burst can be pl...

Page 161: ...or Exit to exit to the playback menu To Use Description Skip back skip ahead Rotate the multi selector to skip back or ahead or press 4 to return to the previ ous frame 2 to skip to the next frame Pause resume J Pause the show Press again to resume Adjust volume Rotate the command dial to adjust vol ume Exit to playback mode K End the show and return to playback mode ...

Page 162: ...red For system requirements and other information see the Nikon website for your region 0 xvii http downloadcenter nikonimglib com Copying Pictures to a Computer ACapture NX D Use Nikon s Capture NX D software to fine tune photos or to change settings for NEF RAW pictures and save them in other formats Capture NX D is available for download from http downloadcenter nikonimglib com AMotion Snapshot...

Page 163: ...iable Power Source To ensure that data transfer is not interrupted be sure the camera battery is fully charged AConnecting Cables Be sure the camera is off when connecting or disconnecting inter face cables Do not use force or attempt to insert the connectors at an angle DDuring Transfer Do not turn the camera off or disconnect the USB cable while trans fer is in progress DUSB Hubs Transfer may no...

Page 164: ...Transfer 2 as described below 1 Under Import pictures and videos click Change program A program selection dialog will be displayed select Import File using Nikon Transfer 2 and click OK 2 Double click Import File AWindows 8 1 Windows 8 1 may display an AutoPlay prompt when the camera is connected Tap or click the dialog and then tap or click Import File Nikon Transfer 2 to select Nikon Transfer 2 ...

Page 165: ...ures on the memory card will be cop ied to the computer 4Terminate the connection When transfer is complete turn the camera off and discon nect the USB cable Start Transfer AFor More Information Consult online help for more information on using ViewNX i ...

Page 166: ... Turn the camera on the camera monitor will remain off and the camera shooting mode display will appear on the HD device Pictures can be played back using camera controls as described elsewhere in this manual note that the edges of images may not be visible in the display Viewing Pictures on TV AConnecting an HDMI Cable Always turn the camera off before connecting or disconnecting HDMI cables When...

Page 167: ...eign matter in the connectors can interfere with data transfer ATelevision Playback Volume can be adjusted using the controls on the television adjusting volume on the camera has no effect Use of an EH 5b AC adapter and EP 5F power connector available separately is recommended for extended playback ...

Page 168: ...the monitor followed by a PictBridge playback display To print pictures one at a time proceed to page 147 To print multiple selected pictures or all pictures proceed to page 148 Printing Photographs DSelecting Photographs for Printing Movies and NEF RAW photographs 0 162 can not be selected for printing If Motion Snapshots are selected only the photographs will be printed the movie portion will no...

Page 169: ...select Use printer settings After selecting an option press J to return to the printer settings menu Option Description Page size Choose a page size Number of copies This option is listed only when pictures are printed one at a time Press 1 or 3 to choose number of copies maximum 99 Print border Choose whether to frame photos in white borders Print time stamp Choose whether to print the times and ...

Page 170: ... number of prints up to 99 Indexprint To create an index print of all JPEG pictures on the memory card proceed to Step 3 Note that if the memory card contains more than 256 pictures a confirmation dialog will be displayed and only the first 256 images will be printed A warning will be displayed if the page size selected in Step 3 is too small 3Adjust printer settings Adjust printer settings as des...

Page 171: ...layback time Same as frame interval Audio Movie sound tracks 137 Rotate tall Rotate tall portrait orientation pictures for display during playback On 152 Sequence display options Choose how bursts are displayed Key picture only 152 Protect Protect pictures from accidental deletion 152 D Lighting Brighten shadows in dark or back lit photos creating a retouched copy that is saved separately from the...

Page 172: ...r retouch images that were cre ated or have been edited with other devices AImage Quality Copies created from JPEG photos are the same quality as the original 0 162 NEF RAW photos can not be retouched when retouch options are used with pictures taken at an image quality of NEF RAW JPEG fine the JPEG image will be retouched and saved as a fine quality JPEG copy Option Description Default 0 ...

Page 173: ...lays an image selection dialog Press 4 or 2 to highlight pictures only pictures to which the operation applies are avail able for selection Delete Delete selected images 0 134 Protect Select set 0 152 D Lighting 0 153 Resize Select images 0 154 Crop 0 155 Edit movie 0 156 ...

Page 174: ...deletion when the memory card is formatted 0 195 Rotate Tall On Tall portrait orientation pictures are automatically rotated for display in the camera monitor Pictures taken with Off selected for Auto image rotation 0 200 will be displayed in wide landscape orientation Off Tall portrait orientation pictures are displayed in wide landscape orientation Sequence Display Options Key picture only Only ...

Page 175: ...wn at right Press 1 or 3 to choose the amount of correction per formed the effect can be previewed in the display and press J to create a retouched copy D Lighting Before After DD Lighting Noise randomly spaced bright pixels fog or lines may appear in cop ies created with D Lighting Uneven shading may be visible with some subjects AImage Size Copies are the same size as the original ...

Page 176: ... 640 pixels and 640 424 0 3 M 640 424 pixels and then choose Select images Press 4 or 2 to highlight pictures 0 151 and press 3 to select or deselect When the selection is complete press J to display a confirma tion dialog and select Yes to save the resized copies Resize DResized Copies Playback zoom may not be available with resized copies ...

Page 177: ... Use Description Choose size Rotate the command dial to choose the crop size Choose aspect ratio Rotate the multi selector to choose between aspect ratios of 3 2 4 3 1 1 and 16 9 Position crop Press 1 3 4 or 2 to position the crop Create copy J Save the current crop as a separate file DCropped Copies Playback zoom may not be available with cropped copies The size of the copy varies with crop size ...

Page 178: ...start point Remove all frames before a chosen starting frame Choose end point Remove all frames after a chosen closing frame Play the movie back pressing J to begin and resume playback and 3 to pause 0 46 the first frame is indi cated by a h icon in the display the last frame by i While playback is paused press 4 or 2 to rewind or advance one frame at a time Pause playback when you reach the frame...

Page 179: ...al footage DTrimming Movies Movies must be at least two seconds long or in the case of 4K and slow motion movies at least three seconds long If a copy can not be created at the current playback position the current position will be displayed in red in Step 4 and no copy will be created The copy will not be saved if there is insufficient space available on the memory card To prevent the camera from...

Page 180: ...reative mode Pop 59 Best moment capture ChoosefromActiveSelection Slow view and Smart Photo Selector Active Selection 76 Advanced movie Choose a movie type for advanced movie mode HD movie 49 Exposure mode Choose how the camera sets shutter speed and aperture Scene auto selector 161 Image quality Choose a file format and compression ratio JPEG fine 162 Image size Choose a size for new photos 5568 ...

Page 181: ...ntrol Choose whether the camera correctsbarrelandpin cushion distortion Off 177 Color space Choose a color space for new pictures sRGB 177 Active D Lighting Avoid loss of detail in highlights and shadows On 178 Long exposure NR Reduce noise in long time exposures Off 179 High ISO noise reduction Reduce noise at high ISO sensitivities On 179 Movie sound options Choose sound recording options Microp...

Page 182: ...electronic vibration reduction with Motion Snapshots or movies Off 183 Focus mode Choose how the camera focuses 184 AF area mode Choose how the focus area is selected Auto area 188 Face priority Turn face priority on or off On 191 Built in AF assist Control the built in AF assist illuminator On 191 Flash control Choose a flash mode for the built in flash TTL Manual Full 192 Flash compensation Cont...

Page 183: ... chooses shutter speed and aperture but adjusts other settings to suit the subject automatic scene selection 0 39 P Programmed auto The camera sets shutter speed and aperture for optimal exposure 0 67 Recommended for snapshots and in other situations in which there is little time to adjust camera settings S Shutter priority auto You choose the shutter speed the camera selects an aperture for best ...

Page 184: ...NEF Compressed 12 bit raw data from the image sensor are saved directly to the memory card White bal ance contrast and other settings can be adjusted on a computer after shooting JPEG fine JPEG Record JPEG images at a compression ratio of roughly 1 4 fine quality JPEG normal Record JPEG images at a compression ratio of roughly 1 8 normal quality NEF RAW JPEG fine NEF JPEG Two images are recorded o...

Page 185: ...uals image size in pixels divided by printer resolution in dots per inch dpi 1 inch approximately 2 54 cm Option Size pixels 1 Approximate print size at 300 dpi cm in 2 A Normal panorama Camera panned horizontally 4800 920 40 6 7 8 16 0 3 1 Camera panned vertically 1536 4800 13 0 40 6 5 1 16 0 B Wide panorama Camera panned horizontally 9600 920 81 3 7 8 32 0 3 1 Camera panned vertically 1536 9600 ...

Page 186: ...ur digit number between 0001 and 9999 assigned automat ically in ascending order by the camera and yyy one of the following three letter extensions NEF for NEF RAW images JPG for JPEG images or MOV for movies The NEF and JPEG files recorded at settings of NEF RAW JPEG have the same file names but different extensions Copies created with the retouch options in the playback menu have file names begi...

Page 187: ...t 1080 60p 1920 1080 59 94 fps 42 Mbps 10 minutes r 1080 30p 29 97 fps 24 Mbps 17 minutes u 720 60p 1280 720 59 94 fps 16 Mbps 20 minutes s 720 30p 29 97 fps 12 Mbps 29 minutes APhoto Frame Size Photographs recorded by pressing the shutter release button all the way down during movie recording are 5568 3712 pixels in size aspect ratio 3 2 ASee Also For information on the total length of movies tha...

Page 188: ...ssic meter for portraits and is recommended if you are using filters with an exposure factor filter factor over 1 N Spot The camera meters the current focus area use to meter off center subjects if Auto area is selected for AF area mode as described on page 188 the camera will meter the center focus area while during face priority the camera will meter the focus area closest to the center of the s...

Page 189: ...e White Balance v Auto Automatic white balance adjustment Recom mended in most situations J Incandescent Use under incandescent lighting I Fluorescent Use with cool white fluorescent lighting H Direct sunlight Use with subjects lit by direct sunlight N Flash Use with built in flash G Cloudy Use in daylight under overcast skies M Shade Use in daylight with subjects in the shade L Preset manual Meas...

Page 190: ...nges and exit Press J An asterisk will appear next to the white balance icon 0 4 in the detailed display 0 196 to show that white balance has been altered from default values Increase green Increase blue Increase amber Increase magenta AWhite Balance Fine Tuning The colors on the fine tuning axes are relative not absolute For example moving the cursor to B blue when a warm setting such as J incand...

Page 191: ...ace a neutral gray or white object under the lighting that will be used in the final photograph A standard gray panel can be used for increased precision 2Select Preset manual Highlight Preset manual in the white balance menu and press 2 The dialog shown at right will be displayed high light Yes and press J to overwrite the existing value for preset manual white balance The message shown at right ...

Page 192: ...l be recorded white balance can be mea sured accurately even when the cam era is not in focus 4Check the results If the camera was able to measure a value for white balance the message shown at right will be displayed To return to shooting mode immediately press the shutter release button half way If lighting is too dark or too bright the camera may be unable to measure white balance The message a...

Page 193: ...s an objective measure of the color of a light source defined with reference to the temperature to which an object would have to be heated to radiate light in the same wave lengths While light sources with a color temperature in the neighbor hood of 5000 5500 K appear white light sources with a lower color temperature such as incandescent light bulbs appear slightly yellow or red Light sources wit...

Page 194: ...sitivity is fixed at the selected value If 6400 NR or 12800 NR is selected the camera will take four shots each time the shutter release button is pressed all the way down and combine them to create a single image processed to reduce the noise that occurs at high sensitivities A Auto ISO Sensitivity Options When auto ISO sensitivity control is in effect the display shows an ISO AUTO icon and the c...

Page 195: ...nd press J Picture Control Q Standard Standard processing for balanced results Recom mended in most situations R Neutral Minimal processing for natural results Choose for photographs that will later be extensively processed or retouched S Vivid Pictures are enhanced for a vivid photoprint effect Choose for photographs that emphasize primary col ors T Monochrome Take monochrome photographs e Portra...

Page 196: ... adjusted or select Quick adjust to choose a preset com bination of settings Default settings can be restored by pressing the O button 3Save changes and exit Press J AModified Picture Controls Picture Controls that have been modified from default settings are indicated by an asterisk in the Picture Control menu 0 173 and in the detailed display 0 196 ...

Page 197: ...t manually or select A for automatic contrast adjustment Brightness Adjust brightness without affecting expo sure Manual adjustments non monochrome only Saturation Control the vividness of colors Select A to adjust saturation automatically Hue Adjust hue Manual adjustments monochromeonly Filter effects Simulate the effect of color filters on mono chrome photographs Toning Choose the tint used in m...

Page 198: ... of the sky in landscape photographs Orange produces more contrast than yellow red more contrast than orange O orange R red G green Softens skin tones Can be used for portraits Note that the effects achieved with Filter effects are more pro nounced than those produced by physical glass filters AToning Monochrome Only Choose from B W black and white Sepia Cyanotype blue tinted monochrome Red Yellow...

Page 199: ...pose printing and display Adobe RGB with its broader gamut of colors is more suited to shots destined for professional publication and commercial printing Regardless of the option selected movies are recorded in sRGB Auto Distortion Control On Reduce barrel distortion in pictures taken with wide angle lenses and pin cushion distortion in pictures taken with long lenses Off Auto distortion control ...

Page 200: ...Active D Lighting Active D Lighting Off Active D Lighting Y On DActive D Lighting Noise randomly spaced bright pixels fog or lines may appear in pho tographs taken with Active D Lighting Uneven shading may be visible with some subjects A Active D Lighting Versus D Lighting The Active D Lighting option in the shooting menu adjusts exposure before shooting to optimize the dynamic range while the D L...

Page 201: ...ssing is complete the picture will be saved but noise reduction will not be per formed In continuous release mode frame rates will slow and while photographs are being processed the capacity of the memory buffer will drop Long exposure noise reduction does not apply to movies Select On to reduce noise randomly spaced bright pixels If Off is selected noise reduction will still be performed but the ...

Page 202: ...ovies are being recorded in auto creative P S A M or sports mode or with HD movie selected in advanced movie mode Photos will be taken when a suitably framed portrait subject is in focus and the composition is stable The maximum number of photos that can be taken during a single clip is 20 including photos taken manually 0 45 Movie Sound Options AThe2 Icon Movies recorded with the microphone off a...

Page 203: ...the number of intervals Highlight Number of shots and press 2 then use the multi selector to choose the number of intervals Press J to return to the interval timer shooting menu when settings are complete Interval Timer Shooting DBefore Shooting Before proceeding check that the clock is set correctly 0 30 199 and then take a test shot at current settings and view the results in the monitor Use of ...

Page 204: ...d interval AInterval Timer Photography A warning will be displayed if the camera is unable to start interval timer photography at current settings for example when Bulb is selected for shutter speed While interval timer photography is in progress settings can not be adjusted and the camera will not turn off automatically 0 28 AInterrupting Interval Timer Photography Interval timer shooting ends an...

Page 205: ...on When the camera is panned vibration reduction applies only to motion that is not part of the pan if the camera is panned horizontally for example vibration reduction will be applied only to vertical shake making it much easier to pan the camera smoothly in a wide arc The composition may appear to change after the shutter is released but this does not indicate a malfunction AOptical VR If the le...

Page 206: ...ssed halfway AF C ContinuousAF For subjects in motion The camera focuses continuously on the subject in the AF area brackets while the shutter release button is pressed halfway note that the AF area brackets appear only in the detailed display 0 196 Photos can be taken whether or not the camera is in focus AF area brackets AF F Full time AF For subjects in motion The camera focuses continu ously p...

Page 207: ...ground The subject contains areas of sharply contrasting brightness Example The subject is the same color as the back ground Examples The subject is half in the shade a night scene with point illu mination The subject contains objects at differ ent distances from the camera Background objects appear larger than the subject Example The subject is inside a cage Example A building is in the frame beh...

Page 208: ...t Manual focus in the focus mode menu 0 184 and press 2 In the shooting display press J to dis play manual focus guides and magnify the view at the center of the frame This feature is not available during movie recording or in 4K or slow motion movie mode Focus distance indicator Navigation window Rotate the command dial to choose from magnifications of up to about 10 Command dial ...

Page 209: ...rtion is shown by the navigation window AMovies The multi selector can also be used to choose the focus distance if manual focus is selected prior to movie recording Rotate the multi selector clockwise to increase the focus distance counterclockwise to decrease the faster you rotate the multi selector the quicker the focus distance changes AFocal Plane Position To determine the distance between yo...

Page 210: ... J to view the focus area selection display then use the multi selector to position the focus area over your subject and press J The focus area will track the subject as it moves through the frame The camera will focus on the selected sub ject when the shutter release button is pressed halfway To end focus tracking when shoot ing is complete press J Focus area ASubject Tracking The camera may be u...

Page 211: ... focus using autofocus 0 185 you can also focus on another subject at the same distance and then use focus lock to recompose the photograph Focus lock is most effective when an option other than Auto area is selected for AF area mode 0 188 1Lock focus Position the subject in the center of the frame and press the shutter release button halfway to initiate focus Check that the focus area is dis play...

Page 212: ...gain at the new distance AAuto Area AF The camera selects from 41 focus areas Except in manual focus mode the selected focus area is displayed when the shutter release button is pressed halfway Large focus areas are used when 4K movies are recorded with AF S selected for focus mode Motion Snapshots are recorded with elec tronic vibration reduction enabled HD movies are recorded in advanced movie m...

Page 213: ...e 0 188 The AF assist illuminator will not light to assist the focus opera tion in sports or advanced movie mode during movie recording or when Off is selected If the AF assist illuminator does not light autofocus may not produce the desired results when light ing is poor Face Priority Built in AF Assist AThe AF Assist Illuminator Larger lenses may prevent the illuminator lighting all or part of t...

Page 214: ...ed when flash com pensation is in effect Normal flash out put can be restored by setting flash compensation to 0 Flash compensa tion is not reset when the camera is turned off Flash Control 1 TTL Flash output is adjusted automatically in response to shooting conditions i TTL flash control 2 Manual Choose a flash level between Full and 1 32 1 32of full power At full power the built in flash has a g...

Page 215: ...Language to default values Formatmemorycard Format the memory card 195 Slot empty release lock Allow the shutter to be released when no memory card is inserted in the cam era Release locked 195 Image review Choose whether pictures are displayed after shooting On 195 Display Adjust display brightness view or hide a framing grid and choose the information displayed in the monitor Display brightness ...

Page 216: ...layed by the Fn button ISO sensitivity 13 Shutter button AE lock Choose whether exposure locks when the shutter release button is pressed halfway Off Flicker reduction Reduce flicker or banding 198 Resetfilenumbering Reset file numbering 198 Time zone and date Set the camera clock Daylight saving time Off 199 Language Choose a language for the camera displays Auto image rotation Record camera orie...

Page 217: ...ased when no memory card is inserted No pictures will be recorded although they will be displayed in demo mode Select Release locked to enable the shutter only when a card is inserted If On is selected pictures will be displayed immediately after shooting To view pictures when Off is selected press the K but ton Format Memory Card The message shown at right is displayed while the card is formatted...

Page 218: ...e higher values to brighten the display and lower values to make the display darker Grid Display Select On to display a framing grid 0 36 Shooting Choose the information displayed during shooting 0 4 Playback Choose the information displayed during playback 0 125 Display Simple Detailed Basic info Detailed info Image only ...

Page 219: ...mains on when no operations are performed 0 28 Choose shorter delays to reduce the drain on the battery Once the display has turned off it can be reactivated by pressing the shutter release button Choose whether reversing the monitor causes the camera to enter self portrait mode 0 108 If Off is selected the camera will not enter self portrait mode when the monitor is reversed and pictures will be ...

Page 220: ...ph numbered 9999 the shutter release button will be disabled and no further photo graphs can be taken To reset file numbering to 0001 select Yes for Reset file numbering and then either format the current memory card or insert a new memory card Flicker Reduction AFlicker Reduction If you are unsure as to the frequency of the local power supply test both options and choose the one that produces the...

Page 221: ...hoose a time zone The camera clock is automatically set to the time in the new time zone Date and time Set the camera clock Date format Choose the order in which the day month and year are displayed Daylight saving time Turn daylight saving time on or off The camera clock will automatically be advanced or set back one hour The default setting is Off ...

Page 222: ...f is selected Choose this option when panning or taking photographs with the lens pointing up or down Auto Image Rotation Landscape wide orientation Camera rotated 90 clockwise Camera rotated 90 counterclockwise DAuto Image Rotation Image orientation is not recorded for movies Motion Snapshots or panoramas ARotate Tall To automatically rotate tall portrait orientation photographs for display durin...

Page 223: ...ens cap Turn the camera off and attach a 1 NIKKOR lens If the lens is equipped with a cap do not remove it 2Select Pixel mapping Turn the camera on press G and select Pixel mapping in the setup menu 3Select Yes Pixel mapping begins immediately Note that other opera tions can not be performed while pixel mapping is in prog ress Do not turn the camera off or remove or disconnect the power source unt...

Page 224: ... 235 for informa tion on using the FT1 be sure to update to the latest version of the FT1 firmware before use For information on attaching and removing the FT1 and on precautions for use see the FT1 Mount Adapter User s Manual Power sources Rechargeable Li ion Battery EN EL24 0 21 23 Additional EN EL24 batteries are available from local retailers and Nikon authorized service representatives Batter...

Page 225: ...evices with which the card will be used are SDXC compliant The camera supports UHS I Other cards have not been tested For more details on the above cards please contact the manufacturer Nikon softwarefor digital cameras Capture NX D Fine tune pictures taken with the camera and convert NEF RAW images to other formats ViewNX i Copy pictures to the computer for viewing AOptional Accessories Availabil...

Page 226: ...t the EP 5F power connector Be sure to insert the connector in the orientation shown using the connec tor to keep the orange battery latch pressed to one side The latch locks the connector in place when the con nector is fully inserted 3Close the battery chamber memory card slot cover Position the power connector cable so that it passes through the power con nector slot and close the battery chamb...

Page 227: ... adapter Connect the AC adapter power cable to the AC socket on AC adapter q and the EP 5F power cable to the DC socket w A P icon is displayed in the monitor when the camera is powered by the AC adapter and power connector ...

Page 228: ...d lint then wipe gently with a soft dry cloth After using the camera at the beach or sea side wipe off sand or salt with a cloth lightly dampened in distilled water and dry thoroughly Important Dust or other foreign matter inside the camera may cause damage not cov ered under warranty Lens Lenses are easily damaged Remove dust and lint with a blower If using an aerosol blower keep the can vertical...

Page 229: ...ds produced by equipment such as radio transmitters could interfere with the display damage data stored on the memory card or affect the product s internal circuitry Keep the lens mount covered Be sure to attach the body cap if the camera is without a lens Do not touch the dust shield The dust shield covering the image sensor is easily damaged Under no circumstances should you exert pressure on th...

Page 230: ...orate Note that des iccant gradually loses its capacity to absorb moisture and should be replaced at regular intervals To prevent mold or mildew take the camera out of storage at least once a month Turn the camera on and release the shutter a few times before putting it away Store the battery in a cool dry place Replace the terminal cover before putting the battery away Notes on the monitor The mo...

Page 231: ...to flame or excessive heat Keep the battery terminals clean Turn the product off before replacing the battery Remove the battery from the camera or charger when not in use and replace the terminal cover These devices draw minute amounts of charge even when off and could draw the battery down to the point that it will no longer function If the battery will not be used for some time insert it in the...

Page 232: ...a spare battery in a warm place and exchange the two as necessary Once warmed a cold battery may recover some of its charge Used batteries are a valuable resource recycle in accord with local reg ulations DServicing the Camera and Accessories The camera is a precision device and requires regular servicing Nikon recommends that the camera be inspected by the original retailer or Nikon authorized se...

Page 233: ... 0 57 400 fps Hue 0 59 Retro Yellow Cross process Blue Filter strength 0 59 60 Soft J normal Fisheye q normal Skin softening Q normal Portrait 0 59 L Saturation 0 60 I normal Vignetting 0 60 V normal Select color 0 66 On release record 0 79 Preceding and following Capture 20 frames over 0 79 1 s Frames saved default 0 78 Y Number of shots saved 0 84 Z Movie before after 0 91 1 0 s 0 6 s File forma...

Page 234: ...mer 0 97 99 Sports 10 fps Other modes 8 single frame Exposure compensation 0 101 0 0 Flash mode 0 103 105 Auto Pop Retro High contrast monochrome Nostalgic sepia Soft Cross process Toy camera effect Fisheye Close up Auto P S A M Fill flash Miniature effect Selective color Cross screen Flash off Skin softening Night portrait Portrait Self portrait Auto red eye reduction Picture Control settings 0 1...

Page 235: ...st motion jump cut and 4 second movies are recorded at 1080 30p 2 For information on the maximum length that can be recorded in a single clip see page 165 4K Movies Memory Card Capacity Image quality 0 162 Image size 0 162 File size No of images NEF RAW JPEG fine 5568 3712 41 3 MB 367 4176 2784 35 7 MB 424 2784 1856 31 7 MB 478 NEF RAW 27 9 MB 544 JPEG fine 5568 3712 13 4 MB 1100 4176 2784 7 8 MB ...

Page 236: ... The display is off The camera is off 0 28 or the battery is exhausted 0 21 32 The display has turned off automatically to save power 0 197 The display can be reactivated by pressing the shutter release button The camera is connected to a computer 0 141 or television 0 144 The camera turns off without warning The battery is low 0 21 32 The display has turned off automatically to save power 0 197 T...

Page 237: ...lease button is pressed halfway Set the focus mode to AF S 0 184 189 Focus area selection is unavailable Focus area selection is not available in auto area AF 0 188 or face priority 0 40 In other AF area modes the focus area can be selected by pressing J AF areamodeselectionisunavailable The camera is in auto creative sports or best moment capture mode 0 33 58 74 76 manual focus mode is selected 0...

Page 238: ... in movies or in the display Choose a Flicker reduc tion setting that matches the local AC power supply 0 198 No flash See page 107 The flash will not fire when off 0 103 in P S A M and self portrait modes the flash will not fire when lowered Menu items are grayed out and unavailable Some options are only available in particular shooting or exposure modes The shutter release is disabled You select...

Page 239: ...de with electronic vibration reduction enabled and AF S selected for focus mode The touch screen can not be used for shooting or focus Touch shooting options are not available in best moment capture or Motion Snapshot mode The edges of the display can not be used for shooting or focus Tap closer to the center of the display Pictures are blurred The camera may move when the display is tapped which ...

Page 240: ...rectly connected 0 144 Pictures cannot be transferred to a computer If your system does not meet the requirements for Nikon software you may still be able to transfer pic tures to the computer using a card reader Computer displays NEF RAW images differently from camera Third party soft ware does not display effects of Picture Controls or Active D Lighting Use Capture NX D 0 140 Smart devices do no...

Page 241: ...ctable lens barrel button is attached with the lens barrel retracted Keeping the retractable lens barrel button pressed rotate the zoom ring to extend the lens 27 231 232 Check lens Pictures can only be taken when a lens is attached Attach a lens 26 Lens error Try again after turning the camera off and on Turn the camera off and then on again If the problem persists or reoccurs fre quently contact...

Page 242: ...lders on memory card If the current folder is numbered 999 and contains either 999 photographs or a photograph numbered 9999 the shut ter release button will be disabled and no further photographs can be taken Choose Yes for Reset file numbering and then either format the current mem ory card or insert a new memory card 198 The movie record button cannot be used in this mode The movie record butto...

Page 243: ... off and on Turn the camera off and then on again If the problem persists or reoccurs fre quently contact a Nikon authorized service representative The camera s internal temperature is high The camera will now turn off Wait for the camera to cool xv Memory card contains no images To view pictures insert a memory card containing images 23 Cannot display this file The file has been created or modifi...

Page 244: ... and all creative modes other than easy panorama aspect ratio 3 2 5568 3712 4176 2784 2784 1856 Still images taken in normal panorama mode with camera panned horizontally aspect ratio 120 23 4800 920 Still images taken in normal panorama mode with camera panned vertically aspect ratio 8 25 1536 4800 Still images taken in wide panorama mode with camera panned horizontally aspect ratio 240 23 9600 9...

Page 245: ...stalgic sepia 5 HDR p easy panorama q soft r miniature effect s selective color 6 cross process 7 toy camera effect Tcross screen U fisheye V skin softening j night landscape o night portrait l landscape n close up and k portrait P programmed auto with flexible program S shutter priority auto A aperture priority auto and M manual u best moment capture s Active Selection t slow view and y Smart Pho...

Page 246: ...ocus area Mode P programmed auto with flexible program S shutter priority auto A aperture priority auto M manual h scene auto selector Exposure compensation 3 3 EV in increments of 1 3 EV Exposure lock Luminosity locked at metered value when shut ter release button is pressed halfway ISO sensitivity RecommendedExposure Index ISO 160 ISO 200 12800 in steps of 1 EV 6400 NR 12800 NR auto ISO sensitiv...

Page 247: ...o and all creative modes other than HDR easy pan orama landscape and night landscape Flash pops up automatically and fires as required P S A M and self portrait Manual Guide Number GN Approx 5 16 m ft ISO 100 20 C 68 F at ISO 160 Guide Number is approx 6 3 20 7 Control i TTL flash control using image sensor Mode Auto auto red eye reduction fill flash fill flash slow sync red eye reduction red eye ...

Page 248: ... 720 120 fps aspect ratio 16 9 plays at 30p 29 97 fps 800 296 400 fps aspect ratio 8 3 plays at 30p 29 97 fps 400 144 1200 fps aspect ratio 8 3 plays at 30p 29 97 fps Time lapse fast motion jump cut and 4 second movies aspect ratio 16 9 1920 1080 30p 29 97 fps Motion Snapshots movie portion aspect ratio 16 9 1920 1080 60p 59 94 fps plays at 24p 23 976 fps File format MOV Video compression H 264 MP...

Page 249: ...r absence of obstacles Data rate 54 Mbps Maximum logical data rates according to IEEE standard Actual rates may differ Authentication Open system WPA2 PSK Access protocols Infrastructure NFC Operation NFC Forum Type 3 Tag Supported languages Arabic Bulgarian Chinese Simplified and Tradi tional Czech Danish Dutch English Finnish French German Greek Hindi Hungarian Indo nesian Italian Japanese Korea...

Page 250: ...t body cap approx 231 g 8 2 oz camera body only Operating environment Temperature 0 C 40 C 32 F 104 F Humidity 85 or less no condensation MH 31 battery charger Rated input AC 100 240 V 50 60 Hz 0 2 A Rated output DC 8 4 V 0 6 A Supported batteries Nikon EN EL24 rechargeable Li ion batteries Charging time Approx 2 hours and 30 minutes at an ambient temperature of 25 C 77 F when no charge remains Op...

Page 251: ...8 mm diameter 28 mm distance from camera lens mount flange when lens is retracted Weight Approx 85 g 3 0 oz 1 NIKKOR VR 30 110mm f 3 8 5 6 Type 1 mount lens Focal length 30 110 mm Maximum aperture f 3 8 5 6 Construction 18 elements in 12 groups including 2 ED lens ele ments Angle of view 29 40 8 20 Vibration reduction Lens shift using voice coil motors VCMs Minimum focus distance 1 0 m 3 3 ft from...

Page 252: ...ts Angle of view 77 9 10 Vibration reduction Lens shift using voice coil motors VCMs Minimum focus distance 10 mm focal length 0 35 m 1 1 ft from focal plane 60 mm focal length 1 0 m 3 3 ft from focal plane 100 mmfocallength 0 65 m 2 1 ft from focal plane Diaphragm blades 7 rounded diaphragm opening Diaphragm Fully automatic Aperture range 10 mm focal length f 4 16 100 mm focal length f 5 6 16 Fil...

Page 253: ... VR 10 30mm f 3 5 5 6 PD ZOOM 1 NIKKOR VR 30 110mm f 3 8 5 6 Lens mounting mark Lens cover CPU contacts Zoom ring Zoom ring Lens cap Lens mounting mark CPU contacts Focal length mark Focal length scale Retractable lens barrel button ...

Page 254: ...equivalent to a 35 mm format lens with a focal length about 2 7 longer The lenses listed above support vibration reduction and can be used with On or Off selected for Optical VR in the camera menus 0 183 Zoom lenses can be zoomed in or out using the zoom ring 0 40 Retractable lens barrel button Zoom ring Lens cap Lens mounting mark CPU contacts ...

Page 255: ...y the hood Lens hoods and filters are not available for the 1 NIKKOR VR 10 30mm f 3 5 5 6 PD ZOOM When the lens is not in use attach the rear cap and either ensure that the lens is retracted and the cover closed 1 NIKKOR VR 10 30mm f 3 5 5 6 PD ZOOM or attach the front cap other lenses If the lens will not be used for an extended period store it in a cool dry location to prevent mold and rust Do n...

Page 256: ...for use with the 1 NIKKOR VR 30 110mm f 3 8 5 6 only Rear Lens Cap LF N1000 Attaching the HB N103 Bayonet Hood AOptional Accessories 40 5 mm screw on filters for use with the 1 NIKKOR VR 30 110mm f 3 8 5 6 only 55 mm screw on filters for use with the 1 NIKKOR VR 10 100mm f 4 5 6 only Bayonet Hood HB N106 for use with the 1 NIKKOR VR 10 100mm f 4 5 6 only Semi soft Case CL N101 for use with the 1 N...

Page 257: ...AF C The only AF area mode available is Single point and the camera focuses on the subject in the center focus area only Face priority is not supported In some cases a beep may sound the in focus indicator may be displayed and pictures can be taken when the camera is not in focus if this occurs focus manually Manual Focus Follow the steps below to focus manually when using the FT1 with a NIKKOR F ...

Page 258: ...using autofocus press the shutter release button halfway again To zoom in on the display for more precise focus press J note that this feature is not available in some modes A navigation window will appear in a gray frame at the bottom right of the display Navigation window Command dial Use the command dial to zoom in or out to a maximum magnification of 10 and the multi selector to scroll to area...

Page 259: ...s indicator can be used to check whether the camera is focused on the subject in the center focus area Focus indicator Status I In focus F Camera focused in front of subject H Camera focused behind subject F H Unable to determine focus flashes Display Problem Solution FEE Lens aperture ring is not locked at minimum aperture When using CPU lenses lock aperture ring at minimum aper ture highest f nu...

Page 260: ...with non CPU lenses stopped down to minimum aperture In advanced movie mode select exposure mode A or M to pre vent sounds made by the lens being picked up by the micro phone Frame rates may slow when I is selected in continuous mode Certain lenses will block the AF assist illuminator and at some distances the flash The tops and bottoms may be missing from circular bokeh shapes created at wide ape...

Page 261: ...e of transmitting audiovisual data and control signals to HDMI compliant devices via a single cable connec tion ATrademark Information IOS is a trademark or registered trademark of Cisco Systems Inc in the United States and or other countries and is used under license Win dows is either a registered trademark or a trademark of Microsoft Cor poration in the United States and or other countries Pict...

Page 262: ...s of this software are copyright 2012 The FreeType Project http www freetype org All rights reserved AMIT License HarfBuzz Portions of this software are copyright 2015 The HarfBuzz Project http www freedesktop org wiki Software HarfBuzz All rights reserved ...

Page 263: ...s pho tographs taken at intervals of 30 s with the built in flash fired with every other shot and the camera turned off and then on after every ten shots Value for movies obtained under the fol lowing test conditions a series of 17 minute movies with a file size of up to 4 GB were recorded recording was only inter rupted when temperature warning was displayed The following can reduce battery life ...

Page 264: ...60 o Night portrait 39 60 l Landscape 39 60 n Close up 39 60 k Portrait 39 60 Z Auto 39 h Scene auto selector 161 U flexible program 67 G menu button 9 149 158 193 K playback button 37 86 93 O delete button 38 47 87 93 134 F Wi Fi button 118 121 J OK button 8 feature 11 51 61 71 80 90 128 C continuous shooting self timer 74 97 99 I continuous 97 E self timer 99 E exposure compensation 101 N flash ...

Page 265: ...lendar playback 130 Capture 20 frames over 79 Capture NX D 140 164 Center weighted Metering 166 Charging a battery 21 Clock 30 31 199 Clock battery 31 Close up 39 60 Color space 177 Color temperature 171 Command dial 2 37 67 68 70 186 236 Connect to smart device 118 Continuous 74 97 Continuous AF 184 Contrast 178 Contrast Picture Control 175 Creative mode 58 Creative palette 96 Crop 155 Crop PictB...

Page 266: ...e mark 2 187 Focus 184 188 Focus area 34 188 Focus lock 189 Focus mode 184 Format 24 195 Format memory card 24 195 Frame rate 57 125 165 Frame size frame rate 165 FT1 235 Full frame playback 37 125 Full time AF 184 G Glamour retouch 135 Grid display 36 H H 264 226 HD movies 49 165 HDMI 144 239 HDR 62 High definition 144 239 High ISO noise reduction 179 High contrast monochrome 59 Histogram 127 Hue...

Page 267: ... VR 183 P Page size PictBridge 147 Photo information 125 PictBridge 146 239 Picture Control 173 Pixel mapping 201 Playback 37 125 Playback menu 149 Playback zoom 131 Pop 59 Portrait 39 60 173 Portrait Soft 59 Power connector 202 204 Power drive zoom 40 Power switch 28 Preset manual 167 169 Press the shutter release button all the way down 35 39 Press the shutter release button halfway 34 39 Print ...

Page 268: ...w view 81 Smart device 114 Smart Photo Selector 83 Soft 59 Sound settings 197 Speaker 3 Sports mode 6 74 Spot Metering 166 sRGB 177 SSID 118 Standard 173 Start printing PictBridge 148 Strap 21 Subject tracking 188 T Tap shooting options 111 Television 144 Temperature warnings xv Thumbnail playback 129 Tilting monitor 14 108 Time 30 199 Time stamp PictBridge 147 Time zone 199 Time zone and date 199...

Page 269: ...247 n Wireless security 115 Z Zoom guide 40 Zoom ring 27 40 231 232 ...

Page 270: ...G02 11 6MVA9111 02 No reproduction in any form of this manual in whole or in part except for brief quotation in critical articles or reviews may be made without written authorization from NIKON CORPORATION ...

Reviews: