background image

15

First Steps : Setting the Time and Date

ADJUST button

When you have finished setting the time and date, turn the camera off to put
the new settings into effect.

Note:

  The clock-calendar has its own internal power supply.  Should you

notice that the clock is running extremely late, this is probably a sign that the
clock's battery needs to be replaced.  Take the camera to your local Nikon
representative for servicing.

Summary of Contents for Coolpix 100

Page 1: ......

Page 2: ......

Page 3: ...i User s Manual DIGITAL CAMERA COOLPIX 100 ...

Page 4: ...sponsibility for consequences resulting from the operation of this product despite the terms mentioned above Important The symbols in this manual indicate important safety precautions that must be observed to ensure safe operation of this product Be sure to read all sections marked with this symbol before use Caution The symbols in this manual indicate areas in which caution is needed to avoid dam...

Page 5: ...ence to radio or television reception which can be determined by turning the equipment off and on the user is encouraged to try to correct the interference by one or more of the following measures Reorient or relocate the receiving antenna Increase the separation between the equipment and receiver Consult the dealer or an experienced radio TV technician for help CAUTION Modifications The FCC requi...

Page 6: ...ies have the camera repaired by a qualified technician Do not use in the presence of flammable gas Do not use electronic equipment in the presence of flammable gas as this could result in explosion or fire Do not place wrist strap around neck Placing the wrist strap around your neck could result in strangulation Special care should be taken to avoid getting the strap around the neck of an infant o...

Page 7: ...er with new Do not attempt to recharge short or disassemble the batteries Do not expose the batteries to flame heat or moisture Batteries are prone to leakage when fully discharged To avoid damaging the camera be sure to remove the batteries when no charge remains Keep out of reach of children Particular care should be taken to prevent infants from putting the camera s batteries or other small par...

Page 8: ...ng to the compact design of the COOLPIX 100 its operation differs from that of standard 35mm cameras When taking pictures hold the camera as shown below Note When using the flash be careful not to place your finger over the flash window ...

Page 9: ...g or reproduction of stamps issued by the government and certified documents stipulated by law is prohibited Cautions on certain copies and reproductions The government has issued cautions on copies or reproductions of securities issued by private companies shares bills checks gift certificates etc commuter passes or coupon tickets except when a minimum of necessary copies are to be provided for b...

Page 10: ...t Steps 10 Putting Batteries in Your Camera 10 Turning the Camera On 11 Checking Battery Level 12 Setting the Time and Date 13 Taking Your First Photograph 16 Beyond the Basics 20 Using the Flash 20 Red Eye Reduction 22 Image Quality 23 Macro Close Up 24 Using the Automatic Timer 25 Connecting Your Camera to a Computer 26 Deleting Pictures from Memory 28 Caring for Your Camera 30 Cleaning 30 Stora...

Page 11: ...ix Troubleshooting 31 General problems 31 Error codes 33 Specifications 34 Index 36 ...

Page 12: ...x ...

Page 13: ...posure automatic gain control and auto white balance Built in automatic flash with red eye reduction Macro close up for taking photographs at ranges as close as 14 cm 5 5 allowing you to take full frame photographs of business card sized documents One megabyte of flash memory allowing storage of up to forty two normal images up to twenty one high quality photographs even when the camera s main bat...

Page 14: ...ow to look after your camera is contained in Caring for Your Camera Should you encounter any problems refer to the Troubleshooting section Please read all instructions thoroughly to make sure that you get the most from your camera Overview Note COOLPIX 100 is not compatible with all types of computer Please check with your retailer or Nikon representative to determine whether COOLPIX 100 can be us...

Page 15: ...a operates properly What s in this Package Your COOLPIX 100 package should contain all the items listed below Should you find that anything is missing please contact your retailer immediately Nikon COOLPIX 100 digital camera 1 Carrying case 1 Wrist strap 1 AA alkaline batteries 4 User s Manual this manual Open Me First Envelope 1 Browser software 1 Before You Begin What s in this Package ...

Page 16: ...4 Before You Begin Parts of the COOLPIX 100 Parts of the COOLPIX 100 1 2 3 4 5 11 6 7 8 9 10 12 13 13 15 14 16 17 18 19 20 21 ...

Page 17: ...Shutter release button 11 ON OFF switch 12 Flash window 13 Latch 14 Viewfinder eyepiece 15 Shutter release lamp 16 Macro close up switch 17 Strap pin 18 Battery unit connector 19 PCMCIA connector 20 Battery cover 21 Battery unit Attaching the Wrist Strap Attach the camera s wrist strap to the strap pin as shown below Be sure to keep the strap on your wrist when carrying the camera ...

Page 18: ...icator 5 Red eye reduction 6 Automatic timer 7 Exposure count indicator indicates number of exposures remaining at current image quality setting 8 Battery indicator Note The brightness and contrast of the control panel s LCD display vary with temperature and age After six to seven years of normal use the display may become difficult to read In this case you may wish to have a replacement installed...

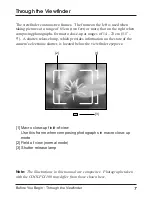
Page 19: ...is used when taking pictures at a range of 65 cm two feet or more that on the right when composing photographs for macro close up at ranges of 14 23 cm 5 5 9 A shutter release lamp which provides information on the state of the camera s electronic shutter is located below the viewfinder eyepiece 2 1 3 1 Macro close up field of view Use this frame when composing photographs in macro close up mode 2...

Page 20: ...lds The magnetic fields produced by equipment such as radio transmitters or household television sets may affect your camera s internal memory and functioning Keep dry The COOLPIX 100 is not waterproof and may malfunction if immersed in water or exposed to high levels of humidity Keep free of salt sand and dust After using your camera at the beach or seaside wipe off any sand or salt with a damp c...

Page 21: ...r the batteries need to be replaced See Checking Battery Level for a description of the battery level indicator Replace the batteries with AA alkaline batteries Do not use nickel cadmium batteries On cold days the capacity of batteries tends to decrease When taking pictures outside in cold weather keep a spare set of warm batteries on hand ...

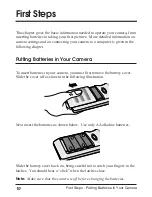
Page 22: ...tteries in Your Camera To insert batteries in your camera you must first remove the battery cover Slide the cover off as shown in the following illustration Next insert the batteries as shown below Use only AA alkaline batteries Slide the battery cover back on being careful not to catch your fingers in the latches You should hear a click when the latches close Note Make sure that the camera is off...

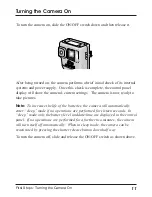
Page 23: ...ra is now ready to take pictures Note To increase the life of the batteries the camera will automatically enter sleep mode if no operations are performed for sixteen seconds In sleep mode only the battery level and date time are displayed in the control panel If no operations are performed for a further two minutes the camera will turn itself off automatically When in sleep mode the camera can be ...

Page 24: ...Check to see that the batteries are correctly installed and that the battery unit is properly connected to the camera If this does not solve the problem insert new batteries and check the battery level as shown above Note When battery level is low the camera may not be able to record pictures under some settings If there is not enough power to charge the flash the flash will automatically be set t...

Page 25: ...e QUALITY button Once the camera has finished its initial check the date time and battery level will be displayed Press the QUALITY button until the date time display stops flashing The style of the date time display can then be changed by pressing the MODE button January 31st 1996 The style of the date time display changes each time the MODE button is pressed MODE button MODE button MODE button M...

Page 26: ...splay will flash Press the QUALITY button until the item you want to change begins to flash Pressing the ADJUST button changes the value of the selected item Pressing the ADJUST button once will increase the value of the selected item by one holding the button down will cause the value to increase rapidly When the maximum value is reached pressing ADJUST will return the item its lowest value First...

Page 27: ...urn the camera off to put the new settings into effect Note The clock calendar has its own internal power supply Should you notice that the clock is running extremely late this is probably a sign that the clock s battery needs to be replaced Take the camera to your local Nikon representative for servicing ...

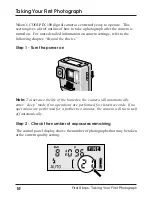
Page 28: ...ings refer to the following chapter Beyond the Basics Step 1 Turn the power on Note To increase the life of the batteries the camera will automatically enter sleep mode if no operations are performed for sixteen seconds If no operations are performed for a further two minutes the camera will turn itself off automatically Step 2 Check the number of exposures remaining The control panel display show...

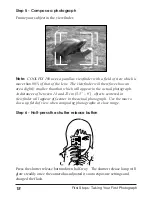
Page 29: ...tures from Memory in Beyond the Basics Step 3 Check the camera s settings Check to see that the camera settings are appropriate to your subject and lighting conditions For more information on the settings available with COOLPIX 100 refer to Using the Flash Image Quality and Macro close up Step 4 Ready the camera Hold the camera as shown below Be sure not to obstruct the lens or flash window First ...

Page 30: ...ctual photograph At distances of between 14 and 23 cm 5 5 9 objects centered in viewfinder will appear off center in the actual photograph Use the macro close up field of view when composing photographs at close range Step 6 Half press the shutter release button Press the shutter release button down half way The shutter release lamp will glow steadily once the camera has adjusted its auto exposure...

Page 31: ...release lamp will glow steadily You can now take a picture by pressing the shutter release button down fully Once you have pressed the shutter release button the shutter release lamp and exposure count indicator blink while the camera records the picture When the camera has finished transferring the picture to memory the shutter release lamp will go off and the exposure count in the control panel ...

Page 32: ...umstances Off When set to Off the flash will not be activated even when light is inadequate Set the flash to Off when you have prepared your own lighting effects when you wish to capture natural lighting under low light conditions or where use of a flash is prohibited On If the flash is set to On the flash will be activated whenever the shutter release button is fully depressed Set the flash to On...

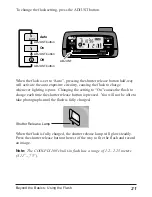
Page 33: ...s poor Changing the setting to On causes the flash to charge each time the shutter release button is pressed You will not be able to take photographs until the flash is fully charged When the flash is fully charged the shutter release lamp will glow steadily Press the shutter release button the rest of the way to fire the flash and record an image Note The COOLPIX 100 s built in flash has a range ...

Page 34: ...icator comes on MODE button MODE button MODE button Red Eye Reduction On Automatic Timer Off Red Eye Reduction On Automatic Timer On Red Eye Reduction Off Automatic Timer Off MODE When the red eye reduction indicator is on the red eye lamp will be activated whenever the flash is used Full pressing the shutter release button will first activate the red eye lamp Approximately one second later the ca...

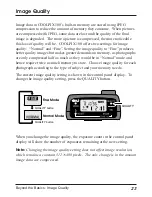
Page 35: ...photographs are only compressed half as much as they would be in Normal mode and hence require twice as much memory to store Choose image quality for each photograph according to the type of subject and your memory needs The current image quality setting is shown in the control panel display To change the image quality setting press the QUALITY button QUALITY button QUALITY button Fine Mode Normal...

Page 36: ...macro close up switch to select between macro close up and normal settings If the camera is in macro close up mode the shutter release lamp will blink when the shutter release button is half pressed Be sure to return the camera to normal mode when taking photographs at ranges greater than 23 cm 9 Note The flash is automatically set to Off when the camera is in macro close up mode Beyond the Basics...

Page 37: ...n Automatic Timer Off Red Eye Reduction On Automatic Timer On Red Eye Reduction Off Automatic Timer Off MODE To take a photograph using the automatic timer first place the camera on a stable surface to frame your photograph in the viewfinder then press the shutter release button down fully The shutter will activate automatically ten seconds after the Automatic Timer indicator begins to flash Note ...

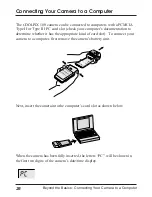
Page 38: ... PC card slot check your computer s documentation to determine whether it has the appropriate kind of card slot To connect your camera to a computer first remove the camera s battery unit Next insert the camera into the computer s card slot as shown below When the camera has been fully inserted the letters PC will be shown in the first two digits of the camera s date time display ...

Page 39: ...ontrol panel display you are ready to view the images stored in the camera s memory or to transfer your photographs to disk for long term storage For more information on how to use COOLPIX 100 with your computer consult the documentation for the browser software included with this product Note In order to read the image data stored in the camera s memory a RAM card driver which supports the ATA in...

Page 40: ... remaining will increase by one indicating that the most recently taken photograph has been deleted Pressing the ERASE button again will cause the next most recent photograph to be removed from memory COOLPIX 100 s internal memory is sufficient to hold up to forty two normal quality images or up to twenty one fine quality images When you no longer have enough memory to take further pictures at the...

Page 41: ...ry unit being careful not to get your fingers caught between the battery unit and the camera body Turn the camera on then hold the ERASE button down while pressing the ADJUST button ERASE ADJUST Hold the ADJUST and ERASE buttons down until E A LL appears in the date time display The display will flash while the camera s memory is reformatted Note Pressing the ADJUST and ERASE buttons simultaneousl...

Page 42: ...t cloth after removing dust and dirt with a blower If necessary the camera may be cleaned with a damp cloth although you should be sure to dry the camera immediately afterward Do not apply alcohol or other cleaning fluids to any part of the camera Storage Store your camera in a dry well ventilated environment away from electronic equipment such as televisions or radios which produce strong magneti...

Page 43: ...eries correctly inserted Insert the batteries as described in Putting Batteries in Your Camera Is the battery unit connected to the camera Make sure that the latches holding the battery unit to the camera are closed Is the battery unit connector clean Clean the battery unit connector with a soft cloth Are the batteries dead Put new batteries in the camera as described in Putting Batteries in Your ...

Page 44: ...tion The camera is set to Macro close up The flash will not charge when the camera is in macro close up mode Change the setting to Normal before using the flash see Macro Close Up Images are over or under exposed When using the flash be sure that your subject is within a range of 1 2 2 25 meters 3 11 7 5 Your computer can t read the camera s image data files Checklist Is the camera correctly inser...

Page 45: ...its or memory an error code will be displayed in the control panel To clear the display turn the camera off and then on again If the code is still displayed when the camera is turned back on contact your retailer or Nikon representative for servicing Troubleshooting ...

Page 46: ... Field of view 80 Display Frames for normal and macro close up modes White balance Automatic TTL homing system Metering system TTL matrix metering system using a divided brightness CCD Exposure control Programmed auto exposure combining electronic shutter and automatic gain control Shutter Charge coupled electronic shutter Speed 1 45 1 10 000 sec Built in flash Guide number 9 IS0 100 m Flash contr...

Page 47: ...rnal flash memory File allocation DOS file allocation table File compression JPEG Compression ratio 1 10 in Fine mode 1 20 in Normal mode Power source Four AA alkaline batteries Dimensions 60 W 154 5 Η 34 5 mm 2 36 6 08 1 36 Weight 160 g 5 7 ounces without batteries Specifications ...

Page 48: ...icator 6 20 21 I Image quality 23 Image quality indicator 6 L LCD display See Control panel display Lens 4 30 34 M Macro close up 1 7 24 32 Macro close up switch 4 24 32 Memory 1 23 35 removing data from memory 28 29 MODE button 4 13 22 25 N Normal mode 7 24 Number of exposures remaining 6 16 17 19 28 29 O ON OFF switch 4 11 P Parts list 4 5 PCMCIA interface 4 26 27 Photocell 4 Q QUALITY button 4 ...

Page 49: ...15 setting the clock calendar 14 15 style of the date time display 13 date time display 6 Timer 6 25 35 Troubleshooting 31 33 Turning the camera off 11 Turning the camera on 11 V Viewfinder 4 7 18 34 W Wrist strap 3 5 Index ...

Page 50: ...unouchi 3 chome Chiyoda ku Tokyo 100 Japon est conforme aux normes suivantes EN55022 Classe B EN50082 1 IEC801 2 1991 4kV décharge par court circuit 8kV décharge par amorçage IEC801 3 1984 3V m IEC801 4 1988 1kVAC 0 5kV I O selon les dispositions de la directive de la CEE 89 336 EEC ERKLÄRUNG ÜBER EG NORMENGERECHTHEIT Wir Name Nikon UK Limited Anschrift Nikon House 380 Richmond Road Kingston Surre...

Reviews: