background image

vii

Movies  

43

 Choosing a Movie Mode ......................................................................   43

Recording Movies......................................................................................   46

Recording a Time-Lapse Movie ............................................................  47

Viewing Movies.........................................................................................   49

Editing Movies...........................................................................................   50

More on Playback 

  52

Viewing Pictures on the Camera..............................................................   52

Viewing Multiple Pictures: Thumbnail Playback ....................................  52
Taking a Closer Look: Playback Zoom...................................................  53
Cropping Pictures ................................................................................  54
Voice Memos: Recording and Playback ................................................  55

Viewing Pictures on TV.............................................................................   56

Viewing Pictures on a Computer .............................................................   57

Printing Pictures ........................................................................................   61

Print Set ..............................................................................................  62
Printing Via Direct USB Connection......................................................  64

Menu Guide 

  69

The Shooting Menu ..................................................................................   69

Image Mode (

 and 

) ................................................................... 70

White Balance (

 Only).....................................................................  72

Continuous (

 Only) ......................................................................... 74

Best Shot Selector (

 Only) ............................................................... 77

Image Sharpening (

 Only) ............................................................... 78

AF Area Mode (

 Only)..................................................................... 79

The Playback Menu...................................................................................   80

 Slide Show ......................................................................................  81

 Delete ..............................................................................................  84

 Protect ...........................................................................................  86

 Auto Transfer .................................................................................  87

 Pic. Enhance Menu ..........................................................................  89

 Small Picture ...................................................................................  90

Summary of Contents for COOLPIX 3700

Page 1: ...En En The Nikon Guide to Digital Photography with the DIGITAL CAMERA ...

Page 2: ... Microsoft Corporation Internet is a trademark of Digital Equipment Corpora tion Adobe and Acrobat are registered trademarks of Adobe Systems Inc The SD logo is a trademark of the SD Card Association Epson and USB Direct Print are trademarks of Seiko Epson Corporation PictBridge is a trademark All other trade names mentioned in this manual or the other documentation provided with your Nikon produc...

Page 3: ...inspection Do not use in the presence of flammable gas Do not use electronic equipment in the presence of flammable gas as this could result in explosion or fire Observe caution when using the camera strap Never place the strap around the neck of an infant or child Do not disassemble Touching the product s internal parts could result in injury In the event of malfunction the product should be repa...

Page 4: ...intain compliance with product regulations Keep out of reach of children Particular care should be taken to pre vent infants from putting the batteries or other small parts into their mouths Removing memory cards Memory cards may become hot during use Observe due caution when remov ing memory cards from the camera CD ROMs The CD ROMs on which the software and manuals are distributed should not be ...

Page 5: ...FCC requires the user to be notified that any changes or modifications made to this device that are not expressly approved by Nikon Corporation may void the user s authority to operate the equipment Interface Cables Use the interface cables sold or provided by Nikon for your equipment Using other interface cables may exceed the limits of Class B Part 15 of the FCC rules Notice for customers in the...

Page 6: ...the gov ernment has been obtained the copy ing or reproduction of unused postage stamps or post cards issued by the government is prohibited The copying or reproduction of stamps issued by the government and of cer tified documents stipulated by law is prohibited Cautions on certain copies and re productions The government has issued cautions on copies or reproductions of securities is sued by pri...

Page 7: ...at weddings or before taking the camera on a trip take a test shot to ensure that the camera is functioning normally Nikon will not be held liable for damages or lost profits that may result from product malfunction Life Long Learning As part of Nikon s Life Long Learning commitment to ongoing product support and education continually updated information is available on line at the following sites...

Page 8: ...2 Basic Photography 14 Step 1 Select Mode 14 Step 2 Frame the Picture 16 Step 3 Focus and Shoot 18 Step 4 View the Results 21 Scene Mode 24 Taking Pictures in Scene Mode 24 Taking Pictures for a Panorama 30 More on Photography 32 Using the Flash Flash Mode 32 Release Mode Self Timer and Sound Release 34 Using the Self Timer 34 Using Sound Release 36 Easy Close ups Macro Close up Mode 37 Controllin...

Page 9: ... Cropping Pictures 54 Voice Memos Recording and Playback 55 Viewing Pictures on TV 56 Viewing Pictures on a Computer 57 Printing Pictures 61 Print Set 62 Printing Via Direct USB Connection 64 Menu Guide 69 The Shooting Menu 69 Image Mode and 70 White Balance Only 72 Continuous Only 74 Best Shot Selector Only 77 Image Sharpening Only 78 AF Area Mode Only 79 The Playback Menu 80 Slide Show 81 Delete...

Page 10: ...ngs 97 Brightness 97 Sound Release Level 98 Auto Off 98 Memory Card Format 99 Language 99 Video Mode 99 Reset All 100 Firmware Version 101 Technical Notes 102 Optional Accessories 102 Caring for Your Camera 103 Error Messages 106 Troubleshooting 110 Specifications 113 Index 115 ...

Page 11: ...owing symbols and conventions are used Introduction First Steps Basic Photography Scene Mode More on Photography Movies More on Playback Menu Guide Technical Notes This icon marks tips additional in formation that may be helpful when using the camera This icon marks cautions informa tion that should be read before use to prevent damage to the camera This icon marks notes information that should be...

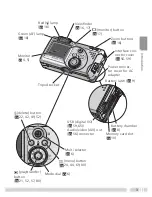
Page 12: ... release button 7 18 Viewfinder Self timer lamp 34 Red eye reduction lamp 32 AF Assist illuminator 19 Speaker 41 49 55 Power on lamp 7 Attaching the Camera Strap Attaching the Viewfinder Eyecup A viewfinder eyecup can be at tached as an aid to users who wear glasses or to prevent light from entering via the viewfind er Attach the eyecup as shown at left Z O O M NIKKOR 5 8 16 2mm 1 2 8 4 9 Lens cov...

Page 13: ...iewfinder 16 17 USB digital I O 59 65 Audio video A V out 56 connector delete button 22 42 49 52 Multi selector 6 menu button 24 44 69 80 Mode dial 6 play transfer button 21 52 57 80 Power connec tor cover for AC adapter Battery latch 9 Memory card slot 10 Interface con nector cover 56 59 Battery chamber 8 ...

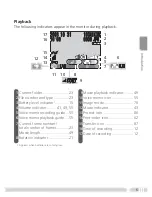
Page 14: ...dicator 96 13 Number of exposures remaining 14 71 Maximum total movie length 43 46 14 Flash mode 32 15 Focus areas and focus area selection guide 79 16 Image mode 70 17 Exposure compensation 38 18 Sensitivity gain indicator6 27 33 19 Continuous shooting mode 74 20 Best Shot Selector BSS 77 21 White balance 72 22 Macro close up mode 37 23 Image sharpening 78 1 Displayed when zoom buttons are presse...

Page 15: ... 49 8 Rotation indicator 21 9 Movie playback indicator 49 10 Voice memo icon 55 11 Image mode 70 12 Movie indicator 43 13 Protect icon 86 14 Print order icon 62 15 Transfer icon 87 16 Time of recording 12 17 Date of recording 12 1 Appears when batteries are running low Playback The following indicators appear in the monitor during playback 8 10 0008 0008 100 100NIKON 10 10 2003 2003 00 00 31 31 10...

Page 16: ...this mode to display the setup menu where you can perform such tasks as set ting the camera clock and ad justing monitor brightness Scene 24 Choose from fifteen scenes suited to different subjects or shooting conditions and let the camera do the rest Voice recording 39 Record sound over the built in microphone Navigating the Menus The multi selector is used to navigate through the camera menus Can...

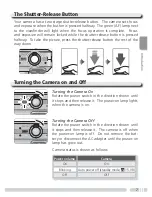
Page 17: ...r release button the rest of the way down Turning the Camera on and Off Turning the Camera On Rotate the power switch in the direction shown until it stops and then release it The power on lamp lights when the camera is on Turning the Camera Off Rotate the power switch in the direction shown until it stops and then release it The camera is off when the power on lamp is off Do not remove the bat te...

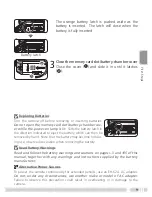
Page 18: ...se About two hours are required to charge battery when no charge remains 1Open the memory card slot battery chamber cover Slide the cover in the direction shown in until it stops and the cover opens 2Insert the battery Insert the battery as shown in the label at the entrance to the battery chamber making sure the positive and negative terminals are in the correct orientation The small projection o...

Page 19: ...s and cautions on pages i ii and 105 of this manual together with any warnings and instructions supplied by the battery manufacturer Alternative Power Sources To power the camera continuously for extended periods use an EH 62A AC adapter Do not under any circumstances use another make or model of AC adapter Failure to observe this precaution could result in overheating or in damage to the camera 3...

Page 20: ...mber cover Slide the cover in the direction shown in until it stops and the cover opens 3Insert the memory card Insert the memory card as shown in the label at the entrance to the memory card slot Inserting Memory Cards Insert the memory card ter minals first Inserting the card upside down or back wards could damage the camera or the card Check to be sure the card is in the correct orientation 4Cl...

Page 21: ...ect switch to prevent accidental loss of data When this switch is in the lock position pictures can not be recorded deleted or edited and the card can not be formatted Do not lock the card when taking deleting or editing pictures or when transferring pictures to a computer 57 When card is locked pictures can be played back but can not be recorded deleted edited or transferred using the camera butt...

Page 22: ...and date No Yes Confirmation dialog displayed 5 London Casablanca HOME TIME ZONE HOME TIME ZONE Back Set Display map of world time zones 4 TIME ZONE TIME ZONE 2003 01 01 00 00 DaylightSaving London Casablanca TIME ZONE menu displayed Select No to exit to mode currently selected with mode dial If you exit without set ting time and date date not set icon will flash in monitor when camera is in shoot...

Page 23: ... M Y 8 Edit Day order of Day Month and Year may differ in some areas DATE DATE 2003 10 00 00 31 D M Y 9 Select Month Repeat steps 8 9 to edit Month Year hour and minute DATE DATE 2003 10 10 00 31 D M Y 10 Highlight D M Y 2003 31 10 00 10 DATE DATE M D Y 11 Choose order in which Day Month and Year will be displayed 12 Exit to mode currently selected with mode dial Note that time and date of recordi...

Page 24: ... and the monitor will display a welcome screen The camera is ready to shoot when the monitor shows the view through the camera lens 17 17 remaining The number of pictures that can be stored on a memory card depends on the capacity of the card and the op tion chosen for Image mode 70 Choose from five op tions depending on how you plan to use the picture 70 The default setting is Shooting mode indic...

Page 25: ...ERY EXHAUSTED Battery exhausted Replace with fully charged battery Auto Power Off Standby Mode If no operations are performed for one minute three minutes when menus are dis played the monitor will turn off automatically and the camera will enter standby mode to reduce the drain on the batteries While the camera is in standby mode the power on lamp will blink The camera will be reactivated when yo...

Page 26: ...t up to 3 and digital zoom in which digital processing is used to further magnify the image up to 4 for a total of 12 Use the zoom buttons to frame your subject in the center of the monitor Press the button to zoom out from your sub ject increasing the area visible in the frame Press the button to zoom in on your subject so that it fills a larger area of the frame When the camera is zoomed in to m...

Page 27: ... to compensate and the image in the monitor may be slightly mottled This is normal and does not indicate a malfunction Monitor or Viewfinder Use the monitor to confirm camera settings at a glance while at the same time viewing an image that shows how the final picture will appear This is particularly useful when the image in the viewfinder does not accurately reflect what will appear in the final ...

Page 28: ...dicator in the monitor Flash status is indicated by the red flash ready lamp next to the viewfinder 2Take the picture Press the shutter release button the rest of the way down to take the picture To prevent blur press the shutter release button down smoothly Red lamp Green AF lamp Focus indicator 17 17 Red lamp On Flash will fire when picture is taken Blinks Flash charging Off Flash off or not req...

Page 29: ...tween the subject and the back ground and the subject is evenly lit It does not perform well if the subject is very dark or moving rapidly if there are objects of sharply differing brightness in the scene e g the sun is behind your subject and their features are in deep shadow or if there are several objects at different distances from the camera at the center of the frame e g your subject is insi...

Page 30: ...er release button halfway Check the green AF lamp and focus indicator 2 With the shutter release button pressed half way check that the green AF lamp and focus indicator glow steadily indicating that the subject is in focus 17 17 Take the picture 4 Press the shutter release button the rest of the way down to shoot Recompose the picture 3 Focus and exposure remain locked while the shutter release b...

Page 31: ...ll quickly to the desired frame To return to shooting mode press the button again Playback Tips Pictures are displayed briefly at low resolution while being read from the memory card This makes it possible to scroll rapidly through the pictures in memory without waiting for each image to be displayed at full resolution Rotating Pictures During playback still pictures can be rotated 90 or 270 degre...

Page 32: ... in Shooting Mode In shooting mode pictures can be deleted one at a time by pressing the button A confirmation dialog will be displayed press the multi selector up or down to highlight an option and press the center of the multi selector Yes Delete the picture shown in the monitor and return to shooting mode No Return to shooting mode without deleting the picture Erase 1 image Erase 1 image Yes No...

Page 33: ...s if you take a picture when the current folder contains 200 pictures a new folder will be created by adding one to the current folder number A new folder is created for each sequence of pictures taken using interval timer photography or panorama assist If you take a picture when the current folder contains a picture numbered 9999 a new folder will be created and file numbering will begin again fr...

Page 34: ...scene 1 17 17 Select 2 Display scene menu Portrait Portrait Exit Set 3 Highlight scene Highlighted scene shown by large icon and caption To exit without changing current selec tion press Party Indoor Party Indoor Exit Set 5 Return to shooting mode Selected scene shown by icon in monitor 17 17 4 Select highlighted scene Party Indoor Party Indoor Exit Set Depending on the scene selected restrictions...

Page 35: ... Image mode 70 can be selected in the scene menu The current setting is shown when the image mode icon is highlighted The following scenes are available IMAGE MODE IMAGE MODE Exit Set Off Portrait Use for portraits Main subject stands out clearly while back ground details are softened lending composition sense of depth Degree of softening depends on amount of light available Auto Off Party Indoor ...

Page 36: ...bject and background when shooting portraits under low light Noise reduction turns on automatically at slow shutter speeds Off Off Sunset Preserves the deep hues seen in sunsets and sunrises Off Off Landscape Use for vivid landscape shots that enhance outlines colors and contrast in such subjects as skyscapes and forests Camera focuses at infinity AF lamp and indicator light whenever shutter relea...

Page 37: ... Photography may be prohibited altogether in some settings Be sure to obtain permission first Off Night landscape A slow shutter speed is used to produce stunning night landscapes Noise reduction 26 turns on automatically at slow shut ter speeds Focus is fixed at infinity AF lamp and indicator light when ever shutter release button is pressed halfway Other modes can be selected Center focus area s...

Page 38: ... that flash may not light entire subject at ranges of 40cm 15 7 or less Take test shot and examine results in monitor Auto Off Copy Provides clear pictures of text or drawings on a white board or in printed matter such as a business card Use macro close up 37 to focus at short ranges Colored text and drawings may not show up well in final picture Auto Off Other modes can be selected Camera automat...

Page 39: ...es are recorded at about 2 5 frames per sec ond to a maximum of three shots Focus exposure and white balance are determined by first shot in each series Monitor turns off during shooting frame pictures in viewfinder Other modes can be selected Camera automatically selects focus area containing subject closest to camera Focus brackets are not displayed in monitor Center focus area selected automati...

Page 40: ...camera after each shot Select Panorama assist in scene menu as described in steps 1 4 of Taking Pictures in Scene Mode 24 Top to bottom Right to left Left to right Bottom to top 4 17 17 Make selection to change selected pan direction press center of multi selector and repeat steps 3 4 Pan direction displayed in white Yellow AE L icon in monitor shows that white balance and exposure will lock with ...

Page 41: ... mode is selected or camera enters standby mode Deleting Pictures Once the first shot is taken pictures can not be deleted until shooting ends Storage Locations for Panoramas Each series of pictures taken at Panorama assist is stored in a separate folder with a name consisting of P_ preceded by a three digit folder number and followed by a three digit sequence number e g 101P_002 17 17 ...

Page 42: ...ot recommended when quick shutter response is required When to use it Flash Cancel off Flash will not fire even when lighting is poor Use to capture natural lighting under dim light or where use of flash is prohibited If camera shake icon appears care should be taken to avoid blurring Slow sync Autoflashcombinedwith slow shutter speeds Use to capture both subject and back ground at night or under ...

Page 43: ...If the shutter speed required for exposure is very slow a camera shake warning will appear in the monitor Use of a tripod or support is recommended Close Ups The flash may not be able to light the entire subject at distances of less than 40cm 15 7 When taking close ups play each picture back after shooting to check the results Flash Mode Selection Depending on the mode selected the flash mode may ...

Page 44: ...pressed Best choice in most situations Self timer Shutter release delayed until 10s or 3s after shutter release button is pressed Use 10s delay for self portraits 3s delay to reduce blur caused by camera movement when shutter release button is pressed When to use it Using the Self Timer 1 17 17 Display release mode menu 2 Highlight 17 17 3 Exit menu to exit without changing mode wait two seconds S...

Page 45: ...mera on a tripod recommended or rest it on a flat level surface The Self Timer Depending on the option selected the self timer may not be available in movie 46 or scene mode 25 29 The Continuous option in the shooting menu is automati cally set to Single while the self timer is on 74 The self timer lamp on the front of the camera will blink until one second before the picture is taken staying lit ...

Page 46: ... 17 Sound Release The sound release volume level can be set using the Snd release level option in the setup menu 98 If no sound loud enough to trigger the release is detected in five minutes the camera will display a message stating that sound release has been deacti vated Press any button to return to shooting mode Sound release will remain active if the monitor is turned off Sound release is not...

Page 47: ...ances of less than 40cm 15 7 When taking close ups play each picture back after shooting to check the results In macro close up mode the camera focuses continuously even when the shutter re lease button is not pressed halfway Depending on the option selected macro close up may not be available in scene mode 25 29 1 17 17 Display macro close up menu 2 Highlight ON 17 17 3 Exit menu to exit without ...

Page 48: ...ry brightly lit for example when photographing an expanse of sunlit water sand or snow or when the background is much brighter than the main subject Choose negative values when large areas of the frame are very dark for example when photographing a forest of dark green leaves or when the background is much darker than the main subject This is because the camera in order to avoid extreme under or o...

Page 49: ...tter release button to start recording While recording is in progress the green AF lamp will light and the following indicators will be dis played in the monitor To pause or resume recording press the center of the multi selector While recording is paused the green AF lamp will blink 001 2003 10 31 13 00 01 15 00 05 00 00 01 Index 1 Recording indicator 2 File number 3 Length of recording 4 Progres...

Page 50: ...uickTime Sound Files Voice recordings are stored in folders with names consisting of a three digit folder number followed by SOUND e g 101SOUND File names consist of DSCN followed by a four digit file number assigned by adding one to the largest file number in the current folder and the extension WAV e g DSCN0001 WAV Making a Voice Recording Without Extending the Lens To make a voice recording wit...

Page 51: ...enter of the multi selector to begin play back The following screen will be displayed while playback is in progress File number Date of recording 01 004 2003 11 03 09 15 00 18 40 01 20 15 Index 쐊 쐎 1 Control icons 2 File number 3 Playback time 4 Index number 5 Progress indicator 6 Date of recording 7 Length of recording 8 Volume 9 Index markers Playback Volume The zoom buttons control volume durin...

Page 52: ...yback and return to voice recording list Resume playback Advance Highlight and press and hold center of multi selector to fast forward through recording Playback resumes when multi selector is released Deleting Voice Recordings To delete a voice recording press the button while the recording is highlighted in the voice recording list or the playback screen is displayed A confirmation dialog will b...

Page 53: ... frame is 160 120 pixels in size Small size allows longer movies to be recorded 200s 3500s B W movie 320 Movies are recorded in black and white at 15 frames per second Each frame is 320 240 pixels in size 45s 880s Sepia movie 320 Movies are recorded in sepia at 5 frames per second Each frame is 320 240 pixels in size 45s 880s Time lapse movie 640 Camera takes still pictures at specified inter vals...

Page 54: ... 1 1 3 TV movie 640 Small size 320 TV movie 640 MOVIE OPTIONS MOVIE OPTIONS Highlight mode 6 1 1 3 TV movie 640 Small size 320 TV movie 640 MOVIE OPTIONS MOVIE OPTIONS Make selection 2 MOVIE MOVIE Movie options Auto focus mode Display MOVIE menu 7 Return to shooting mode Selected movie mode shown in monitor 12s To return to MOVIE menu after making selection press multi selector to left To exit wit...

Page 55: ...lso includes the following focus options 5 Return to shooting mode 12s MOVIE MOVIE Movie options Auto focus mode 1 Highlight Auto focus mode AUTO FOCUS MODE AUTO FOCUS MODE Single AF Continuous AF 2 Display options AUTO FOCUS MODE AUTO FOCUS MODE Single AF Continuous AF 3 Highlight desired focus mode 4 AUTO FOCUS MODE AUTO FOCUS MODE Single AF Continuous AF Make selection To choose a focus option ...

Page 56: ...can continue past this point if enough memory is available on the memory card Movies are recorded as QuickTime movie files with the extension MOV e g DSCN0001 MOV and can be played back on a computer after transfer 1Rotate the mode dial to 2Turn the camera on The exposure count display in the monitor shows the maximum total length of the movie that can be recorded 3Start recording Press the shutte...

Page 57: ...Set interval time 3 Choose interval between frames from 30s thirty seconds 1m one minute 5m five minutes 10m ten minutes 30m thirty minutes and 60m sixty minutes 1m 30s 5m 1 2 1 2 SET INTERVAL TIME SET INTERVAL TIME TIME LAPSE MOVIE TIME LAPSE MOVIE Set interval time AE lock 6 Highlight AE lock Off On AE LOCK AE LOCK 7 Display AE LOCK menu 4 Make selection 1m 30s 5m 1 2 1 2 SET INTERVAL TIME SET I...

Page 58: ...lder e g INTN0015 MOV Use a Reliable Power Source We recommend using the optional EH 62A AC adapter when recording time lapse photos at intervals of ten minutes or more AE Lock When On is selected for AE lock a yellow AE L icon will be displayed in the monitor indicating that exposure and white balance will be locked with the first shot Once the first shot is taken the icon will turn white 148 9 S...

Page 59: ...f multi selector to fast forward through movie Playback resumes when multi selector is released Jog advance When movie is paused advance one frame Jog rewind When movie is paused rewind one frame Stop End movie and return to full frame playback Resume Resume playback Playback Zoom Playback zoom is not available with movies Playback Volume The zoom buttons control volume during playback Press to de...

Page 60: ... menu Starting movie trim Starting movie trim Cancel Begin trim 2 Display confirmation dialog Starting movie trim Starting movie trim Cancel Begin trim 3 Highlight Begin trim 25s 4 Begin movie playback To exit without trimming movie highlight Cancel and press center of multi selector 5 Use controls at top of monitor to pause rewind and advance movie 49 For frame by frame playback select and use an...

Page 61: ... movie highlight No and press center of multi selector High light Yes and press center of multi selector to skip to Step 10 To exit without trimming movie highlight No and press center of multi selector High light Review movie and press center of multi selector to view edited movie again Editing Movies The edited movie is saved under a new name assigned by adding one to the largest file number in ...

Page 62: ...01 0001 JPG JPG 100 100NIKON 12 12 2003 2003 00 00 31 31 10 10 1 3 2 4 To Description Press Delete highlighted picture Confirmation dialog will be displayed Press multi selector up or down to highlight option press center to select Select Yes to delete picture Select No to exit without deleting pic ture Highlight pictures Press multi selector up down left or right to highlight pictures Change numb...

Page 63: ...s can cel zoom Zoom out Zoom decreases each time button is pressed To cancel zoom zoom picture out until entire picture is displayed W Crop picture 54 Confirmation dialog will be displayed Press multi selector up or down to highlight option press center to select Select Yes to create new picture con taining only area visible in monitor Select No to exit without creating cropped copy Shutter button...

Page 64: ...amera Cropping Pictures When a picture is zoomed in the portion of the picture visible in the monitor can be saved in a separate file creating a cropped copy of the image To cre ate a cropped copy press the center of the multi selector after using the T and W buttons and multi selector to display the desired portion of the picture in the monitor 53 3 Done Create cropped copy and return to full fra...

Page 65: ... shutter release button is held down During recording icon blinks Re cording ends after about 20s or when shutter release button is released Do not touch microphone during recording Shutter button Play voice memo Pictures for which voice memo exists are marked by voice memo play back guide and icons Press shut ter release button to play voice memo Playback ends when voice memo ends or shutter rele...

Page 66: ...connector cov er as shown at right and insert the black plug into the camera s inter face connector Insert the yellow plug into the video in jack on the television or VCR Connect the white plug to the audio in jack PAL If the camera is used to record movies with PAL selected for Video mode and the camera connected to a video device video output will be suspended and the camera monitor will turn on...

Page 67: ...B option selected in the camera setup menu After consulting the follow ing table select the appropriate option using the USB item in the camera setup menu The default option is Mass Storage Viewing Pictures on a Computer Pictures can not be transferred using camera button in Mac OS X 10 1 2 Use Nikon View button to transfer pictures Nikon View button Windows XP Home Edition Windows XP Professional...

Page 68: ...torage 3 Display USB menu USB USB PTP Mass Storage 4 Highlight PTP or Mass Storage SET UP SET UP 1 5 1 5 Welcome screen Date Date imprint 1 Select SETUP mode USB Video mode Reset all SET UP SET UP 4 5 4 5 2 Highlight USB USB USB PTP Mass Storage 5 Make selection ...

Page 69: ... as described below Be sure to select Mass Storage before reconnecting the camera Windows 2000 Professional A dialog will be displayed welcoming you to the Found New Hardware Wizard Click Cancel to close the dialog and then disconnect the camera Windows Millennium Edition Me After displaying a message stating that the hardware information database is being updated the computer will start the Add N...

Page 70: ...isconnecting the cable Windows XP Home Edition Windows XP Professional Click the Safely Remove Hardware icon in the taskbar and select Safely remove USB Mass Storage Device from the menu that appears Windows 2000 Professional Click the Unplug or Eject Hardware icon in the taskbar and select Stop USB Mass Storage Device from the menu that appears Windows Millennium Edition Me Click the Unplug or Ej...

Page 71: ...kon View and print them using the Nikon View date imprint option see the Nikon View Reference Manual on CD ROM Print Set and Digital Print Order Format DPOF The Print set option in the playback menu is used to create a digital print order listing the pictures to be printed the number of prints and the information to be included on each print This print order is stored on the camera memory card in ...

Page 72: ...ent picture and set num ber of prints to 1 Selected pictures marked by icon 2003 10 31 12 10 4 3 PRINT SELECTION PRINT SELECTION Back Set 5 Scroll through pictures Current pic ture shown at bottom of display 2003 10 31 12 10 4 3 PRINT SELECTION PRINT SELECTION Back Set 3 3 7 Use multi selector to specify number of prints up to 9 To deselect picture press multi selector down when num ber of prints ...

Page 73: ...rint the time and date of recording on pictures recorded when Date or Date and time is selected for Date imprint The Print Order Icon During playback a print order icon appears on all pictures in the current print order 1 1 0001 100NIKON 12 2003 00 31 10 8 Press center of multi selector to complete print order and display menu of print options To print date of recording on all pictures in print or...

Page 74: ...e a USB option as described below before connecting the printer USB USB PTP Mass Storage 3 Display USB menu USB USB PTP Mass Storage 4 Highlight PTP PictBridge or Mass Storage USB Direct SET UP SET UP 1 5 1 5 Welcome screen Date Date imprint 1 Select SETUP mode USB Video mode Reset all SET UP SET UP 4 5 4 5 2 Highlight USB USB USB PTP Mass Storage 5 Make selection Step 1 Choose a USB option Connec...

Page 75: ...ion make sure that the printer supports Pict Bridge or USB Direct and check printer settings See the printer manual for details Use a Reliable Power Source When printing pictures via direct USB connection be sure the battery is fully charged If in doubt recharge the battery before printing or use the optional EH 62A AC adapter PictBridge PictBridge is an industry standard for direct printing that ...

Page 76: ...on memory card highlight Print all images and press multi selector to right 2003 10 31 12 10 4 3 PRINT SELECTION PRINT SELECTION Back Set 1 1 6 Select current picture and set num ber of prints to 1 Selected pictures marked by icon 2003 10 31 12 10 4 3 PRINT SELECTION PRINT SELECTION Back Set 5 Scroll through pictures Current pic ture shown at bottom of display 2003 10 31 12 10 4 3 PRINT SELECTION ...

Page 77: ...n dialog shown in Step 4 Select Cancel to exit without printing pictures Message shown above at right is displayed when printing is complete Turn camera off and disconnect USB cable Printer ready Printer ready Cancel Start print Back 006 PRINT SELECTION PRINT SELECTION prints prints Printing 001 006 Cancel Done YOU MAY TURN OFF THE CAMERA The PictBridge Logo The illustrations on these pages show t...

Page 78: ... without printing pictures Message shown above at right is displayed when printing is complete Turn camera off and disconnect USB cable Printer ready Printer ready Cancel Start print Confirm 006 DPOF PRINTING DPOF PRINTING prints prints 1 4 2 5 3 6 3 1 1 1 CONFIRM CONFIRM Exit 4 Display print order Press multi selec tor up right left or down to view pictures not visible in display Printing 001 006...

Page 79: ...era sharpens outlines 78 AF area mode Determines how the focus area is selected 79 1 Highlight menu item 2 Display options Single Continuous H Continuous L CONTINUOUS CONTINUOUS 1 2 1 2 SHOOTING MENU SHOOTING MENU 1 2 1 2 Image mode White balance Continuous 4 Make selection Single Continuous H Continuous L CONTINUOUS CONTINUOUS 1 2 1 2 3 Highlight option Single Continuous H Continuous L CONTINUOUS...

Page 80: ... is compressed the more noticeable this loss of quality is likely to be The figures in parentheses show the approximate compression ratio for each setting All figures are approximate Print sizes assume a printer resolution of approximately 300dpi Print size cm Size pixels TV screen 640 Can be displayed full screen on television or 13 monitor Suited to distribution by e mail or web 5 4 2 1 1 8 640 ...

Page 81: ...f images when printed depends on the printer resolution the higher the resolution the smaller the final print size Image Mode The current image mode is shown by an icon at the bottom left corner of the monitor The following table shows the approximate number of pictures that can be stored on 16 and 256 megabyte memory cards at different image modes All figures are approximate File size of pictures...

Page 82: ...n as a white balance adjustment In and scene modes white balance is adjusted automatically to suit the selected scene In mode white balance can be selected from the fol lowing options Auto White bal preset Daylight WHITE BALANCE WHITE BALANCE 1 3 1 3 Option Incandescent Use under incandescent lighting Auto White balance automatically adjusted to suit lighting conditions Best choice in most situati...

Page 83: ...an not be measured with the flash White Balance At settings other than Auto white balance is shown by an icon in the monitor WHITE BAL PRESET WHITE BAL PRESET Cancel Measure 17 Option Cancel Recalls the most recent value for preset white balance from the memory and sets white balance to this value Measure To measure a new value for white balance place a neutral gray object such as a piece of cardb...

Page 84: ...ait subject photograph a subject that is moving unpredictably or capture motion in a series of pictures Single Continuous H Continuous L CONTINUOUS CONTINUOUS 1 2 1 2 17 Option Single Camera takes one picture each time shutter release button is pressed Continuous H While shutter release button is pressed camera records up to 3 pictures at rate of up to 2 5 fps Monitor turns off during shooting Con...

Page 85: ...hoose interval between shots from 30s thirty seconds 1m one minute 5m five minutes 10m ten minutes 30m thirty minutes and 60m sixty minutes 1m 30s 5m SET INTERVAL TIME SET INTERVAL TIME 1 2 1 2 Take Test Shots Take a test shot and view the results before starting interval timer photography 6 Highlight AE lock Set interval time AE lock INTVL TIMER SHOOTING INTVL TIMER SHOOTING 7 Display AE LOCK men...

Page 86: ...older number followed by INTVL e g 101INTVL File names consist of DSCN followed by a four digit file number assigned in ascending order starting from 0001 e g DSCN0001 AE Lock When On is selected for AE lock a yellow AE L icon will be displayed in the monitor indicating that exposure and white balance will be locked with the first shot Once the first shot is taken the icon will turn white 17 7 Ret...

Page 87: ...aken at close range in macro close up mode lighting is poor and the flash can not be used Restrictions on BSS BSS may not produce the desired results with a moving subject or if the composition is changed while the shutter release button is pressed all the way down BSS can not be used with the self timer 34 or at Continuous settings other than Single 74 BSS When BSS is on a BSS icon appears in the...

Page 88: ...performed Taking Pictures for Retouching on a Computer When taking pictures that will later be retouched choose Off Image Sharpening At settings other than Auto the current image sharpening setting is indicated by an icon in the monitor Auto High Normal IMAGE SHARPENING IMAGE SHARPENING 1 2 1 2 17 Option Low Sharpening reduced below normal level Auto Camera sharpens edges for optimal results amoun...

Page 89: ...spot AF area meter ing Can be used instead of focus lock 20 to focus on off cen ter subjects Off Camera focuses on subject in center focus area No focus area in dicators appear in monitor Can be used in combination with focus lock 20 to focus on off center subjects Description Restrictions on Focus Area Selection Focus area selection is not available when the monitor is off or digital zoom 16 is i...

Page 90: ...nting on a DPOF compatible device specify number of copies and information to be included on prints 62 63 Slide show View pictures on the memory card in an automatic slide show 81 83 Delete Delete all or selected pictures 84 85 Protect Protect selected pictures from accidental deletion 86 Auto transfer Mark all or selected pictures for transfer to a com puter turn auto transfer marking on or off 8...

Page 91: ...check mark next to Loop indicates that the loop option is selected Viewing All Pictures in the Order Recorded SLIDE SHOW SLIDE SHOW Select all Select image s SLIDE SHOW SLIDE SHOW Start Loop Pause Pause Option Select all View all pictures in order recorded Select image s View chosen pictures in selected order Description Pause Pause SLIDE SHOW SLIDE SHOW Start Loop 2 Starting screen displayed SLID...

Page 92: ...l pictures To exit without changing selection press button SELECT IMAGE S SELECT IMAGE S 2003 10 31 12 05 Back Set ON OFF 4 2 3 Scroll through pictures Current picture displayed at bottom of monitor Pause Pause SLIDE SHOW SLIDE SHOW Start Loop 6 Starting screen displayed Start slide show as described in steps 3 4 of Viewing All Pictures in the Order Re corded 81 1 1 1 1 SELECT IMAGE S SELECT IMAGE...

Page 93: ...or to right to resume show Highlight End and press multi selector to right to end show Skip to next frame Press multi selector right to skip to next slide Hold multi selector down to fast forward through show End Restart PAUSE PAUSE Return to previous frame Press multi selector left to return to previous slide Hold multi selector down to rewind through show End slide show End slide show and return...

Page 94: ...marked by icon Scroll through pictures Current pic ture displayed at bottom of monitor ERASE SELECTED IMAGES ERASE SELECTED IMAGES Back Set 2003 10 31 12 20 ON OFF 4 4 2 Display selection dialog DELETE DELETE Erase selected images Erase all images 1 Highlight Erase selected images DELETE DELETE No Yes Erase 1 image s Erase 1 image s 6 Confirmation dialog displayed Press multi selector up or down t...

Page 95: ...and can not be deleted 86 Deleting All Pictures DELETE DELETE Erase selected images Erase all images 1 Highlight Erase all images Erasing all images Erasing all images Exclude Exclude No Yes DELETE DELETE 2 Confirmation dialog displayed Press multi selector up or down to highlight option press center to select Select Yes to delete all unprotected pictures on memory card Select No to exit without d...

Page 96: ...4 4 PROTECT PROTECT 2003 10 31 12 05 Back Set ON OFF 4 2 2 Select current picture Selected pic tures marked by icon PROTECT PROTECT 2003 10 31 12 05 Back Set ON OFF 4 2 1 Scroll through pictures Current pic ture displayed at bottom of monitor 3 Repeat steps 1 2 to select ad ditional pictures To deselect picture select and press multi selector down To exit without changing selection press button Do...

Page 97: ...nnect the camera to a computer via the UC E6 USB cable and press the button to transfer pictures only pictures marked with a icon will be transferred Note that the camera button can not be used to transfer pictures in Mac OS X ver sion 10 1 2 Use Nikon View to transfer pictures Auto Transfer This option is used to mark pictures for transfer to a computer and to turn automatic transfer marking on a...

Page 98: ...utton AUTO TRANSFER AUTO TRANSFER 2003 10 31 12 20 Back Set ON OFF 4 4 2 Display selection dialog AUTO TRANSFER AUTO TRANSFER 2003 10 31 12 05 Back Set ON OFF 4 2 4 Select current picture Selected pic tures marked by icon AUTO TRANSFER AUTO TRANSFER 2003 10 31 12 05 Back Set ON OFF 4 2 3 Scroll through pictures Current pic ture displayed at bottom of monitor AUTO TRANSFER AUTO TRANSFER All on All ...

Page 99: ...nd names of the form FSCNnnnn JPG where nnnn is a four digit file number assigned by adding one to the larg est file number in the current folder Copies are independent of the original image and can be modified or deleted separately Picture Enhance Copies may not display or transfer correctly when viewed on other models of Nikon digital camera Picture enhance options can not be used with movies re...

Page 100: ...our digit file number assigned by adding one to the larg est file number in the current folder Copies are independent of the original image and can be modified or deleted separately During playback copies are indicated by a gray border or icon is displayed when copies are viewed full frame Small Picture Copies may not display or transfer correctly when viewed on other models of Nikon digital camer...

Page 101: ... the monitor will remain on be fore turning off automatically to save power 98 Memory card format Format memory cards for use in the camera 99 Language Choose a language for camera menus and mes sages 99 USB Choose the USB setting used when copying pic tures to a computer or printing on PictBridge or Epson USB Direct printers 58 64 Video mode Select the video mode from NTSC and PAL 99 Reset all Re...

Page 102: ...urned on Description Select Image Choose the welcome screen displayed when the cam era is turned on Nikon Image shown at right is displayed when cam era is turned on Animation Animation shown at right is displayed when camera is turned on Select an image SELECT IMAGE SELECT IMAGE 2003 10 31 12 05 Back Set 4 2 Choose welcome screen from pictures on memory card Press multi selector left or right to ...

Page 103: ...t right will be displayed Select Yes to replace the existing picture with the new welcome screen No to exit leaving the welcome screen unchanged Select Start Sound If Off is selected for Sel start sound no sound will be played when the camera is turned on If On is selected a startup sound will be played whenever the camera is turned on even if Disable welcome is selected for Select image SELECT ST...

Page 104: ...lti selector to the right then select a location TIME ZONE TIME ZONE 2003 10 31 10 00 London Casablanca Tokyo Seoul DaylightSaving DaylightSaving DATE DATE Date Time zone HOME TIME ZONE HOME TIME ZONE Madrid Paris Berlin Back Set 2 Choose time zone London Casablanca HOME TIME ZONE HOME TIME ZONE Back Set 1 Select time zone TIME ZONE TIME ZONE 2003 10 31 10 00 Madrid Paris Berlin London Casablanca ...

Page 105: ...Time Zones The time zone can not be selected if the date and time have not been set Time zone increments of less than one hour are not supported When travelling to or from destinations at half or quarter hour increments from Greenwich Mean Time GMT such as Afghanistan Central Australia India Iran Nepal or Newfoundland set the camera clock to local time 13 GMT GMT 11 Midway Samoa Location GMT 10 Ha...

Page 106: ... that the camera clock is set to the correct time and date The date is recorded in the order selected in the DATE menu Date imprint can not be selected if the camera clock has not been set 12 13 Print Set The Print set option can be used to print the date and time of recording on images taken with Off selected for Date imprint 62 63 Date Imprint The date imprint option is used to imprint the date ...

Page 107: ... SETTINGS Button sound Shutter sound Volume Option Description Button sound Select On to sound beep if data are deleted memory card is formatted error occurs battery is exhausted new mode is selected or pictures can not be recorded when shutter is released BUTTON SOUND BUTTON SOUND Off On Shutter sound Choose sound played when shutter is released If Off is selected no sound will be played when shu...

Page 108: ... the camera remains active when no opera tions are performed can be chosen from 30 seconds 1 minute the default setting 5 minutes or 30 min utes If the mode dial has been rotated from shooting to playback or setup mode the lens will return to its housing in the camera body when the camera enters standby mode Regardless of the option chosen the camera will remain ac tive for 3 minutes when menus ar...

Page 109: ...d Description WARNING WARNING All image will be All image will be deleted deleted MEMORY CARD FORMAT MEMORY CARD FORMAT No Format Memory Card Format Memory card performance drops as pictures are recorded and deleted For best performance format memory cards regularly Language Choose the language for camera menus and mes sages from Deutsch German English Espanõl Spanish Français French Italiano Ital...

Page 110: ...sure compensation 0 Image mode Normal 2048 White balance Auto Continuous Single Best Shot Selector Off Image sharpening Auto AF area mode Auto Setting Default Welcome screen Select image Nikon Select start sound On Date imprint Off Brightness 3 Auto off 1m Sound settings Button sound On Shutter sound 1 Volume 2 Reset All Select this option to restore the settings listed below to their original sta...

Page 111: ...101 The Setup Menu Menu Guide Firmware Version Select this option to display the current camera firm ware version Press the multi selector to the left to return to the setup menu Back ...

Page 112: ...EL5 Li ion batteries are available from your re tailer or local Nikon representative MH 61 battery charger for EN EL5 batteries These cards are rated for 10MB s or more Operation is not guaranteed with other makes of card For more details on the above cards please contact the manufacturer Approved Memory Cards In addition to the memory card provided with the camera the following cards have been te...

Page 113: ...ry or internal circuitry To prevent an ac cidental interruption of power avoid carrying the product from one place to another while the AC adapter available separately is connected Do not drop The product may malfunction if sub jected to strong shocks or vibration Keep away from strong magnetic fields Do not use or store this device in the vicinity of equipment that generates strong electromagneti...

Page 114: ...e monitor touching the skin or entering the eyes or mouth Body Use a blower to remove dust and lint then wipe gently with a soft dry cloth After using the camera at the beach or seaside wipe off any sand or salt with a cloth lightly dampened with fresh water then dry thoroughly Do not use alcohol thinner or other volatile chemicals Notes on the Monitor The monitor may contain a few pixels that are...

Page 115: ...hicle on a sunny day are subject to humidities of over 60 To prevent mold or mildew take the camera out of storage at least once a month Turn the camera on and release the shutter a few times before put ting the camera away again Store the battery in a cool dry place Batteries When turning the camera on check that the battery is charged The monitor will display a warning when batteries are low Car...

Page 116: ...ase wait for camera to finish recording Camera turned off or button pressed during re cording Message clears from display automatically when recording is complete 19 NO CARD PRESENT Camera can not detect memory card Turn camera off and confirm that memory card is correctly inserted 10 MEMORY CARD IS WRITE PROTECTED Write protect switch is in lock position Slide write protect to write position 11 T...

Page 117: ... for welcome screen Reformat memory card Insert new memory card or delete pictures Copies can not be created from movies or from other copies Remove protection from movie Choose image 640 480 pixels or larger 99 10 22 52 84 50 54 89 90 86 70 SOUND FILE CANNOT BE SAVED Camera has run out of file numbers Insert new memory card or delete voice recordings 10 42 84 CANNOT RECORD MOVIE Memory card has n...

Page 118: ...BE PLAYED BACK COMMUNICATIONS ERROR Nikon Transfer is not run ning USB cable disconnected or memory card removed while pictures are being transferred to computer USB option set incorrectly Start Nikon Transfer before pressing button If error appears in computer monitor click OK to exit Nikon View Turn camera off reconnect cable or re place memory card then turn camera on and transfer pictures Turn...

Page 119: ...mpt to delete protect ed picture Remove protection before de leting picture 86 SYSTEM ERROR Error has occurred in cam era s internal circuitry Turn camera off unplug op tional AC adapter if using remove and reinsert batteries and turn camera on If error persists contact retailer or Nikon representative 8 9 LENS ERROR Error has occurred during lens operation Turn camera off and then on again If err...

Page 120: ...e that disconnecting the power source as de scribed above may result in the loss of any data not recorded to the memory card at the time the problem occurred Data already recorded to the memory card will not be affected Problem Solution Monitor is blank Camera is off Batteries are not correctly inserted or battery chamber cover is not properly latched Batteries are exhausted EH 62A AC adapter avai...

Page 121: ...is off or set to Sound is not loud enough to trigger release Snd release level is set too high 34 98 Pictures are too dark underexposed Flash is off Flash window is blocked Subject is outside range of flash Exposure compensation is too low 32 16 33 38 Pictures are too bright overexposed Exposure compensation is too high 38 Pictures are out of focus Camera can not focus on selected subject using au...

Page 122: ...und files 46 54 89 90 22 42 52 55 84 Can not crop picture Picture is an enhanced resized or cropped copy Picture is a protected movie Space remaining on memory card is insufficient Delete pictures or sound files 54 89 90 86 22 42 52 55 84 Can not zoom in on picture Picture is a movie Picture was created with small picture option Picture has been cropped to below 320 240 Picture is rotated 46 90 70...

Page 123: ...lluminator f number f 2 8 f 4 9 Construction 7 elements in 6 groups Focal length F 5 4 16 2mm 35 mm 135 camera format equivalent 35 105mm Lens 3 Zoom Nikkor Frame coverage shooting mode Approximately 97 horizontal and 97 vertical Monitor 1 5 134 000 dot High Transmissive Advanced TFT LCD moni tor with 5 level brightness adjustment Storage Media SD Secure Digital memory cards File formats Compresse...

Page 124: ...200 equivalent Self timer 10 or 3 second duration sound release Built in Speedlight Range approx 0 4 3 0m 1 4 9 10 W 0 4 1 7m 1 4 5 7 T Flash control Sensor flash system Interface USB Video output Can be selected from NTSC and PAL I O terminals DC in audio video A V out with digital I O Power sources One rechargeable Nikon EN EL5 lithium ion battery supplied One CP1 lithium battery EH 62A AC adapt...

Page 125: ...ing pictures 22 42 52 84 85 all pictures 85 during shooting 22 in full frame playback 22 52 selected pictures 84 Design rule for Camera File system 114 Digital Print Order Format v 61 Direct Print see USB Direct DPOF see Digital Print Order Format E E mail 71 EN EL5 see Batteries Enhancing pictures 89 Epson USB Direct Print see USB Direct Error messages 106 109 Exif 2 2 114 Exif Print see Exif 2 2...

Page 126: ...pictures 89 Setup menu 91 101 setup mode 6 SHOOTING menu 69 79 Shutter release button 2 7 Shutter release delay see Re lease mode Size see Image mode Slide show 80 83 Slide shows 81 83 Small pic 90 Smear 104 Snd release level 98 Sound 39 43 55 Sound settings 97 Sound release 36 Speedlight see Flash Standby mode see Auto off Strap camera 2 Sunset 26 Support information v T Telephoto see Zoom Televi...

Page 127: ...an SB3K00100401 11 6MAA9011 A No reproduction in any form of this manual in whole or in part except for brief quotation in critical articles or reviews may be made without written authorization from NIKON CORPORATION ...

Reviews: