background image

Summary of Contents for Coolpix P90

Page 1: ...Nikon DIGITAL CAMERA COOLPIX P90 User s Manual ...

Page 2: ...acintosh Mac OS and QuickTime are trademarks of Apple Inc Adobe and Acrobat are registered trademarks of Adobe Systems Inc The SO logo is a trademark of the SO Card Association PictBridge is a trademark All other trade names mentioned in this manual or the other documentation provided with your Nikon product are trademarks or registered trademarks of their respective holders ...

Page 3: ...hooting Suited for the Scenes Automatic Shooting of Smiling Faces Sport Continuous Mode Shoot pictures using P S A M U 1and U 2 E More on Playback Movies Voice Recordings Connecting to Televisions Computers and Printers MENU Shooting Playback and Setup Menus Technical Notes ...

Page 4: ...lt in injury After removing or disconnecting the power source take the equipment to a Nikon authorized service representative for inspection Lt Do not disassemble Touching the internal parts of the camera or AC adapter could result in injury Repairs should be performed only by qualified technicians Should the camera or AC adapter break open as the I esult of a fall or other accident take the produ...

Page 5: ... as discoloration or deformation If liquid from the damaged battery comes in contact with clothing or skin rinse immediately with plenty of water For Your Safety Observe the following precautions when handling the battery charger Keep dry Failure to observe this precaution could result in fire or electric shock Dust on or near the metal parts of the plug should be removed with a dry cloth Continue...

Page 6: ...pairment Particular care should be observed if photographing infants when the flash should be no less than 1 m 3 ft 4 in from the subject Lt Do not operate the flash with the flash window touching a person or object Failure to observe this precaution could result in burns or fire Lt Avoid contact with liquid crystal Should the monitor break care should be taken to avoid injury caused by broken gla...

Page 7: ... or more of the follOWing measures Reorient or relocate the receiving antenna Increase the separation between the equipment and receiver Connect the equipment into an outlet on a circuit different from that to which the receiver is connected Consult the dealer or an experienced radio television technician for help Nikon COOLPIX P90 CAUTIONS Modifications The FCC requires the user to be notified th...

Page 8: ... separate collection at an appropriate collection point Do not dispose of as household waste For more information contact the retailer or the local authorities in charge of waste management This symbol on the battery xt indicates that the battery is to be collected separately The following apply only to users in European countries All batteries whether marked with this symbol or not are designated...

Page 9: ...P display Button 15 First Steps 16 Charging the Battery 16 Inserting the Battery 18 Removing the Battery 19 Tuming On and Off the Camera 19 Setting Display Language Date and Time 20 Inserting Memory Cards 22 Removing Memory Cards 22 o Basic Photography and Playback Auto Mode 24 Step 1 Turn the Camera On and Select 0 Auto Mode 24 Indicators Displayed in 0 Auto Mode 25 Step 2 Frame a Picture 26 Usin...

Page 10: ...Mode 56 Sport Continuous Menu 58 Shoot pictures using P 8 A M U 1and U 2 60 P 5 A M modes 60 P Programmed Auto Mode 62 5 Shutter Priority Auto Mode 63 A Aperture Priority Auto Mode 64 M Manual Mode 65 Using U 1 U 2 User Setting Mode 67 Save the Settings in U 1or u2 68 Resetting Saved Settings 69 Active D Lighting 70 B More on Playback 71 Viewing Multiple Pictures Thumbnail Playback 71 Calendar dis...

Page 11: ...to a TV 92 Connecting to a Computer 93 Before Connecting the Camera 93 Transferring Pictures from the Camera to a Computer 94 Connecting to a Printer 97 Connecting the Camera and Printer 98 Printing Pictures One at a Time 99 Printing Multiple Pictures 100 Creating a DPOF Print Order Print Set 103 MENU Shooting Playback and Setup Menus 105 Shooting Options The Shooting Menu 105 Displaying the Shoot...

Page 12: ...Date 138 101 Monitor Settings 141 II Datelmprint 142 JIll Vibratior Reductlol 143 il Motion Detection 144 1 AF Assist 145 Digital Zoom 145 Sound Se tings 146 o Auto Off 146 d I LJ Forrnat Memory Format Card 147 Language 148 mVideo Mode 148 l Blink WatTling 49 Reset All 151 iii Reset file numberinq 154 Uet f irrnware Versioll 154 Technical Notes 155 Optional Accessories 155 Approved Memory Cards 15...

Page 13: ...mory card is referred to as a memory card The setting at the time of purchase is referred to as the default setting The names of menu items displayed in the camera monitor and the names of buttons or messages displayed in a computer monitor are indicated in bold text Screen Samples In this manual images are sometimes omitted from monitor and electronic viewfinder display samples so that monitor in...

Page 14: ...N WARRANTY The use of third party rechargeable Li jon batteries not bearing the Nikon holographic seal could imerfere With norrlial operation of the camera or result irl the batteries overheating igrlitirig rupturinq or leaking For more information about Nikon brand accessories contact a local authOrized Nikon dealer Holographic seal Identifies this device as an authentic Nikon product 2 Before Ta...

Page 15: ... not copy or reproduce passports issued by the government licenses issued by public agencies and private groups 10 cards and tickets such as passes and meal coupons Comply with copyright notices The copying or reproduction of copyrighted creative works such as books music paintings woodcut prints maps draWings movies and photographs is governed by national and international copyright laws 00 not u...

Page 16: ...87 Built in flash 7 32 II Flash pop up button 7 33 I Eyelet for camera strap at 2 places 7 II Connector cover 92 n 98 II Cahle connector 92 94 98 II Power connector cover 155 ID Shutter release button 28 Zoom control 27 W Wide 27 T Tele 27 Thumbnail playback 1 q Playback zoom 73 Help 14 I Self timer lamp 3 AF asslst Illumlncltor 14 J III Lens 160 112 4 ...

Page 17: ...ker 80 86 89 II Monitor 8 15 25 II E playback button 30 II MENU button 13 40 82 106 129 136 161718 5 II Multi selector 12 III ill1 delete button 30 31 80 86 90 III apply selection button 12 11 I Tripod socket I Battery chamber memory card slot cover 18 22 III Cover latch 18 22 1 1I Memory card slot 22 lEI Battery latch 18 19 II Battery chamber 18 4 3 1 2 5 ...

Page 18: ... 45 or raised upward to 90 This is convenient when taking pictures with the camera held at high or low positions Notes on Monitor Do lIot apply excessive force when changing the angle of the monitor The morlilor cannot be nlOved horizontally Put the monitor back in the original position when usinq in normal Situations ...

Page 19: ... it clicks shut 0 Attaching the Camera Strap and Lens Cap l ttach the lens cap to the strap and then attach the strap to the camera at two places J o Q c n o J LensCap Remove the lens cap before you shoot a picture At tirnes when you will not be shaming pictures such as when the power is off or while you are carrying the camera attach rile lens cap to the camera to protect the lens 7 ...

Page 20: ...utter speed 61 III Flash mode 32 ED Exposure display 65 o Motion detection icon 144 m ISO sensitivity 34 116 o Battery level indicator 24 ED Exposure compensation value 39 I r I I IIPI r7 51 e nco e satl EIl B W color 113 iD Distortion control 126 El lmage optimization 111 iEI Active D Lightinq 70 D White balance mode 114 III FOll S area 28 122 I Self timer IIldlcator 35 iII Focus area Face Priorl...

Page 21: ... I Image size 108 Movie options 82 I a Current frame number total number of frames 30 b Movie length 86 a Internal memory indicator 30 Differs accordin J to the selected option II Voice memo recording guide 80 II Voice memo playback guide 80 lEI Movie playback indicator 86 lEI Print order icon 103 III Small picture 77 78 lEI Black border indicator 79 II D Lighting icon 76 EEl Quick retouch icon 75...

Page 22: ...de in shooting modes P S A o and M Once the settings S ZIJJ are saved you can shoot I M with the settings that are f t l3 more frequently used by just changing over to this Continuous shooting of Sport Continuous Q S6 Choose this simple mode an automatic point and shoot mode recommended for first time users of digital cameras o Auto Q 24 pictures are done at high speeds when the shutter release bu...

Page 23: ... Shutter priority auto Adjust shutter speed mode dial set to S _ __ M 0 _ _ _ _ __ w _ _ __ _H_ __ _ _ ____ Aperture priority auto Adjust aperture I mode dial set to A 1 Manual AdTCst shutter speed oraperture r press the multi selector to I mode dial set to M select a different option 72 Choose a date Calendar display For Playback _ _ _ Mode _ _A__ _ _ _ _ _ Full frame playback or thumbnail playba...

Page 24: ...nsation f 39 guide ej J f l Apply selection Display focus mode 36 menu or choose the option below For Playback Choose the previous picture I ttJ lliJ o Flash mode Choose the next picture For the Menu Screen Choose the option above 1 Display sub menu or I r apply selection Return display to e 12 I l the previous screen JJ l APPI selection or Choose the dIsplay sub menu option below Note on the Mult...

Page 25: ... o J Top tab Display the menus for the mode selected by the mode dial Middle tab Display the playback menu Bottom tab Display the setup menu Displayed when there are following menu options Displayed when there are previous menu options Press the button or the multi selector to proceed to the next set of options Press the button or the multi selector to apply the selection Switching Between Tabs Pr...

Page 26: ...ctronic viewfinder Switch to the one that suits the shooting conditions For example use the electronic viewfinder in bright locations when it is difficult to see the monitor Monitor i k Electronic viewfinder Diopter Adjustment of Electronic Viewfinder When the diopter for the electronic viewfinder is out of focus and the display is difficult to see adjust the diopter with the diopter adjustment co...

Page 27: ...re only I Information hidden Display only the taken picture 1 Available only when mode dial is set to p 5 A M U 1 or U 2 2 The brightest portions of the image portions that are highlighted will blink Use highlights as a guide when setting exposure 3 A graph showing tone distribution The horizontal axis corresponds to pixel brightness with dark tones to the left and bright tones to the right The ve...

Page 28: ...required to charge a fully exhausted br1ttery The following chart explains CHARGE lamp status 76 CHARGE lamp Blinks On Flickers Description charging fully charged The battery is not inserted correctly Remove the battery and reinsert it into the batter y charger so that the battery is lying flat The temperature is not suitable for usage Use the charger in a room with a surrounding temperature range...

Page 29: ...ety Oii thorou lhlybefore using the battery Be sure to read and fol ow the warnings for The Battery 0159 of the section iring for the Camera thoroughly before uSillg the battery If the battery will not be used for 2m extended period recharge it dt least Ollee ever y six mornhs and run it flat before returning it to storage ri Note on AC Power Supply To power the camera contilluously for extended p...

Page 30: ... the battery Use the battery to push the orange battery latch in the direction indicated by the arrow D and fully insel t the battery 2 When the battery is fully inserted the battery latch will lock it in place Inserting the Battery Correctly Inserting the battery upside down or backwards could damage the camera Be sure to confirm that the battery is in the correct orientation 3 Close the battery ...

Page 31: ... the power switch when the power on lamp green or the monitor is lighted up will turn off the camera When the camera is off holding down the EJ button will turn the camera on in playback mode I 30 It If Lens error is displayed check that the lens cap has been removed and turn the camera on again Auto Power Off while in Shooting Mode Standby Mode If 0 operations aloe performed for abou a minute def...

Page 32: ... on the camera The power on lamp jreerl will light for a rnornent and tile monitol will tum all Remove tile lens cap VI If rp 0 VI 3 Choose Yes and press the button If No is selected the date and time will not be set 4 Press the multi selector or to select your home time zone D140 and press the button Daylight Saving Time If d lyli Jht aVir1 J rime is in effect press the ITlulti selector in the ti...

Page 33: ...der in which the day month and year are displayed 7 Check that the lens cap is removed and press the button The settings are applied and monitor display reverts to shootirKj mode The lens will extend at thiS time Changing the Date and Time Select Date from Date OJ138 in the setup menu CJ 135 to change the current date clnd tirne and follow the procedure described in step 5 above Select Time zone f...

Page 34: ...off the camera before opening the battery chamber memory card slot cover 22 2 Insert the memory card Slide the rnernory card in correctly as shown on the riCJht until It clicks into place Close the battery chamber mernory card slot cover direr inserting the memory card Inserting the Memory Card Correctly Inserting the memory card upside down or backwards could damage the camera or the memory card ...

Page 35: ...a cannot be written to or deleted from the memory card If the switch is in the lock position unlock it by sliding the switch to the write position to record or delete pictures or to format the memory card Write protect switch I fLock i loci i I Memory Cards Use only Secure Digital mer nory cards 00 not perform the follOWing operations during formattillg while data is being written to or deleted fr...

Page 36: ...tor will turn on 3 Check the battery level and number of exposures remaining in the monitor Battery level M Uo7l Des ri ti NO r INDI ATOR a er ed _ ql IBattery level low prepare to charge or l replace the battery O ter Ircannot Sho r ge o r r e p h t Yd la fully charged battery ex aus e _ _ _ _ _ _ _ Battery level indicator Number of exposures remaining 24 Number of Exposures Remaining The number ...

Page 37: ... the flash setting is fixed to off and appears at the top of the monitor In situations where flash is needed such as in dark locations or when the subject is backlit be sure to raise the built in flash CD33 Functions Available in 10 Auto Mode In 0 auto mode focus mode 0 36 and exposure compensation 0 39 can be applied and pictures can be taken using the flash mode J 32 and self timer 0 35 Pressing...

Page 38: ...e the picture Position the main subject near the center of the rl1oni or 26 Using the Electronic Viewfinder Use the electronic viewfinder to frame pictures when bright light makes it difficult to see the display in the monitor Press the 101 button to switch to the electronic viewfinder CD14 When the diopter for the electronic viewfinder is out of focus rotate the diopter adjustment cmltrol to a po...

Page 39: ...oom quickly while rotating the control partially will adjust the zoom slowly ri Digital Zoom and Interpolation Unlike OptiG ll zoom digitai zoon uses a digital imaging process known as interpolation to r lagnify images resulting in slight deterioration of picture quality according to the image size 0108 and digital ZOOI1l magnification Interpolation is applied at zoom positions beyond 8 When loom ...

Page 40: ... focus area will glow green Press the shutter release button the rest of the way down 1he shutter will be released and the picture will be recorded to the memory card or internal memory Pressing the Shutter Release Button Halfway All the Way Down rhe camera features a two stage shutter release buttor1 To set focus and exposure press the shutter release button halfway stopping when you feel resista...

Page 41: ... halfway exposure is locked J utofocus may not perform as expected in the following situations In some rare cases the subject may not be in focus despite the fact that the active focus area or focus indicator glows green Subject is very dark Objects of sharply differirig brightrless are included in the scene e g the sun IS behind the subject and is in deep shadow No contrast between the subject an...

Page 42: ...at low resolution while being read from the memory card or internal memory Press the button or the shutter release button to switch to shooting mode When ll1J is displayed pictures stored in the internal memory will be displayed When memory card is inserted ll1J is not displayed and pictures stored on the memory card will be displayed Deleting Pictures 1 Press the ill1 button to delete the picture...

Page 43: ...os seconds in leng h _ _ _ _ ___ y _ _ O __ _ _ _ eEl Switch to shooting Press the eEl button or the shutter release f button to change back to the last chosen 30 mode shooting mode _ _ _ _ Pressing the lEJ Button to Turn on the Camera When the camera is off holding down the E button will turn the camera on in playback mode fhe lens will not extend Viewing Pictures Pictures stored in the internal ...

Page 44: ... Auto with red eye reduction Reduces red eye in portraits lI 34 l Off Flash will not fire even when lighting is poor Fill flash Flash fires when a picture is taken Use to fill in illuminate shadows and backlit subjects tti Slow sync Fill flash is combined with slow shutter speed Suitable for taking portrait images with the night landscape as the background Flash illuminates main subject slow shutt...

Page 45: ...nd press the button The icon for the selected flash mode is displayed at the top of the monitor When tRUTD auto is applied 1iJrnJijij is only displayed for a few seconds even if monitor indicators 2 15 are turned on If a setting is not applied by pressing the button within a few seconds the selection will be cancelled 2 Press flash mode The flash mode menu is displayed g U ll W u J lowering the Bu...

Page 46: ...ctor mode tRUTO auto the Celmera automatically choo es tile optimUtli flash rnode setting for the scene mode it has selected Q 32l sport continuous mode off Time lapse movie tRUTO Auto rhe flash mode seltirlg t auto with red eye reduction applied in 0 auto mode j J loreo ill the camera s memory even after the camera is turned off and reapplied the nex time 0 Clulo mock is selected For P S A and M ...

Page 47: ...e number of seconds remaining until the shutter is released is displayed in the monitor The self timer lamp will blink The lamp stops blinking U iJ m one second before the picture is taken and remains lit until the shutter is released When the shutter is released the self tinler turns OFF To stop the timer before a picture is taken press the shutter release button again 2 Use the multi selector to...

Page 48: ...ed for allY subject that is a distallce of 1 cm 0 4 in to infinity from the lens CD3S Choose a focus mode according to the subject and composition RF Autofocus Camera automatically adjusts focus according to distance to subject Use when the distance from subject to lens is 50 cm 1 ft 8 in or more or 1 7 m 5 6 ft or more when camera is zoomed all the way out Macro close up Use for close ups of flow...

Page 49: ...setting is not applied by pressing the button within a few seconds the selection will be cancelled Macro Close up In macro close up mode the camera will automatically repeat focusing The focus will lock by pressing the shutter release button halfway and exposure will be fixed However in P 5 A M U 1and U 2 modes the setting for Autofocus mode 0 125 will take priority and be applied Infinity If you ...

Page 50: ...he composure Continue pressing down fully to take the picture 3 Press the button to check the field of view The field of view and the enlarged center section of the picture will be displayed together Press the shutter release button at this POint to take the picture 4 Press the button iill is displayed at the top of the monitor and the focus is locked Pictures can be ta en using the locked focus T...

Page 51: ...ith the icon in the monitor To carleel the exposure compensation settirlg chcmge the value to 0 0 arid press the button Press the shutter release button to take the picture Pictures can also be tdken with a speCified exposure compensation value by pressing tile shutter release button after step 2 I Exposure Compensation Value for p S and A shooting modes the settinq for exposure comperlSatlon will...

Page 52: ...or and press the button Choose the tab when the scene menu is not displayed rn13 2 Setting the Scene Mode 1 Rotate the mode dial to SCENE VI J o o J lO VI C fl CL 0 J fl VI fl J fl V1 3 Frame the subject and take the picture or scene modes that use the flash be sure to press the flash pop up button to I aise the built in flash before shooting Image Quality and Image Size Image quality CD 107 and I...

Page 53: ...ink7 Screen I 150 for more information Digital zoom is not available Portrait I t I Off _ _ __A I f r _o c Other settings can be selected Landscape INRI Use this mode for vivid landscapes and cityscapes Camera focuses at infinity When the shutter release button is pressed halfway the focus area or focus indicator lIJ8 always lights green however focus may not be set for nearby subjects while the c...

Page 54: ...ection CD 144 is disabled J i I wr I Of T N r w _ _ _ _ A _ _ _ _ L 1 Fill flash with slow sync and red eye reduction Sc lf timel and l smile timer are available j Other settings cal be selected Party indoor Suitable for taking pictures in parties Captures the effects of candlelight and other indoor background lighting The camera focuses on the subject in the center of the frame Hold the camera st...

Page 55: ...release button is pressed halfway the focus area or focus indicator CDS always lights green however focus may not be set for nearby subjects while the camera focuses at infinity Motion detection 0144 is disabled AF assist illuminator does not light regardless of the I F assist 0145 setting Sunset I Preserves the deep hues seen in sunsets and sunrises The camera focuses on the subjec in the center ...

Page 56: ...focus When the zoom indicator is positioned where the 2J mark glows green the camera can focus on subjects as close as 10 em 4 in from the lens At the 6 zoom position the camera can focus on subjects as close as 1 em OA in from the lens AF area mode is set to Manual Press the button to choose the focus area in which focus is acquired 1Il122 The camera focuses continuously until focus is locked by ...

Page 57: ...ted 3 Other settings can be selected x1 Self timer is available 2 Other settings can be selected ifii Museum Use indoors where flash photography is prohibited for example in museums and art galleries or in other settings In whic you do not want to use the flash The camera focuses on the subject in the center of the frame BSS Best Shot Selector rnl18 is used when shooting As pictures are easily aff...

Page 58: ...le 1 rllrJUo close up can be selected V1 J o o l 1 0 V1 C QCopy Provides clear pictures of text or drawings on a white board or in print The camer a focuses on the subject in the center of the frame Use t rnacro close up mode OJ36 ill focus mode With this mode to shoot pictures at close distances Colored text and cJrawillCJs may not show up well ifj Backlight Use when light is corning from behind ...

Page 59: ...that will later be joined to form a single panorama using the supplied Panorama Maker software See Taking Pictures for a Panorama Q SO for more information I 0 0 xl 01her settings can be selected x2 5elf tinler is available 3 macro close up or Ai infinity can be selected VI o o 47 ...

Page 60: ...re the mark glows green the camera can focus on subjects as close as 10 cm 4 in from the lens At the 6 zoom position the camera can focus on subjects as close as 1 em 0 4 in hom the lens As pictures are easily affected by camera shake check the Vibration reduction IJ143 setting and hold the camera steadily AF area mode is set to Manual CD122 Press the button to move the focus area Press the multi ...

Page 61: ... release button halfway again Shooting in Scene Mode Lf r o o J 0 Lf C Note on Food Mode f lash mode is disabled Focus mode setting Q 36 is fixed at macro close up g White Balance Setting in Food Mode Increasing the amount of red or blue will decrease illumination effects Changing white balance in food mode will not affect White balance in the shooting menu OJ114 The white balance setting applied ...

Page 62: ...er in the completed panorama right left up 6 or down 7 The yellow panorama direction icon will move to the direction pressed so press the button to choose the direction A white panorama direction icon will be displayed in the chosen direction Apply flash mode 0 32 self timer 0 35 focus mode 0 36 and exposure co pensation 0 39 settings with this step if necessary Press the button again to reselect ...

Page 63: ...mera enters standby mode with the auto off function CJ 146 during shooling Setting the time allo lved to elapse before the auto off function is enabled to a longer time is recommended OOlE OOIf L exposure lock Indicator nlEtrn1 f is displayed to indicate that white balance exposure and focus have been locked at the values set with the first shot All pictures take in a panorama series have the same...

Page 64: ...Iii Close up 6 Landscape 6 Backlight 6 Night portrait Press the shutter release button halfway to set focus and exposure When the subject IS in focus the focus area active focus area glows green Press the shutter release button the rest of the way down to take the picture The Did someone blink screen may be displayed when the Blink warning option CD 149 in the setup menu is set to On default setti...

Page 65: ...hen B close up mode IS in use the camera will automatically focus on the area one of nine containing the subject closest to the camera This is similar to the Auto setting of AF area mode CIJ 122 II Flash Mode in Scene Auto Selector Mode tRuro auto default setting and off flash mode settings 0 32 ccm be applied When tRuro auto is applied the camera automatically chooses tile optimum flash mode sett...

Page 66: ... double border and the others by single borders Digital zoom IS not available Use the multi selector to choose l smile timer or t blink proof Q SSL and press the button If a setting is Iwt applied by pressing the button within a few seconds the selection will be cancelled 3 2 c o 3 Q L o o l lD 11 Q ro Vl 54 4 Press the shutter release button fully fhe camera beqins searching for smiling faces fiv...

Page 67: ...matically recognized and that smiling face will be detected Under some shooting conditions Face priority will not take effect and smiling faces cannot be detected See Shooting with Face Priority Ill 23 for more information about Face Priority Operation of the Self Timer Lamp for Smile Timer Blink Proof When the shutter release button is pressed in step 4 the self timer lamp will blink The lamp sto...

Page 68: ... mode changes to sport continuous rnode D f U il IT l Q Sport continuous fJ Pre shooting cache OFF Image quality NORM Image size Frame the subject and shoot The camera focuses on the subject in the center of the frame Up to a maximum of 45 frames can be taken continuously while he shutter release button is fully pressed down Press the MENU button and choose a continuous shooting type See Sport Con...

Page 69: ... or higher the camera may fail to obtain the proper exposure in fine weather pictures mJy be over exposed Exposure and white balance values may be unstable when shooting pictures under high speed flickering fluorescent lights or mercury lamps Note that shooting will stop if you raise or lower the built in flash while fully depressing the shutter release button The flash mode Q 32 is locked to of T...

Page 70: ...camera will start shooting once the shutter release button is pressed down half way and can save up to ten frames just before the shutter release button is fully pressed down Up to a nlaximurn of 35 Images can be recorded dLJI ing the period wher1 the shutter release button is pressed down fully This improves the probability of capturing acritical moment CD59 Image quality Image quality CD107 sett...

Page 71: ...ected an icon for the current setting is nor displayed Q S When rhe shutter release button IS pressed down halfway the pre shooting cache icon will glow ill green Press down halfway Press down fully Images recorded by pressing down halfway up to ten frames Images recorded by pressing down fully up to 35 frames V 0 0 l 0 J J C 0 C Vl s 0 0 ro Check the remaining memory capaCity before shooting Havi...

Page 72: ... _ _ v _ _ Settings that are frequently used for P 5 A and M shooting modes can be saved in mode dial U 101 U 2 Rotating the mode dial to U 1or U 2 enables you to shoot pictures using the saved settings that are used frequently 68 User chooses shutler speed camera selects apertul e for best results Shutter priority auto I 63 s M Manual I 65 Use to shoot fast moving subjects using a fast shutter sp...

Page 73: ...ficJure shows how shutter speed and aperture affect exposure When the ISO sensitivity setting CJ116 is changed the rCllige of shutter speeds and aperture values at which the correct exposure can Shutter speed be obtained also changes Fast shutter speed 1 1000 s Large aperture small f number f 2 8 Slow shutter speed 1 30 s Small aperture large f number f 8 0 VI r o o TI n C fD VI C VI to C CJ r s c...

Page 74: ...pears next to the mClde indicator p in the monitor I orate the command dial to the right for large apertures small f numbers that blur background details or fast shutter speeds that freeze motion Rotate the command dial to the lef for small apertures large f rlumbers that increase depth of field or slow shutter speeds that I_I blur motion ro restore default shutter speed elnd aperture settings lot...

Page 75: ...tter speed would result in the picture being over or underexposed the shutter speed display will flash wherl the shutter release button is pressed halfway Choose another shutter speed and try again At speeds slower than I 4 second the shutter speed Indicator will turn red to show that noise red uction CD 126 is recommended to reduce noise in the form of randomly spaced brightly colored dots Settin...

Page 76: ...r U11derexposed the aperture display will flash when the shutter relea l button is pressed halfway Choose another aperture value c nd try J9i1in Note on Shutter Speed When Multi shot 16 is selected for Continuous 118 the slowest shutter speed is restricted 10 1no second Aperture and Zoom I lperture IS expressed as an f number which is the lalio of the focal length of the lens to the effective c kl...

Page 77: ...1 Exposure display li 111 Overexposed 2 Press the multi selector to activate the aperture setting The degree of deviation in the exposure display is shown in EVs 2 to 2 EV in increments of 1 3 EV A display similar to that illustrated at right indicates that the picture will be overexposed byl EV 1 Rotate the command dial to choose the shutter speed value between 1 2000 second and 8 seconds When ad...

Page 78: ...ornatically selects the focus ared one of nine containing the subject closest to the camera CD 122 0 1 C ro V1 c V1 l lO 0 en s c OJ J Cl C N 66 Note on Shutter Speed When Multi shot 16 is selected for Continuous CD118 the slowest shutter speed is restricted TO 1 0 second Note on ISO Sensitivity WhelllSO sensitivity QJ116 is set to Auto default st lllllq High ISO sensitivity auto or Fixed range au...

Page 79: ...Auto bracketing OJ 121 AF area mode CD 122 Autofocus mode CD 125 Flash exp compo CD125 NR Noise reduction CD 126 Distortion control CD 126 flO Active D Li Jhting CD70 The currellt flexible program when set to p shutter speed when set to 5 and M or lpelture when set to A and M SettiliCJs will be saved 2 The currellt focus distance will be saved when set to MF manual focus j The preset value for pre...

Page 80: ...tly used setting 3 Press the MENU button The shooting menu is displayed Choose the P S A M U 1or U 2 tab when the shooting menu is not displayed IJ13 4 Use the multi selector to choose Save user settings and press the button If 0 0 ri 0 n ri C 5 1 VI c VI J I Q CJ en l s c Q J 0 C I 68 Choose the destination to which to save and press the button The current settings will be saved The settings in t...

Page 81: ... Settings The saved setting will revert back to the default setting of shooting mode P 1 Choose Reset user settings in the shooting menu screen and press the button 2 Choose the destination to reset and press the button The saved settings have been reset Vl J o o 0 n c 1 Vl C Vl J lQ C en t c ClJ J Q C I 69 ...

Page 82: ...come appropriate The setting for Metering CDI17 will change to Matrix when shooting with ctive D Lighting Ihe Contrast setting for the optimize ima Je options Custom CD112 and Black and white OJ113 Custom will be chanqed to Auto If thr ISO sensitivity CD 116 is set to High ISO sensitivity auto or to 1600 and dbovt the settillCj for A ctIW D Lightin9 will change to Off Active D Lighting Versus D Li...

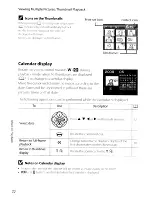
Page 83: ...isplay of thumbnails W In calendar displ Jy the images can be selected displayed Calendar according to date by moving the cur or display Q 72 Rotate towards the T q direction to return to thumbnail display Rotate the zoonl control towards the T C Decrease number of direction to decrease the number of picture thumbnails T C thumbnails from 16 9 4 Rotate towards T C again during 4 displayed thumbnai...

Page 84: ...sor and choose the image according to the date Dates will be underlined in yellow if there are pictures taken on that date 2009 05 72 The following operations can be performed while the calendar is displayed _ _ _ _ _ _ _ _ _ _ _ _ _ _ _ _ _ __ __ _ _ _ M M __ _ t _M To Use Description Irn _ _ __ _ _ _ _ _ _ __ _ _ _ t ia i 2 iPress or on the multi selector I 12 Select date I _ _ _ L _ _ _ _ _ _ _...

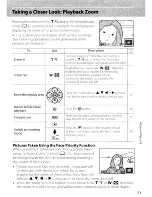
Page 85: ...on visible in the monitor Press the button Press the multi selector at 1 or to move the display area to other areas of the picture MENU Crop picture Move the display area __ __ __ __ _ __ 1 _ f A _ _ r Return to full frame playback 30 _ C1 Press the button or the shutter release button to change back to the last chosen ce shooting mode Switch to shooting mode Pictures Taken Using the Face Priority...

Page 86: ...iting functions cannot be used for pictures taken with another make or model of camerd If a copy created using this camera is viewed on another make or model of camera the picture melY not he displayed or r ay not be transferred to a computer Editing functions are not available when there is not enough free space in the internal memory or on the rnemory care Restrictions on Picture Editing 2nd edi...

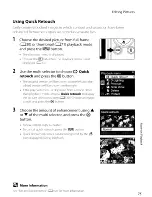
Page 87: ...and press the button The original version will be shown on the left and the edited version will be shown on the riqht If the playback menu is displayed from a mode other than playback mode choose Quick retouch to display the picture selection screen CD 130 Choose an Image to edit and press the button Choose the amount of enhancement using or T of the multi selector and press the button A new edite...

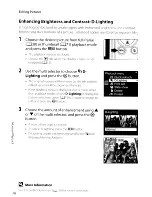
Page 88: ...lti selector to choose g 0 Lighting and press the button The original version will be shown on the left and the edited version will be shown on the right If the playback menu is displayed from a mode other than playback mode choose D Lighting to display the picture selection screen I 130 Choose an image to edit and press the button 3 Choose the amount of enhancement using or of the multi selector ...

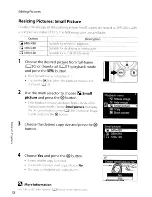
Page 89: ...dscape orientatioll Next enlarge the picture for cropping crop the picture and therl rotate the cropped picture back to tall portrait orientation 77 4 Use the multi selector to choose Yes and press the button A new picture containing only the portion visible ill the monitor is created To carleel creating a cropped copy choose No Image Size As the area to be saved is reduced the irildlle size pixel...

Page 90: ...layback mode and press the MENU button Ihp playback menu is displayed loose the E tab when the playback menu is not cllsplayed CD 13 78 2 Use the multi selector to choose Small picture and press the button If he playback meliU is displayed from a mode other han playback mode choose Small picture to display the picture selection screen aJ 130 Choose an image 10 edit and press the button 3 Choose th...

Page 91: ...e other than playback mode choose Black border to display the picture selection sueen CD 130 Choose an image to edit and press the button Playback menu Rotate image f5i Hide image 5 Small picture Cil Copy 3 Choose the desired thickness of frame and press the button 4 Choose Yes and press the button A new copy with a black frarne is created To cancel creating a copy with black border choose No Blac...

Page 92: ...mos can be recognized by the IillI grn icon Use the zoom control T q or W during playback to adjust the volume Deleting Voice Memos Choose a picture with a voice memo and press the 1ID button Use the multi selector to choose and press the button Only the voice merno will be deleted Notes on Voice Memos 80 When fJieture with c1 voice memo eJrtclchecJ is deleted hoth the pidulE dncl its voice memo a...

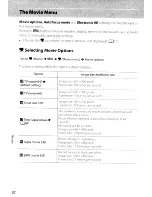
Page 93: ...on settings cannot be applied or chonged while movies are being recorded Apply or change settings as necessary before movie recording begills Optical zoom canllot be adjusted once movie recording beSjins Digital zoom Cimnot be applied before mOVie recording begins However digital zoom up to X Cd be applied while movies other thall time lapse Il lovies are being recorded With the exception of time ...

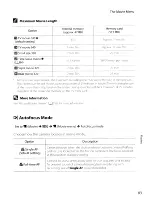
Page 94: ... setting Frame rate 30 frames per second 1m TV movie 640 IrTiage size 640 x 480 pixels Frame rate 15 frames per second ___ _ _ _ __ 4 _0 11 Small size 320 Image size 320 x 240 pixels rne rate 15 frames per second camera automatically shoots pictures at intervals and joins them into a movie Ii Time lapse movie Record flowers opening or butterflies ernerging from C084 cocoons No sound will be record...

Page 95: ...ning length of the movie that IS displayed on the screen during recording will be a maximum of 25 minutes regardless of the remainin memory on the memory card More Information ee File and Folder Names CJl 56 for more information Autofocus Mode Set to Movie MENU Movie menu Autofocus mode Choose how the camera focuses in movie mode Option Single AF default setting Description Camera focuses when the...

Page 96: ... current setting is displayed in the monitor 08 Vibration Reduction for Time Lapse Movies fo enable or disable viLJration reduction while shooting 111 Time lapse movie mode use the Vibration reduction settinq D143 in the setup menu Il135 Time Lapse Movies Record flowers opening or butterflies emerging from cocoons 082 o ro VI 84 1 2 Use the multi selector to choose Movie options from the movie men...

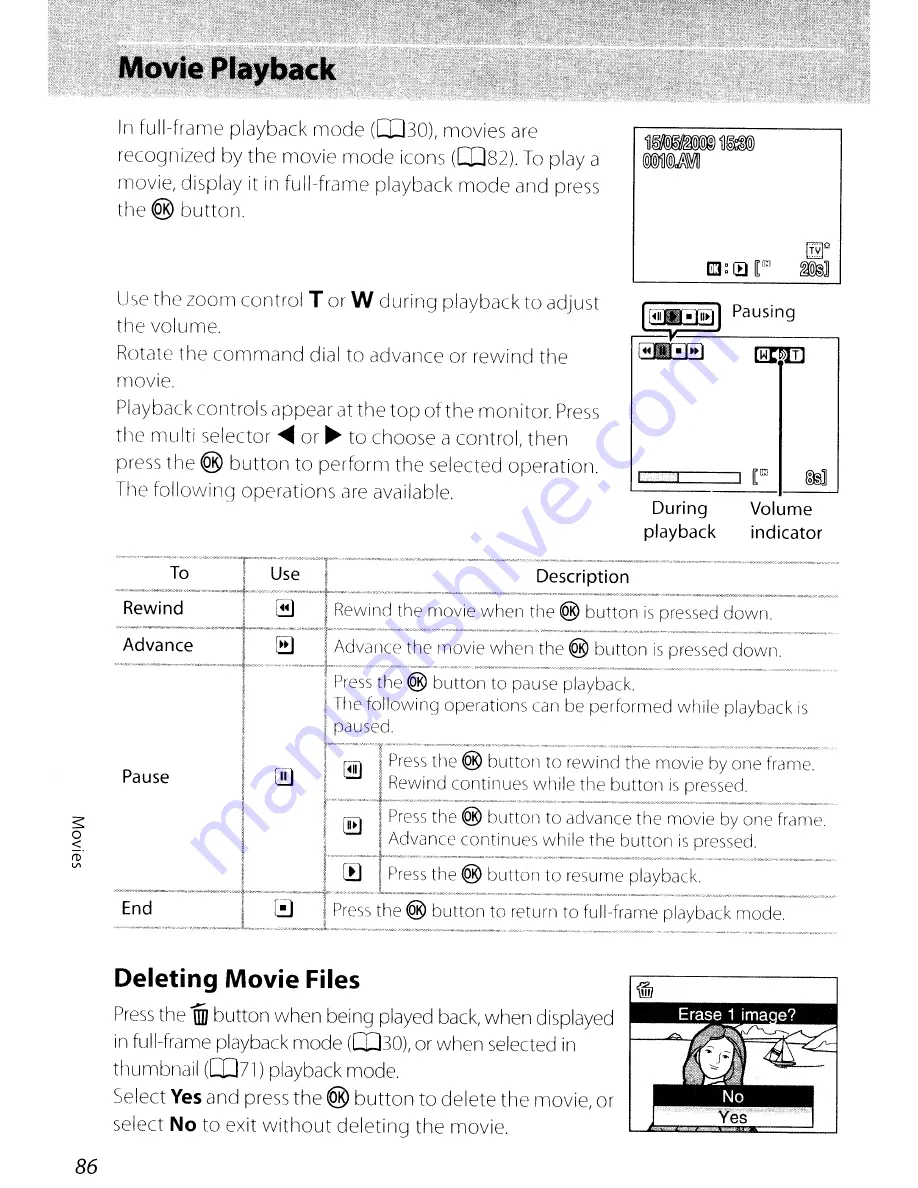
Page 97: ...ve been recorded A 1800 frame movie has a playback time of 60 secorlds Time Lapse Movie Flash mode 32 focus mode 36 and exposure compensation JJ39 cannot be adjusted after the first picture is shot The second picture or later will be shot with the same seltlrlCjs Apply the appropriate settings before shooting begins To prevent the carnera from turnrng off urlexpectedly durlrlg recording use a full...

Page 98: ...ed down w _ _ I Advance EJ Advance the movie when the button is pressed down _ _ _ a M _ _ _ _ I Press the button to pause playback The following operations can be performed while playback is I paused I Press the button to rewind the movie by one frame Pause ReWind continues while the button IS pressed h _ ___ _ _ _ __ _ o_ _ y _______ _ _ B Press the button to advance the movie by one frdme Advan...

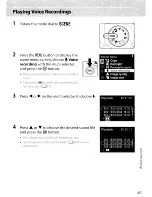
Page 99: ... start recording The power on 1 HTlp ICJhts durillCJ i t cmdinlj If 110 Opt rations ale pelforilled for dbout 30 seconds after voice recording begins the calTlera s power saving fUI cticm is ella bled allC the monitor turns off I ress the DISP button to light lip the lilonitor See Operations During Recording Q SS for more ir form tion 4 Press lllIIII or to choose on the operation panel and press t...

Page 100: ...ile recording is paused Press or on the multi selector Indexes rnake it easy to locate desired portions ot a recording Start ot recording is index number 01 other numbers that tollow are assigned in ascendilig order each time the multi selector is pressed up to index number 98 o n 1 0 1 n o Q J l D VI 88 fht cU lied files can be played back usin 1 Quickf irl e or any other WAV llilipatible audio p...

Page 101: ...voice recording screen Choose the SUNI tab when tilt scene meliU is not displayed 0 13 3 Press or on the multi selector to choose 001 15 05 200917 30 I 003 26 05 2009 13 00 D 4 Press or T to choose the desired sound file and press the button The selected sound file will be piayed back See OperatiorlS During Iayback Q 90 for liore information Playback 00 03 12 o I D Xl j o 0 J 1 0 V 89 ...

Page 102: ...vvincJ the voice IP l Hclil whell the bUlla ie prl ed dmvrl Aclv lIlCe the VOIU rcc mdinq when Ihe hLJtlUll is Ilit SSl cl down Press the buttol lu skip to the previouc illCiex Pless lI1 buttcm to kip 10 11w Ilex index Press the buttOll tu pause playbcKk f lc s the button I resume playbClck while playoclCk i pdu d Ilres the bunotl tl etiCJ playbdck o n J JJ J n o Q J lQ Vl 90 Deleting Sound Files ...

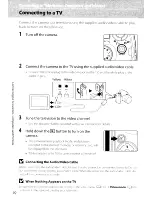
Page 103: ...m memory card to internal rnernory 3 Select a copy option and press the button Selected files proceed to step 4 Copy all files pmceed to step 5 4 Choose the data to be copied Press the muiti selector to select the file Press the multi selector again to cancel the selection iViultiple files can be selected Press the button vvhen setting is complete 5 When a confirrnation dialog is displayed choose ...

Page 104: ...ion to the video channel 4 Hold down the EJ button to turn on the camera The camera enters playback mode and pictures recorded to the internal memory or memory card will be displayed on the television While connected to the TV the camera monitor will remain off Connecting the Audio Video Cable When corll1ceting the audio video cable be sure that the connectors drc orientecJ c orrectly Do no lN far...

Page 105: ...c Home Prelilium c5usiness Enterprise Ultimate editions Service Pack 1 VVindows XP Home Edition Professional Service Pack 3 Macintosh Mac OS X version 10 3 9 10 4 11 10 5 5 f efer to the Nikon website for the latest information on operating system compatibility I Notes on Power Source When connecting the camera to a computer or printer use a fully charc ed battery to prevent the camera from turnin...

Page 106: ... click Nikon Transfer Copy pictures to a folder on my computer and click OK Nikon Transfer will start To bypass this dialoq in the future check Always use this program for this action Mac OS X Nikon Transfer will start automatically if Yes was selected in the Auto Launch setting didlog when Nikon Transfer was first installed 4 Turn on the camera n o J J ro n o ro rtl Vl o J Vl n o 3 D C ro Vl nJ J...

Page 107: ...tart Transfer button The folder to which pictures are trarisferred is automatically opened when transfer is complete at the N kon Transfer default setting If ViewNX has been installed ViewNX Ivill start automatically and you can view the pictures tralisferred For more Inforrnation on using Nikon Transfer or ViewNX refer to the help information contained in Nikon Transfer or ViewNK 6 Disconnect the...

Page 108: ...o Open Image Sound Files f j lVIC lte to the fulcJc r tu which pictures were saved Jnd open rl picture in the viewer supplied Vitil your perdlill J yst m JouncJ files Cdrl he played bdCk L1sinq OuickTime or any other WAV compatiblt audio player Panorama Creation with Panorama Maker lJ e 1 erles of picturl s taken usin thp Panorama assist optiun ill scene mode 047 to creale d sinqle panorama rhoto ...

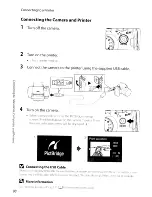
Page 109: ... 10 power the camera continuously for extended lJeriods use the AC Adapter EH 62A available separately frmn Nikorl Do nut under any circumstances use Jnother make or model of AC adcipter Failure to observe this precaution could result in overheating or In damage to the cameri1 Printing Pictures In addition to printing pictures transferred TO a computer cHid prlmirl over d direct cdmer a to prirner...

Page 110: ...en 1 will be displayed in the camera monitor Tiler the print selection screen will be displayed 2 J to o i J J VI g 4 Turn on the camera VI Connecting the USB Cable Nhen COIll1f cting the U B cable be sUIe that the connector clrE oriel1ted correuly Do I ot use for _t 1 11 1 i cOlmecllIKJ tile LN3 cable WlIt I1 cJisc nllectlnc the lY 3lJble do not pull the UJl1flcctor 11 an anqle More Information S...

Page 111: ...to T q to switch back to full fr Jme playback 2 Choose Copies and press the button Printing Pictures One at a Time flJter connecting the camera to the printer correctly IJ98 print pictures by following the procedure below 1 Use the multi selector to choose the picture to be printed and press the button 5 Choose the desired paper size and press the button Paper size Default To specify paper size us...

Page 112: ...r size and press the button 10 exit the print menu press the MENU button Printing Multiple Pictures After connecting the camera to the prin er correctly OJ 98 print pictures by followlIlg the procedure below 1 When the print selection screen is displayed press the MENU button o t rtl rtl lJ o J lJ l o 3 D C rtl II 1lI J Q u J lD 3 Choose the desired paper size and press the button Paper size Defau...

Page 113: ...lltecJ A check Ilklrk IS nOl displayed with pictures for wh ch no copies have been specified and these pictures will not be prilited Rotate the zoom control to T q to switch to full frame playback or W to switch to 1 2 thumbnails display Press the button whell setting is complete The mellU shown at right will be displayed fa print choose Start print arid press the butlon Choose Cancel cHid flless ...

Page 114: ...e View images amJ IJrt the button 10 irint pictules pre the button again 5 Printing starts Monitor di ipldy retuill to th lt shown in step when print ilK is complete 10 meel befole edl copit hdvc l en printed press the rJu1tCJIl DPOF printing prints Start rinf View images Cancel Current print total number of prints 102 Paper Size rII dll 1 1 lq J lllC t I foliuwinq l dpC 1 i7E Default 1111 ckLllil...

Page 115: ... n t 703 4 Choose the pictures up to a maximum of 99 and number of copies up to nine per picture Press the multi selector or to choose the pictures and press A or to set the number of copies for each Pictures can also be chosen by rotating the command dial Pictures selected for printing can be recognized by the check mark icon and the numeral indicating the number of copies to be printed Acheck ma...

Page 116: ...ot be printed when the camer l is cOrlilecred dir ectly to a printer viri the supplied USB cable for DPOF printing OJ1 2 Date ind Info are reset each tinle the Print set menu is displayed_ Deleting All Print Orders Choose Delete print set in step 3and press the button Print orders for all pictures will be deleted Note on the Print Set Date Option The dale cHid time printed on the pict re is the da...

Page 117: ...vity to light Metering Choose how the camera meters exposure Continuous D108 COlll COl14 CDl16 CDll C0118 Change settings for Continuous continuous shooting and BSS Best Shot Selector OKr NR Auto bracketing Vary exposure over a sequence of pictures AF area mode Choose where the camera focLises Autofocus mode Choose how the camera focLises Flash expo camp Adjust nash level Noise reduction Reduce no...

Page 118: ...mmed Auto S Shutter Priority Auto A Aperture Priority Auto M Manual or U 1 U 2 by rotating the mode dial Press the MENU button and choose a tab from P S A M U 1or U 2 to display the shooting menu lIll3 l r o o 706 Press the multi selector to select items and set functions on menus lIll2 Press the MENU button to exit the shooting menu Functions that Cannot Be Applied Simultaneously Some fUIlCtions ...

Page 119: ...ge quality compression of 1 8 suitable for most applications BRSIC Basic Basic image quality compression of 1 16 suitable for pictures that will be distributed by e mail or used in web pages The icon for the current setting is displayed in the monitor in shooting and playback modes mS 9 Notes on the Image Quality Setting Changes made to the image quality setting apply to all shootirlg ilodes excep...

Page 120: ..._ c _O _ _ _ _ _ _ _ 2048x1536 1600x1200 Srnaller than 4000x3000 3264x2448 and 2592x1944 for recordinc more pictures 1280x960 1024x768 Record pictures sUitable for display on a computer r1lOnitol 640x480 Record pictures suitable for display on ij television or for distribution via e mail E3 3984x2656 Record pictures with the same aspect I atio 3 2 de those shot with 35 mm film cameras 3968x2232 Re...

Page 121: ...8 34x25 1 3x 10 2x 16 85x65 r 19C 375 30S 590 1115 Memory card 1 512 MB 80 lGO 320 120 240 70 I 31 60 114 FinC I Jormal Basic Fine Norrnal Basic Fi iE Norlncll Basic Fine Norr nal Bl1Sic Image quality Image size 2048x1536 2592x1944 3264x2448 4000x3000 default setting 1600x1200 fine Nor 11al Basic 50 q6 171 405 94 1675 14x10 Sx4 1280x960 r i lie Normal BdSic 140 56 1310 2515 11 x8 4x3 I f Y o o 5x4...

Page 122: ...tting images printed at hi lhcr Icc ollitions will print smaller thall the size indicclted and those printed at lower I esolutions will print Inrger than the sizE irldicated 3 rhis image size is used when Continuous H 16 9 is chosen tor the High speed mode option in the port Continuous Mellu Printing Images of Size 1 1 ChangE the printer set ling to Border when prjntin J imaqes of size set to 1 1 ...

Page 123: ...e crisp images with sharp outlines Cr 3 Portrait Lowers contrast while lending natural texture and rounded feel to skill of portrait subjects Custom Customize image optimization settincjs CD 112 Black and white Shoot photos in black and white OJ113 I t settings other than Normal the indicator for the current optimize image setting is displayed in the monitor during shooting lII8 I Optimize Image I...

Page 124: ...g I o Normal 2 Low 1 Medium low 1 Medium high 2 High Saturation or trol the vividness of colors Choose moderate for le s saturated colors ellhanced for rnore vivid colors lhe default setting is Auto Image sharpening CI loose how rnuch outlines dre sharpened during shootin J _hoose high settings for sharp outllrles low settings for softer outlines The default setrirl J is Auto V1 7 o o t Note on Co...

Page 125: ...he following options can be adjusted in Custom Contrast Same as Optimize image Custom Contrast CD 112 Image sharpening Same as Optimize image Custom Image sharpening CJ 1 2 Monochrome filter This effect Simulates black and white photography With a color filter Yellow Orange Red nhance corltrast Cali be used to toile down the brightness of the sky in larldscape photographs Oralige filter results ir...

Page 126: ...der most types of lighting you can apply the white balance setting suited to a particular light source to achieve more accurate results RlflO Auto default setting White balance automatically adjusted to suit lighting conditions Best choice in most situations PRE Preset manual Neutral colored object used as reference to set white balance under unusual lighting conditions See Preset Manual CD115 for...

Page 127: ...te balance menu and press the button The camera lens extends to a position that is half of the camera s maximum optical zoom Reference object frame s Press the button to measure the white balance value The shutter is released and the new white balancevalue is set No images are recorded V1 Y o o j4 Frame the reference object To use tile most recently measured value for preset manual choose Cancel a...

Page 128: ... ISO 64 200 or ISO 64 400 The camera will not raise sensitivity beyond the maximum value in the selected range Set the maximum value for ISO sensitivity for effective control over the amount of grain that appears in images In M manual mode sensitivity will be fixed at ISO 64 if Fixed range auto is chosen 64 100 200 400 800 1600 3200 6400 ISO Sensitivity will be locked at the specified value At set...

Page 129: ...that subject in metering target is correctly exposed even If background is much lighter or darker Ensure that the subject is within the area shown by circle when shooting Can be used with focus lock 029 to meter off center subjects ttl Spot AF area Camera meters selected focus area Available only when a setting other than Center IS selected for AF area mode CD 122 Vl Y o o I Notes on Metering When...

Page 130: ... without the flash with the camercl zClolned in or In other situcHions in which camer a shake is likely to blur pictures The carnera takes up to ten images while the shutter release button is held down The sharpest imaqe image with the most detail in the series is automatically selected and saved I l J Multi shot 16 Each time shutter release button is pressed camera shoots 16 pictures at about 7 5...

Page 131: ...sun or electric lights 3rc captured when shooting with the Multi shot 16 option vertical streaks of light may appear in the recorded Images We recommenc that you avoid capturing bright objects when shooting with t he Multi shot 16 option Note on Shutter Speed When Multi shot 16 is selected for Continuous the slowest shutter speed available is reduced to 1130 second Interval Timer Shooting Images a...

Page 132: ...he internal memory or memory card becomes full or when the rriaximuni amount of frames have been recorded Notes on Interval Timer Shooting To prevent the camera from turning off unexpectedly durin J recording use atully charged battery To power the camera continuously for extended periods use the AC Adapter EH 62A available separately from Nikon Do not Wider any circumstances use another make m mo...

Page 133: ...ully pressed 7 O 7 Camera varies exposure by 0 EV O 7EV and O 7EV over next three shots The three shots will be taken in sequellce when the shutter release button is fully pressed tl O 1 0 Camera varies exposure by 0 EV 1 OEV and l OEV over next three shots The three shots will be taken in sequence when the shutter release button is fully pressed OFF Off default setting Bracketing is not performed...

Page 134: ...table areas L r Choose the focus position from 99 areas in the screen rhis option is suited to situiJtions in which the intended subject IS relatively still and not positioned ifI the cerlter of the frame Press the multi selector A or to select one of 99 focus areas displayed ill the monitor s focus area selection screen and shoot To end focus area selection and adjust the flash nlOde focus mode s...

Page 135: ...2 is chosen When 1 smile timer or t blink proof is set 54 1 Frame the picture When the camera detects a face looking toward the carllera thelt face will be frclmed by a yellow double border When the camera detects more than one face depending upon the shooting mode the operation varies as follows Shooting mode Faces framed by a double Number of faces to be border recognized Auto mode Face priority...

Page 136: ...l automcltically switch to Auto if 110 face is detected when the shutter release button is pressed halfway If no feKe is recognized when the shutter release button is pl essed halfway in the Portrait or Night portrait scerle modes the camerd will focus on the subject in the center focus area The camera may be unable to detect faces in the follOWing situations When faces are partially hidden by sun...

Page 137: ...ENU P S A M shooting menu 05 Flash expo compo Flash compensation is used to adjust flash output by 2 0 EV in increments of 1 3 EV changing the brightness of the main subject relative to the background 0 3 to 2 0 Flash output is reduced from 03 to 2 0 EV in increments of 3 EV to prevent unwanted highlights or reflections 0 0 default setting Flash output is not adjusted 0 3 to 2 0 Flash output is in...

Page 138: ...hutter speeds Multi shot 16 cannot be used when noise reduction is set to On When noise reduction is performed the OORJ icon is displayed in the monitor during shooting CDS Distortion Control Set to P 5 A or M MENU P 5 A M shooting menu CDl 05 Distortion control Specify whether or not the distortion is corrected Enabling distortion control reduces the size of the frame as compared to distortion co...

Page 139: ... used if B W color is enabled for the Black and white option of Optimize image Focus mode When l smile timer or blink proof is set while the focus mode setting is set to infinity macro close up or ME the focus mode setting will be changed to RF When Face priority is selected for AF area mode setting focus 1T lode to infinity changes the AF area mode setting to Auto Selecting an option other than i...

Page 140: ... the brightness when shooting mode P 5 or A IS used The setting for ISO sensitivity will be fixed at 400 for shooting mode M When an option other than Multi shot 16 is selected for Continuous the original settings for Image quality Image size and ISO sensitivity will be restored Auto bracketing When an option other than Off is selected for Auto bracketing the setting for Continuous will be changed...

Page 141: ...card in an automatic slide show Delete CD 132 Deiete selected or all pictures Protect IJ132 Protect selected pictures from accidental deletion Rotate image IJ133 Change the orientation of an existing picture Hide image CD133 Hide selected pictures during playback Small picture IJ78 Create a small copy of the current picture Copy CD134 Copy files between memory card afld internal memory Black borde...

Page 142: ...lack border1 J 79 Setup menu Welcome screen CD137 fhe will be displayed if menu items are selected when the playback menu ha been displayed from cl mode other than playbcKk rnode OJ 13 Follow the procedure described below to select pictures 1 Press the multi selector or to choose the desired picture The comrlland dial can also be used in place of pressing or 0 the multi selector Only one picture c...

Page 143: ...check mark v will be added to the loop option when enabled 2 The slide show begins While the slide show is iii progress the followillg operations can be performed Press the multi selector to view pictures in the order recorded or to view pictures in reverse order Press arid hold to fast forward or to rewind Press the button to pause the slide show Choose End or Restart When the slide show ends or ...

Page 144: ...important irnages to 1 computer before delctlcJn Pictures rnarked wilh the iii icon are prorec ed and Cdnnot be deleted 0 Protect Press the MENU button eEl Playback menu lI 129 Ow Protect Protect selected pictures from accidental deletion Select the picture and apply the settirlg in the picture selection screerl see Selecting Pictures CD 130 for more information Note however that formatting the ca...

Page 145: ...te image screen Press the multi selector or to rotate the picture 90 0 MENU Rotate 90 clockwise Press the button to set the orientation displayed and save the orientation data with the picture Hide Image Press the MENU button E Playback menu 0 129 Hide image Hide selected pictures during playback Select the picture and apply the setting in the picture selection screen see Selecting Pictures OJ 130...

Page 146: ... cannot be copied If voil c memos JJSO are attached to pictures seleeteci for copyinq voice memos are copied with the pictures Sound files recorded using voice recordinC 0 87 Cdn be copied using the Copy sound files option 091 Pieturt s recorded with another make or model of cam ra or that have been modified on cl Olilputer CclrH10t be copied Ec1ited Lopies have lhe same protection miHking Q 132 a...

Page 147: ... whel1 ShootllK still pictures Adjust setting rH cc ssciry for cmnecticm to TV Blink warning I 149 CI100se whetl1er or IlOt to detect blirlkillC hUITlclll subjects whell hootinq piCTures usi feKe pliorlty AF assist f nz lble or disable AF assist illuminatic I1 Digital zoom Enable or disable drc itzil loom Sound settings Adjust sound e1tin l o Auto off Set tinle before Cdnwrd ellters standby rnode ...

Page 148: ...selectable Date Monitor settings Date imprint OFF Vibration reduction I Motion detection OFF VI r o o r 736 3 Press or T to select the Vtab 4 Press or the button The setup rYlerlU items will be selectable Press the multi selector to select items and set functiolls orl menus aJI2 10 exit the setup menu press the MENU button or to select the shooting or playback tabs Set up Welcome screen ...

Page 149: ...cry or 011 the rnernory cald for the welcome screen Choose a picture ill the picture selection screen CD130 and press the button As the selected picture is stored in the camera the picture will appet lr in the welcome screen ever if the originJI picture is deleted Pictures shot with Image size 0108 of E3 3984x2656 3968x2232 md 12992x2992 and pictures shot on Continuous H 16 9 settinq 058 cannot be...

Page 150: ...llowing controls to set the date and time highlight adifferent item day r1iOlith year hour minute and the order in which day rllOnth and year are dlspli 1yed edit the highlighted item button apply he setting Time zone b horne time zone can be specified and daylight savinCJ enabled or disabled flam tirne zone options When travel destination is selected the time difference aJ14U between the horne ti...

Page 151: ...con will be displayed in the monitor when the camera is in shootinCj rnode 4 Press or to choose the travel destination time zone The Backup Battery he carner a inte ndl clock USE S J different battery from the cJmera s battery fhe bcKkup battery charges when the main battery is installed or the AC adapter is conllccted and provides several days of backup power after about tell hours of charging b ...

Page 152: ...T Los Angeles Seattlel Vancouver MST MOT Denver Phoellix CST CDT Chicago Houston Mexico City EST EDT New York TOlonto Lima Caracas Manaus UTe 11 2 t3 4 5 t 5 5 6 7 Location Nc lirobi Riyadh Manama bi Dub li Islamab ld Kar achl New Delhi Colornbo Dhaka Bangkok Jakarta 1 7 o o 740 2 1 to Buenos Aires Sao Paulo Femcmdo de Noronha Azores LondcHl Casablanca 18 9 10 f 11 12 Beijing Hong Kong Singapore T...

Page 153: ...tings for the options below Image review On default ettin J Picture is automatically displayed in the monitor immediately after it is takerl and the monitor display r eturns to shooting mode Off Picture is Ilot displayed after it is taken Brightness Choose fronl five settings for monitor brightness The default setting is 3 747 ...

Page 154: ...of imdqe ddtd Hid CdIHlUl be CJcIC ICd dle Impi ilned dtclnlmage size 0 I08 settill J 01 c Y 640x480 l1 k1Y be diffiLult lo r tid Ci 1CXN 1024x768 or Idlqcr whpn uSln dale imprint 1 he Llll is recorded u illC lhe lorrll ll selelwd in till c etup Im rw s Date optl I I O 118 d e mrll bE 11l1llrliited III t followinq SiWdlioll 101 hi Whell Museum or Panorama assist is selected fOI scerlC modc Wlll rl...

Page 155: ...tically vibration reduction clffect only horizontal shake Off VibrCJtion reduction is not enabled VVhen vibration reduction is enabled the current setting is displayed during hooting when Off is selected an icon for the current setting is not displayed DS Notes on Vibration Reduction VibrLltion reductiol rlOy tClkC 1 ew seconds to ilCtivJte elftel the powt I is turned Oil 01 the ClIner enters shoo...

Page 156: ...en shooting modes P S A M U 1or U 2 is used When sport cOlltinuous mode is selected Off default setting Motion detection will not be applied When rnotion detection is enabled the current setting is displayed during shooting when Off is selected an icon for the current setting is not displayed 8 The motion detection icon will glow green when the camera detects any vibration and increases the shutte...

Page 157: ... in to the maxirnum optical ZOOITI position rotc1til J and holding the zoorn control at T Q triggers di Jital zoom CD2l Crop Limit digital zoom to the range at which image quality does not degrade Off Digital zoorn will not be activated except when shooting a rilovie Notes on Digital Zoom When digital zoom is iii effect AF area rnode is set to Center 012 n Digital zoom Callrlot be used in the ioll...

Page 158: ...ftime the monitor will tum off and the camera enters standby mode I 19 to reduce drain on the batteries The power Oil lamp blirlks in standby mode If 110 operations are performed for another three minutes the camera will turn off automatically Choose the time allowed to elapse before the camera enters standby mode if no operations are performed from 305 1 min default setting 5 min and 30 min rat C...

Page 159: ... the memory card is inserted in the amera the Format card option appears in the setup menu Formatting Internal Memory and Memory Cards Format card All images will be deleted OK No Format rOrtTl ttil1Cj lht irlterrl 1ll11e1flmy Or 1l1e rl Ory l H S pC I l1i Hk lltly deletl s 111 tlL I k We to lldll 1 ilnporlarit pictules to d cornpulel IH lme Inllllc1 tlll i Uo 110t tU111 t 1Incr I ott ell lOllIWl ...

Page 160: ..._ __ _ o _ _ _ _ _ 3t nl Traditional Chinese Polski Poli h _ _ _ _ _ _ _ _ v _ _ m Portugues Portuquese _ _ _ w lo1M i s Suomi Finnish default setting Spanish Fre ch Ilidonesian Italian Czech Danish C erman EAAIlVIKO Indonesia Italiano Fran ais Deutsch English Espanol Cestina Dansk Magyar Nederlands Hungaric m Dutch Japanese Korean Norsk Norwegian h w _ III Video Mode Press the MENU button Y Setup...

Page 161: ... have closed his her eyes is framed by a yellow border You call check the picture taken cHid determine if you need to take the pict re again See Operating the Did someone blink Screer IJ 150 for more Information Off Blink warnlrl doesn t take effect Notes on Blink Warning The camera does not perfurll1 bli ik warning ill the followinq elses When l l smile timer 05 1 i u eci When Continuous BSS Mult...

Page 162: ...omaticdlly returns to the shooting mode iueen To Enlarge and display the detected face Return to full frame playback Use W Description Rotdtc the ooln contrul to T q RotcHE the oorn Ontrollo W VI r o o l 0 U Q J 0 Q J n r Q J l 0 VI ro c u 5 ro l c VI 750 Select the face to be displayed Delete the picture taken Return to shooting mode mJ If the CcllllcrJ detects rnore thall olle hurndll ubje I bli...

Page 163: ...0 36 _ t Exposure compensation 0 39 0 0 Center _ _ _ _ White balance in food mode 0 48 I _ __ _ Shooting in the Scene Mode _ _ _ _ _ _ _ _ T Option Default value _ _ _ _ Scene menu 0 40 Portrait l Movie Menu Off 30 s Normal Default value Default value 2048x1536 TV movie 640 _ __ _ _ _ _ __ _ Option _ _ h W _ w__ _ _ _ y _ ___ Movie options 082 _ _ _ _ _ __ _ Y o _ _ v _ x W _ Time lapse movie 084 ...

Page 164: ...FF 152 _ __ _ _ _ _ _ o _ _ _ _ __ __ _ _ _ _ _ _ _ _ White balance I 114 Auto _ _ __ _ _ __ _ _ f _ _ _ _ _ _ _ _ _ ISO sensitivity Ill 16 Auto 4 __ _ y _ _ _ _ _ _ _ _ _ _ _ _ __ x __y_ _ _ _ _y __ Fixed range auto Ill 16 ISO 64 100 Metering Ill 17 Matrix Continuous I 118 Single Intvl timer shooting Q 119 30 s Auto bracketing 121 Off _ _ _l Il S _ __ _ __ _ _ o __ __ _ _ _ _ _ wr _ _ AF area mod...

Page 165: ... 132 are deleted before selecting Reset all the file number for the next image taken will start from 0001 The following settings will not return to default settings even if Reset all is performed Shooting menu Preset manual data for White balance lI 115 Setup menu Date lI 138 Language CD 148 and Video mode lI 148 User settings that were saved to the mode dial U 1and U 2 modes will not be reset to ...

Page 166: ...et to Panorama assist or Voice recording and if interval timer shooting is chosen for Continuous when P S A M U 1or U 2 shooting modes are used For Panorama assist and Intvl timer shooting a new folder will be created and file numbers will be assigned automatically starting with 0001 156 157 Reset file numbering cannot be applied when the folder number reaches 999 and there are images in the folrl...

Page 167: ...n tested and approved for use in this camera All cards of the designated make and capacity can be used regardless of speed D k _ _ 512 1 1181 13 2 GB r 4 GS 7 SGS 2 16 GB 2 _ J I I I TOSHIBA t 5 1 2 M s 1 GB 2 GB l 4G 2 8GS 16 GB T _ _ _ 12 M S lG S 2 G S 1 4 GS 2 8 GS 1 6G s 2 1 If the memory card will be used with a card reader or similar device check that device supports 2 GB cards 2 S SDHC com...

Page 168: ...us a three digit sequence number for pictures shot usirlg Panorama assist e g 1 101 P_0011 OJSO I INTVL for interval timer photography e g 1 1 01INTVL OJ 119 I SOUNDI for voice recordings e g 101 SOUNDI OJ87 and NIKON for all other pictures e g 1 1 OONIKON When the number of files within a folder reaches 9999 or reset the file number a new folder will be created File numbers will be assigned autom...

Page 169: ...y adding one to the current folder name will be created the next time a picture is taken If the current folder is numbered 999 and contains 200 pictures or a picture is numbered 9999 no further pictures can be taken until the internal memory or memory card is formatted CD147 or a new memory card is inserted l III n r J n OJ z o III VI 757 ...

Page 170: ... camera Intense light may cause deterioration of the CCD image sensor producing awhite blur effect in pho ographs Keep away from strong magnetic fields Do not use or store this device in the vicinity of equipment that generates strong electromagnetic radiation or magnetic fields Strong static charges or he magnetic fields produced by equipment such as radio transmitters could interfere with the mo...

Page 171: ...battery that could not be used temporarily due to lowered perfor ance may recover some of its charge Should the battery terminals become dirty the camera may not turn on due to poor contact Wipe the terminals off with a clean dry cloth before use If the battery will not be used for some time insert it in the camera and run it flat before removing it for storage Attach the included terminal cover t...

Page 172: ...g toward the edges If this fails clean the lens using a cloth htly dampened with commercial lens cleaner Remove dust or lint with a blower To remove fingerprints and other stains clean the monitor with a soft dry cloth being careful not to apply pressure Body I Use a blower to remove dust dirt or sand then wipe gently with a 50ft dry Icloth After using the camera at the beach or seaside wipe off a...

Page 173: ...onitor may contain a few pixels that are always lit or that do not light This is a characteristic common to all TFT LCD displays and does not indicate a malfunction Images recordeci using the product will not be affected Images in the monitor may be difficult to see under bright lightirlg The monitor is lit by an LEO backlight Should the monitor begin to dim or flicker contact your Nikon authorize...

Page 174: ... will turn off 1 I automatically but you can also press j Ithe power switch to turn it off I manually 0 _ _ _ r _ _ _ _ _ __ _ _ _ _ _ 4 _ IWrite protect sWitch IS Slide the write protect switch to MemolY card IS write t I k d In oc position write position protecte _ _ _ _ _ _ _ _ _ _ _ _ _ _ __ _ _ _ _ D I Use an approved card Thiscard cannot be used iError accessing Check that connectors are cle...

Page 175: ...memory card 0 An Image that has One or more subjects blinking subjects Check results in playback mode 55 may have closed their detected in it was eyes saved Select a picture that supports quick 74 0 Cannot edit selected retouch d lighting crop small Image cannot be picture picture or black border modified These options cannot be used with movies M O o _ _ x 0 Time out error while Choose memory car...

Page 176: ...zone as horne 140 CD Mode dial is not in the proper position Mode dial is between two modes Rotate mode dial to select deSired mode 10 Press the flash pop up bUttOll to raise the Aash The built in flash is not raised during the Night portrait or Backlight scene modes Press the flash pop up button to raise the built in flash 33 112 46 z o 1 VI o fhe flash is lowered o I ens error If the lens cap IS...

Page 177: ...n to resume printing w N VO V w w m A_ A D Paper has jammed in the jammed paper select Resume and press the button to Printer error paper Jam the printer resume printing _ _ _ h _ _ _ _ _ _ _ o_ _ _x D No paper is loaded in Load the specified type of paper select Resume and press the Printer error Ollt of paper the printer x button to resume printing D Ink error Check ink select Resume and press t...

Page 178: ...or move to darker location Adjus monitor brightness Monitor is dirty Clean monitor Adjust diopter adjustment control You cannot switch the display in the follOWing itllrl J While recording or playing back movies While recording or playing back voice memos or voice recordings While connected to a printer While displaying image deletion screens You cannot switch the display while displaying some err...

Page 179: ... be done sellO Panorama assist or Voice recording alld if Continuous is set to Intvl timer shooting when p S A M U 1or U 2 shooting modes He used Battery emperature is high Turn off camera and allow Monitor turns off battery to cool down before resuming use After the lamp and the power on blinks for three minutes the camera will turn off 19 lamp blinks rapidly automatically but you can also press ...

Page 180: ...ess the B or 30 No picture taken shutter release button Wilen menus are ciispldyed pres the MENU bulton 13 Itlfhcn shutter rdease hutto b Battery is exhausted 1 The built in flash is not raised cJurillg the Night portrait 33 42 16 pressed or Backlight scene modes When flash indicator blinks flash is charging 34 0 The intended subject is me with which autof ocus does 29 not perform well Set AF assi...

Page 181: ...92 cannot be selected Image mode cannot be adjusted when Continuous H 58 16 9 is selected Off is selected for Shutter sound of the Sound settings 146 option in the setup menu Continuous BSS or Multi shot 16 is selected for 118 Continuous in shooting menu No sound when When any setting other than Off is selected for Auto 121 shutter is released bracketing Whetl Museum is selected in scene mode 45 S...

Page 182: ...s overwritten or renamed by computer or another played back make or model of camera Time lapse movie recording in pl ogress S4 11 CHino loom irl on Playback zoom cannot be used with movies small picrures _ picture or cropped copies of size 320 x 240 pixels and below _ OI Z o _ _ _ __ _ _ _ 126 113 35 54 70 111 Camera does not shoot with Multi shot 16 Self timer l smile timer or blink proof has bee...

Page 183: ...t be edited Other cameras Iliay be unable to play back or trllnster to a computer pictures edited with thi camera The Video mode setting in Setup menu has not been set cOII etly Menlmy card contaillS 110 pictures 8eplace memory card Remove memory card to play back pictures from interrlc ll mernolY Camera is off Battery is exhausted USB cable is not correctly connected Canrel l is not recoCJnized b...

Page 184: ...WI 50 un 1 ft 8 in to 00 T1 I 7 m 5 ft 6 in to 00 Macro close up l riode 10 cm 4 in to ex zoom positiorl where glows greet 1 ern OA in to 00 zoom positicm at 6 mark Face priority dUto 9 Jreii automz1tic selection center Inanu lI with 99 focus areas Color LCD viewfinder O 24 in TFT LCD approx 230k dot with diopter adjust erlt function Approx 97 horizontal Jnd 97 vertical compared to the actual scre...

Page 185: ... program shutter priority auto aperture priority auto manual auto bracketing motiorl detectioll exposure compensation 20 to 2 0 EV in steps of 1 3 EV W1 1 to 17 5 EV T1 0 7 to 17 6 EV Mechanical and charge coupled electronic shutter 1 2000 8 s 1 4000 1 20 s when shooting using Continuous H or Continuous H 16 9 Electronically controlled 6 blade iris diaphragm 10 steps of 1 3 EV Can be selected frol...

Page 186: ...menus and irriages are displayed Rechargeable Li ion Battery EN ELS Type Rated capacity Operating temperature Irn nSi09 Wx H X D Weight I echar eable lithiulll ion battery DC 3 7 V 1100 mAh oto 40 T 32 to 104 OF Approx 36 x 54 x 8 lim 1 4 x 2 1 x OJ in excludirlg prOjections Approx 30 9 1 1 oz excluding terminal cover DC 4 2 V 950 mA RechargeablE Li ion Battery EN EL5 Approx 2 hours when no charge...

Page 187: ...ers stored on the memory card Exifversion 2 2 This camera supports Exif Exchangeable Image File Format for Digital Still Cameras version 2 2 a standard that allows information stored with photographs to be used for optimal color reproduction when images are output from Exif compliant printers PictBridge A standard developed cooperatively by the digital canlera and printer industries allowing photo...

Page 188: ...155 Active D Lighting 70 AF area mode 122 AF assist 4 145 Aperture 61 Aperture priority auto 64 Audio video cable 92 Audio video in jack 92 Auto 32 Auto bracketing 121 Auto mode 24 Auto off 146 Autofocus 37 83 125 Autofocus mode 83 125 AV cable 92 B B W color 113 B W movie 82 83 Backlight i 46 Battery 18 139 Battery chamber 5 Battery charger 155 Battery latch 18 Battery level indicator 24 Battery ...

Page 189: ...h ISO Sensitivity auto 116 High speed continuous shooting 58 1 Identifier 156 Image copy 134 Image quality 107 Image Sharpening 112 Image size 108 Infinity 36 Internal memory 22 Internal memory indicator 25 Interval Timer Shooting 118 119 INTN 156 ISO sensitivity 34 116 L Landscape 1iIIl41 Language 148 Lens 4 172 Lens cap 7 Li ion rechargable battery 18 Lithium ion type battery 18 M Macro close up...

Page 190: ...ll 151 Reset file numbering 154 Rest the user setting 69 Rotate image 133 RSCN 156 s Saturation 112 Save to user settin 68 Scene auto selector 52 Scene menu 40 Scene mode 40 Self timer 35 Self timer lamp 35 Sepia movie 82 83 Setup menu 135 Shooting 24 Shooting menu 105 Shutter button 28 Shutter sound 146 Shutter speed 61 Shutter Priority Auto Mode 63 Single 118 Single AF 83 125 Slide show 131 Slow...

Page 191: ...Voice memo 80 Voice recording 87 Voice recordings 187 Volume 86 90 N Welcome screen 137 White balance 114 Wide 27 Zoom 27 Zoom control 4 27 Index z o ro Vl 779 ...

Page 192: ...r brief quotation in critical articles or reviews may be made without written authorization from NIKON CORPORATION C NIKON CORPORATION Fuji Bldg 2 3 Marunouchi 3 chome Chiyoda ku Tokyo 100 8331 Japan 2009 Nikon Corporation 1AG6Pl P520S Printed in Indonesia FX8LOl 11 6MM6837 7 07 ...

Page 193: ...Nikon Quick Start Guide Take the Camera Out of the Box 3 First Steps 5 Shooting and Playback 12 Installing Nikon Transfer 16 Transferring Pictures to a Computer 21 s COOLPIX P90 ...

Page 194: ...essional advisers are standing by to help with your digital camera needs An Important Notice about Accessories Nikon COOLPIX digital camera is designed to the highest standards and includes complex electronic circuitry Only Nikon accessories such as chargers batteries and AC adapters are certified by Nikon specifically for your Nikon COOLPIX digital camera and are engineered and tested to operate ...

Page 195: ...rger MH 61 with power cable Software Suite installer CD Audio Video Cable EG CP14 USB Cable UC E6 Lens Cap LC CP19 with cord Quick Start Guide this guide User s Manual Warranty Shape of power cable depends on country of use NOTE A Secure Digital SO card hereafter referred to as a memory card is not provided See page 155 of the Users Manual for a list of approved memory cards Take the Camera Out of...

Page 196: ...wer switch Power on lamp II DISP display button II Command dial 4 5 67 8 9 Changing the Monitor Angle The monitor can be lowered down to 45 or raised upward to 90 This is convenient when taking pictures with the camera held at high or low positions Put the monitor back in the original position when using in normal situations Take the Camera Out of the Box ...

Page 197: ... The CHARGE lamp will light CJ CHARGE 1 2 Insert the battery into the battery charger by sliding the battery forward CD and press down until it locks into place CHARGE lamp starts blinking when charging starts Charging is complete when the lamp stops blinking About two hours are required to charge a fully exhausted battery Pages 16 17 of the User s Manual First Steps ...

Page 198: ...Step 2 Attach the Camera Strap and Lens Cap Attach the lens cap to the strap and then attach the strap to the camera at two places First Steps ...

Page 199: ...emory card slot cover Memory card slot 3 2 Insert the battery Use the battery to push the orange battery latch in the direction indicated by the arrow G and fully insert the battery 0 When the battery is fully inserted the battery latch will lock it in place Inserting the Battery Correctly Inserting the battery upside down or backwards could damage the camera Be sure to confirm that the battery is...

Page 200: ...2 23 of the User s Manual Removing the Battery and Memory Card Turn the camera off and confirm that the power on lamp and the monitor are off before opening the battery chamber memory card slot cover Removing the Battery To remove the battery open the battery chamber memory card slot cover and slide the orange battery latch in the direction shown CD The battery can then be removed by hand Note tha...

Page 201: ...s cap has been removed and turn the camera on again PZi Auto Power Off while in Shooting Mode Standby Mode If no operations are performed for about a minute default setting the monitor will turn off automatically and the camera will enter standby mode If no operations are performed for another three minutes the camera will turn off automatically the auto off function If the monitor is off in stand...

Page 202: ...pply settings Operate the multi selector by pressing it up down left right and by pressing the button 5 1 Choose the desired language and press the button 5 2 Choose Yes and press the button The time zone selection screen is displayed Multi selector operations used are indicated withO 5 3 Select your home time zone and press the button The date menu is displayed If daylight saving time is in effec...

Page 203: ...to shooting mode The lens will extend at this time 5 5 Choose the order in which the month day and year are displayed Changing the Language Date and Time Select Language or Date from the Ytab setup menu to change the settings Press the MENU button and choose the Ytab to display the setup menu Choose Language to change the language Choose Date to change the date and time Choose Time zone from the D...

Page 204: ...of exposures remaining II J __ Shutter Aperture speed Number of Exposures Remaining Of Wher1 data is recorded to the internal memory m is displayed Pages 24 25 of the User s Manual Step 2 Frame a Picture Position the main subject near the center of the screen Zoom control Rotate towards T to zoom in and enlarge the subject or rotate towar ds W to zoom out increasing the area visible in the frame Z...

Page 205: ...ess the 101 button to switch between the monitor or electronic viewfinder Switch between the displays to suit the situation Press the DISP button to change the information displayed on the monitor or electronic viewfinder When the diopter for the electronic viewfinder is out of focus rotate the diopter adjustment control to the position in which the indicators are clearly visible Take care not to ...

Page 206: ...s the shutter release button halfway again Focus area Flash indicator The flash lamp shows the flash status if the shutter release button is pressed halfway down On Flash will fire when picture is taken Blinks Flash charging Off Flash off or not required 3 2 Smoothly press the shutter release button the rest of the way down to take the picture Do not use force when pressing the shutter release but...

Page 207: ...leting Pictures To delete the picture currently displayed in the monitor press the 1iD button When a confirmation dialog is displayed use the multi selector to select Yes Press the button to delete the picture Deleted pictures cannot be recovered To exit without deleting the picture choose No and press the button Pages 30 31 of the User s Manual View the previous picture View the next picture Step...

Page 208: ...with a minimum of 128 MB free Intel Celeron Pentium 4 or Core series processor with a clock speed of 1 GHz or faster recommended Preinstalled versions of 32 bit Windows Vista Home Basic Home Premium Business Enterprise Ultimate editions Service Pack 1 Windows XP Home Edition Professional Service Pack 3 PowerPC G4 or G5 model or Intel Core or Xeon Universal Binary model Mac OS X Version 10 3 9 10A ...

Page 209: ...he Software Suite folder will open automatically Double click the Welcome icon If the folder does not open automatically double click on the Software Suite CO icon on the desktop 2 Enter the administrator name and password and then click OK Macintosh only 3 Choose the language and click Next If the desired language is not displayed click Region Selection to choose a different region and then choos...

Page 210: ...he Software Suite CD An internet connection is required 5 Install Panorama Maker Panorama Maker is a software that joins a series of images to create a single panorama Image Windows Choose a language in the Choose Setup Language dialog and click OK When the ArcSoft Panorama Maker 4 dialog is displayed click Next The License Agreement will be displayed Read the license agreement carefully and click...

Page 211: ...contents of this document carefully and click Next Follow the on screen instructions to complete the installation _ 0 Jh YO i _ _ _ I Mac OS X The License Agreement will be displayed Read the license agreement carefully and click Accept The Read Me dialog will be displayed Read the contents ofthis document carefully and click OK Follow the on screen instructions to complete the installation When t...

Page 212: ...nding upon the computer s operating system vVhen the cursor is positioned over the software name an explanation of the software is displayed Downloading software Check the software to be installed and click Confirm Follow the on screen instructions to complete the installation Not downloading software Click Skip Microsoft DirectX 9 Windows XP only If DirectX 9 is not already installed a DirectX 9 ...

Page 213: ...e camera for extended periods 7 2 Turn off the camera Connect the camera to the computer using the supplied USB cable Check to be sure that the connector is in the correct orientation and insert the plug straight Do not insert or disconnect it forcibly Transferring Pictures to a Computer ...

Page 214: ...ansfer Copy pictures to a folder on my computer and click OK Nikon Transfer will start To bypass this dialog in the future check Always use this program for this action MacOSX Nikon Transfer will start automatically if Yes was selected in the Auto Launch setting dialog when Nikon Transfer was first installed 4 Confirm that the source device is displayed in the transfer options Source panel and cli...

Page 215: ...camera off and disconnect the USB cable Using a Card Reader The pictures stored on a memory card that is inserted into a card reader or similar device can also be transferred to the computer using Nikon Transfer If the memory card has a capacity greater than 2 GB or is SDHC compliant the intended device must support these features of the memory card At the Nikon Transfer default settings Nikon Tra...

Page 216: ...anual Simply choose the scene mode that most closely matches the shooting scene In scene auto selector mode the camera chooses the optimum scene mode for simpler shooting simply by framing the picture Sport Continuous Page 56 of the User s Manual Pictures are taken continuously at high speeds when the shutter release button is pressed down fully IPi 1 PictBridge Page 97 of the User s Manual Print ...

Page 217: ......

Page 218: ...tes on Continuous H 16 9 and Continuous H The contents of page 58 of the User s Manual are to be explained fu rther as follows If very bright objects such as the sun or lights are captured in Continuous H 16 9 or Continuous H mode vertical streaks of light known as smear may appear in the recorded image Parts or the entire image around the border of the smear may turn dark or green in color To pre...

Page 219: ...te Pour eviter cela nous vous recommandans d eviter de prendre directement de telles sources lumineuses lors d une prise de vue COOLPIX P90 Observaciones sobre Continuo A 16 9 y Continuo A EI contenido de la pagina 58 del Manual del usuario se va a explicar mas ampliamente de la siguiente forma Si se capturan objetas muy brillantes como el sol a luces en los modos Continuo A 16 9 0 Continuo A pued...

Page 220: ......

Page 221: ...ive a Nikon product s with an approximate retail value of up to 1 000 see Official Rules for explanation and restrictions A purchase will not improve your chances of winning Odds of winning the Sweepstakes depend on the total number of eligible entries for the relevant month during the Sweepstakes period Visit Nikonusa com registration for Official Rules or for Official Rules by postal mail send a...

Page 222: ...up to 2 GB to anyone for an easy to use and secure experience Available with selected mobile phones Post photo URLs to blogs and social networking sites View photos on mobile phones Share photos with selected friends Save and organize photos easily Bring Your Circle Closer 2GB FREE Learn More 71 mypicturetown I Search http mypicturetown com 9MXA3911 02 1AG6P1 P5067 S ...

Page 223: ...Smart photo storage and sharing service from Nikon my Picturetown Search Imypicturetown I P Nikon TM At the heart of the Image TM ...

Page 224: ...QUENTIAL INCIDENTAL SPECIAL DIRECT INDIRECT EXEMPLARY OR PUNITIVE DAMAGES RELATING TO OR ARISING OUT OF ANY BREACH OF THIS WARRANTY OR ANY OTHER CLAIM REGARDING THIS PRODUCT INCLUDING BUT NOT LIMITED TO CLAIMS OF NEGLIGENCE STRICT LIABILITY OR BREACH OF CONTRACT SOME STATES DO NOT ALLOW A LIMITATIONS ON HOW LONG AN IMPLIED WARRANTY LASTS OR B THE EXCLUSION OR LIMITATION OF INCIDENTAL OR CONSEQUENT...

Reviews: