.
USB
.
VI Basic Operations
5 Using the DS-L1 when Connected to a PC by a USB Cable
- 126 -
5.4.2
Outline of the Disk Drive
When the DS-L1 is connected to a PC, the disk drive for the CF card, etc., and the internal image
drive of the DS-L1 are each recognized as one removable disk by the PC.
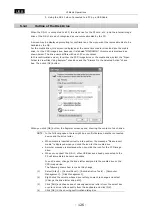
A screen may be displayed prompting for confirmation of how you want the removable disk to be
handled by the OS.
For the media drive, this screen is displayed at the same time media is inserted into the media
drive. For the CCD image drive, because it is labeled “NIKONIMG,” this screen is displayed as
shown below. The drive name differs with each PC environment.
In this confirmation screen, for either the CCD image drive or the media drive, select the “Open
Folder to View Files Using Explorer” check box and the “Always Do the Selected Action” check
box. Then click [OK] button.
When you click [OK] button, the Explorer screen opens, showing the content of each drive.
NOTE: In the following cases, there might be a conflict between another connected
device and the drive letter.
• When media is inserted correctly into position, the message “Please insert
media” is displayed when you click the icon for the media drive
• A similar message is displayed when you click the icon for the CCD image
drive.
• When you connect the DS-L1, other USB devices already connected to the
PC will immediately become unusable.
In such a case, change the drive letter assigned to the media drive or the
CCD image drive.
The following shows how to make this change.
(1)
Select [Start] – [Control Panel] – [Administrative Tools] – [Computer
Management] – [Disk Management].
(2)
Right-click the volume whose drive letter you want to change and select
[Change the drive letter and path].
(3)
Click [Edit] and choose one of unassigned drive letters from the select box
or enter a drive letter directly from the keyboard and click [OK].
(4)
Click [OK] in the ensuing confirmation dialog box.


