JAA78851-R.3617.A
- L42-15 ・ AF-S 17-55/2.8G -
July.11.2005
How to create Setting board of "Lens alignment chart" and "Viewer"
1. Summary
1-1: In order to get necessary data for lens alignment, this board is created to use for setting a special chart and light
viewers (for chart illumination), while taking pictures of the special chart with a digital camera.
2. Preparation
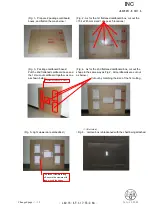
2-1:Prepare a board (760 x 880 x 20 mm) or 2 package cardboard boxes (size 2.33).
(Note) Because you have to cut out the shape to embed light viewers, choose package cardboard boxes (size 2.33) or
material which can be easily cut.
-
ref. Fig. 1
3. Procedure
(
In this document, 2 package cardboards are used
)
3-1: As for the 1st flattened cardboard box (size 2.33), check the positions for embedding the light viewers, and cut out
the shape at 5 locations (shaded parts/size 154 x 245 mm) as shown below.
-
ref. Fig. 2
(Note) Cutting the shape slightly smaller than the actual size of viewers makes it easier to fit the positions of viewers
tightly.
3-2:Put the 2nd flattened cardboard box (size 2.33) and the above cut-out 1st cardboard together as one, and fix them by
taping at 4 sides.
-
ref. Fig. 3
3-3:Then as for the 2nd flattened cardboard box, cut out the shape again by matching the cut-out size of 3-1 for each
viewer.
-
ref. Fig. 4
3-4:Reinforce the edges of cut-out parts with tape.
(Note) To prevent viewers falling off, secure them with tape around the edges.
-
ref. Fig. 5
3.5: Blacken around the setting board (with black spray, etc).
△
(Addition)
4. Prevent Viewers from falling off (In this document, 2-mm width Velcro tape is used.)
4-1: As shown above, when viewers are embedded, secure them with square pieces of Velcro tape (hook and loop
fastener) on the back of the cardboard to prevent viewers falling off.
Changed page
△×1
INC


