background image

17

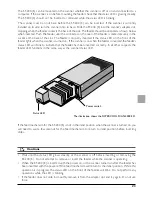
Slide Feeder SF-200 (S)

Contents

Cautions ..................................................................................................................................................................................................... 18

1. Overview .......................................................................................................................................................................................... 20

2. Parts and Accessories ................................................................................................................................................................ 21

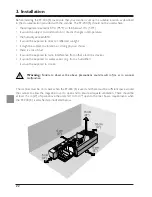
3. Installation ......................................................................................................................................................................................... 22

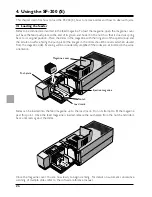
4. Using the SF-200 (S) .................................................................................................................................................................. 24

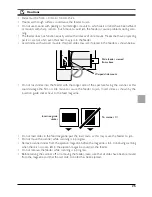
5. Maintenance .................................................................................................................................................................................... 31

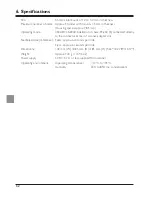
6. Specifications ................................................................................................................................................................................... 32

Summary of Contents for SF-200

Page 1: ...17 Slide Feeder SF 200 S Contents Cautions 18 1 Overview 20 2 Parts and Accessories 21 3 Installation 22 4 Using the SF 200 S 24 5 Maintenance 31 6 Specifications 32 ...

Page 2: ...s provided separately Nikon is not liable for damages resulting from the use of this product Trademark Information All trade names mentioned in this manual are the trademarks or registered trademarks of their respec tive holders Symbol The symbols in this manual signify important safety precautions All passages marked with this indication should be read prior to installation to prevent injury to y...

Page 3: ... Règlement sur le matériel brouilleur du Canada Notice for customers in European countries ACHTUNG Dieses Gerät entspricht den Bestimmungen der EG Direktive 87 308 EEC zur Störungsunterdrückung Lärmemission kleiner 70 dBA Notice concerning prohibition of copying or reproduction Note that simply being in possession of material which has been copied or reproduced by means of a scanner may be punisha...

Page 4: ...es are explained The final chapter Maintenance gives instructions on how to care for and transport the feeder Please read all instruc tions thoroughly to ensure that you can get the most from your SF 200 S The procedures for scanning consecutive slides with the SF 200 S may be found in the software reference manuals provided on the CD ROM that came with your scanner We hope that you find this manu...

Page 5: ...f the SF 200 S should find that the package contains all the items listed below Should you find that anything is missing or damaged contact your retailer immediately Reference manual this manual 1 Feed mechanism attachment for rounded slide mounts 1 2 2 Parts of the SF 200 S Load mark Feed magazine Ejection magazine Push plate Magazine cover Slide insertion guide Status LED Push plate ...

Page 6: ...on or strong physical shocks there is a lot of dust it would be exposed to radio interference from other electronic devices it would be exposed to water vapor e g from a humidifier it would be exposed to smoke Warning Failure to observe the above precautions could result in fire or in scanner malfunction The scanner must be on its base when the SF 200 S is used and there must be sufficient space a...

Page 7: ...eeder s status LED will blink to indicate that the feeder has been inserted correctly In all other respects the feeder LED functions in the same way as the scanner status LED Status LED If the feed mechanism for the SF 200 S is not in the initial position when the scanner is turned on you will need to wait a few seconds for the feed mechanism to return to initial position before inserting slides C...

Page 8: ...SF 200 S how to remove slides and how to deal with jams 4 1 Loading the feeder Slides to be scanned are inserted in the feed magazine To load the magazine open the magazine cover pull back the feed push plate to the end of its grove and hook it in the notch so that it does not spring back to its original position Place the slides in the magazine with the long end of the aperture up and the emulsio...

Page 9: ...h surfaces could cause the feeder to jam Do not use mounts with peeling or burred edges mounts to which seals or labels have been affixed or mounts with sharp corners Such mounts could jam the feeder or cause problems during scan ning The feeder does not function equally well with all makes of slide mount Makes that have projecting parts or are not of an even thickness may jam in the feeder Avoid ...

Page 10: ...t the slide with the front the photograph side facing the right of the SF 200 S when the feeder is viewed from the front The uneven edges sur face projections curled edges or apertures or burrs on these mounts can cause jams The following mounts are known to cause jams WESS Insert the slide with the front the photograph side facing the right of the SF 200 S when the feeder is viewed from the front...

Page 11: ... and removing it from the feed mechanism To attach the feed mechanism attachment the scanner must be connected to the computer and both scanner and computer must be on After inserting the SF 200 S into the scanner as described above open the FDUtility Windows or Utility Macintosh folder in the folder to which you installed Nikon Scan and then double click the Attachment Utility icon to start the a...

Page 12: ...the attachment into the holes in the feed mechanism 4 4 Removing attachment When scanning slides with flat mounts or slides less than 2 mm thick you will need to remove the attachment Use the attachment utility as described above to move the feed mechanism into the magazine then remove the attachment and click OK to return the feed mechanism to its initial posi tion Click the OK button in the atta...

Page 13: ... and the feed mechanism has returned to its housing in the front of the unit the jammed slide can be removed with your fingers If the feed mechanism has locked while feeding a slide you will need to use the attachment utility to resolve the jam the attachment utility is a special program for the SF 200 S distributed with the Nikon Scan software that came with your scanner To use the attachment uti...

Page 14: ...e double left arrow button in the attach ment utility window to move the feed mechanism back to its housing then remove the jammed slide with your fingers If two or more slides have jammed so that they overlap remove the slide on the magazine side first If the mount has caught at the entrance to the ejection magazine while being ejected from the feeder click the right arrow button to move the feed...

Page 15: ...n to use the feeder for an extended period of time remove it from the scanner Store in a dry well ventilated environment away from electronic equipment such as televisions or radios which produce strong magnetic fields Do not store the feeder where the temperature exceeds 60ºC 140ºF or goes below 20ºC 4ºF or where the humidity is less than 20 or more than 90 5 3Transport When transporting the scan...

Page 16: ...led on its base SF 200 S connected directly to the connector at rear of scanner adapter slot Feed eject time reference Feed approx 6 seconds per slide Eject approx 6 seconds per slide Dimensions 142 mm W 325 mm D 85 mm H 5 63 12 78 3 37 Weight Approx 700 g 1 lb 9 0 oz Power supply 5VDC 0 7 A or less supplied from scanner Operating environment Operating temperature1 10ºC to 35ºC Humidity 20 to 85 n...

Reviews: