137
C
o
pyi
n
g
Ne
tw
o
rk Pr
o
fil
es
to
t
h
e
C
a
m
e
ra
/ I
n
fr
a
stru
c
tu
re
N
e
tw
o
rk
s
Uploading Images to an ftp Server
11
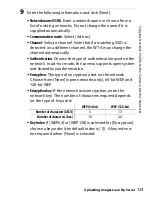
Enter ftp settings and click [Next].
•
FTP server
: Enter the URL or IP address of the ftp server.
•
FTP server port
: Enter the port number for the ftp server. The
default port is 21.
•
FTP path
: Choose the folder to which pictures will be
uploaded. If no path is specified, pictures will be uploaded
to the folder specified in Step 12 of “Creating an ftp Server:
Windows Vista” (Windows Vista) or Step 8 of “Creating an ftp
Server: Windows XP” (Windows XP) or to the home folder for
the current user (Mac OS X).
•
Anonymous login
: Select this option for anonymous login, or
leave this option unchecked to supply a [User ID] and
[Password].
•
Use proxy server
: If a proxy server is required for ftp, select this
option and enter the server name and port number for the
proxy server.
•
PASV mode
: Select this option to use PASV mode.
Summary of Contents for WT-4
Page 1: ...Wireless Transmitter En User s Manual ...
Page 41: ...Configuring the Network Windows XP Creating an Ad Hoc Network Introduction 29 5 Click Add ...
Page 67: ...55 Copying Network Profiles to the Camera Ad Hoc Networks Using the WT 4 with a Computer ...
Page 136: ...124 Copying Network Profiles to the Camera Ad Hoc Networks Uploading Images to an ftp Server ...
Page 156: ...Connecting to the ftp Server Uploading Images to an ftp Server 144 4 Click Close ...
Page 162: ...Uploading Images Uploading Images to an ftp Server 150 ...
Page 186: ...174 Device Settings Format Transmitter s Memory Menu Guide ...

