background image

ENGLISH 

- 1

Dear Customer,

Thank you for choosing one of our cleaning products.

The floor cleaner you have purchased has been designed to satisfy users in terms of ease 

of use and reliability.

We are aware that, in order to remain so over time, a good product requires continu-

ous updates aimed at satisfying the expectations of those who use it daily. To this end, 

we hope that you will be not only a satisfied customer but also a partner who does not 

hesitate to let us know your views and ideas resulting from personal experience on a 

day-to-day basis.

Summary of Contents for 1691005

Page 1: ...IT Uso e Manutenzione nilco 433 OSD...

Page 2: ...lla pagina seguente EN IDENTIFICATION DATA The machine identification data and CE marking are located on the plate on the machine body It is advisable to note the machine model and serial number on th...

Page 3: ...3...

Page 4: ...dice articolo di lavoro Velocit di rotazione N Matricola Caratteristiche elettriche Anno di costruzione EN Manufacturer Model Article code Working Rotation speed Serial number Electrical characteristi...

Page 5: ...5 4 4 2 5 2 6 7...

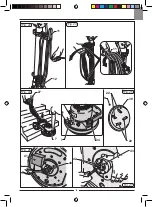
Page 6: ...6 8 9 13 14 14 10 8 8 8 9 9 9 12 14 17 18 10 11 14 19 13 21 20 15 15 16 Fig 14 11...

Page 7: ...7 2 4 23 24 26 25 25 25 25 22 22 5 11 12 4 29 33 3 31 28 30 34 29 28 32 Fig 16 Fig 15 Fig 17 22 22 27...

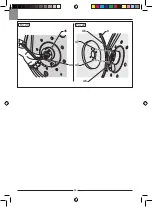
Page 8: ...8 3 37 37 35 3 5 7 4 4 27 31 30 Fig 18 Fig 19 Fig 20 Fig 21 34 37 36 37 38 2 3 2 34...

Page 9: ...9 11 11 12 Fig 22 Fig 24 Fig 25 Fig 26 Fig 27 Fig 23 7 7 27 39 22 9 22 41 40 43 42 34...

Page 10: ...10 Fig 28 Fig 29 45 9 44 47 47 46 46...

Page 11: ...11 IT Italiano ITALIANO 1 Istruzioni originali EN English ENGLISH 1 Translation of original instructions DE Deutsch DEUTSCH 1 bersetzung der Originalanleitung...

Page 12: ...12...

Page 13: ...ese Orbital Einscheibenmaschine wurde f r Sie mit dem Fokus auf beste Reinigungs leistung verbunden mit einfacher Handhabung und Langlebigkeit entwickelt Wir sind bestrebt unsere Produkte permanent we...

Page 14: ...ASCHINE DE 5 4 1 EINSTELLUNG DER NEIGUNG DER HANDSTANGE DE 5 5 1 F HRUNGSSTANGE DE 6 6 1 BETRIEBSWEISE DE 6 6 1 a Pr fungen vor dem Gebrauch DE 6 6 1 b Montage von zus tzlichen Gewichten DE 6 6 1 c Ei...

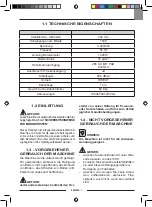
Page 15: ...ern Benutzer und Wartungspersonen zug nglichen Ort sorgf ltig aufbewahrt werden 1 3 VORGESEHENER GEBRAUCH DER MASCHINE Die Maschine wurde entwickelt und gefertigt F r gewerblichen Gebrauch die Reinigu...

Page 16: ...n 13 in den obe ren Teil des Tanks 14 Abb 9 Verbinden Sie den Schlauch 15 mit dem entsprechenden Anschlussst ck 16 auf dem unteren Teil des Tanks 14 Abb 10 Setzen Sie den Tank 14 auf die untere Hal te...

Page 17: ...es Transports des Ger ts 11 12 Halterungen 27 F hrungss ule 28 Elektrischer Steuerkasten 29 Hebel zum Ausf hren der B rstendre hung on off 30 Hebel zur Wasserabgabe 31 Versorgungskabel 32 Knopf zum En...

Page 18: ...ustauschen Pr fen Sie dass das Ger t insbeson dere das Netzkabel keine Sch den auf weist die den korrekten Betrieb der Ma schine oder die Sicherheit des Benutzers beeintr chtigen k nnten 6 1 b Montage...

Page 19: ...nen und die darin enthaltene L sung entfernen um die D se wie im Abschnitt Wartung be schrieben zu reinigen HINWEIS Die Maschine nicht mit montiertem und nicht angehobenen Pad stehen lassen damit dies...

Page 20: ...gereinigt werden Den Tank 25 entfernen Abb 16 die L sung aussch tten den Tank auswa schen und mit Wasser f llen Die Maschine in die N he einer Ablauf ff nung stellen und die Taste 33 dr cken Abb 17 b...

Page 21: ...leer Schalter nicht gedr ckt Den Tank f llen Die Taste dr cken Reinigungsergebnis unge n gend Pad oder chemisches Mittel ungeeignet Pad abgenutzt F r den zu polierenden Bodentyp geeignete Pads oder c...

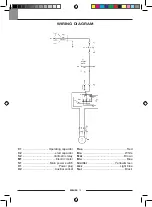
Page 22: ...CHALTPL NE C1 Zwischengeschalteter Kondensator C2 Anlaufkondensator S2 Voltmess Relais M1 Elektromotor S1 Hauptschalter X1 Stecker X2 Hilfsbuchse Ros Rot Bia Wei Mar Braun Blu Blau Gia Ver Gelb Gr n A...

Page 23: ...nd reliability We are aware that in order to remain so over time a good product requires continu ous updates aimed at satisfying the expectations of those who use it daily To this end we hope that you...

Page 24: ...5 3 1 KNOWLEDGE OF THE MACHINE EN 5 4 1 HANDLE TILT ADJUSTMENT EN 5 5 1 GUIDE HANDLE EN 6 6 1 OPERATION EN 6 6 1 a Checks to be performed before use EN 6 6 1 b Additional weights assembly EN 6 6 1 c S...

Page 25: ...t in a safe place where it is accessible to all users opera tors and maintenance personnel throughout the life of the machine until it is scrapped 1 3 INTENDED USE OF THE MACHINE The machine has been...

Page 26: ...f the handle joint Fig 11 Screw the chain 13 onto the top of the tank 14 Fig 9 Connect the tube 15 into the fitting 16 at the bottom of the tank 14 Fig 10 Place the tank 14 on the lower support 12 tak...

Page 27: ...Handle tilt lever 5 Machine body 7 Head lifting and machine movement handle 11 12 Supports 27 Guide handle 28 Electric control box 29 Brush rotation start levers on off 30 Water supply adjustment lev...

Page 28: ...the appliance particularly the mains cable is not damaged in any way that might compromise correct machine operation or the operator s safety 6 1 b Additional weights assembly Fig 20 If there s the n...

Page 29: ...ion and clean the nozzle as indicat ed in the maintenance paragraph WARNING Do not leave the machine stopped if the pad is mounted and not raised in order to prevent them from being damaged Unplug the...

Page 30: ...tank 25 Fig 16 empty the solution rinse it and refill it with water Position yourself with the machine near a discharge drain and press the button 33 Fig 17 until the tank is empty OPERATIONS TO BE CA...

Page 31: ...Polishing liquid is not re leased The tank is empty Button not pressed Fill the tank Press the button Insufficient floor cleaning Pad or chemical product not suitable Pad worn Use a pad or chemical p...

Page 32: ...GRAM C1 Operating capacitor C2 start capacitor S2 Voltmetric relay M1 Electric motor S1 Main power switch X1 Power plug X2 Auxiliar socket Ros Red Bia White Mar Brown Blu Blue Gia Ver Yellow Green Azz...

Page 33: ...mplicit di utilizzo e affidabilit nel tempo Noi siamo coscienti che un buon prodotto per restare tale nel tempo necessita di con tinui aggiornamenti mirati a soddisfare le aspettative di chi quotidian...

Page 34: ...ico IT 5 3 1 CONOSCENZA DELLA MACCHINA IT 5 4 1 REGOLAZIONE INCLINAZIONE MANIGLIONE IT 5 5 1 MANIGLIONE GUIDA IT 6 6 1 FUNZIONAMENTO IT 6 6 1 a Controlli prima dell uso IT 6 6 1 b Montaggio pesi aggiu...

Page 35: ...nti con acqua superio re a 50 C non utilizzare gasolio benzine o detergen ti corrosivi per il lavaggio di pavimenti non lavare e aspirare liquidi corrosivi in fiammabili esplosivi anche se diluiti 1 2...

Page 36: ...te su periore del serbatoio 14 Fig 9 Collegare il tubo 15 nell apposito rac cordo 16 posto nella parte inferiore del serbatoio 14 Fig 10 Posizionare il serbatoio 14 sul suppor to inferiore 12 facendo...

Page 37: ...azione maniglione 4 Ruote 5 Corpo macchina 7 Maniglia sollevamento testata e movi mentazione macchina 11 12 Supporti 27 Maniglione guida 28 Scatola comandi elettrici 29 Leve avviamento rotazione spazz...

Page 38: ...Se usurato sostituirlo Controllare che l apparecchio in parti colare il cavo di rete non presenti danni che possano compromettere il corretto funzionamento della macchina o la sicu rezza dell operato...

Page 39: ...soluzione ed effettuare l opera zione di pulizia ugello come indicato nel paragrafo manutenzione AVVERTENZA Non lasciare la macchina ferma con pad montato e non sollevato per evitare la com promission...

Page 40: ...pulire l ugello Rimuovere il serbatoio 25 Fig 16 svuotare la soluzione risciacquarlo e ri empirlo di acqua Posizionarsi con la macchina vicino ad una piletta di scarico e premere il pulsante 33 Fig 1...

Page 41: ...o vuoto Pulsante non premuto Riempire il serbatoio Premere il pulsante Pulizia pavimento insuffi ciente Pad o prodotto chimico ina deguati Pad consumato Usare pad o prodotto chimi co adatti al tipo di...

Page 42: ...C1 Condensatore inserito C2 Condensatore di spunto S2 Rel voltmetrico M1 Motore elettrico S1 Interruttore principale X1 Spina X2 Presa ausiliaria Ros Rosso Bia Bianco Mar Marrone Blu Blu Gia Ver Giall...

Page 43: ......

Page 44: ...1665 Vaihingen Enz Postfach 1480 D 71657 Vaihingen Enz Tel 49 7042 912 0 Fax 49 7042 912 360 www fakir de www nilco de info fakir de verkauf nilco de 2019 Fakir Hausger te GmbH nderungen vorbehalten 4...

Reviews: