66 - FORM NO. 56043097 / Adgressor
™
/ BR 850S, 850CS, 950S, 950CS, 1050S, 1050CS
ELECTRICAL SYSTEM
Fixed Pressure Mode
1 Turn
the
main power key switch to the off position.
2 Press and hold the scrub pressure decrease switch.
3 While holding the pressure decrease switch turn the main power key switch to the on position.
4 Continue to hold the pressure decrease switch until the scrub pressure decrease indicator is green.
5 Release the pressure decrease switch.
6 Pressing and releasing the scrub pressure decrease switch will now select between 0, 1, 2, 3, 4, or 5. Set the mode to 0.
7 Press
the
scrub system off switch to save this setting.
8 The status display will now show a number from 1 to 5. This represents the scrub pressure that the operator will be able to select using the light
scrub pressure select switch. Use the pressure decrease switch to set the desired pressure.
9 Press
the
scrub system off switch to save this setting.
10 The status display will now show a number from (1 + the setting from step 8) to 9. This represents the scrub pressure that the operator will be
able to select using the heavy scrub pressure select switch. The scrub pressure increase indicator will now be illuminated. Use the pressure
increase switch to set the desired pressure.
11 Press
the
scrub system off switch to save this setting.
12 The status display will now show “d” to indicate that the procedure is done.
13 The new setting will be saved and will remain in effect until it is changed again.
Light / Heavy Scrub Mode
1 Turn
the
main power key switch to the off position.
2 Press and hold the scrub pressure decrease switch.
3 While holding the pressure decrease switch turn the main power key switch to the on position.
4 Continue to hold the pressure decrease switch until the scrub pressure decrease indicator is green.
5 Release the pressure decrease switch.
6 Pressing and releasing the scrub pressure decrease switch will now select between 0, 1, 2, 3, 4, or 5. Set the mode to 2.
7 Press
the
scrub system off switch to save this setting.
8 The status display will now show a number from 1 to 5. This represents the maximum scrub pressure that the operator will be able to select
using the light scrub pressure select switch. Use the pressure decrease switch to set the desired pressure.
9 Press
the
scrub system off switch to save this setting.
10 The status display will now show a number from (1 + the setting from step 8) to 9. This represents the maximum scrub pressure that the
operator will be able to select using the heavy scrub pressure select switch. The scrub pressure increase indicator will now be illuminated. Use
the pressure increase switch to set the desired pressure.
11 Press
the
scrub system off switch to save this setting.
12 The status display will now show “d” to indicate that the procedure is done.
13 The new setting will be saved and will remain in effect until it is changed again.
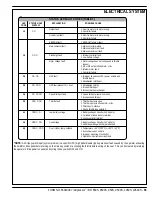
SPECIAL PROGRAM OPTIONS (CONTINUED)
* Values given are approximate.
1
2
3
4
5
6
7
8
9
2820D
3220D / BR850S
(Disc) 1-1/2 HP
2820C / 3220C
BR850CS
3520C / 3820C
(All Cyl.) (2) 3/4 HP
PA#
SCRUB PRESSURE (PA#) & CURRENT LOAD (AMPS) SPECIFICATIONS (TABLE 2)
15.0
17.5
20.0
22.5
25.0
27.5
30.0
32.5
35.0
15.0
17.5
20.0
22.5
25.0
27.5
30.0
32.5
35.0
19
22
25
28
31
34
37
40
43
3520D / 3820D
(Disc) (3) .6 HP
Summary of Contents for Adgressor BR 1050CS
Page 81: ......
Page 82: ...www nilfisk advance com 2006 ...


