background image

     FORM NO. 56043051 / Retriever

 2060 - 7

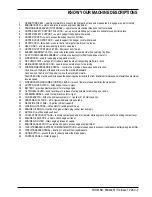
KNOW YOUR MACHINE DESCRIPTIONS

________________________________________________________________________________________________________________________________________________________________________________________________________________________________________________________________________

1

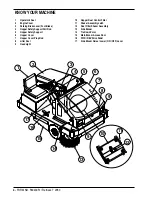
OPERATOR’S SEAT – seat tips forward for access to the hydraulic oil tank and propane tank.  Engage prop bar for safety.

2

ENGINE COVER – unlatch and raise to access engine compartment.

3

PARKING BRAKE LEVER (FOOT BRAKE) – operates the mechanical brakes on the front wheels.

4

HOPPER SAFETY SUPPORT PULL ROD – pull up on rod while hopper is raised to pull safety support into place.

5

HOPPER SAFETY SUPPORT – used to support the hopper while raised.

6

HOPPER COVER – open to access the hopper dust control filter.

7

HOPPER COVER PROP ROD – used to support the hopper cover while raised.

8

LITTER DOOR – throw debris in here that is too large for the broom to pick up.

9

HEAD LIGHT – use when sweeping in hard to see areas.

10

HOPPER DUST CONTROL FILTER – filters dust from the air.

11

SHAKER ASSEMBLY LATCH – used to hold the shaker assembly UP while servicing the filter.

12

DUST FILTER SHAKER ASSEMBLY – vibrates the dust control filter to shake dust out of it.

13

SIDE BROOM – used for sweeping along walls or curbs.

14

TIE DOWN POINT – safe point to tie down machine when transporting via trailer or truck.

15

MAIN BROOM ACCESS DOOR – open to access main broom for servicing.

16

FORWARD/REVERSE DRIVE PEDAL – controls the machine’s travel speed and direction:
Push down on the Back of the pedal to move the machine Backward.
Push down on the Front of the pedal to move the machine Forward.
The SPEED of the machine will increase as the pedal is pushed closer to the floor. Maximum forward speed is faster than maximum
reverse speed.

17

SIDE BROOM RAISE/LOWER (ON/OFF) LEVER – raises or lowers (stops and starts) the side broom.

18

HOPPER COVER LATCH – holds hopper cover in place.

19

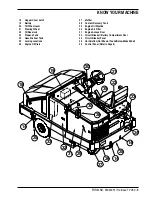
BATTERY – provides electrical power for starting engine.

20

TILT WHEEL LEVER – push lever down to release steering column for adjusting up or down.

21

STEERING WHEEL – used to steer machine left or right.

22

OIL RESERVOIR – holds the hydraulic system oil, 11 gallon (41.63 liter) capacity.

23

PROPANE FUEL TANK – 33 lb. liquid withdrawal propane tank.

24

GASOLINE FUEL TANK – 12 gallon (45 liter) capacity

25

JACKING LOCATIONS – safe points for jacking machine up.

26

ENGINE OIL DRAIN – location of engine oil drain plug (under rear bumper).

27

MUFFLER – muffles engine exhaust.

28

COOLANT RECOVERY TANK – recovers coolant pushed out of radiator while engine is hot, used for checking coolant level.

29

ENGINE OIL DIPSTICK – used to check engine oil level.

30

ENGINE AIR FILTER – filters engine’s intake air supply.

31

ENGINE ACCESS DOOR – unlatch and open to access engine compartment.

32

CIRCUIT BREAKER / BATTERY COMPARTMENT DOOR – unlatch and open to access circuit breakers, battery & engine air filter.

33

CIRCUIT BREAKER PANEL – location of all machine circuit breakers.

34

HORN BUTTON – sounds the horn (directly below the brake pedal).

35

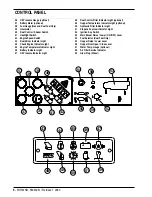
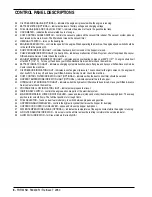
CONTROL PANEL – Refer to page 6.

Summary of Contents for Advance Retriever 2060

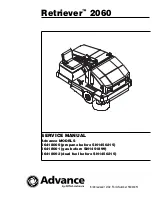
Page 1: ...8 99 revised 12 02 Form Number 56043051 SERVICE MANUAL Advance MODELS 56418000 propane before SN1450215 56418001 gas before SN1451899 56418002 dual fuel before SN1450215 Retriever 2060...

Page 2: ...DER REMOVAL 27 HOPPER DUMP DOOR INTERLOCK SWITCH ADJUSTMENT 28 HOPPER ADJUSTMENT 28 TROUBLESHOOTING GUIDE 29 31 DUST CONTROL SYSTEM 32 38 FUNCTIONAL OVERVIEW 32 ELECTRICAL DIAGRAM 32 HYDRAULIC DIAGRAM...

Page 3: ...R WHEEL REMOVAL 56 WHEEL MOTOR REMOVAL 57 HYDRAULIC COMPONENT LOCATION 58 HYDRAULIC DIAGRAM 59 ELECTRICAL SYSTEM 60 66 ELECTRICAL SCHEMATIC WIRING DIAGRAMS 60 63 ELECTRICAL COMPONENT LOCATION DIAGRAM...

Page 4: ...the ramp Keep sparks flame and smoking materials away from the battery and fuel system Remove all jewelry when working near electrical components Take precautions to prevent hair jewelry or loose clot...

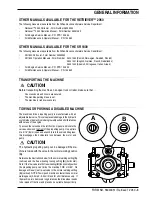
Page 5: ...__________________________________________________________ TRANSPORTING THE MACHINE CAUTION Before transporting the machine on an open truck or trailer make sure that All access doors and covers are s...

Page 6: ...ety Support 6 Hopper Cover 7 Hopper Cover Prop Rod 8 Litter Door 9 Head Light KNOW YOUR MACHINE 10 Hopper Dust Control Filter 11 Shaker Assembly Latch 12 Dust Filter Shaker Assembly 13 Side Broom 14 T...

Page 7: ...ing Locations 26 Engine Oil Drain KNOW YOUR MACHINE 27 Muffler 28 Coolant Recovery Tank 29 Engine Oil Dipstick 30 Engine Air Filter 31 Engine Access Door 32 Circuit Breaker Battery Compartment Door 33...

Page 8: ...ine Speed Switch 43 Dump Door Indicator Light 44 Check Engine Indicator Light 45 Engine Temperature Indicator Light 46 Battery Indicator Light 47 Oil Pressure Indicator Light CONTROL PANEL 48 Dust Con...

Page 9: ...OOR open to access main broom for servicing 16 FORWARD REVERSE DRIVE PEDAL controls the machine s travel speed and direction Push down on the Back of the pedal to move the machine Backward Push down o...

Page 10: ...have your Nilfisk Advance Service Center check the machine 46 BATTERY INDICATOR LIGHT indicates a charging system malfunction shut off engine and have your Nilfisk Advance Service Center check the mac...

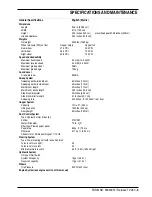
Page 11: ...eg Sound Level At operators ear 85 dBA Sweep System Sweeping path w side broom 60 inches 152 cm Sweeping path w o side broom 45 inches 114 cm Main broom length 45 inches 114 cm Main broom bristle leng...

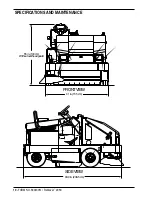
Page 12: ...10 FORM NO 56043051 Retriever 2060 SPECIFICATIONS AND MAINTENANCE 55in 140cm Withoutoverheadguard 93 9in 238 5cm 61in 155cm FRONTVIEW SIDEVIEW...

Page 13: ...ter X Flush the radiator X Grease steering box X Inspect steering box X See sweeping system section for maintenance information See hopper system section for maintenance information See steering syste...

Page 14: ...____________________________________________________________________________________________ ENGINE COOLANT CAUTION Do not remove the radiator cap when the engine is hot To check the engine coolant le...

Page 15: ...weldment that will allow for the correct side broom angle adjustment The side broom is raised and lowered by a cable that is connected at the side broom lever runs through three pulleys and is connect...

Page 16: ...room housing The skirts should be replaced or adjusted if they are torn or worn to a height of more than 1 4 inch 6 35 mm off the ground 6 Turn the broom around end for end and slide it back into the...

Page 17: ...ion FRONT C D E G H F To Level the Main Broom 1 Follow the steps To Adjust Broom Height and determine if the taper is larger on the right or left side of the broom 2 See Figure 2 Loosen the lock nut o...

Page 18: ...____________________________________________________________________________________________________ MAIN BROOM MOTOR REMOVAL 1 Remove main broom see main broom maintenance section 2 Open left side lo...

Page 19: ...ide Broom 13 in the UP position 2 Reach under the Side Broom 13 and remove the large T Handle Nut holding the side broom on and remove the broom and plastic disc 3 Install the new broom and plastic di...

Page 20: ...cket and reconnect two wire connector Check for proper operation 6 Reinstall side panel and latch ______________________________________________________________________________________________________...

Page 21: ...________________________________________________________________________________________________________________________________________________________________________________________________________...

Page 22: ...eck the adjustment and operation of S12 hopper dump door interlock switch see hopper section Yes Replace solenoid ______________________________________________________________________________________...

Page 23: ...3 broom switch adjustment and operation Adjust or replace Check broom lug inserts for damage or wear Check for oil flow to broom motor Check for proper operation of L3 solenoid coil and cartridge see...

Page 24: ...or replace side broom motor See symptom one in this section Check adjustment and operation of S14 side broom switch Adjust or replace as needed Check for proper operation of L4 solenoid valve see hydr...

Page 25: ...oes not turn off Access solenoid valve L4 inside hopper Raise side broom and turn key switch to on position Check for 12vdc at yel brn and blk connector Check adjustment and operation of S14 side broo...

Page 26: ...it the hopper switch S15 and the dump door switch S16 When the dump door lever is moved to either the open or closed position S16 will energize the directional by pass solenoid L1 and allow oil flow t...

Page 27: ...________________________________________________________________________________________________________________________________________________________________________________________________________...

Page 28: ...ctions 2 Remove lower and upper cotter pins and cylinder pins L 3 Remove cylinder To reassemble 1 Mountcylinderendtouppermountingbracketusingpin and cotter pin 2 Pull cylinder rod out until clevis mee...

Page 29: ...cylinderdonotrelysolelyonproprodtosupporthopper Supportthehopperwithsomeadditional means such as overhead hoist stands etc 2 Turn off engine and disconnect battery 3 Remove two Screws N from Console O...

Page 30: ...oosen lock Nut Z 8 Turn Rod AA out until dump door indicator is lit Turn rod another quarter turn then tighten Lock Nut Z Note If indicator does not light it may be necessary torepeatsteps1 4inswitcha...

Page 31: ...s not operate SYMPTOM ONE Check for 12vdc at blk and blu yel connector on L1 with key on and hopper lift lever in up position and dump door lever in open and closed position No Check wiring from direc...

Page 32: ...inder Check the operation and wiring of S15 in the direc tional control valve See hydraulic section Repair or replace as needed Repair or replace hopper directional control valve See hydraulic section...

Page 33: ...switch on and dump door lever in open and closed position Repair or replace dump door directional control valve See hydraulic section Check for oil flow to dump door cylinder with lever in open and c...

Page 34: ...t is created when sweeping In general the dust control should always be on when sweeping except when there is water on the surface being swept A hydraulic impeller motor with a fan mounted on it is us...

Page 35: ...ver C on top of the hopper Make sure that the Hopper Cover Prop Rod D is in place 2 SeeFigure2 Inspect thetopoftheHopperDustControlFilter E fordamage A large amount of dust on top of the filter is usu...

Page 36: ...tainer Note remove Retainer H and install in new connector if replacing motor 4 See Figure 3 Raise shaker assembly I and remove Filter J from machine then lower shaker assembly 5 Remove the four Nuts...

Page 37: ...d support shaker assembly and remove Filter Q 3 Remove 11 bolts from access cover and remove cover 4 Remove three hoses to impeller Motor R Note There may be oil in hoses and motor be prepared to cap...

Page 38: ...or and impeller motor do not operate SYMPTOM ONE Yes No No Yes No Yes Shaker does not operate Check for 12vdc at shaker motor connec tor grn blk and blk wires with key switch on and S7 in shaker posit...

Page 39: ...r does not operate Verify brooms are running If optional temperature switch is installed check if indicator H5 is lit See operators manual Check for 12vdc at terminal 3 on S7 with key on and S7 in fan...

Page 40: ...________________________________________________________________________________________________________________________________________________ TROUBLESHOOTING GUIDE CONTINUED No Yes Shaker motor and...

Page 41: ...gharackandpinionsteering box The pinion gear is on the spindle shaft and a hydraulic cylinder moves the rack The cylinder and steering box are located under the rear center console A hydraulic steerin...

Page 42: ...RING REMOVAL 1 See Figure 1 Remove the four Bolts A and remove Cover B 2 Remove Bolt C and Nut D then remove lower Spring Bracket E and Spring F 3 Remove the two Bolts G and Nuts H holding upper weldm...

Page 43: ...hoses and cap cylinder connections 7 Reassemble in reverse order check for leaks and test for proper operation ________________________________________________________________________________________...

Page 44: ...________________________________________________________________________________ PINION GEAR REMOVAL WARNING Rear wheel must be on the ground when removing pinion gear 1 Remove the four Bolts Z from C...

Page 45: ...NOTE If replacing bearings be sure to pack bearing with grease before installing 8 To reassemble first install lower bearing cup cone and seal into steering Casting GG Using a movable service jack gui...

Page 46: ...ly holds its locked park setting without easily being released 2 To adjust the parking brake turn the handle Knob A Figure 1 on the end of the lever clockwise to increase the brake locking force NOTE...

Page 47: ...move lug nuts C and remove wheel D 5 Reassemble in reverse order _______________________________________________________________________________________________________________________________________...

Page 48: ..._________________________________________________________________________________________________ ENGINE OIL Oil Viscosity and type Use the information below to choose the proper engine oil for the te...

Page 49: ...d Switch 42 in the IDLE position l turn the Ignition Key Switch 52 clockwise to the START position and release it as soon as the engine starts If the engine does not start after cranking for 15 second...

Page 50: ...e To adjust 1 With the engine running assure that the foot pedal is in the neutral position and that there is no forward or reverse creep Turn the key switch to the off position 2 See Figure 1 Loosen...

Page 51: ...BLK BRN YEL BLK VIO BRN BLU RED TAN TAN ORN WHT YEL BLU VIO VIO GRN WHT BLK ORN BLK RED BLK RED WHT RED WHT A B A C SERIALCOM SHORTINGCAP 2 5 4 6 3 1 1 4 A A B B 3AMPS LP 3 4 1 2 3 4 5 6 7 8 9 10 11 1...

Page 52: ...tes to two different hydraulic circuits Since this pump is also directly coupled to the engine crankshaft through the propulsion pump the volume of oil delivered by the pump will be determined by the...

Page 53: ...reading varies greater than 20 there will be a noticeable loss of performance and should be corrected Hydraulic System Component Specifications Description RPM Flow Rate Seal Kit Propulsion pump 2400...

Page 54: ...noid Valve 56418104 L4orL2Coil FIGURE 3 FIGURE 5 PriorityDivider 56418102 L1Coil ReliefValve 1500PSI FIGURE 4 Relief Block 56418105 ReliefValve 2500PSI L3Coil Directional Control Valve ReliefValve S15...

Page 55: ...broom side broom and Check if front gear circuit is exceeding impeller do not operate 2500PSI Check relief valve in relief block 4 No wheel drive in either direction Check that bypass valve is in cor...

Page 56: ...H and remove Cable I and Hydroback J from Mount K 9 Pull Hydroback and cable assembly through the machine opening NOTE If installing a new cable you may want to tape it to pedal end of the cable and u...

Page 57: ...right and remove it from the Interlock Bracket P 5 Remove Ball Joint Q from the Actuator O then unthread the ball joint from the cable end 6 Loosen the two upper connector Nuts R and pull the cable fr...

Page 58: ...ring wheel to left 2 Turn off engine set parking brake and block front wheels 3 See Figure 9 Loosen the five wheel Lug Nuts V 4 If removing drive motor remove Cotter Pin W and loosen center castle nut...

Page 59: ...w steps 1 6 in Steer Wheel Removal section 2 Remove center castle nut 3 See Figure 9 Using a puller remove Hub Assembly X from motor shaft NOTE The motor has a tapered shaft 4 Remove and mark the thre...

Page 60: ...4 ______________________________________________________________________________________________________________________________________________________________________________________________________...

Page 61: ...t 4 1 Reservoir Weldment 5 1 Hydraulic Oil Cooler 6 1 Hydraulic Cylinder 7 1 Wheel Motor 8 1 Hydraulic Manifold 9 1 Oil Filter 10 1 Piston Pump 11 1 Dual Gear Pump 12 1 Main Broom Motor 13 1 Impeller...

Page 62: ...8 1 1 1 12 1 2 1 2 YEL BLU BLK GRA RED BLK GRN GRA 1 9 B F A B A A OPTIONAL A OPTIONAL OPTIONAL F STANDARD OPTIONAL OPTIONAL OPTIONAL OPTIONAL OPTIONAL OPTIONAL 30 87 85 86 OPTIONAL OPTIONAL 1 2 ORN...

Page 63: ...2 3 4 5 6 7 8 9 10 11 12 H3 K5 YEL BLK YEL VIO RED ORN GRN WHT BLK AC G 08 AMP 4 AMPS GASOLINE H2 H4 S4 o S5 R3 P1 h VIO BLK WHT GRA GRA WHT RED BLU BLK BLK BLK VIO VIO VIO VIO S I P2 08 AMP 08 AMP RE...

Page 64: ...3 5 2 6 4 1 S I P2 2 3 1 8 8 1 1 1 12 1 2 1 2 YEL BLU BLK GRA RED BLK GRN GRA 1 9 B F A B A A OPTIONAL A OPTIONAL OPTIONAL F STANDARD OPTIONAL OPTIONAL OPTIONAL OPTIONAL OPTIONAL OPTIONAL 30 87 85 86...

Page 65: ...GRD A B A B A C 33 3 AMPS 2 5 F3 Q3 Q1 Q4 Q2 T H1 Q6 1 1 YEL GRA BLK ORN WHT VIO WHT GRA BLK VIO RED 11 9 AMPS 12 VDC COOLANT TEMP SIGNAL AIR TEMP SIGNAL 5 VDC MAP SIGNAL CRANK SIGNAL INPUTS SIGNAL G...

Page 66: ...ional Control Valve Bypass 8 L2 Solenoid Dust Control 9 L3 Solenoid Main Broom 10 L4 Solenoid Side Broom 11 M1 Starter Assembly 12 M2 Shaker Motor 13 M3 Fuel Pump located in fuel tank P1 Hour Meter P2...

Page 67: ...stration below _________________________________________________________________________________________________________________________________________________________________________________________...

Page 68: ...not operate F4 20A Headlights taillights optional back up alarm will not operate F5 8A Shaker motor will not operate F6 10A Horn will not work F7 20A Optional turn signal brake light will not operate...

Page 69: ...NS WARNING DISCONNECT BATTERY BEFORE SERVICING 1 Turn the key switch OFF and disconnect the battery 2 Open the Access Door E 3 Mount the Strobe C and Bracket D as shown with the A Screws and B Nuts fr...

Page 70: ...n Phil 10 24 x 38 8 56009009 2 Nut Hex Machine 10 24 9 56009011 2 Wsh Int Shprf 10 INSTALLATION INSTRUCTIONS 1 Open and prop up the hopper cover 2 Remove the Dummy plug and ground wire from the extra...

Page 71: ...e 12 56418205 1 Seal 9 Pole Interface 13 Intentionally Omitted 14 56740200 1 Strain Relief 15 56418667 1 Harness Tail Light 16 56109037 2 Bushing 17 56418411 1 Switch Waterproof 18 56009019 4 Scr Hex...

Page 72: ...duit 9 over the wires from the Turn Signal Assembly 1 Also route Ground Wire 19 through Conduit 9 3 Remove Plug B and discard remove the 4 C Screws and remove Cover Panel D 4 Route wires and Conduit 9...

Page 73: ...and secure with the 4 Cord Clamps 20 using the 4 Screws 18 12 Adjust the Switch 17 so that it closes when you step on the brake pedal it is a normally closed switch and should be activated open when...

Page 74: ...Breaker F7 previously installed 22 Connect the BLU ORN Wire from the ConnectorAssembly 25 to the X terminal of the item 2 Flasher E2 along with the BLU ORN wire from the machine wiring harness 22 2 3...

Page 75: ...5 down through the opening at the rear of this compartment as shown Make sure the connectors with the following wire colors are on the left side GRA WHT VIO BLU BLK WHT The connectors with the followi...

Page 76: ...g the mounting screws 40 Connect the ground wires from the Amber Lamps 4 to one of the mounting Screws J for the headlight brackets on each side 41 Connect the wiring connectors from the Amber Lamps 4...

Page 77: ...er Volt I 56489592 1 Gauge Pressure J 56489600 1 Gauge Temp K 56244138 1 Receptacle Tab 25 INS L 56469382 3 Term 25 INS Tab M 56365222 1 Tee ST 25 Brass N 56740214 1 Bushing Pipe O 56478246 12 Cable T...

Page 78: ...he new gauges from the kit 9 9 9 9 9 Also on the propane model the BLU BLK Wire T T T T T from the wiring harness will not be connected to anything Once you have installed the 3 L L L L L Terminal Tab...

Page 79: ...olt P5 B C Q E L L L S T Rear Viewof Control Panel Assembly Diesel Machines S S S I I I Fuel Gauge P2 S I Harness W FIGURE 4 FIGURE 4 FIGURE 4 FIGURE 4 FIGURE 4 A J Water Temp P4 I Oil Press P3 H Volt...

Page 80: ...Pressure Locate the oil sender just to the left of the distributorless ignition coil Remove it from the engine block and install the Brass Tee M M M M M in its place see Figure 5 Figure 5 Figure 5 Fig...

Page 81: ...7 See Figure 7 Locate and remove the Oil Sender AA AA AA AA AA Re move the Kubota Fitting BB BB BB BB BB from the engine block and use a 1 8 27 NPT pipe tap to clear the threads to accept the el bow...

Page 82: ...O BLK I P5 S I P3 S I P4 I S P2 GAUGE KIT WIRING FOR GASOLINE OR DUAL FUEL MODELS WITH FUEL GAUGE S3 S7 S8 H1 H3 H2 H21 H H17 H18 H4 H5 H BRN 1A A RED BLK 20A A BLU BLK 60Q B YEL BLK 40A A BLU BLK 60P...

Page 83: ...y A as shown with the B Screw and C Nut from the kit 4 Directly above this location hanging from the wiring harness are the wires needed to connect the Time Delay A 5 There is a tab connector with two...

Page 84: ...009019 2 Scr Hex Thd Form 1 4 20 x 38 C 56001954 2 Wsh Flt SAE 10 D 56418435 1 Wire Assembly BLK E 56418436 1 Wire Assembly WHT VIO F 56455403 1 Switch Waterproof G 56324310 1 Nut Plate H 56002503 2 S...

Page 85: ...D connect the other end to the Negative terminal on the Back Up Alarm 7 Re install the Control Panel 8 Open the large Left Side Access Door 9 See Figure 3 Install the Switch F as shown using the H Scr...

Page 86: ...m the Vacuum Switch 1 10 Connect the other end of Ground Wire 5 to the middle terminal 11 Coming from the wiring harness which connects the headlight assembly is a WHT GRA wire connect this wire to th...

Page 87: ...4 99 Form No 56040696 page 2 A 3 B C D 5 1 2 6...

Page 88: ...Scr Hex Thd Form 1 4 20 x 75 11 56418893 1 Gasket 12 56459255 1 Hose 13 56380722 2 Washer Rubber 265 14 56419334 1 Wand Adapter Weldment 15 56418830 1 Butterfly Assembly see page 5 16 56418902 1 Hange...

Page 89: ...u will need to follow steps 4 6 4 See Figure 2 Use the dimensions shown to find and mark the location for the 2 wand retainer mounting holes Drill the holes to 224 5 69 mm in the right top bumper corn...

Page 90: ...4 99 revised 7 01 Form No 56040701 page 3 of 5 20 FRONT 13 9 7 19 5 29 17 24 23 18 27 1 2 4 28 3 21 15 12 6 25 26 14 10 22 10 28 28 B 8 11 16 10 FIGURE 4...

Page 91: ...ounting location and connect to the Butterfly Assembly 15 NOTE Make sure the T Handle of the Control Cable 8 is all the way RIGHT and theArm B on the Butterfly Assembly 15 is turned all the way Clock...

Page 92: ...ut Hex Nyl Loc 10 24 3 56003269 2 Ring Ret Ext Type E Rienf 38 Dia 4 56009032 2 Scr Hex Thd Form 6 32 x 38 5 56009045 2 Wsh Bowed 375 x 578 x 060 6 56009056 2 Wsh Int Shprf 6 7 56331312 1 Gasket 8 563...

Page 93: ...o one side or the other Using the Overhead Guard mounting holes as templates mark and drill the 3 mounting holes if your machine does not have pre drilled holes 5 Remove the 2 screws at the rear of th...

Page 94: ...6 99 revised 3 00 Form No 56040702 page 2 5 3 2 6 6 5 3 4 1 2...

Page 95: ...1 Fitting Tee 4 INSTALLATION INSTRUCTIONS WARNING DISCONNECT BATTERY BEFORE SERVICING 1 Open the Left Side Main BroomAccess Door See Figure 1 Remove the 2 A Screws the 4 B Screws and Nuts and the 2 C...

Page 96: ...e proper realignment during re assem bly This is necessary to prevent disturbing the timing of the motor If the rotor is removed and not re installed properly the motor could run backwards or not at a...

Page 97: ...nect Hose U from the Valve Assembly V Install Tee 4 as shown and reconnect Hose U to the end of the tee 15 Route Hose 3 up and over the hydrostatic pump and connect to Tee 4 as shown NOTE Make sure th...

Page 98: ...8 1 Schematic Electrical T 56263669 1 Connector U 56419237 1 Handle Prop Rod V 56009016 2 Nut Hex Jam 1 2 13 W 56002043 1 Scr Pan Phil 10 24 x 38 X 56002832 1 Nut Hex Nyl Loc Thin 10 24 Y 56900229 1 F...

Page 99: ...ere is not a welded bracket inside the hopper drill two 406 10 3mm diameter holes at the locations shown These holes are for mounting the Gearmotor Bracket 14 8 See Figure 2 Remove Right Side Hopper P...

Page 100: ...Connect other end of Linkage 20 to Lever 23 using original hardware items 5 19 See Figure 4 Remove Switch 3 from its current position and mount it in the new position holes drilled in step 11 Adjust s...

Page 101: ...t the hopper with some additional means such as overhead hoist stand etc 26 See Figure 4 Remove Pull Rod 24 and its mounting hardware 27 Loosen Set Screws 25 and then remove Screw 26 Slide out Hinge P...

Page 102: ...the small hole in the cab beneath the fuse block Use a Screw J and Washer K to secure the black wire with the ring terminal to this hole 36 Insert Fuse Y into the second slot from the right of the cab...

Page 103: ...to this terminal and the open terminal of Cir cuit Breaker D 52 Feed the long red wire of Connector Assembly R along main harness through the large hole in wall of the machine then move it up toward...

Page 104: ...3 8 4 56002684 1 Scr Hex Hd 3 8 16 x 1 75 5 56002769 5 Nut Hex Nyl Loc 3 8 16 6 56002923 1 Scr Hex Hd Loc 5 16 18 x 50 7 56002956 1 Scr Hex Hd Loc 5 16 18 x 75 8 56003040 3 Scr Hex Hd Loc 3 8 16 x 62...

Page 105: ...h the air cleaner into the fan inlet and Seal 13 before tightening air cleaner clamp 15 Then tighten the clamp at the fan inlet that came with the fan 4 Locate the two mounting holes in the rear of th...

Page 106: ...Switch 11 Attach the two wires from the fan to the other end of the switch so that the two black wires are across from each other 16 Secure Switch 11 to its mounting bracket 20 by first removing the...

Page 107: ...5 00 Form No 56040719 page 3 of 3 22 FRONT Wires from fan Wires from cab elec harness 9 8 11 20 8 10 18 19 FRONT FIGURE 2 FIGURE 3...

Page 108: ...raulic Hoses from the oil cooler Cap off these hoses to prevent leaking and from dirt entering the hydraulic system 5 If your machine is either a propane or a dual fuel model disconnect the propane li...

Page 109: ...ent 1 to the new Radiator 4 using the original Screws F 13 Install the Lower Radiator Hose H between the Radiator 4 and the Shroud Weldment 1 using original hose clamps 14 Mount New Radiator and shrou...

Page 110: ...INSTRUCTIONS Removal 1 Disconnect the battery 2 Open the left side door and the engine cover 3 See Figure 1 Remove and save the hardware items H that secure the oil cooler s hydraulic hoses 4 Loosen...

Page 111: ...9 00 Form No 56040733 page 2 of 3 Diesel H FRONT M K L N R W P O T S J Q O P U V FIGURE 1...

Page 112: ...engine cooling fan 23 Swing the oil cooler down Tighten the hydraulic hoses at point J 24 Reattach hardware group H and secure the hydraulic hoses to the radiator mount 25 Connect the hose from the ov...

Page 113: ...inlet 2 Drill or cut out the large 2 375 60 mm diameter hole 3 Insert the Flange Weldment B into the hole Use the flange as a template to mark the location for the two 281 7 mm diameter holes Remove...

Page 114: ...B D G H F FIGURE 2 Item Part No Qty Description 56040738 1 Instruction Sheet A 56419313 1 Inlet Hood Assembly items B E B 56419314 1 Flange Weldment C 56419312 1 Hood Inlet D 56002708 2 Nut Hex Nyl L...

Page 115: ...le 7 56418165 2 Switch Waterproof 8 56419335 1 Bracket Switch 9 56419336 1 Bracket Switch 10 56478246 6 Cable Tie 11 56002091 1 Scr Hex 3 8 16 x 2 00 12 56009085 2 Nut Hex Jam 3 8 16 13 56001854 2 Scr...

Page 116: ...this location as shown using Hardware Items 13 16 two of the item 14 Screws NOTE Make sure the switch actuator is centered from side to side in the 1 50 3 81cm hole and that the switch actuator IS NO...

Page 117: ...8cm Rear View of Hopper 2 06 5 23cm 59 15 08mm 1 00 2 54cm Align with large hole 5 See Figure 3 Mark and drill 1 43 10 92mm hole in the upper left corner of the hopper in the location shown Mark and d...

Page 118: ...B Nuts from the old Switch ActuatorAssembly NOTE The linkage arm that these two nuts are attached to is protruding out the back of the hopper 8 Lower the hopper and open the dump door 9 Open the hoppe...

Page 119: ...s shown NOTE The measurements shown are from the back wall and the left wall of the compartment as seen when standing in front of the hopper 11 16 28 34cm 218 5 53mm Top View of Hopper with Cover open...

Page 120: ...stall the assembly as shown but do not tighten the 2 15 Screws yet Slide the assembly toward the Dump Door Arm F until you hear the switch click as the switch actuator contacts the Dump Door Arm then...

Page 121: ...Harness 1 that you pulled up through the protective sock as shown and tighten NOTE Install the Strain Relief 5 at a point on the harness that allows just enough cord to reach the strain relief mountin...

Page 122: ...ine When the hopper is down and the dump door is open the main broom should run and no indicator lights will be ON If the dump door is closed or the hopper is raised the hopper Indicator Light M will...

Page 123: ...e Cable 9 56172230 1 Term 25 Ins Tab INSTALLATION INSTRUCTIONS WARNING DISCONNECT THE BATTERY BEFORE SERVICING 1 Drain the cooling system Gasoline Engine Instructions 2 See Figure 1 Remove Heater Hose...

Page 124: ...ithout a fitting on Tube G you will also need to order a new Radiator Tube PN 56419403 prior to installing this kit 10 See Figure 3 Remove Fitting F from the thermo stat housing Install the straight f...

Page 125: ...ole in the bottom of the Bottle Holder I all the way through the control panel NOTE Be careful not to damage the hydraulic hoses directly under the control panel 17 Route the 2 heater hoses through th...

Page 126: ...ont of the cab and install the 10 Amp fuse from the HeaterAssembly PN 56419250 in the third slot from the left side of the fuse block 22 At the back left inside corner of the cab just inside of the do...

Page 127: ...S INC Zenith Electronic Engine Management System 6 7 21 352 5 0 385326 DQG 2 7 9 6 6 7 21 3 6 3523 57 6 RI 62 1 DQG 3523 1 6 7 21 6 7 352 85 6 6 7 21 1 7 21 RI 7 506 6 7 21 6 67 0 23 5 7 21 6 7 21 0 1...

Page 128: ...PROGRAM PURPOSE and OBJECT ZENITH FUEL SYSTEMS Page 1 1 5 48 7 0 1 2 3 4 5 0 50...

Page 129: ...he fuel air mixture Low carbon fuels have lower CO exhaust emissions With Octane rating being a measure of a fuel s resistance to knock propane can stand higher compression pressures and greater ignit...

Page 130: ...SAFETY PROCEDURES Garaging and Repairing Machines 0 4 6 4 7 8 9 1 2 8 6 6 6 0 ZENITH FUEL SYSTEMS Page 3 1...

Page 131: ...SAFETY PROCEDURES ZENITH FUEL SYSTEMS Page 3 2 Levels of Carbon Monoxide Exposure Effects of Carbon Monoxide Exposure 5 0 5 0 0 5 0 3 5 1 0 2 5 7...

Page 132: ...ZENITH FUEL SYSTEMS Page 4 1 6 0 6 0 0 0 2 2 2 0 2 0 0 0 6 0 5 0 6 5 6 0 6 0 5 6 5 5 0 6 5 0 1 2 1 2 7 7 0 0 0 1 0 1 0 50 5 0...

Page 133: ...ZENITH FUEL SYSTEMS Page 5 1 5 0 50 A 50 4 4 B 8 6 A C D FIG 5 1...

Page 134: ...ZENITH FUEL SYSTEMS Page 5 2 6 5 8 0 8 2 0 2 0 2 E F 0 D 50 4 C D 5 5 5 5 6 6 2 0 6 FIG 5 2...

Page 135: ...FUEL SYSTEMS Page 5 3 INPUTS OUTPUT MANIFOLD ABSOLUTE PRESSURE IMAP ENGINE RPM ENGINE COOLANT TEMP ECT INJECTOR INTAKE AIR TEMP IAT OXYGEN SENSOR EGO E C U 4 4 4 A 4 6 G5 4 6 6 6 6 6 FIG 5 3 FIG 5 4 F...

Page 136: ...ZENITH FUEL SYSTEMS Page 5 4 50 4 4 G 4 1 2 4 C D G 4 1 2 FIG 5 6 FIG 5 7 2 4 4 4 H 3 2 FIG 5 8 FIG 5 9...

Page 137: ...ZENITH FUEL SYSTEMS Page 5 5 G 6 5 6 I 6 4 6 2 FIG 5 11 4 50 9 A 6 71 7 2 0 1 7 1 5 1 7 287 7 FIG 5 10...

Page 138: ...STEMS Page 5 6 ZEEMS COMPONENT LOCATIONS 2 Manifold adapter 3 Manifold gasket 4 Gasoline injector 6 Fuel pressure reg 8 Gasoline fuel inlet 9 IAT sensor 10 IMAP sensor 11 ECU 13 Throttle body with act...

Page 139: ...Fuel Enrichment 4 6 6 50 5 5 6 A 50 5 0 0 ZENITH FUEL SYSTEMS Page 5 7...

Page 140: ...Operational sequences of the propane fuel system 1 6 6 C 6 D 3 2 3 0 4 ZENITH FUEL SYSTEMS Page 5 8 FIG 5 13 FIG 5 14...

Page 141: ...Governor Operation 50 A C D 6 4 6 50 C D 6 6 ZENITH FUEL SYSTEMS Page 5 9 G A 5 5 5 G 5 FIG 5 15 FIG 5 16...

Page 142: ...ZENITH FUEL SYSTEMS Page 5 10 Governor operation G A 5 5 A 5 5 A 5 5 5 5 5 A 6 C D 4 6 C D Failsafe Modes 5 1 2 6 H 6 Engine start sequence C 6 D...

Page 143: ...Propane Tank 6 6 6 05 6 6 3 6 H J J F J 3 6 1 6 ZENITH FUEL SYSTEMS INC Page 5 11 FIG 5 18 FIG 5 17...

Page 144: ...ZENITH FUEL SYSTEMS INC Page 5 12 3F 6 6 H J 3F FIG 5 19 6 G 6 FIG 5 20...

Page 145: ...ZENITH FUEL SYSTEMS INC Page 5 13 FIG 5 21 FIG 5 22 Quick Disconnect Couplings 5 6 6 G 6 C D B 6 FIG 5 23...

Page 146: ...ZENITH FUEL SYSTEMS Page 6 1 0 2 8 0 6 3 1 6 1 2 30 2 4 4 4 3 4 0 50 3 25 63 7 0 G 7 6 8 A G G 5...

Page 147: ...ZENITH FUEL SYSTEMS Page 6 2 A A 1 6 FIG 6 1...

Page 148: ...ZENITH FUEL SYSTEMS Page 6 3 5 2 3 0 0 1 4 4 B 6 6 6 4 4 3 6 6 6 9 6 6...

Page 149: ...ZENITH FUEL SYSTEMS Page 7 2 8 2...

Page 150: ...ZENITH FUEL SYSTEMS Page 7 3 8 2...

Page 151: ...tuator unplugged OK Back out Idle stop screw one turn Does idle speed drop NO Binding or stuck throttle OK NO Engine idle above 500 650 RPM with actuator connected Adjust idle stop to specifications S...

Page 152: ...rn Does idle speed drop NO Binding or stuck throttle OK NO Engine idle above 500 650 RPM with actuator connected Adjust idle stop to specifications SEE Operating spec YES With ECT above 161 deg F allo...

Page 153: ...ZENITH FUEL SYSTEMS Page 9 3...

Page 154: ...switch Repair wiring or replace ECU Replace throttle body Check throttle plate rotation Governor actuator continuity Governor actuator input OK APP sensor or speed select output OK YES YES NO NO NO Y...

Page 155: ...s Repair wiring or voltage source Tach signal to ECU 12V at injector Check ground or replace ECU Fuel press 9 11 psi 16 psi restricted return line Replace injector or o rings Adjust Fuel pres 9 11 psi...

Page 156: ...p when keyis turned on Momentary12v fromECU when keyis turned on 12v to ECU Ground continuity Repair or replace pump Repair wire topump Repair 12v source to ECU Replace ECU Repair ground wire YES NO Y...

Page 157: ...ECU See lock off diagnosis Repair wiring or voltage source Tach signal to ECU 12V at injector Check ground or replace ECU primary reg pressure 28 psi Replace injector or o rings Replace injector NO YE...

Page 158: ...tic Go to no start diagnostic Replace defective pump and lock off Repair 12v source to ECU Replace ECU Repair ground wire Starts in alternate fuel Momentary 12v at lock off or gas pump when key is on...

Page 159: ...ing system NO Fuel pressure 9 11 psi YES 16 psi restricted fuel line NO Replace fuel pressure regulator YES Replace fuel pump and or filter Map Sensor OK YES Replace map sensor NO Ignition timing OK Y...

Page 160: ...ZENITH FUEL SYSTEMS Page 9 11 6 6 9 8 2...

Page 161: ...nections Check MAP sensor with alternate sensor Replace fuel pressure regulator Adjust timing or repair harness module See engine service manual Ign timing Retarded Fuel press Greater than 11 psi Rest...

Page 162: ...nge tanks Regulator freeze up Engine coolant level and circulation Check restriction filter or lock off YES YES NO YES YES Fuel pressure OK Primary regulator Pressure 28 psi Static Adjust pressure or...

Page 163: ...ZENITH FUEL SYSTEMS Page 9 14 6 6 9 8 Continued...

Page 164: ...sensor connections Check MAP sensor with alternate sensor Replace fuel injector Adjust timing or repair harness module See engine service manual Ign timing OK Fuel press Primary reg 28 psi Runs OK OK...

Page 165: ...Nilfisk Advance Inc 14600 21st Avenue North Plymouth MN 55447 3408 www nilfisk advance com Phone 800 989 2235 Fax 800 989 6566 2002 Nilfisk Advance Inc Plymouth MN 55447 3408 Printed in the U S A...

Reviews: