


FORM NO. 56041587 - Hydro-Retriever
™
3800, 2042 / BR 1100, 1100C, 1100C-XL - 19
ENGLISH / 19
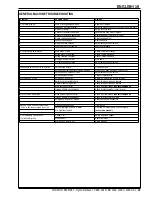
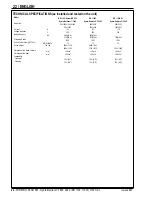
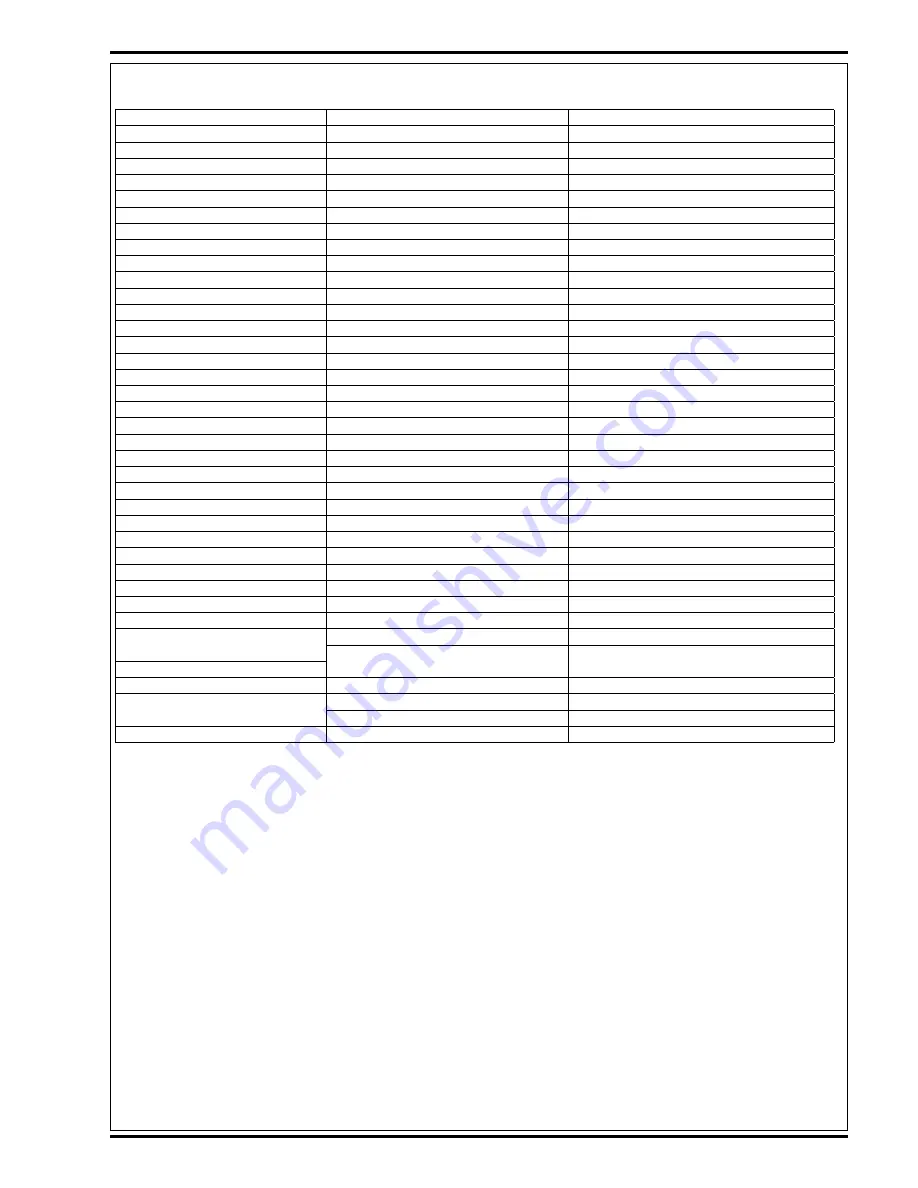
GENERAL MACHINE TROUBLESHOOTING
Problem
Possible Cause
Remedy
Poor water pick-up
Worn or torn squeegee blades
Reverse or replace
Squeegee out of adjustment
Adjust so blades touch fl oor evenly across entire width
Recovery tank full
Empty recovery tank
Recovery tank drain hose leak
Secure drain hose cap or replace
Recovery tank cover gasket leak
Replace gasket / Seat cover properly
Debris caught in squeegee
Clean squeegee tool
Vacuum hose clogged
Remove debris
Using too much solution
Adjust solution control valves
Foam fi lter cover not seated
Seat cover properly
Poor scrubbing performance
Worn brush or pad
Rotate or replace brushes
Wrong brush or pad type
Consult Nilfi sk-Advance
Wrong cleaning chemical
Consult Nilfi sk-Advance
Moving machine too fast
Slow down
Not using enough solution
Adjust solution control valves
Inadequate solution fl ow or no solution
Solution tank empty
Fill solution tank
Solution lines, valves, fi lter or trough clogged
Flush lines, trough and clean solution fi lter
Solution control valves not open
Adjust solution control valves
Solution solenoid valve
Clean or replace valve
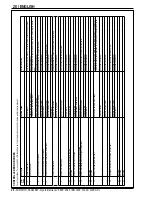
Machine does not run
Emergency stop switch
Rotate the stop switch knob to release
Battery charger port interlock
Check for open circuit and replace
Operator seat safety switch
Check for open circuit and replace
Main system controller
Check error fault codes (see service manual)
Tripped 10 Amp circuit breaker
Check for electrical short circuit & reset
No FWD/REV wheel drive
Drive system speed contoller
Check error fault codes (see service manual)
Tripped 80 Amp circuit breaker
Check for drive motor overload
Emergency stop switch tripped
Reconnect battery connectors
Vacuum shuts off and display shows
“FULL” when recovery tank is not full
Plugged squeegee hose
Clear debris
Vacuuming large amounts of water
at a high travel speed
Slow down or disable auto shut-off feature
(see service manual)
Poor Sweeping Performance
(Cylindrical System)
Hopper Full
Empty and clean hopper
Brushes worn
Replace brushes
Bristles have taken a set
Rotate brushes


