background image

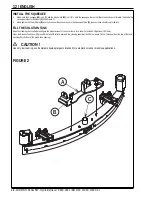
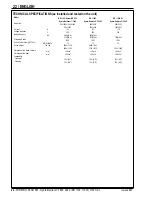
 8 - FORM NO. 56041587 - Hydro-Retriever

™ 

3800, 2042 / BR 1100, 1100C, 1100C-XL

8 / ENGLISH

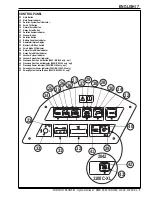
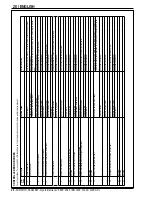
FUNCTIONAL DESCRIPTION OF CONTROL BUTTONS:

The controls were designed with one touch operation in mind.  For single pass scrubbing the user can simply depress one button and all systems on the 
machine will be ready to go.
For most single-pass scrubbing operations, the operator should only need to use the fi rst three buttons on the control panel.  These are the Scrub Off (25)
Normal Scrub (26), and Heavy Scrub (27) buttons.  For this reason these buttons are outlined in bright white on the control panel while the other buttons are 
outlined in a darker color.
Horn Button (22) - Pressing this button will activate the horn.
Scrub Off Button (25) - Pressing this button when the unit is in a scrub mode will cause the following to occur:
• 

The scrub brushes will turn off

• 

The scrub deck will raise to the UP position

• The 

solution 

fl ow will be stopped

• The 

fi rst time that this button is pressed, the vacuum/squeegee system will NOT be turned off.  This is so that any remaining water may be picked up 

without having to turn the vacuum back on.  If this button is pressed a second time (pressed after the scrub mode has been turned off) the squeegee will 
raise and the vacuum will shut off after a 6 second delay.

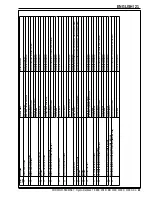
Normal Scrub Button (26) - Pressing the normal scrub button will enable the scrub system and set the scrub pressure to the last selected value for the nor-
mal scrub mode. The status display will momentarily display the scrub pressure setting. This is indicated by “PA” followed by a number.  Subsequent presses 
of the normal scrub button will step the pad pressure setting through the allowable range up to the maximum value programmed for the normal scrub mode.  
Once the maximum value is reached the pressure setting will step back to 1.  The factory default maximum for the normal scrub mode is 4.  The following will 
occur when this button is pressed:
• 

The scrub deck will be lowered

• 

The vacuum and solution systems will be enabled (vacuum and solution modes = AUTO)

• 

As soon as a direction is commanded by the throttle (forward or reverse) the brushes will start turning and the vacuum will turn on. If the direction is 
forward, the squeegee will lower and the solution fl ow will start. If the direction is reverse, the squeegee will go to the up position and the solution fl ow will 
be stopped.

Heavy Scrub Button (27) - Pressing the heavy scrub button will enable the scrub system and set the scrub pressure to the last selected value for the heavy 
scrub mode.  The status display will momentarily display the scrub pressure setting.  This is indicated by “PA” followed by a number.  Subsequent presses 
of the heavy scrub button will step the pad pressure setting through the allowable range up to the maximum value programmed for the heavy scrub mode.  
Once the maximum value is reached the pressure setting will step back to (normal scrub limit + 1).  The factory default maximum for the heavy scrub mode is 
7 (cylindrical) or 9 (disc).  The following will occur when this button is pressed:
• 

The scrub deck will be lowered

• 

The vacuum and solution systems will be enabled (vacuum and solution modes = AUTO)

• 

As soon as a direction is commanded by the throttle (forward or reverse) the brushes will start turning and the vacuum will turn on. If the direction is 
forward, the squeegee will lower and the solution fl ow will start. If the direction is reverse, the squeegee will go to the up position and the solution fl ow will 
be stopped.

Vacuum Button (29) - This button is used to select the mode of operation for the vacuum/squeegee system.  There are 3 modes of operation for this system.  
These modes are OFF, AUTO, ON. Following is a description of each mode and how they are selected.
OFF MODE:  In this mode the vacuum is off and the squeegee is in the up position.  As mentioned above, when a scrub mode is selected, the vacuum 
system will be placed in the AUTO mode.  If it is desired to double-scrub (scrub without recovering the solution) the vacuum system can be turned off by 
pressing this button.
AUTO MODE:  This mode is automatically selected when a scrub mode is selected.  In this mode the squeegee will be in the down position unless the re-
verse direction is selected via the throttle.  The vacuum will turn on if either direction is selected. While in this mode the vacuum will remain on for 10 seconds 
after the throttle returns to the neutral position.  This is so that the solution in the squeegee and hose can be drawn into the tank.  This mode can be selected 
independently of the scrub mode by pressing and releasing the vacuum button.
ON MODE:  In this mode the squeegee will remain in the UP position and the vacuum will be on regardless of the throttle position.  This mode is selected 
by pressing and holding the vacuum button for approximately 1.5 seconds.  The vacuum mode must fi rst be OFF before entering this mode.  This mode is 
included in the event an external wand is to be used with this machine or if the operator wants to clean the squeegee using the vacuum hose.
Solution Button (30) - This button is used to select the mode of operation for the solution system.  There are 3 modes of operation for this system.  The 
modes are OFF, AUTO, MOMENTARY ON.  Following is a description of each mode and how they are selected.
OFF MODE:  In this mode the solution fl ow is turned off.  As mentioned above, when a scrub mode is selected, the solution system will be placed in the 
AUTO mode.  If it is desired to scrub without dispensing solution, the solution can be turned off by pressing this button.
AUTO MODE:  This mode is automatically selected when a scrub mode is selected.  In this mode the solution fl ow will be turned on whenever the forward 
direction is selected via the throttle.  The solution fl ow will be turned off otherwise.
MOMENTARY ON MODE:  This mode can only be selected when the scrub mode is OFF.  Solution can be dispensed by pressing and holding the solution 
button.  Solution will be dispensed for as long as the button is held.  This is for pre-wetting the fl oor prior to scrubbing.
Presweep Dust Control Button (opt / 39) - Use this button in conjunction with the optional presweep kit.  The dust control feature will only work when the 
brooms are running on the presweep unit.
Sweep System Control Button (2042 / BR 1100C-XL only) (43) - Use this button to turn the sweep system ON or OFF.  The side brooms will only run when 
the scrub system is ON and the machine is in motion (not in neutral).  If the scrub system is turned OFF while the sweep system is still ON, the side brooms 
will automatically lower and run the next time the scrub system is turned ON.
Side Broom Wear Adjustment Lever (2042 / BR 1100C-XL only) (44) - Use this adjustment lever to periodically re-adjust the down limit of the side brooms 
as they wear.  Loosening the lever, sliding it to the left and re-tightening it will cause the side brooms to drop closer to the fl oor.
Operator Seat Adjustment Lever (45) – Use this lever to slide the operator’s seat forward or backward.

Summary of Contents for BR 1100

Page 1: ...1587 English Hydro Retriever 3800 Instructions For Use BR 1100 1100C 1100C XL Hydro Retriever 2042 Advance MODELS 56410000 disc 56410350 cyl 56410001 2042 Nilfisk MODEL 56410002 disc 56410351 cyl 56410425 1100C XL 56307200 Haram BR 1100 ...

Page 2: ......

Page 3: ...only PARTS AND SERVICE Repairs when required should be performed by your Authorized Nilfisk Advance Service Center who employs factory trained service personnel and main tains an inventory of Nilfisk Advance original replacement parts and accessories Call the NILFISK ADVANCE DEALER named below for repair parts or service Please specify the Model and Serial Number when discussing your machine NAME ...

Page 4: ...hine on or near these agents or operate in areas where flammable liquids exist Do not clean this machine with a pressure washer Only use the brushes provided with the appliance or those specified in the instruction manual The use of other brushes may impair safety CAUTION This machine is not approved for use on public paths or roads This machine is not suitable for picking up hazardous dust Do not...

Page 5: ...s blocs de sécurité ou des étais destinés à soutenir la machine Ne déversez pas d agents nettoyants inflammables ne faites pas fonctionner la machine à proximité de ces agents ou d autres liquides inflammab les Ne nettoyez pas cette machine avec un nettoyeur à pression Utilisez uniquement les brosses fournies avec l appareil ou celles spécifiées dans le manuel d instructions L utilisation d autres...

Page 6: ...r 8 Drive Pedal Directional Speed 9 Charger Plug 10 Drive and Steer Wheel 11 Circuit Breakers 12 Emergency Stop Switch Battery Disconnect 13 Scrub Brush Deck And Side Skirts 14 Rear Wheel 15 Battery Compartment 16 Recovery Tank Shutoff Float 17 Vacuum Motor Filter Housing 18 Squeegee Assembly 19 Squeegee Casters 20 Solution Filter 21 Recovery Tank Drain Hose 44 Side Broom Wear Adjustment Lever 204...

Page 7: ...Display 33 Master On Off Key Switch 34 Scrub Mode Off Indicator 35 Normal Scrub Mode Indicator 36 Heavy Scrub Mode Indicator 37 Vacuum System Indicator 38 Vacuum System Fault Indicator 39 Presweep Dust Control Button 3800 BR 1100 only opt 40 Presweep Dust Control Indicator 3800 BR 1100 only opt 41 Presweep Power Indicator 3800 BR 1100 only opt 42 Sweep System Power Indicator 2042 BR 1100C XL only ...

Page 8: ... is reverse the squeegee will go to the up position and the solution flow will be stopped Vacuum Button 29 This button is used to select the mode of operation for the vacuum squeegee system There are 3 modes of operation for this system These modes are OFF AUTO ON Following is a description of each mode and how they are selected OFF MODE In this mode the vacuum is off and the squeegee is in the up...

Page 9: ...his indicates that the vacuum system is enabled but the vacuum is currently off This indicator will be GREEN if the vacuum is currently on This indicates that the system is in the AUTO mode and the throttle is not in neutral or that the vacuum system is in the ON mode This indicator will FLASH GREEN if the shutoff delay is keeping the vacuum on This occurs if the vacuum system is in the AUTO mode ...

Page 10: ...cator NOTE Have a qualified service engineer reference the Service Manual for explanations about the error code descriptions and scrub system control default parameter changes A brief description of error codes can be found at the back of this manual Emergency Stop Switch Battery Disconnect 12 This will remove all power from the machine INSTALL THE BATTERIES WARNING Use extreme caution when workin...

Page 11: ...le X X Vinyl tile X X X Raised rubber tile X X Polishing Raised Disc Tile X Marble X Vinyl tile X INSTALL THE BRUSHES CYLINDRICAL SYSTEM CAUTION Turn the key switch off O and remove the key before changing the brushes and before opening any access panels 1 Make sure the Key Switch 33 is off O To access the brushes swing both side skirt assemblies open Note The skirts are held in place by a large c...

Page 12: ... vacuum hose to the Squeegee Tube C vacuum hose should loop to the left FILL THE SOLUTION TANK Read the cleaning chemical label and figure the proper amount of chemical to mix for a tank that holds 53 US gallons 200 liters Open the Solution Tank Cover 2 then fill the tank 1 3 full of water add the cleaning chemical then fill the tank to 7 62cm 3 inches from the top of the tank opening fill to bott...

Page 13: ... a normal walking speed and overlap each path by 2 3 inches 50 75 mm Adjust when necessary the machine speed and solution flow according to the condition of the floor CAUTION To avoid damaging the floor keep the machine moving while the brushes are turning 9 When scrubbing check behind the machine occasionally to see that all of the waste water is being picked up If there is water trailing the mac...

Page 14: ...se the brushes or pads in warm water and hang up to dry 5 Remove the squeegee rinse it with warm water and re install on mount 6 Remove the hopper on cylindrical systems and clean thoroughly Remove from left side of machine by opening skirt and tilting hopper up and away from housing then pull out 7 Check the maintenance schedule below and perform any required maintenance before storage MAINTENANC...

Page 15: ...ller tubes WARNING Do not fill the batteries before charging Only charge batteries in a well ventilated area Do not smoke while servicing the batteries CAUTION To avoid damage to floor surfaces always wipe water and acid from the top of the batteries after charging CHECKING THE BATTERY ELECTROLYTE LEVEL Check the electrolyte level of the batteries at least once a week After charging the batteries ...

Page 16: ...ustments height and angle The recommended adjustment steps are to set the tool angle first then adjust the blade height Adjusting the Squeegee Angle Adjust the squeegee angle whenever a blade is reversed or replaced or if the squeegee is not wiping the floor dry 1 Park the machine on a flat even surface and lower the squeegee Then drive the machine forward enough to have the squeegee blades fold o...

Page 17: ...ged edge points inside towards the scrub brushes Replace the blades as a set if they are nicked torn or worn beyond their ability to be adjusted 4 Reinstall the skirt housing assemblies onto the machine and adjust the blade for proper contact to the floor when the brush deck is placed in the scrub position SIDE SKIRT HEIGHT ADJUSTMENT DISC SYSTEM 1 The side skirt housing knob retainer screw studs ...

Page 18: ... cleaning path During normal use the blades will wear in time The operator will notice a small amount of water leaking out underneath the side skirts Skirt height adjustment is automatic on this system The skirt assemblies should move up and down freely for proper operation To replace the scrub system side skirt s 1 See Figure 5 Remove the 2 A Cotter Pins and swing the Skirt Assemblies open Remove...

Page 19: ...y Fill solution tank Solution lines valves filter or trough clogged Flush lines trough and clean solution filter Solution control valves not open Adjust solution control valves Solution solenoid valve Clean or replace valve Machine does not run Emergency stop switch Rotate the stop switch knob to release Battery charger port interlock Check for open circuit and replace Operator seat safety switch ...

Page 20: ...service manual 8 Scrub motor severe overload See error code 7 9 Scrub motor circuit open Bad electrical connection Check all conections to scrub motors Defective scrub motor s Consult service manual Control failure Consult service manual 10 Scrub motor contactor contacts shorted Contactor failure Consult service manual 11 Not used 12 Scrub motor contactor coil overload Contactor failure Consult se...

Page 21: ...fault Bad electrical connection Check all conections to solution solenoid Defective solution solenoid Consult service manual Control failure Consult service manual 35 External wiring fault Wiring problem Check for loose connections to main control unit Consult service manual 36 No accessory output voltage Control Failure Wiring problem Check for loose connections to main control unit Consult servi...

Page 22: ...56410000 56410350 56410001 Current A 136 103 115 Voltage Batteries V 36V 36V 36V Battery Capacity Ah 480 5 hr 480 5 hr 370 6 hr 370 6 hr 370 6 hr Protection Grade IPX3 IPX3 IPX3 Sound Power Level IEC 704 1 dB A 20μPa 73 73 73 Gross Weight lbs kg 2988 1355 2998 1360 2690 1220 2700 1225 2833 1285 Vibrations at the Hand Controls m s2 2 5m s2 2 5m s2 2 5m s2 Vibrations at the Seat m s2 0 5m s2 0 5m s2...

Page 23: ......

Page 24: ... non deve essere smaltito con altri rifiuti domestici al termine del ciclo di vita Per evitare eventuali danni all ambiente o alla salute causati dall inopportuno smaltimento dei rifiuti si invita l utente a sep arare questo prodotto da altri tipi di rifiuti e di riciclarlo in maniera responsabile per favorire il riutilizzo sostenibile delle risorse materiali Gli utenti domestici sono invitati a c...

Page 25: ... estabelecimento onde adquiriram este produ to ou as entidades oficiais locais para obterem informações sobre onde e de que forma podem levar este produto para permitir efectuar uma reciclagem segura em termos ambientais Os utilizadores profissionais deverão contactar o seu fornecedor e consultar os termos e condições do contrato de compra Este produto não deverá ser misturado com outros resíduos ...

Page 26: ...otnímu prostÀedí recyklovat Obchodníci by mûli kontaktovat své dodavatele a zkontrolovat všechny podmínky koupû Tento výrobek by se nemûl míchat s jinými komerãními produkty urãenými k likvidaci Slovenia Ustrezno odstranjevanje tega izdelka odpadna elektriĀna in elektronska oprema Oznaka na izdelku ali spremljevalni dokumentaciji pomeni da ga na koncu uporabne dobe ne smemo odstranjevati skupaj z ...

Page 27: ...l som skal kastes Lithuania Latvia Greece Poland Prawidãowe usuwanie produktu zu yty sprz t elektryczny i elektroniczny Oznaczenie umieszczone na produkcie lub w odnoszàcych si do niego tekstach wskazuje e produktu po upãywie okresu u ytkowania nie nale y usuwaþ z innymi odpadami pochodzàcymi z gospodarstw domowych Aby uniknàþ szkodliwego wpãywu na Êrodowisko naturalne i zdrowie ludzi wskutek niek...

Page 28: ...vance A E Tel 30 8 Thoukididou Str 210 963 3443 Argioupoli Fax 30 Gr 164 52 Athens 210 965 0975 Greece Holland Sales Sub Nil sk Advance B V Phone 31 Camerastraat 9 2e verdieping 36 546 07 00 1322 BB Almere Fax 31 Postbus 60112 36 523 51 48 1320 AC Almere www nil sk advance nl Ireland Sales Sub Nil sk Advance Limited Phone 35 28 Sandyford Of ce Park 3 12 94 38 38 Sandyford Dublin 18 Fax 35 Ireland ...

Page 29: ... Fuitian Free Trade Zone Fax 86 755 518038 Shenzhen 8359 1063 P R China China Suzhou Nil sk Advance Professional Phone 86 512 Cleaning Equipment Suzhou Co Ltd 8918 5656 306 Su Hong Zhong Road Build 2 Fax 86 512 Suzhou Industrial Park 8918 5666 215021 Suzhou P R China Hong Kong Sales Sub Nil sk Advance Ltd Phone 852 2001 HK Worsted Mills Ind l Bldg 2427 5951 31 39 Wo Tong Tsui St Fax 852 Kwai Chung...

Page 30: ...EEC 93 68 EEC Harmonized standards EN 60 335 2 72 Normativa sobre baja tensión 73 23 CEE 93 68 CEE Normas armonizadas EN 60 335 2 72 Dichiarazione di conformità CEE I EU Declaração de conformidade da CE P Lavasciuga a batteria Auto lavadora a baterias È prodotto in conformità alle disposizioni contenute nelle Direttive del Consiglio dei Ministri Esta máquina foi fabricada em conformidae com as seg...

Page 31: ... o shodě CS Deklaracja zgodności z normami UE PL Bateriemi napájené zařízení pro mytí podlah Akumulatorowa cyklinarka podłogowa Tento stroj byl vyroben ve shodě s následujícími směrnicemi a normami Niniejsze urządzenie zostało wyprodukowane w zgodzie z następującymi dyrektywami i normami UE Směrnice o strojním zařízení 98 37 EEC Dyrektywa dotycząca maszyn 98 37 EEC Směrnice o elektromagnetické kom...

Page 32: ...www nilfisk advance com 2005 Printed in USA ...

Reviews: