background image

13

english

IVB 3-H
IVB 5-H
IVB 7-H

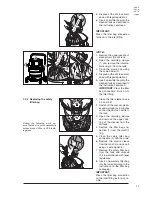
7.2.5  Emptying dirt tank 

(IVB 3-H/IVB 5-H)

1. Remove the upper section of 

cleaner from the dirt tank.

2.  Using one hand, take hold of the 

dirt tank underneath and tip out 
the dirt.

3.  Dispose of the dirt in accordance 

with legal regulations.

4.  Clean the rim of the tank before 

fitting the upper section of clean-
er.

Before reinserting the suction hose:
5.  Clean the inlet fitting and hose 

collar.

Only after picking up harmless dust 
without a filter bag.

8.  Check that the control flap (6) 

for filter cleaning works properly. 
The control flap should move 
back and forwards easily.

9.  Clean the level hose (7).
10. Fit a new filter element.
11. Fit the filter holder. Ensure that it 

is in the correct position.

12. Fit bar and close bar handle.
13. Dispose of the used filter ele-

ment in accordance with legal 
regulations.

5

6

7

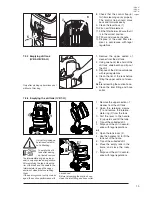
7.2.6  Emptying the dirt tank (IVB 7-H)

1. 

Remove the upper section of 
cleaner from the dirt tank.

2. 

Open the retaining clamps 
(1) and remove the interme-
diate ring (2) from the tank.

3. 

Pull the lever in the handle 
(3) upwards and tilt the tank.

4. 

Tip out the collected dirt.

5. 

Dispose of the dirt in accord-
ance with legal regulations.

or:

3.  Open the tank locks (4).
4.  Use the handles (5) to lift the 

tank out of the frame. 

5.  Tip out the collected dirt.
6.  Place the empty tank in the 

frame and close the locks 
(4).

7.  Dispose of the dirt in accord-

ance with legal regulations.

1

1

3

3

1

1


Only after picking up 
harmless dust with-
out a filter bag.


To empty the dirt 
tank after picking 
up liquids: remove 

the intermediate ring as a proper 
seal is only ensured during suction.
After emptying the tank: clean the 
rim of the tank and the seals in the 
intermediate ring and the upper 
section of cleaner before refitting 
them.
If the seal or groove is dirty or dam-
aged, the suction performance will 

5

5

4

4

4

4

2

2

be reduced.
Before reinserting the suction hose: 
clean the inlet fitting and hose collar.

Summary of Contents for IVB 3-H

Page 1: ...d utilisation Gebruiksaanwijzing Istruzioni sull uso Driftsinstruks Bruksanvisning Driftsvejledning K ytt ohje Navodilo za uporabo Uputstvo za rad Prev dzkov n vod Provozn n vod Instrukcja obs ugi Ke...

Page 2: ...IVB 3 H IVB 5 H IVB 7 H auto 1 4 3 5 6 7 3 11 9 8 10 IVB 3 H 14 auto 9 8 3 5 6 7 IVB 5 H 1 4 auto 14 IVB 7 H 2 3 4 1 5 5 6 8 10 12 12 13 10 9 14 auto auto...

Page 3: ...ower control 7 4 3 Check volume flow monitor 7 4 4 Acoustic warning 8 4 5 Cleaning the filter element IVB 3 H 8 4 6 Cleaning the filter element IVB 5 H 7 H 8 5 1 Techniques 9 5 1 1 Picking up dry subs...

Page 4: ...erve recognized regulations for safety and proper use Do not use any unsafe work techniques Purpose and intended use The vacuum cleaners described in this operating manual are suitable for commercial...

Page 5: ...liquid emerges stop work immediately and empty the dirt tank Regularly clean the built in float IVB 3 H and level indicator hose IVB 5 H 7 H to limit the water level and check that they are not damage...

Page 6: ...ubstanc es get into the surroundings Before removing the vacuum cleaner from the area contami nated with harmful substances clean the outside of the vac uum cleaner wipe it clean or pack the vacuum cl...

Page 7: ...ncentration values use the filter bag To pick up harmless dust use the waste bag See section 9 5 Accessories for ordering number 2 2 Operating elements See fold out page at the front of these operatin...

Page 8: ...amps NOTE Ensure that the retaining clamps fit properly 4 Operation 4 1 Connections 4 1 1 Connecting the suction hose 1 Connect the suction hose The suction hose diameter must suit the position of the...

Page 9: ...mply with regulations only ap proved dust producing tools should be connected The maximum power consumption of the connected power tool is stat ed in section 9 4 Technical data The hose diameter and t...

Page 10: ...suction performance is always at its best the filter ele ment is automatically cleaned dur ing operation We recommend com plete cleaning if the filter element becomes extremely dirty NOTE If the acou...

Page 11: ...number To pick up harmless dust we recommend the use of a waste bag See section 9 5 Accesso ries for ordering number Dis posal of the picked up material is then simple and hygienic After picking up li...

Page 12: ...e the vacuum cleaner in a dry room where it is protected from unauthorized use 7 Maintenance 7 1 Maintenance plan After finishing work As required 7 2 1 Replacing the waste bag 7 2 2 Replacing the saf...

Page 13: ...ions in the filter bag packaging IMPORTANT Press the filter bag connection on the inlet fitting as far as pos sible During the following work en sure that dust is not unnecessarily spread around Wear...

Page 14: ...ations 7 2 4 Replacing filter element H IVB 5 H 7 H During the following work ensure that dust is not unnecessarily spread around Wear a cleaner down with the filter ele ment facing upwards Do not pla...

Page 15: ...dirt tank IVB 7 H 1 Remove the upper section of cleaner from the dirt tank 2 Open the retaining clamps 1 and remove the interme diate ring 2 from the tank 3 Pull the lever in the handle 3 upwards and...

Page 16: ...r selected with suction power control is too low Set suction power in accor dance with section 4 2 3 Set ting suction power Hose diameter is not right for switch position Set correct switch position f...

Page 17: ...art 1 and Part 3 at regular intervals and after re pairs or modifications A dust test must be performed at least once every year by the manufacturer or a trained per son This test covers for exam ple...

Page 18: ...EN 55014 2 EN 61000 3 2 DIN EN 60335 1 DIN EN 60335 2 69 Br ndby 04 07 2005 9 6 EC declaration of conformity IVB 3 H 5 H 7 H EU GB 230 240V GB 110V EU GB 230 240V GB 110V EU GB 230 240V GB 110V Voltag...

Page 19: ...Nilfisk Advance A S Sognevej 25 DK 2605 Br ndby Denmark Tel 45 43 23 81 00 Fax 45 43 43 77 00 www nilfisk advance com...

Reviews: