background image

01

english

IVB 3-M
IVB 5-M
IVB 7-M

1) 

Option depending on model

Contents

1 Important 

safety 

instructions

2 Description

3 Before 

start-up

4 Operation

5 Applications 

and 

techniques

6  After finishing work

7 Maintenance

8 Troubleshooting

9 Further 

information


............................................................................................2

2.1 Purpose 

................................................................................4

2.2 Operating 

elements 

..............................................................5

3.1 

Assembling the cleaner ........................................................5

4.1 Connections 

.........................................................................5

4.1.1  Connecting the suction hose ................................................5
4.1.2 Electrical connection ............................................................5
4.1.3  Connecting electrical appliances ..........................................6
4.2 

Switching on the vacuum cleaner .........................................6

4.2.1 Switch position “I” .................................................................6
4.2.2  Switch position „auto“ ...........................................................6
4.2.3  Suction power control ...........................................................6
4.3 

Check volume flow monitor ..................................................6

4.4 Acoustic 

warning 

..................................................................7

4.5 

Cleaning the filter element (IVB 3-M) ...................................7

4.6 

Cleaning the filter element (IVB 5-M/7-M) ............................7

5.1 Techniques 

...........................................................................8

5.1.1  Picking up dry substances....................................................8
5.1.2  Picking up liquids ..................................................................9

6.1 

Switching the vacuum cleaner off and storage .....................9

7.1 Maintenance 

plan 

...............................................................10

7.2 Maintenance 

work 

..............................................................10

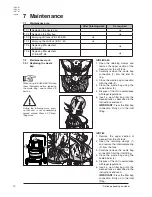
7.2.1  Replacing the waste bag ....................................................10
7.2.2  Replacing the filter bag .......................................................11
7.2.3  Emptying dirt tank (IVB 3-M/5-M) .......................................11
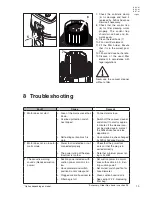
7.2.4  Emptying the dirt tank (IVB 7-M) .....................................11
7.2.5  Replacing filter element (IVB 3-M) .....................................12
7.2.6  Replacing filter element (IVB 5-M/7-M) ..............................12


..........................................................................................13

9.1 

Recycling the vacuum cleaner ...........................................14

9.2 Guarantee 

..........................................................................14

9.3 

Tests and approvals............................................................14

9.4 Technical 

data 

....................................................................15

9.5 Accessories 

........................................................................15

9.6 

EC declaration of conformity ..............................................15

Summary of Contents for IVB 3-M

Page 1: ...nwijzing Istruzioni sull uso Driftsinstruks Bruksanvisning Driftsvejledning K ytt ohje Navodilo za uporabo Uputstvo za rad Prev dzkov n vod Provozn n vod Instrukcja obs ugi Kezel si utas t s Instrucci...

Page 2: ...IVB 3 M IVB 5 M IVB 7 M auto 1 4 3 5 6 7 3 11 9 8 10 IVB 3 M 14 auto 9 8 3 5 6 7 IVB 5 M 1 4 auto 14 IVB 7 M 2 3 4 1 5 5 6 8 10 12 12 13 10 9 14 auto auto...

Page 3: ...2 3 Suction power control 6 4 3 Check volume flow monitor 6 4 4 Acoustic warning 7 4 5 Cleaning the filter element IVB 3 M 7 4 6 Cleaning the filter element IVB 5 M 7 M 7 5 1 Techniques 8 5 1 1 Picki...

Page 4: ...rve recognized regulations for safety and proper use Do not use any unsafe work techniques Purpose and intended use The vacuum cleaners described in this operating manual are suitable for commercial u...

Page 5: ...ard ous dust Electrical components Check the rated voltage of the vacuum cleaner before con necting it to the mains supply system Ensure that the voltage shown on the rating plate cor responds to the...

Page 6: ...intenance staff or other persons In the maintenance area use filtered compulsory ven tilation wear protective clothing clean the maintenance are so that no harmful substanc es get into the surrounding...

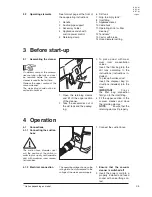
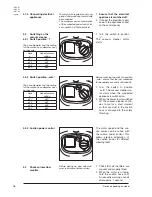
Page 7: ...er The mains plug should not be in serted into a socket 3 To pick up dust with maxi mum room concentration values Insert the filter bag into the dirt tank according to the instructions instructions in...

Page 8: ...l panel To comply with regulations only ap proved dust producing tools should be connected The maximum power consumption of the connected power tool is stat ed in section 9 4 Technical data The hose d...

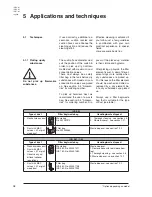
Page 9: ...r removes attached dust from the slats of the filter elements To ensure that suction perform ance is always at its best the filter element is automatically cleaned during operation We recommend comple...

Page 10: ...hygienic After picking up liquids the filter element is wet A damp filter el ement clogs more quickly when dry substances are picked up For this reason the filter element should be washed and dried o...

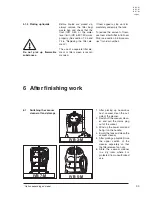
Page 11: ...e foam killer Nilfisk Alto Foam Stop see section 9 5 Accesso ries for order number 6 After finishing work 6 1 Switching the vacuum cleaner off and storage 1 After picking up hazardous dust vacuum clea...

Page 12: ...and remove the intermediate ring 2 from the tank 3 Carefully remove the waste bag connection from the inlet fitting 4 Close the waste bag using the cable binder 3 5 Dispose of the dirt in accordance...

Page 13: ...he suction hose 5 Clean the inlet fitting and hose collar Only after picking up harmless dust without a filter bag 7 2 4 Emptying the dirt tank IVB 7 M 1 Remove the upper section of cleaner from the d...

Page 14: ...it clockwise to secure it firmly 10 Dispose of the used filter ele ment in accordance with legal regulations Never use the vacuum cleaner without a filter During the following work ensure that dust is...

Page 15: ...ad protection switch has tripped Switch off the vacuum cleaner and allow it to cool for approx 5 minutes If the cleaner can not be started again contact the Nilfisk Advance service department Self act...

Page 16: ...9 3 Tests and approvals The vacuum cleaners have been tested as specified in IEC EN 60335 2 69 including appendix AA All the requirements were fulfilled for equipment in dust class M The vacuum clean...

Page 17: ...0082 Filter screen 15475 Nilfisk Alto Foam Stop 6 x 1 l 8469 9 6 EC declaration of conformity 9 4 Technical data IVB 3 M 5 M 7 M EU GB 230 240V GB 110V EU GB 230 240V GB 110V EU GB 230 240V GB 110V Vo...

Page 18: ...Nilfisk Advance A S Sognevej 25 DK 2605 Br ndby Denmark Tel 45 43 23 81 00 Fax 45 43 43 77 00 www nilfisk advance com...

Reviews: