background image

23

1) 

Optional accessories / Option depending on model

Original Instructions

IVB 9 H/M

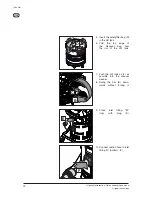
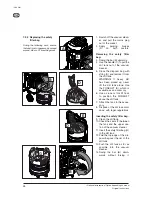
7.2.2  Replacing the disposal 

bag

1.  Switch off the vacuum clean-

er and pull the mains plug 
out of the socket.

2.  Apply parking brakes (A) on 

both castors.

Removing the disposal bag:

3.  Swing the bar (B) upwards. 
4.  Use the handle (C) to pull the 

dirt tank out of the vacuum 
cleaner.

5.  Close the disposal bag with 

string (D) and remove it from 
the dirt tank.

WARNING! 

If heavy dirt has been picked 
up, never lift the dirt tank 
alone. Use the FORKLIFT 
(E), which is available as an 
accessory.

6.  Use a crane or fork lift truck 

to position the FORKLIFT 
above the dirt tank.

7.  Attach the tank to the acces-

sory.

8.  Dispose of the dirt in accord-

ance with legal regulations.

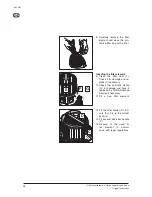
Inserting the disposal bag:

9.  Clean the dirt tank.
10. Check the seals (F) between 

the tank and the upper sec-
tion of the vacuum cleaner.

11. Insert the disposal bag (G) in 

the dirt tank.

12. Fold the top edge of the dis-

posal bag over the rim of the 
dirt tank.

13. Push the dirt tank as far as 

possible into the vacuum 
cleaner.

14. Swing the bar (B) downwards 

without forcing it.

B

C

E

F

B

G

D

A

A

Summary of Contents for IVB 963-2M ED XC

Page 1: ...ledning K ytt ohje Navodilo za uporabo Uputstvo za rad Prev dzkov n vod Provozn n vod Instrukcja obs ugi Kezel si utas t s Instrucciones de manejo Instru es de opera o letme k lavuzu Naudojimo instruk...

Page 2: ......

Page 3: ...15 4 1 Connections 16 4 1 1 Electrical connection 16 4 2 Switching on the vacuum cleaner 16 4 2 1 Switch auto 0 I 16 4 2 2 Suction power control 16 4 2 3 Auto On Off Operation auto switch position 17...

Page 4: ...d up material 1 Do not use any unsafe work techniques 2 Never use the vacuum cleaner without a filter 3 Switch off the appliance and disconnect the mains plug in the following situations Prior to clea...

Page 5: ...ED XC to pick up liquids The vacuum cleaner IVB 965 2H M SD XC is suitable to pick up dry nonflammable dust non flammable liquids sawdust and haz ardous dusts with OEL values1 carcinogenic dusts dusts...

Page 6: ...minated with harmful substances 1 Clean the outside of the vacuum cleaner wipe it clean or pack the vacuum cleaner in well sealed packaging 2 and avoid spreading deposited harmful dust Warning Do not...

Page 7: ...ons for such waste removal At least once a year a Nilfisk ALTO technician or an instructed per son must perform a technical inspection including filters air tight ness and control mechanisms According...

Page 8: ...table mains voltage The appliance can be damaged as a result of being connected to an unsuitable mains voltage 1 Ensure that the voltage shown on the rating plate corre sponds to the voltage of the lo...

Page 9: ...r has been used with dust classified as H it is necessary to clean the machine thoroughly before using the machine with dust classified as M or lower Hazardous materials Spare parts and accessories CA...

Page 10: ...Option depending on model Original Instructions IVB 9 H M 2 Description 2 1 Operating elements aut o 3 2 17 3 4 7 8 14 13 12 11 18 1 15 aut o 0 3 6 1 2 3 5 6 15 14 13 12 11 10 9 8 7 4 16 16 IVB 965 2H...

Page 11: ...o remove dirt tank 6 Swivel bar to remove dirt tank 7 Bracket for floor nozzle 8 Castor with brake 9 Dirt tank 10 Inlet fitting H 11 Inlet fitting M 12 Receptacle for electrical lead 13 Applicance swi...

Page 12: ...3 1 1 Taking accessories out of the packaging 1 Take vacuum cleaner and accessories out of the pack aging 2 The mains plug should not yet be inserted into a socket 3 Apply parking brakes A on both ca...

Page 13: ...dust with OEL values 0 1 mg m observe any additional national regulations Waste bag Order No 965 2H M SD XC 302001480 5pcs 963 2M ED XC 302003723 25 pcs IVB 965 2H M SD XC All dusts with OEL values W...

Page 14: ...r bag D in the dirt tank 6 Fold the top edge of the disposal bag over the rim of the dirt tank D B C 7 Push the dirt tank as far as possible into the vacuum cleaner 8 Swing the bar B down wards withou...

Page 15: ...a socket 2 Apply parking brakes A on both castors 3 Swing the bar B upwards 4 Use the handle C to pull the dirt tank out of the vacuum cleaner A A B C D B C 5 Insert the disposal bag D in the dirt tan...

Page 16: ...14 1 Optional accessories Option depending on model Original Instructions IVB 9 H M E F 9 Close inlet fitting H bottom with plug E 10 Connect suction hose to inlet fitting M top F...

Page 17: ...cket 2 Apply parking brakes A on both castors 3 Open clamping ring B 3 1 5 Inserting the disposal bag IVB 963 2M ED XC 4 Insert disposal bag C into clamping ring 5 Fold the top edge of the dis posal b...

Page 18: ...er is switched off 2 Insert the power cord into a properly installed and fused socket with earthing contact 4 2 Switching on the vacuum cleaner 4 2 1 Switch auto 0 I The hose diameter and the setting...

Page 19: ...e switch to posi tion auto ensure that the tool con nected to the appliance socket is switched off 1 Switch off the vacuum clean er 2 Switch off the power tool auto 0 3 3 6 5 2 2 7 3 Connect the power...

Page 20: ...ounds if the air speed in the suction hose drops to be low 20 m s See section Trou bleshooting 4 5 Cleaning the filter element After picking up harmless dust us ing the waste bag 10 sec To ensure that...

Page 21: ...r ordering number To pick up harmless dust we recommend the use of a waste bag See section Accessories for ordering number Disposal of the picked up material is then simple and hygienic After picking...

Page 22: ...tch off the vacuum clean er and pull the mains plug out of the socket 3 Make sure that both plugs are inserted in fittings 4 Wind up the power cord and hang it on the handle 5 Empty the tank and clean...

Page 23: ...ance plan IVB 965 2H M SD XC After finishing work When required 7 2 1 Emptying dirt tank 7 2 2 Replacing the disposal bag 7 2 3 Replacing the safety filter bag 7 2 4 Replacing filter element H IVBw 96...

Page 24: ...out the collected dirt WARNING If heavy dirt has been picked up never lift the dirt tank alone Use the FORKLIFT D which is available as an accessory 6 Use a crane or fork lift truck to position the FO...

Page 25: ...en picked up never lift the dirt tank alone Use the FORKLIFT E which is available as an accessory 6 Use a crane or fork lift truck to position the FORKLIFT above the dirt tank 7 Attach the tank to the...

Page 26: ...it from the dirt tank WARNING If heavy dirt has been picked up never lift the dirt tank alone Use the FORKLIFT E which is available as an accessory 6 Use a crane or fork lift truck to position the FOR...

Page 27: ...e upper sec tion of the vacuum cleaner Remove the filter element 4 Lay the upper section of the cleaner down with the filter element facing upwards 5 Unscrew the screw C open the bar handle and remove...

Page 28: ...er element 9 Clean the filter seal F Check it for damage and re place it if necessary 10 Check the antistatic clamp G for damage and have it replaced by Nilfisk Advance Service if necessary 11 Fit a n...

Page 29: ...n both castors Remove the disposal bag 3 Open clamping ring B 4 Detach the disposal bag C from the storage container and seal it 5 Dispose of the dirt in accord ance with legal regulations Inserting t...

Page 30: ...imum power rating is P 40W The acoustic warning sounds Reduced suction power Suction power selected with suction power control is too low Set suction power in accordance with section Setting suction p...

Page 31: ...e 9 3 Tests and approvals Electrical tests must be performed in accordance with the provisions of safety regulations VBG4 and to DIN VDE 0701 Part 1 and Part 3 In accordance with DIN VDE 0702 these te...

Page 32: ...e level at a distance of 1m EN 60704 1 dB A 70 2 Working sound pressure level dB A 67 2 Power cord Length m 10 Power cord Type H07RN F3G1 5 mm Protection class I Type of protection splash water protec...

Page 33: ...Nilfisk Advance A S Sognevej 25 DK 2605 Br ndby Denmark Tel 45 43 23 81 00 Fax 45 43 43 77 00 www nilfisk advance com...

Reviews: