background image

IVB 995-0H/M SD XC Type 22

4

1) 

OEL = Occupational Exposure Limit

Original Instructions

in the room must be adequate if the exhaust air from the vacuum 
cleaner is blown into the room (please observe regulations valid in 
your country).

The appliance is suitable for commercial use, such as e.g. in
• Hotels, Schools, Hospitals, Factories, Shops, Offices, Hire shops

Any other use is considered as improper use. The manufacturer ac-
cepts no liability for any damage resulting from such use. The risk for 
such use is borne solely by the user.
Proper use also includes proper operation, servicing and repairs as 
specified by the manufacturer.

1.  As an extension lead, only use the version specified by the man-

ufacturer or one of a higher quality.

2.  When using an extension lead, check the minimum cross-sec-

tions of the cable:

Cable length

Cross section

< 16 A

< 25 A

up to 20 m

1.5 mm

2

2.5 mm

2

20 to 50 m

2.5 mm

2

4.0 mm

2

Transport

1.  Before transporting the dirt tank, close all the locks.
2.  Make sure that both plugs are inserted in fittings.
3.  Do not tilt the cleaner if there is liquid in the dirt tank.
4.  Do not use a crane hook to lift the cleaner.

Storage

1.  Store the appliance in a dry place, protected from frost.

Electrical connection

1.  It is recommended that the vacuum cleaner should be connected 

via a residual current circuit breaker.

2.  When picking up flammable dust in zone 22, extension lines, 

couplings and adapters must not be used.

3.  Arrange the electrical parts (sockets, plugs and couplings) and 

lay down the extension lead so that the protection class is main-
tained.

4.  Connectors and couplings of power supply cords and extension 

leads must be watertight.

Extension lead

Summary of Contents for IVB 995-0H/M SD XC Type 22

Page 1: ...IVB 995 0H M SD XC Type 22 Operating Instructions 107400432 B 08 2017...

Page 2: ...16 4 1 1 Electrical connection 16 4 2 Switching on the vacuum cleaner 16 4 2 1 Switch I 0 II 16 4 3 Check volume flow monitor 16 4 4 Acoustic warning 16 4 5 Cleaning the filter element 17 5 1 Techniq...

Page 3: ...the picked up materia 1 Do not use any unsafe work techniques 2 Never use the vacuum cleaner without a filter 3 Switch off the appliance and disconnect the mains plug in the following situations Prior...

Page 4: ...ly controlled to achieve a minimum flow rate of Vmin 20 m s in the suction hose The vacuum cleaner IVB 995 0H M SD XC Type 22 is suitable for picking up Non flammable liquids flashpoint 55 C or higher...

Page 5: ...When using an extension lead check the minimum cross sec tions of the cable Cable length Cross section 16 A 25 A up to 20 m 1 5 mm2 2 5 mm2 20 to 50 m 2 5 mm2 4 0 mm2 Transport 1 Before transporting t...

Page 6: ...ated with harmful substances 1 Clean the outside of the vacuum cleaner wipe it clean or pack the vacuum cleaner in well sealed packaging 2 and avoid spreading deposited harmful dust Warning Do not reu...
Page 7: ...of the vacuum cleaner contains live components Contact with live components leads to serious or even fatal injuries 1 Never spray water on to the upper section of the vacuum cleaner CAUTION Damage du...

Page 8: ...ith liquids explosive substances or substances considered to be similar in 1 of the law on explosives flammable dusts with an extremely low minimum igni tion energy 1 mJ also observe national regulati...

Page 9: ...The use of other accessories can cause danger of explosion The use of non genuine spare parts and accessories can impair the safety of the appliance 1 Only use spare parts and accessories from Nilfis...

Page 10: ...9 1 Optional accessories Option depending on model Original Instructions IVB 995 0H M SD XC Type 22 2 Description 2 1 Operating elements auto 1 2 3 4 5 6 15 14 13 12 11 10 9 8 7...

Page 11: ...t for fresh air Filter for air supply to motor 4 Retaining clamp 5 Grip to empty tank 6 Handle to remove dirt tank 7 Bracket for floor nozzle 8 Castor with brake 9 Dirt tank 10 Inlet fitting H 11 Inle...

Page 12: ...cleaner 3 1 1 Taking accessories out of the packaging 1 Take vacuum cleaner and accessories out of the pack aging 2 The mains plug should not yet be inserted into a socket 3 Apply parking brakes A on...

Page 13: ...e dust dust ex plosion class St1 St2 St3 in Zone 22 Safety filter bag 5 pcs Order No 302003473 All dusts with OEL values Explosive dust dust ex plosion class St1 St2 St3 in Zone 22 Filter element H Or...

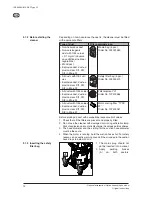
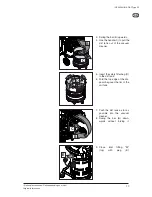
Page 14: ...e handle C to pull the dirt tank out of the vacuum cleaner 5 Insert the safety filter bag D in the dirt tank 6 Fold the top edge of the dis posal bag over the rim of the dirt tank D B C 7 Push the dir...

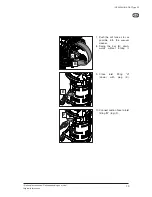
Page 15: ...hould not yet be inserted into a socket 2 Apply parking brakes A on both castors 3 Swing the bar B upwards 4 Use the handle C to pull the dirt tank out of the vacuum cleaner A A B C D 5 Insert the dis...

Page 16: ...ginal Instructions IVB 995 0H M SD XC Type 22 B C 7 Push the dirt tank as far as possible into the vacuum cleaner 8 Swing the bar B down wards without forcing it E F 9 Close inlet fitting H down with...

Page 17: ...The hose diameter and the setting for the suction hose diameter must correspond 27 27 32 32 38 38 50 50 Switch position Function I Reduced suction 0 Off II Maximum suction 4 3 Check volume flow monito...

Page 18: ...hat suction performance is always at its best the filter element is automatically cleaned during operation We recommend complete cleaning if the filter element becomes extremely dirty 1 Switch off the...

Page 19: ...ccessories for ordering number To pick up harmless dust we recommend the use of a waste bag See section Optional accessories for ordering number Disposal of the picked up material is then simple and h...

Page 20: ...aner 2 Switch off the vacuum clean er and pull the mains plug out of the socket 3 Make sure that both plugs are inserted in fittings 4 Wind up the power cord and hang it on the handle 5 Empty the tank...

Page 21: ...Emptying the dirt tank 7 2 3 Replacing the disposal bag 7 2 4 Replacing the safety filter bag 7 2 5 Replacing the filter element H 7 2 6 Replacing the filter for air supply to motor 7 2 Maintenance w...

Page 22: ...If heavy dirt has been picked up never lift the dirt tank alone Use the FORKLIFT D which is available as an accessory 6 Use a crane or fork lift truck to position the FORKLIFT above the dirt tank 7 At...

Page 23: ...t has been picked up never lift the dirt tank alone Use the FORKLIFT E which is available as an accessory 6 Use a crane or fork lift truck to position the FORKLIFT above the dirt tank 7 Attach the tan...

Page 24: ...osal bag with string D and remove it from the dirt tank WARNING If heavy dirt has been picked up never lift the dirt tank alone Use the FORKLIFT E which is available as an accessory 6 Use a crane or f...

Page 25: ...h out a filter 1 Switch off the vacuum clean er and pull the mains plug out of the socket 2 Apply parking brakes A on both castors 3 Opentheretainingclamps B and remove the upper sec tion of the vacuu...

Page 26: ...filter element E 12 Fit the filter holder D En sure that it is in the correct position 13 Fit bar and close bar handle C 14 Dispose of the used filter ele ment in accordance with le gal regulations 7...

Page 27: ...diameter and switch position do not correspond Set correct switch position for hose diameter Clogged suction hose nozzle Clean suction hose nozzle Tank disposal bag or safety filter bag is full See Em...

Page 28: ...provisions of safety regulations VBG4 and to DIN VDE 0701 Part 1 and Part 3 In accordance with DIN VDE 0702 these tests must be performed at regular intervals and after repairs or modifications The v...

Page 29: ...at a distance of 1 m EN 60704 1 dB A 70 2 Sound level dB A 67 2 Power cord Length m 10 Power cord Type H07RN F3G1 5 mm Protection class I Type of protection splash water protected IP 54 Radio interfer...

Page 30: ...sk Inc 1 6 6 Kita shinyokohama Kouhoku ku Yokohama 223 0059 Tel 81 45548 2571 www nil sk com MALAYSIA Nil sk Sdn Bhd Sd 33 Jalan KIP 10 Taman Perindustrian KIP Sri Damansara 52200 Kuala Lumpur Tel 60...

Reviews: