2
II. MACHINE PREPARATION
A. Adding Oil
The Burnisher is shipped by
overland freight with the correct amount of oil in the engine. Air freight
shipments require the
machine to be shipped without oil.
The machine is also shipped with the battery disconnected.
When filling a "dry" burnisher or changing oil,
add no more than 1.5 quarts (or 1.75 quarts when the oil filter is
changed)
then check the dip stick in the fill cap. Add oil if necessary but
DO NOT OVERFILL! ALWAYS CHECK OIL
BEFORE USING THE MACHINE.
Refer to Engine Owner's Manual.
IMPORTANT:
WHEN CHECKING OIL ON KAWASAKI MODELS, REMOVE OIL FILLER CAP AND CLEAN
DIPSTICK WITH CLEAN CLOTH, THEN INSERT DIPSTICK INTO TUBE WITHOUT SCREWING IN. THEN
CHECK OIL LEVEL.
ALWAYS MAKE SURE THE MACHINE IS SITTING LEVEL WHEN CHECKING OIL.
B. Connecting the Battery
Connect the
RED
positive battery cable
FIRST.
Connect the
BLACK
negative battery cable
LAST.
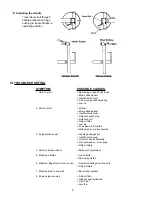
C. Adjusting the Handle
The burnisher handle adjusts for comfort and optimum control. Height may be changed to suit the individual operator.
(See page 8)
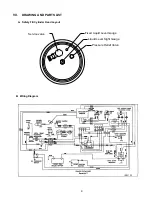
D. Filling the Safety Fill Fuel Cylinder
Nilfisk-Advance uses the 20 lb. capacity aluminum safety fill cylinder which meets the D.O.T. 4E240 standards. These
cylinders are also listed by U.L. Filling should ONLY be done by a qualified propane dealer.
FILL THROUGH THE STOP
FILL VALVE ONLY.
(See page 9) A properly filled cylinder should not exceed 80% of the rated capacity.
DO NOT
attempt safety fill cylinder repair. Return the cylinder to your propane dealer if repair is necessary. Please note that
D.O.T. regulations prohibit shipping of cylinders after the cylinder has been filled with propane.
E. Installing the Safety Fill Fuel Cylinder
Align the slot in the top flange of the cylinder with the locating pin on the machine. Strap the safety fill cylinder in place by
clamping the toggle assembly to the cylinder band. Adjust the toggle assembly by screwing in or out in order to keep the
tank firmly secured. Connect the fuel hose coupling to the service valve by turning right (clockwise).
HAND TIGHTEN
ONLY.
Make sure coupling is not cross threaded and check for leakage by noting any odors of propane immediately after
cylinder is connected. (It is sometimes easier to install if the connection to the service valve is made before strapping the
cylinder in place.)
TO REMOVE THE SAFETY FILL CYLINDER, reverse above procedure. Always connect or change cylinders in a well
ventilated area.
III. OPERATING INSTRUCTION
A. Starting Instructions
1. Check oil and fuel levels.
2. Check and clean engine air filter.
NEVER RUN CONTINUOUSLY FOR MORE THAN 1 HOUR WITHOUT CLEANING OR CHANGING ENGINE DUST
FILTER.
(See "Scheduled Maintenance")
3. Check carburetor air filter. Change if necessary.
(see "Scheduled Maintenance")
4. Turn propane service valve counterclockwise to open.
5. Allow machine to tilt backward (pad off floor) and move the throttle to the
SLOW
position.
6. Engage starter by turning the key-switch to the starting position for approximately 5 seconds. If the machine fails to start,
let the ignition switch return to the run position (Do not turn off). Wait approximately 5 seconds and try again for another
5 seconds. (
NOTE:
Do not engage starter for more than 10 seconds. Allow a 60 second cool-down period for each 10
second start-up cycle.)
7. After engine starts, a GREEN light will flash for a 3 minute warm-up cycle of the SmartAir system. (The machine may be
operated during this warm-up period.) After the warm-up cycle the green light will remain on steady as long as the
machine is running safely.


