background image

 5 - FORM NO. 56041423 / SD 4317, SD 5120

INTRODUCTION

This manual will help you get the most from your Advance SD 4317/5120
Floor Machine. 
Read it thoroughly before operating the machine.
This product is intended for commercial use; polishing, spray buffing,
scrubbing, stripping and rotary carpet shampooing.

PARTS AND SERVICE

Call the DEALER named below for repair parts or service. Please specify
the Model and Serial number when discussing your machine.

(Dealer, affix service sticker here)

NAME PLATE

The Model Number and Serial Number of your machine are shown on the
Nameplate on the back of the motor. This information is often needed
when ordering repair parts for the machine. Use the space below to note
the  Model  Number  and  Serial  Number  of  your  machine  for  future
reference.

MODEL NUMBER

SERIAL NUMBER

UNCRATING

When the machine is delivered, carefully inspect the shipping carton and
the machine for damage.  If damage is evident, save the shipping carton
so that it can be inspected.  Contact the Advance Customer Service
Department immediately to file a freight damage claim.

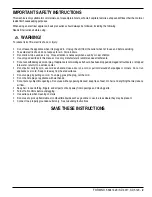
WARNING!

This machine contains moving parts. To reduce the risk of injury,
always unplug the power cord before servicing.

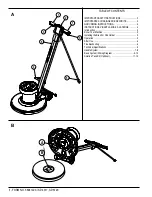
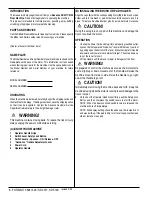
(A)-KNOW YOUR MACHINE

1

Operator Handle Grips

2

Switch Lever Safety Lock Button

3

Switch Levers - Squeeze - ON / Release - OFF

4

“Quick-Loc” Handle Adjustment Lever

5

Power Cord

6

Operator Handle

(B) INSTALLING THE BRUSH OR PAD HOLDER

Align the Lugs (A) with the corresponding Slots (B) in the brush or pad
holder and turn the brush or pad holder counterclockwise to lock it in
place.  To remove brush/pad holder, give it a quick, hard turn clockwise.

CAUTION!

Using the wrong brush or pad on this machine can damage the
floor or overload the motor.

OPERATION

1

Unwrap the Power Cord and plug it into a properly grounded outlet.

2

Loosen the foot operated “Quick-Loc” lever with the toe of your foot
by pulling up on the bottom of the lever.  Move the Operator Handle
downward until your arms are almost straight.  Then step down on
top of the lever to lock it.

3

Lift the Handle until the brush (or pad) is flat against the floor.

WARNING!

Be prepared to control the machine as soon as the motor starts.
Just a slight up or down movement of the Handle will make the
machine move from side to side. Raise the Handle to go right.
Lower the Handle to go left.

CAUTION!

Immediately start moving the machine back and forth.  Keep the
machine moving while the motor is running to avoid damage to the
floor or carpet.

4

Hold one of the Operator Hand Grips firmly, push the Safety Lock
Button  and  then  compress  the  switch  levers  to  start  the  motor.
NOTE:  When the dual controlled switch levers are released, the
machine shuts off immediately.

NOTE:  When spray buffing, check the pad every 15 minutes for dirt
and wax build-up. If the pad is dirty, turn it over to expose the clean
side or install a clean pad.

revised 9/99

Summary of Contents for SD 4317

Page 1: ...11 98 revised 10 02 Form Number 56041423 SD 4317 SD 5120 OPERATOR MANUAL AND PARTS LIST Advance MODELS 56201631 56201632 ...

Page 2: ...NTES CONSIGNES DE SÉCURITÉ 3 GROUNDING INSTRUCTIONS 4 INSTRUCTIONS VISANT LA MISE À LA TERRE 4 Introduction 5 Know Your Machine 5 Installing the Brush or Pad Holder 5 Operation 5 After Use 6 Troubleshooting 6 Technical Specifications 6 Handle System 7 8 Base System Wiring Diagram 9 10 Solution Tank Kit Optional 11 12 ...

Page 3: ...ttachments Donotusewithdamagedcordorplug Ifapplianceisnotworkingasitshould hasbeendropped damaged leftoutdoors ordropped into water return it to a service center Do not pull or carry by cord use cord as a handle close a door on a cord or pull cord around sharp edges or corners Do not run appliance over cord Keep cord away from heated surfaces Do not unplug by pulling on cord To unplug grasp the pl...

Page 4: ...ourner l appareil à un atelier de réparation s il ne fonctionne pas bien s il est tombé ou s il a été endommagé oublié à l extérieur ou immergé Ne pas tirer soulever ou traîner l appareil par le cordon Ne pas utiliser le cordon comme une poignée le coincer dans l embrasure d uneporteoul appuyercontredesarêtesvivesoudescoins Nepasfaireroulerl appareilsurlecordon Garderlecordon àl écart des surfaces...

Page 5: ...têtremisàlaterre Encasdedéfaillanceoudepanneéventuelles lamisealaterrefournitaucourantunchemindemoindrerésistance qui réduit le risque de choc électrique Cet appareil est pourvu d un cordon muni d un conducteur de terre et d une fiche avec broche de terre La fiche doit être branchée dans une prise appropriee correctement installée et mise à la terre conformément aux règlements et ordonnances munic...

Page 6: ...er 5 Power Cord 6 Operator Handle B INSTALLING THE BRUSH OR PAD HOLDER Align the Lugs A with the corresponding Slots B in the brush or pad holder and turn the brush or pad holder counterclockwise to lock it in place To remove brush pad holder give it a quick hard turn clockwise CAUTION Using the wrong brush or pad on this machine can damage the floor or overload the motor OPERATION 1 Unwrap the Po...

Page 7: ...the job CIRCLES ON THE FLOOR Machine standing still while the brush or pad is running FLOOR FINISH REMOVED Improper pad too aggressive Solution too strong MACHINE WOBBLES DURING OPERATION Defective pad one side is more dense than the other Machine left sitting on brush or pad for extended period of time causing bristles or pad to take a set Pad not seated properly into pad holder bristles Warped b...

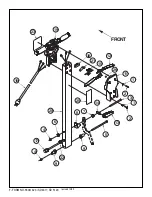
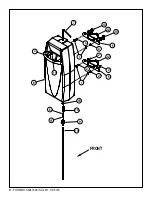
Page 8: ...7 FORM NO 56041423 SD 4317 SD 5120 revised 10 02 FRONT 1 1 2 2 3 13 14 5 7 8 9 9 22 4 17 4 6 20 16 19 18 21 15 12 11 23 25 26 ...

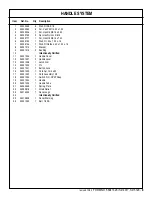
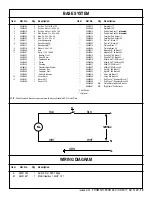
Page 9: ...sh Flt Harden 40 x 1 00 x 16 8 56201015 1 Bracket 9 56201016 2 Bushing 10 Intentionally Omitted 11 56201026 1 Handle Cover 12 56201027 2 Handle Lever 13 56201028 1 Latch Arm 14 56201029 1 Pin 15 56201031 1 Button Lock 16 56201032 1 Cord Set 14 3 x 50 17 56201033 1 Cord Assembly 14 3 18 56201034 1 Switch N O SPST Snap 19 56201054 1 Handle 20 56201056 1 Handle Tube 21 56263648 1 Spring Plate 22 5638...

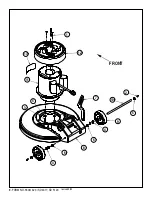
Page 10: ...9 FORM NO 56041423 SD 4317 SD 5120 1 FRONT 12 11 10 9 8 7 2 4 6 4 6 5 3 5 13 revised 2 00 ...

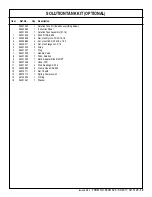
Page 11: ...ight Kit 17 56201062 1 Weight Kit 20 56505910 1 Pad Holder Assy 17 standard 56505920 1 Pad Holder Assy 20 standard 56505270 1 Level Set Pad Holder 17 56505280 1 Level Set Pad Holder 20 56505915 1 ProLite Brush 17 56505925 1 ProLite Brush 20 56505914 1 Prolene Brush 17 56505924 1 Prolene Brush 20 56505911 1 MagnaGrit 46 Brush 17 56505921 1 MagnaGrit 46 Brush 20 56505912 1 DynaGrit 80 Brush 17 56505...

Page 12: ...11 FORM NO 56041423 SD 4317 SD 5120 FRONT 1 1 2 2 2 2 3 4 4 5 5 6 15 9 10 14 16 8 11 7 13 13 12 12 ...

Page 13: ... SAE 5 16 2 56002826 4 Nut Hex Nyl Loc Thin 5 16 18 3 56002884 4 Scr Hex Hd SS 5 16 18 x 1 25 4 56009217 2 Nut Hex Flange Loc 5 16 5 56201005 2 Strap 6 56201007 1 Plug 7 56201008 1 Handle Valve 8 56201020 1 Tank Solution 9 56201035 1 Barb Adapter 3 8 x 3 4 NPT 10 56201036 1 Hose PVC 11 56201047 4 Wsh Sealing SS 5 16 12 56352829 2 Clamp Hose SAE 52 13 56370711 2 Nut Thumb 14 56379170 1 Spring Compr...

Page 14: ...Nilfisk Advance Inc 14600 21st Avenue North Plymouth MN 55447 3408 www nilfisk advance com Phone 800 989 2235 Fax 800 989 6566 2002 Nilfisk Advance Inc Plymouth MN 55447 3408 Printed in the U S A ...

Reviews: