background image

S31NUK5120(3)2001-04

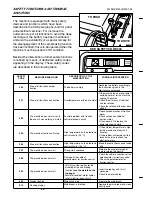
The machine is equipped with many safety 
devices and functions which have been 
described in the USE paragraphs (both for petrol 
and electrical versions). For instance the 
automatic stop of all functions to avoid the deep 
discharge of the battery has been mentioned; 
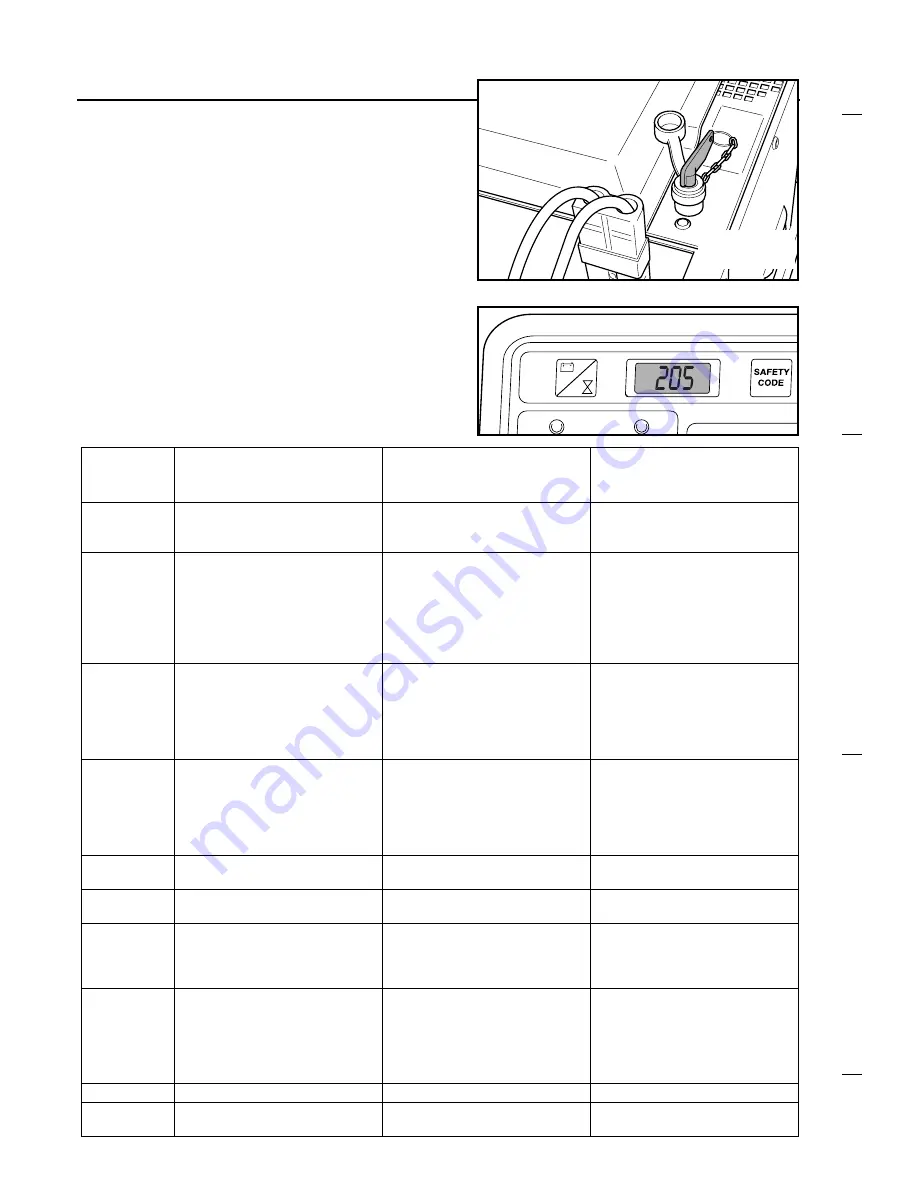
and also the availability of a special red key for 
the disengagement of the self-breaking function 
has been notified: this is to be operated when the 
machine must be pushed in Off condition.

Besides the intervention of other safety functions 
is notified by means of dedicated safety codes 
appearing on the display. These safety codes 
are described in the following table.

SAFETY FUNCTIONS AND TROUBLE-
SHOOTING

26

TO PUSH

TO DRIVE

SEE SAFETY CODE 333

SAFETY 

CODE

MACHINE BEHAVIOUR

DESCRIPTION OF THE 

MALFUNCTION

POSSIBLE INTERVENTION

205

Stop of all functions except 
traction

The battery is empty

Recharge the battery according to 
the instructions given in the 
Maintenance paragraph

301

Stop of all functions and traction

Overtemperature of the drive motor

-If the machine run on a long ramp it 

could be normal: let the machine 
cooling 20 minutes

-Check the efficiency of the front 

and rear brakes

-Check the rotation of the rear drive 

wheels

302

The machine does not start or, in 
the event it was working, will stop

Possible problem with traction 
control electronic circuit

-Check carbon brushes of traction 

motor

-Check connection cables of 

traction motor

-If the above is OK replace the 

power electronic board

305

The machine functions will stop

High temperature on the electronic 
control circuits (95 °C)

-If the ambient temperature is high 

let the machine cool down 20 
minutes 

-If the problem will remain call the 

technical service to check the 
electrical motors

306

Stop of all functions and traction

High temperature on the electronic 
control circuits (105 °C)

-Make the same checks as per code 

305

307

The machine does not start

Wrong start sequence

-Release the accelerator pedal 

before turning the key On

308

The machine does not start

Damage of the cable of 
potentiometer for traction control

-Check the cable connections of the 

potentiometer for traction control

- Check the potentiometer for 

traction control

333

The machine does not start

-Off status of the red key for the 

disabling of the self braking 
function 

(see the picture on the 

top page)

-Possible trouble of motor kables 

(short circuit or open circuit)

-Insert the red key and turn it 

clockwise

-Check the motor cables

800

Display flashing

Main brush worn

-Replace the main brush

E10

Flashing display

Main broom is blocked

Remove the main broom and clean 
all dirty parts

Summary of Contents for SR 1100 P/B

Page 1: ...FORM No S31NUK5120 3 2001 04 SWEEPER Manual for use and maintenance SR 1100 P B SR 1200 P B SR 5110 P B SR 5120 P B ...

Page 2: ...MENT 17 18 MAINTENANCE 19 22 BATTERIES CONTROL AND RECHARGE 19 BRAKES ADJUSTMENT 20 FRONT LAMP REPLACEMENT 20 MAINTENACE OF THE PETROL ENGINE 21 22 SUMMARY OF MAINTENANCE CONTROLS battery version 23 SUMMARY OF MAINTENANCE CONTROLS petrol version 24 OPTIONAL ITEMS 25 SAFETY FUNCTIONS AND TROUBLE SHOOTING 26 SERVICE ADDRESSES 27 Model Serial No Power Tot weight Prod No Max axel rear Max axel front N...

Page 3: ...e in an explosive atmosphere environment Do not use the machine as a transport vehicle Do not allow the brushes to operate while the machine is stationary to avoid damaging the floor In case of fire use a powder extinguisher Do not bump into shelves or scaffolding where there is a risk of falling objects Adjust the operating speed to the floor conditions Do not exceed the declared slope limit to a...

Page 4: ...ing items are supplied with the machine 1 envelope with cables for batteries and connector for battery charger 2 technical documents Spare Parts Catalogue Manual for Use and Maintenance and for the petrol version only Use and Maintenance Manual of the engine 2 ...

Page 5: ...h max 9 km h Reverse speed max 3 5 km h max 3 5 km h max 4 km h max 4 km h Max slope 20 20 20 20 Main brush Ø 300 mm x 700 mm Ø 300 mm x 700 mm Ø 300 mm x 800 mm Ø 300 mm x 800 mm Side brush Ø 430 mm Ø 430 mm Ø 460 mm Ø 460 mm Cleaning width with 1 side brush 900 mm 900 mm 1050 mm 1050 mm Cleaning width with 2 side brushes 1100 mm 1100 mm 1250 mm 1250 mm Front wheel NR 1 Ø 250 mm Ø 250 mm Ø 250 mm...

Page 6: ...icator of suction motor 6 Knob for the speed adjustment of the side brushes 7 Indicator of the operation of left right side brushes 8 ON button of filter shaker motor 9 Emergency stop push button 4 10 ON OFF main key switch 11 Start Stop push button for petrol engine 12 Selection of forw reverse speed light ON OFF horn 13 Steering wheel 14 Pedal for flap lifting 15 Brake pedal 16 Accelerator 17 Pa...

Page 7: ...compartment lid towards the steering wheel and verify which one of the three possibilities is applied to your machine If the batteries are installed open one of the caps of every battery and check if they are filled with electrolyte 1 If the battery is filled 1a Check the electrolyte level in every cell and if necessary fill up with distilled water 1b Proceed with a battery recharge according to t...

Page 8: ...with water and consult a physician The batteries must be filled in a well ventilated area Fill every battery cell with acid the right level is specified in the Battery User Manual After one hour fill up with acid if necessary Let batteries rest for a further hour then proceed with a recharge according to the instructions specified in the Battery User Manual and in the MAINTENANCE paragraph During ...

Page 9: ... machine can be used for the connection of the four batteries WARNING before starting the recharge the battery connector must be disconnected from the machine Fill the fuel tank with UNLEADED PETROL and close the engine compartment Check the engine oil level according to what specified in chapter Maintenance After having set the batteries climb onto the machine and adjust the seat to find the most...

Page 10: ...ssed 5 seconds If the batteries are charged enough now it is possible to start the job in battery mode If the machine is equipped with the gasoline engine proceed with the start of the engine itself START STOP OF THE PETROL ENGINE To start the gasoline engine press the red button shown in the figure to stop the engine press the same button again Displayed datum function Display reading 1 Voltmeter...

Page 11: ...er with the suction motor indicator The temporary activation of the main brush and suction electric motors will also occur the relevant light indicators will flash Note the working parameters of programs P1 and P2 are pre set by the manufacturer of the machine if you want to change the pre set values call the customer service personnel of your supplier Lower the side brush es by pressing the top o...

Page 12: ...c restart of all functions will automatically occur as soon as the accelerator pedal will be pushed again Auto Power ON In order to enable the selection of a different working program first disable the previously selected one When it is necessary to sweep on a wet floor stop the suction fan pressing the relevant button in order to prevent the damage of the paper panel filter In order to get an eff...

Page 13: ...n active The figure shows the functions of the command lever 1 forward gear 2 reverse gear 3 horn 4 front light On Off The machine is equipped with an emergency stop button by pressing this button red light On a sudden stop of the machine will occur and all functions will turn off the petrol engine too To restart the machine turn the red button clockwise according to the arrow shown on the button ...

Page 14: ... engaged and the master key in the OFF position counter clockwise At the end of the job or whenever it is necessary empty the rear dirt container In the event that the machine must be pushed when switched Off turn the proper red key counter clockwise see the figure in order to disengage the electric drive motor and disable the self breaking function Turn and eventually remove the red key that can ...

Page 15: ...eries On this machine in order to guarantee the reliability of the batteries two safety features are envisaged 1 protection against the deep discharge of the battery when the battery voltage drops down to about 20 Volt the automatic stop of all function will occur except the traction function When it is in this condition it is necessary to proceed with the recharge of the battery or to start the p...

Page 16: ... start it and verify that the contact with the floor is as shown in the figure If necessary repeat the adjustment sequence When the brush is remarkably worn out it is necessary to replace it Just press the two tabs inwards and remove the brush Reinstall the new brush by carrying out the reverse operation apply a light pressure to the brush with your hands Note when the brush is replaced set the ad...

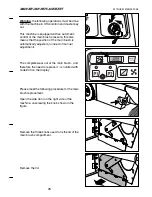
Page 17: ...osition of the main brush is automatically adjusted no need of manual adjustment The complete wear out of the main brush and therefore the need to replace it is notified with code 800 on the display Please meet the following procedure for the main brush replacement Open the side door on the right side of the machine unscrewing the knob shown in the figure Remove the three knobs used to fix the lid...

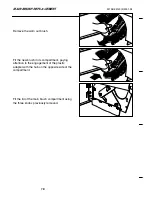
Page 18: ...the new brush in its compartment paying attention to the engagement of the plastic adapter with the hub on the opposite side of the compartment Fit the lid of the main brush compartment using the three knobs previously removed MAIN BRUSH REPLACEMENT 16 ...

Page 19: ...st first be switched off and the key out Loosen the two screws with butterfly head on the two sides of the metal frame fixing the panel filter it is not necessary to remove the screws completely Remove the metal frame and take the panel filter out Clean the filter shaking blowing it with compressed air pressure not higher than 6 bar from the side where the metal protection net is mounted to avoid ...

Page 20: ...the two screws with butterfly head and reconnect the filter shaker electric cable If the filter is damaged or can not be properly cleaned replace it with a new one Ask to your supplier for the new spare parts list Polyester panel filters are also available FILTER CLEANING AND REPLACEMENT 18 ...

Page 21: ...nd consult a physician When necessary proceed with a recharge of the battery according to the following instructions and taking also into account what is specified in the Battery User Manual switch the machine Off and remove the master key Warning before starting the recharge the battery connector must be disconnected from the machine the recharge must be done in a well ventilated area open all th...

Page 22: ...en locking nut A On models SR 1200 and SR 5120 the two brakes on the rear wheels can also be adjusted by means of the regulating devices located under the foot board under the brake pedal FRONT LAMP REPLACEMENT In order to replace the front lamp remove the transparent cover push the lamp and turn it counter clockwise to remove it replace the lamp paying attention to the volt and watt ratings fit t...

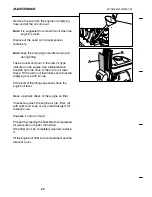
Page 23: ...d the oil type specified on the engine Manual Warning the engine oil must be replaced the first time after 20 working hours or in any case not later that one month since the receipt of the machine Afterwards it must be replaced every 100 hours or not later than 8 months since the last replacement The procedure for the replacement of the engine oil is specified here below Remove the side panel from...

Page 24: ...the hose of the rod for oil level check Fit the rod for oil level check and close the emptying hose with its cap At the end of the filling sequence check the engine oil level Make a periodic check of the engine air filter If necessary wash the engine air pre filter A with water and soap or any other detergent for domestic use Squeeze it and dry it well Proceed by cleaning the filter B with compres...

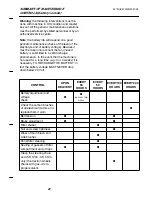
Page 25: ...e phenomenon In the event that the machine is not used for a long time e g 3 or 4 weeks it is necessary TO RECHARGE THE BATTERY in fact the battery voltage MUST NEVER drop down below 20 Volt 23 CONTROL UPON DELIVERY EVERY 30 HOURS EVERY 50 HOURS EVERY 100 HOURS EVERY 400 HOURS Battery liquid level and voltage check OR EVERY TWO WEEKS Check the carbon brushes of all electrical motors and replace th...

Page 26: ...RY OF MAINTENANCE CONTROLS petrol version 24 For SR1100 3200 engine shaft RPM with no function working and battery voltage higher than 27 Volt For SR 1200 3300 engine shaft RPM with no function working and battery voltage higher than 27 Volt 20 hours or not more than 1 month 100 hours or not more than 8 months CONTROL UPON DELIVERY TWO TIMESPER WEEK ONE TIME PER WEEK EVERY 20 HOURS EVERY 50 HOURS ...

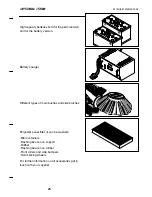
Page 27: ...ion Battery charger Different types of main bushes and side brushes Polyester panel filter it can be washed Mini containers Flashing beacon on support Rollbar Flashing beacon on rollbar Front rollers and side bumpers Non marking wheels For further information on all accessories get in touch with your supplier 25 ...

Page 28: ...the rear drive wheels 302 The machine does not start or in the event it was working will stop Possible problem with traction control electronic circuit Check carbon brushes of traction motor Check connection cables of traction motor If the above is OK replace the power electronic board 305 The machine functions will stop High temperature on the electronic control circuits 95 C If the ambient tempe...

Page 29: ...berg Wil Tel 719 23 52 83 Fax 719 23 84 44 SINGAPORE Nilfisk Advance Pte Ltd 10 Woodlands Loop Singapore 738388 Tel 65 759 9100 Fax 65 759 9133 SVERIGE Nilfisk Advance AB Sjöbjörnsvägen 5 117 67 Stockholm Tel 085 55 944 00 Fax 085 55 944 30 TAIWAN Nilfisk Advance Ltd 1 F No 23 Lane 132 Sec 2 Ta An Road Taipei 27 Tel 700 22 68 Fax 784 08 43 UNITED KINGDOM Nilfisk Advance Limited Newmarket Road Bury...

Page 30: ... VISUAL DIVISION Milan Italy COD S31NUK5120 3 2001 04 Nilfisk Advance Italia S p A Località Novella Terza 26862 Guardamiglio Lodi Italia www nilfisk advance com Phone 39 0377 451124 Fax 39 0377 51443 Printed in Italy ...

Reviews: