

INSTRUCTIONS FOR USE
8
Terra™ 3700B
– 146 1963 000(2)2006-06
b) Lead batteries installed on the machine but dry,
that is without electrolyte
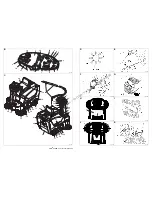
1. Raise the machine hood (10, Fig. C) and engage
the hood support rod (3, Fig. U).
2. Remove all the battery caps (5, Fig. U).
3. Fill the cells (or each element) of the batteries with
sulfuric acid for batteries (density from 0.57 to
0.58 lb at 77°F (from 1.27 to 1.29 Kg at 25°C)) in
accordance with the instructions given in the
Battery User's Manual. The correct quantity of
sulfuric acid to fill in is given in the Battery User's
Manual.
4. Let the batteries rest and fill the cells up with
sulfuric acid in accordance with the instructions
given in the Battery User's Manual.
5. Charge the batteries (see the relevant procedure
in the Maintenance chapter).
c)
Without battery
1. Buy appropriate batteries (See the Technical Data
paragraph and the diagram 20, Fig. U). For the
battery choice and installation, apply to qualified
battery retailers.
2. Install the batteries.
3. Set the machine and the battery charger
according to the type of batteries installed.
Proceed as follows.
WET OR GEL BATTERY SETTING
It is necessary to set the electronic board of the machine
and of the battery charger according to the type of battery
installed (lead or gel). Proceed as follows:
1.
Turn the ignition switch (2, Fig. B) to “0” position.
2.
Raise the hood (10, Fig. C) and engage the hood
support rod (3, Fig. U).
Machine setting
The machine factory setting is for lead (WET) batteries. If
this setting corresponds to the type of battery installed on
your machine, go to the next paragraph, otherwise
perform the following operations:
–
Disconnect the battery connector (6, Fig. U).
–
Unscrew the control panel fixing screws (13) and
carefully remove the right control panel (14, Fig. B).
–
Install a jumper wire (1, Fig. T) on the GEL
connectors (3) for gel batteries.
–
Carefully reassemble the control panel (14, Fig. B)
and fix it by using the related fixing screws.
–
Reconnect the battery connector (6, Fig. U).
Battery charger setting
1.
Position the selector switch (12, Fig. U) to WET for
lead batteries or to GEL for gel batteries.
2.
Charge the batteries (see the relevant procedure in
the Maintenance chapter).
BEFORE MACHINE START-UP
STARTING AND STOPPING THE MACHINE
Starting the machine
1.
Sit on the driver's seat (29, Fig. C) and, if it is
necessary for an easier access to the machine, push
the lever (15, Fig. B) and tilt the steering column (31,
Fig. C) forward.
2.
Push the lever (15, Fig. B) forward and tilt the steering
column (31, Fig. C) forward or backward, to reach a
comfortable position. Then release the lever (16, Fig.
B) and lock the steering column.
3.
Without pressing the forward/reverse gear pedal (5,
Fig. C), turn the ignition switch (2, Fig. B) to “II”
position, then release it; it will go back to “I” position.
Check that the green warning light (5, Fig. B) (battery
charged) turns on. If the yellow or red warning light (3
or 4, Fig. B) turns on, turn the ignition switch back to
“0” position, then charge the batteries (see the
relevant procedure in the Maintenance chapter).
WARNING!
Be extremely careful when working with
sulfuric acid, as it is corrosive. If it comes in
contact with skin or eyes, rinse thoroughly
with water and call a physician.
Batteries have to be filled in a well-ventilated
area.
Wear protective gloves.
CAUTION!
Make sure that there are no open
doors/hoods and that the machine is in
normal operating conditions.
Make sure that the hopper (20, Fig. C) is
properly closed.
If the machine has not been used after being
transported, check that all the blocks used
for the transportation have been removed.
https://harrissupplyind.com - To Order Parts Call 608-268-8080


