


INSTRUCTIONS FOR USE
146 1963 000(2)2006-06 –
Terra™ 3700B
15
Battery charging with the battery charger installed
on the machine
1.
For lead battery only: Check the level of electrolyte
inside the batteries; if necessary, top up through the
caps (5, Fig. U). Leave the caps (5) open for the next
battery charge. When the correct level is reached,
clean, if necessary, the upper surface of the battery.
2.
Connect the battery charger electrical cable (8, Fig.
U) to the electrical mains.
3.
When the green warning light (13, Fig. U) turns on,
the batteries are charged.
4.
For further information about the battery charger
operation (7, Fig. U), see the Battery Charger
Operating Manual.
5.
Disconnect the battery charger connector (8, Fig. U)
from the electrical mains and place it in its special
housing.
6.
(For lead battery only) Close all the caps (5, Fig. U).
7.
Disengage the hood support rod (3, Fig. U) and close
the hood (2); the machine is ready to be used.
SAFETY FUNCTIONS
The machine is equipped with the following safety
functions.
EMERGENCY SWITCH
It is located in an easily accessible position (see 12, Fig.
B); it has to be pressed in case of emergency, to stop all
the machine functions.
To reset it, turn it clockwise.
HOOD SAFETY SWITCH
It is activated when the machine hood is lifted. It stops all
functions.
If the machine keeps operating when the hood is open,
contact an authorized Service Center or retailer.
DRIVER'S SEAT MICROSWITCH
It is located inside the driver's seat and it does not allow
the machine drive system to operate if the operator is not
seated in the driver's seat.
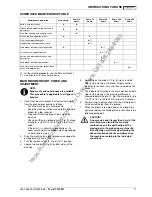
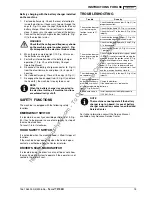
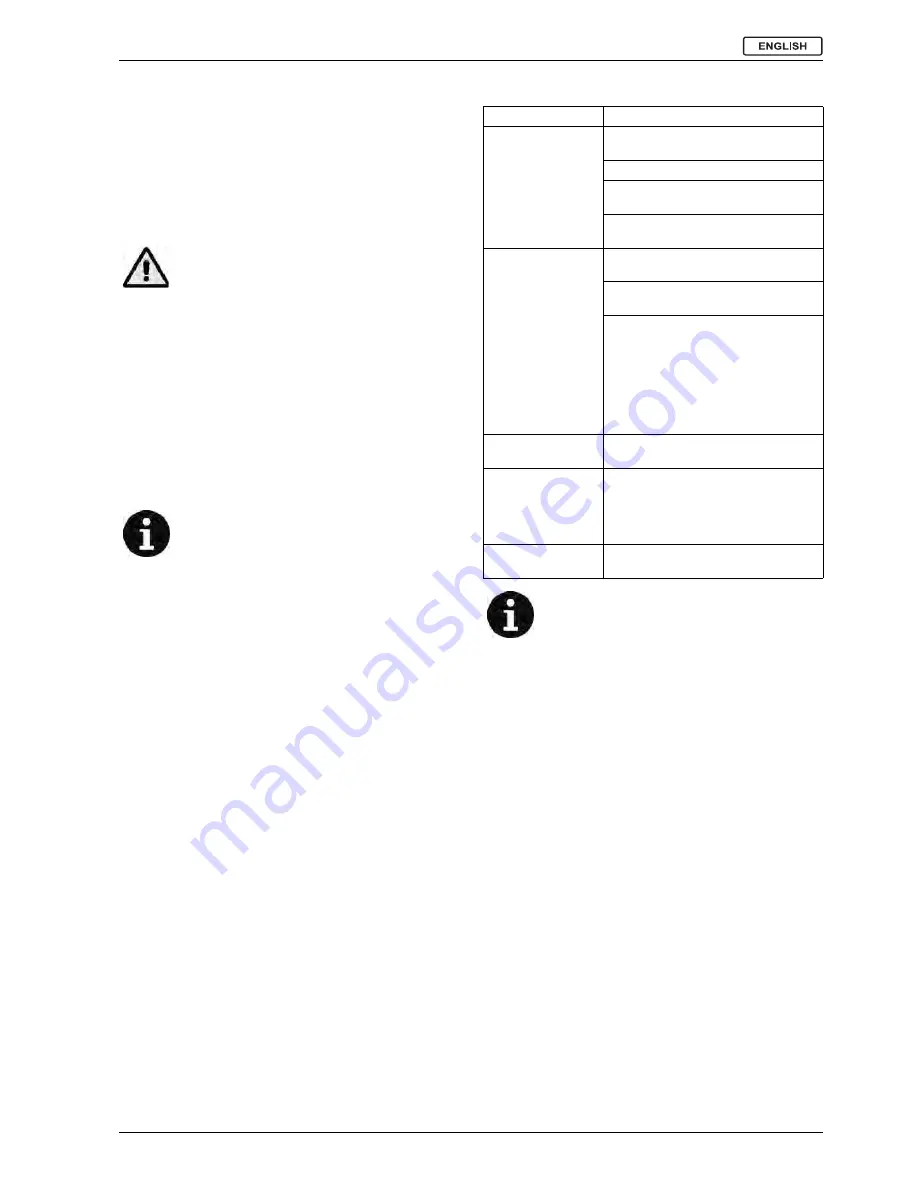
TROUBLESHOOTING
For further information consult the Service Manual,
available at any Advance Service Center.
WARNING!
Check that the voltage and frequency shown
on the machine serial number plate (1, Fig.
U) correspond to the electrical mains values.
NOTE
When the battery charger is connected to
the electrical mains, all machine functions
are automatically cut off.
Trouble
Remedy
The machine does not
start by turning the
ignition switch to “II”
position.
Check the battery connector (6, Fig. U) for
proper connection.
Check that the hood (10, Fig. C) is closed.
Check the fuse F1 in the box (9, Fig. U) for
integrity.
Check that the battery charger (7, Fig. U) is
disconnected from the electrical mains.
The machine does not
move by pressing the
pedal (5, Fig. C).
Check that the parking brake (6 and 7, Fig.
C) is disengaged.
Check that the switch (19, Fig. U) is in the
“I” position.
Check that the forward/reverse gear pedal
(5, Fig. C) is not pressed while starting the
machine through the ignition switch (2, Fig.
B), or while the operator is sitting in the
driver's seat; the forward/reverse gear
pedal (5, Fig. C) has to be pressed only
after the operator has sit in the driver's seat
and the machine has been started.
The side brooms do
not operate.
Check the fuse F6 in the box (9, Fig. U) for
integrity.
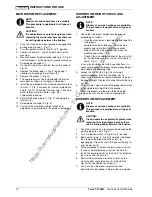
The machine operates
only when stationary,
otherwise it switches
off and the red warning
light (3, Fig. B) flashes.
Charge the batteries.
If the trouble persists, replace the
batteries.
Battery autonomy is
low.
Install batteries having higher capacity
(100 Ah C5 min.)
NOTE
The machine cannot operate if the battery
charger is not on board. In case of battery
charger malfunction, contact an authorized
Service Center.
https://harrissupplyind.com - To Order Parts Call 608-268-8080


