7
NOTE!
The Sack Filter and the Float System should always be mounted in
the machine during both WET AND DRY operations.
Please also notice that the fi ll factor at the container may vary when
using a sack fi lter during wet pick-up operations.
NOTE! Before wet pick-up
The machine is equipped with a fl oat system that shuts off the
airfl ow through the machine when the maximum liquid level is
reached.
Never pick up liquid without the fl oat body in place.
To control:
Loosen the two latches at each side of the motor top
.Then remove the motor top. Check that the fl oat basket and fl oat
valve are mounted at the motor top.
Remounting the motor top:
Put back the motor top to the container. Make sure that the switch/
switches is located in direction towards the suction inlet. Then tigh-
ten both latches so that the motor top is properly secured.
Always
use a chemical defoamer when picking up water containing
foaming detergents. Use a defoamer recommended by the
detergent manufacturer.
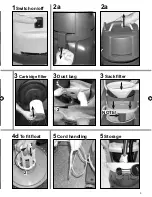
1 Starting and operating the machine
Check that the electrical switch is switched off (in position 0). Then
connect the suction hose into the suction inlet at the machine by
pushing the hose forward until it is sliding in place at the inlet (to re-
lease the hose from machine just twist and pull out the hose). Then
connect the two tubes with the hose handle, twist the tubes in order
to ensure that they are properly fi tted. Attach suitable nozzle to the
tube. Choose nozzle depending on what type of material that is to
be picked-up. Connect the plug into a proper electrical outlet. Put
the electrical switch into position 1 in order to start the motor. Some
variants have two motors/fan units and two electrical switches - one
switch for each motor.
WD 7 & WD 7 Duo Adjusting the handle
The handle can be adjusted to the suitable working heigth. Start by
loosing the two locking screws at each side of the handle. Then ad-
just the handle by moving it upwards or downwards until the proper
angle is found. Tighten the both locking screws again to secure the
handle
Wet pick up
The machine is equipped with a fl oat body that shuts of the airfl ow
through the machine when the maximum liquid level is reached.
You will then hear a noticeable change of the sound from the motor
and notice that the suction power decreases. When this occurs,
switch the machine of. Disconnect the machine from the socket.
See chapter 2 for emptying after wet pick-up.
Emptying: WD 7 & WD 7 Duo
2f)
Drain hose:
Thease models have a draining hose that easy
and comfortable drain the container from liquids. Detach the drain
hose from the bracket by pulling hose backwards from the cleaner.
Place the drain hose end near a fl oor drain and then remove the
plug at hose end. The natural pressure will then drain the liquids
from the container.
2g)
Emptying from the container:
Pull the upper parts of the
latches outwards and release the motor top. Remove the motor top.
Then remove the sack fi lter from the container.
The suction hose can be attached during emptying from the con-
tainer. Grasp with one hand at the handle at the lower part of the
container. To avoid movement of the trolley - place one foot at the
basepart of the trolley. Then tilt the container backwards and pour
the liquids into a fl oor drain or similar.
2h)
Wipe the fl oat valve and the fl oat basket with a damp cloth.
2i)
Put back the motor top to the container. Make sure that the
switch/switches is located in direction towards the suction inlet.
Secure with the latches.
3 Emptying after dry pick-up
Remove the plug from the socket before emptying after dry
pick-up.
Release the latches by pulling them outwards so that the
motor top is released. Lift up the motor top from container. Check
the fi lters and dustbag regularly.
Cartridge fi lter:
To clean the cartridge fi lter you can either shake,
brush or wash it. Wait until it is dry before you reuse it. A motor pro-
tection fi lter is located in front of the motor inlet. Check this motor
fi lter after dry pick-up - replace to new fi lter if fi lter is clogged.
Sackfi lter:
Grasp the sackfi lter and lift it up from cleaner. Shake
fi lter so that all dust is removed from the fi lter.
Dustbag:
Check the bag regularly to ensure the fi ll factor. Never
Replace dust bag if necessary. Remove the old bag. The new bag
is fi tted by passing the carboard piece with the rubber membrane
through the
vacuum inlet. Make sure that the rubber membrane is passing past
the heightening at the vacuum inlet.
Motor fi lter:
A fi lter is located in front of the motor inlet at the
motor top. Check this motor fi lter when emptying after dry cleaning
- replace to new fi lter if fi lter is clogged.
After emptying:
Put back the motor top to the container. Make
sure that the switch/switches is located in direction towards the
suction inlet. Secure with the latches. Never pick up dry material
without fi lter and dustbag fi tted in the machine. The suction ef-
fi ciency of the vacuum cleaner depends on the size and quality of
the fi lter and dust bag. Therefore - use only Original fi lter and dust
bags.
4 Maintenance of the fl oat system
Remove the plug from the socket before performing
maintenance. Always empty and clean the container and the
fl oat system after picking-up liquids.
4a)
Release the latch by pulling them outwards so that the motor
top is released. Lift up motor top from container. Turn the motor top
to upside down position.
4b)
Then loosen the fl oat basket by turning the basket to the left.
Remove the complete fl oat system from motor top.
4c)
A fi lter is located in front of the motor inlet. Check this motor
fi lter - replace to new fi lter if fi lter is clogged.
4d)
Wipe the fl oat valve and fl oat basket with a damp cloth before
the motor top is reinstalled to the container. Then reinstall the fl oat
valve to the fl oat basket. Make sure that the sealed surface of the
fl oat valve is installed upwards in direction towards the motor top.
4e)
To mount the fl oat basket - fi t the arrow at the basket to the
arrow at the motor top. Then secure the fl oat basket by turning it to
the right.
5 After use
Remove the plug from the socket when machine is not in use.
Wind up the cord starting from the machine. The power cord can
be wound up around the handle/hook located on the motor top.
Some variants have special storage places for accessories.
INSTRUCTIONS FOR USE
2 Emptying after wet pick-up
Before emptying the container, unplug the vacuum cleaner. Always
empty and clean the container and the fl oat system after picking-up
liquids. Never pick up liquid without the fl oat system installed in the
machine. The Sack Filter and the Float System should always be
mounted in the machine during both WET AND DRY operations.
Please also notice that the fi ll factor at the container may vary when
using a sack fi lter during wet pick-up operations.
Emptying WD 3
2a)
Release the latch by pulling the lower parts outwards so that
the motor top is released. Lift up the motor top. Remove the sack
fi lter from the container.
2b)
Disconnect the hose from the inlet by pulling the hose out-
wards.
2c)
Empty by tilting the container backwards and pour the liquids
into a fl oor drain or similar. Wipe the fl oat valve and fl oat basket
with a damp cloth before the motor top is reinstalled to the contai-
ner.
2d)
Wipe the fl oat valve and the fl oat basket with a damp cloth.
2e)
Put back the motor top to the container. Secure with the latches
.
h
s
t
r
823 0062 130 Instruction for use Alto EU 1.indd 7
823 0062 130 Instruction for use Alto EU 1.indd 7
2008-10-21 10:33:43
2008-10-21 10:33:43
Summary of Contents for MAXXI WD 3
Page 2: ...2...


