background image

8

42445 Avenida Alavardo, Temecula, CA 92590 

(800) 451-9343,  www.nimbuswater.com

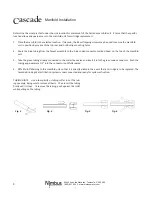
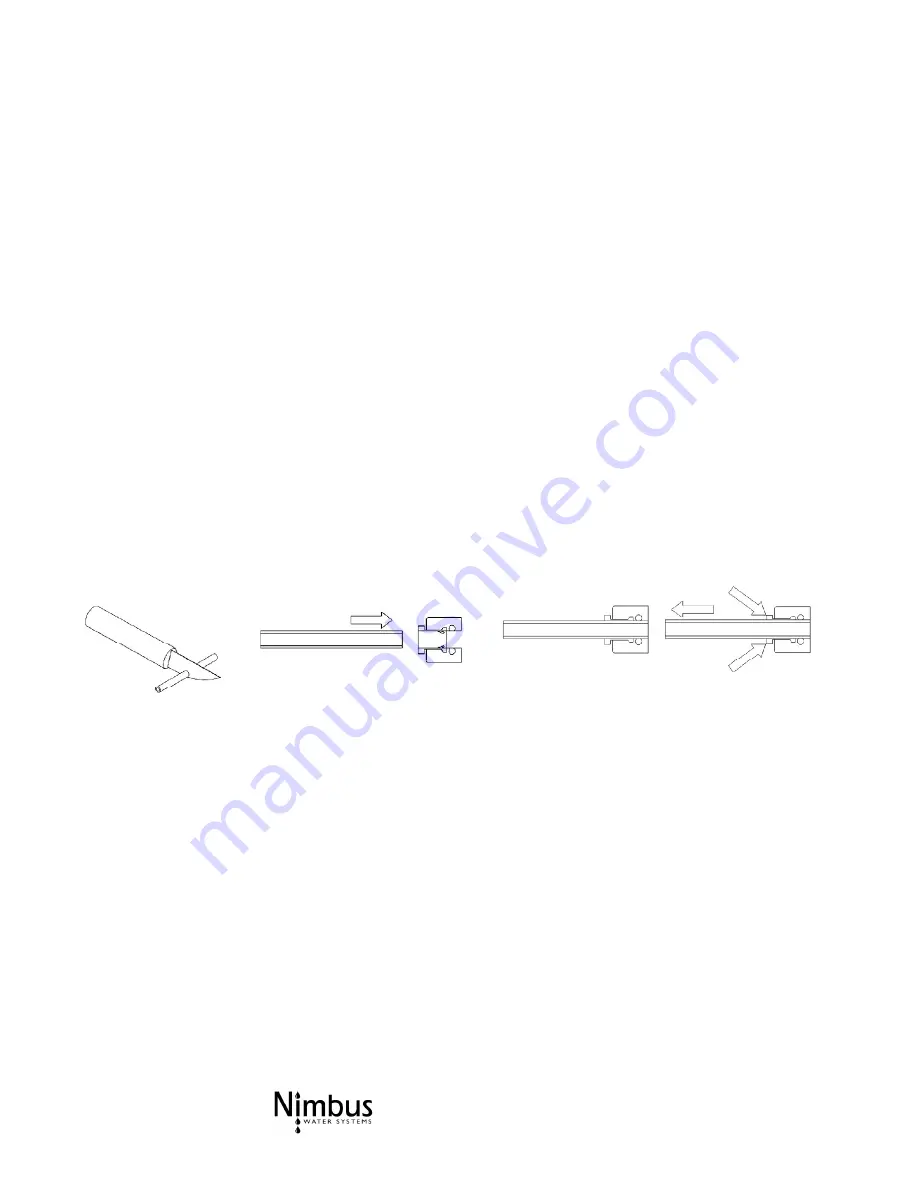
TUBING HINTS:    Use a sharp knife or tubing cutter to cut the tub-

ing squarely, being sure to remove all burrs.   Then insert the tubing 

firmly until it stops.   To remove the tubing, push against the collet 

while pulling on the tubing. 

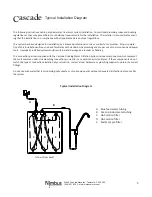
Determine the most practical under-the-sink location for placement of the Cascade manifold unit.   Ensure that the specific 

location allows adequate access to the manifold unit for cartridge re placement.


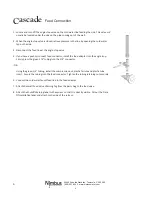
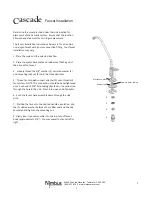
1.  Place the manifold in the selected location.  If desired, the #6 self tapping screws may be used to secure the manifold 

unit in position by means of the top rear and bottom lip mounting holes. 

2.   Route the blue tubing from the faucet assembly to the  blue coded connector, marked Feed, on the top of the manifold 

unit.  

3.   Take the green tubing already connected to the water feed valve and insert it into the green coded connec tor.   Push the 

tubing approximately 1/2" into the connector until fully seated.

4.   Affix Shutoff Warning to the manifold unit so that it is directly visible in the event that a cartridge is to be replaced. The 

Cascade Drinking Water Filtration system is now connected and ready for system activation.

Fig. 5

7

Fig. 3

Fig. 4

Fig. 6

Manifold Installation

ascade

C

Summary of Contents for Cascade

Page 1: ...ida Alavardo Temecula CA 92590 800 451 9343 www nimbuswater com DRINKING WATER FILTRATION SYSTEM 42445 Avenida Alvarado Temecula CA 92590 800 451 9343 www nimbuswater com Owner s Manual Installation Guide ascade C ...

Page 2: ...2590 800 451 9343 www nimbuswater com Please fill out this form immediately after installation and retain for future reference Model Number NS 14 __ __ Code __ __ __ __ __ On right side of frame below model number Install Date Service Phone ...

Page 3: ...roper use of common hand and power tools If you are not familiar with standard sink plumbing and proper use of common hand and power tools or have any difficulty with the installation of this system consult a licensed professional such as a contractor or plumber NOTE This system has been designed for installation by licensed professionals such as a contractor or plumber System Performance System C...

Page 4: ...sumes no liability for the determination of the proper equipment necessary to meet your requirements and we do not authorize others to assume such obligation on our behalf This Limited Warranty does not cover any Manufacturer supplied items that are defective as a result of the use of improper parts equip ment or materials This warranty does not cover alterations or modifications of the unit or fa...

Page 5: ...ity with standard sink plumbing and proper use of common hand and power tools Improperly installed systems could result in water damage due to leaks or flooding The connection parts kit supplied with the Cascade Drinking Water Filtration System includes components which repre sent the most common under sink plumbing connections currently in use within the United States If these components do not m...

Page 6: ... connect feed connector install the feed adapter into the angle stop Firmly press the green 1 4 tubing into the 1 4 connector OR Using the green 1 4 tubing install the compression nut plastic ferrule and plastic tube insert Secure the tubing into the feed connector Tighten the tubing retaining nut securely 5 Connect the cold water faucet feed line to the feed adapter 7 Attach the small Feed Valve ...

Page 7: ... faucet 3 Loosely thread the 3 8 washer 2 serrated washer 3 and mounting lock nut 4 onto the threaded stem 5 Thread faucet quick connect adapter 5 onto threads of faucet stem NOTE This connection should be hand tightened only Push end of 3 8 blue tubing located on the system up through the hole in the sink Press into open end of adapter 6 Push the faucet base assembly down through the sink hole 7 ...

Page 8: ...ted location If desired the 6 self tapping screws may be used to secure the manifold unit in position by means of the top rear and bottom lip mounting holes 2 Route the blue tubing from the faucet assembly to the blue coded connector marked Feed on the top of the manifold unit 3 Take the green tubing already connected to the water feed valve and insert it into the green coded connec tor Push the t...

Page 9: ...ed water valve to the system Observe all tubing and connections for several minutes to detect any leaks Allow the faucet to run for at least 3 minutes then close the faucet A small amount of carbon fines may be seen in the initial flushing of the system 4 Check fittings again for leaks after closing the faucet Checklist 1 Cascade unit is located where it will not be subject to physical impacts or ...

Page 10: ...o side as necessary until the cartridge tubes are properly engaged in the manifold connectors Install the retaining clip ensuring the slide locks snap into place in the slots If the clip does not snap easily into place through the slots it means the cartridge is not fully inserted into the connectors Press top or bottom of cartridge to engage connectors until it snaps into place properly 6 Close t...

Page 11: ...11 42445 Avenida Alavardo Temecula CA 92590 800 451 9343 www nimbuswater com ...

Reviews: