background image

11

12

1-877-646-5288

ninjakitchen .com

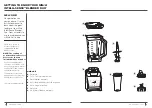
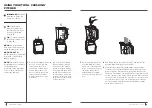
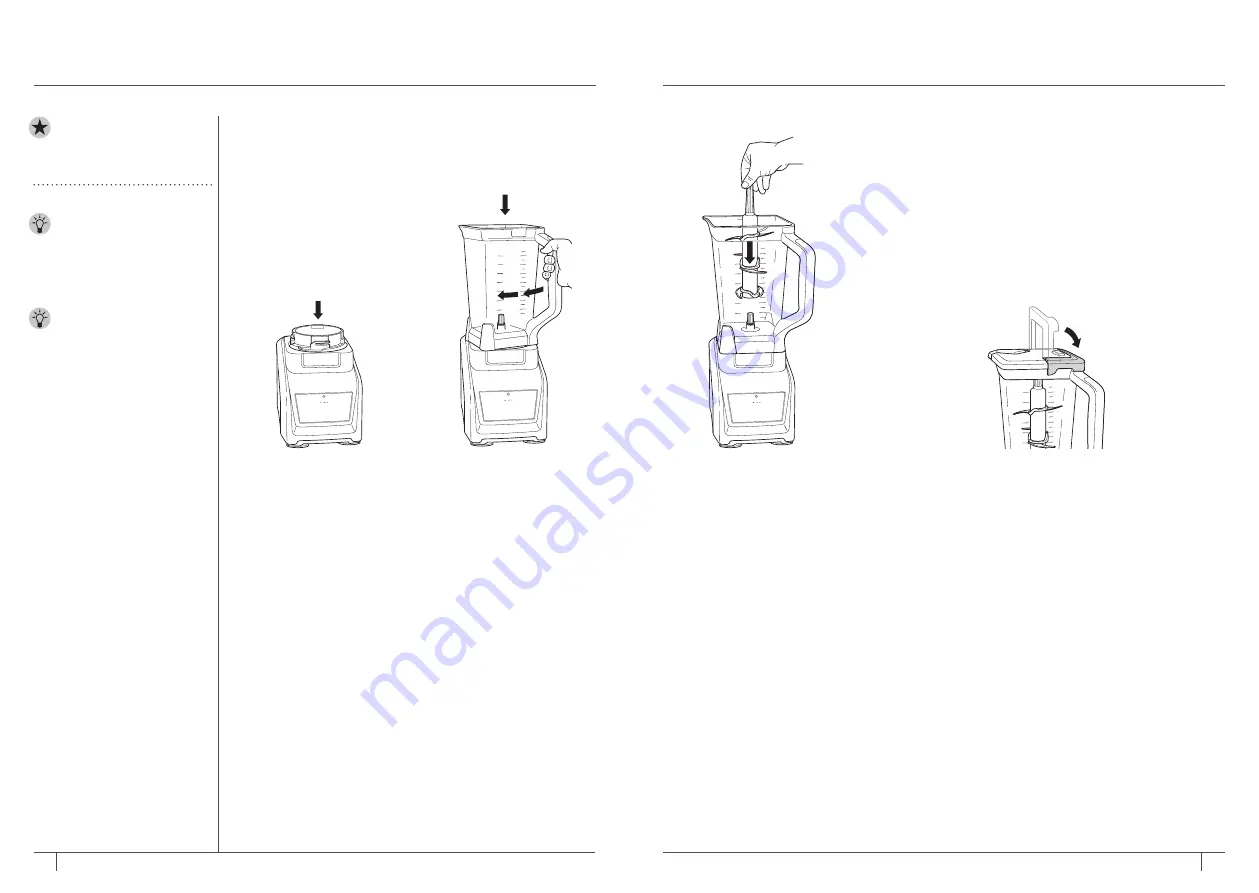
Place the unplugged motor 
base on a clean, dry, and 
level surface such as a 
countertop or table. Press 
downward on the motor 
base to adhere the suction 
cups to the work surface. 
Plug the motor base into a 
wall outlet.

Lower the Total Crushing 
Blender pitcher onto the 
motor base. The handle 
should be aligned slightly 
to the right and the pitcher 
should be oriented so the 
LOCK symbols are visible 
on the motor base. Rotate 
the pitcher clockwise until 
it clicks into place.

USING YOUR TOTAL CRUSHING®  

PITCHER

   IMPORTANT:

 Review all 

warnings on pages 3–6 
before proceeding. 

   TIP:

 If the Stacked  

Blade Assembly is not  
fully seated, you will not  
be able to install and  
lock the lid.

   TIP:

 To learn more about 

the unit’s programs, refer 
to page 10.

NOTE:

 Pre-set programs 

have pauses and changes in 
speed throughout the cycle. 

NOTE:


DO NOT

 add 

ingredients before completing 
installation of the Stacked 
Blade Assembly.

NOTE:

 The pitcher can only 

be installed in one orientation. 
The handle must be 
positioned on the front-right 
corner of the motor base to 
operate the appliance. 

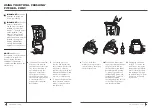
Exercising care, grasp the 
Stacked Blade Assembly 
by the top of the shaft and 
place it onto the drive gear 
inside the pitcher. Note 
that the blade assembly 
will fit loosely onto the drive 
gear.

Add ingredients to the pitcher. DO NOT add ingredients 
past the MAX LIQUID line on the pitcher.

Place the lid on the pitcher, aligning the triangle symbol 
located on the lid with the triangle symbol located on the 
pitcher’s handle. Press down on the handle until it clicks 
into place. The triangle symbols MUST be aligned for the lid 
to lock onto place and for the unit to operate. When the unit 
is connected to power and the container is correctly locked 
onto the motor base, press the Power symbol to turn unit 
on. The available program buttons will illuminate and the 
unit will be ready for use.

Summary of Contents for Intelli-Sense Blender Duo CT641

Page 1: ...ninjakitchen com 1 877 646 5288 INSTRUCTIONS Intelli Sense Blender Duo CT641 ...

Page 2: ... 19 Troubleshooting Guide 20 Warranty 22 PLEASE READ CAREFULLY AND KEEP FOR FUTURE REFERENCE These instructions are designed to help you get a complete understanding of your new Ninja Intelli Sense Blender Duo If you have any questions please call our customer service line at 1 877 646 5288 TECHNICAL SPECIFICATIONS Voltage 120V 60Hz Watts 1200W REGISTER YOUR PURCHASE registeryourninja com 1 877 64...

Page 3: ...iquid 10 DO NOT use this appliance outdoors It is designed for indoor household use only 11 This appliance has a polarized plug one prong is wider than the other To reduce the risk of electric shock this plug will fit in a polarized outlet only one way If the plug does not fit fully in the outlet reverse the plug If it still does not fit contact a qualified electrician DO NOT modify the plug in an...

Page 4: ...the sides of the pitcher stop the appliance remove the lid and use a spatula to dislodge ingredients NEVER insert your hands into the pitcher as you may contact one of the blades and experience a laceration 38 DO NOT attempt to remove the container or lid from the motor base while the blade assembly is still spinning Allow the appliance to come to a complete stop before removing lids and container...

Page 5: ... this blender series NOTE The top flap of your box shows the select accessories that are included with your model If you have any questions concerns or feedback we d love to hear from you Give us a call at 1 877 646 5288 or visit ninjakitchen com To find great recipes and purchase more accessories visit ninjaaccessories com 64 oz max liquid capacity MAIN UNIT A Pitcher Lid B 72 oz Total Crushing P...

Page 6: ... care when handling blade assemblies as the blades are sharp 5 Thoroughly rinse and air dry all parts 6 All attachments are dishwasher safe It is recommended that the containers lids and blade assemblies be placed on the top rack of the dishwasher Ensure blade assemblies are removed from their containers before placing in the dishwasher Exercise care when handling blade assemblies 7 Wipe touchscre...

Page 7: ...cycle NOTE DO NOT add ingredients before completing installation of the Stacked Blade Assembly NOTE The pitcher can only be installed in one orientation The handle must be positioned on the front right corner of the motor base to operate the appliance 3 Exercising care grasp the Stacked Blade Assembly by the top of the shaft and place it onto the drive gear inside the pitcher Note that the blade a...

Page 8: ...ptied through the pour spout remove the lid and Stacked Blade Assembly before pouring To remove the lid press the RELEASE button and lift the handle To remove the blade assembly carefully grasp it by the top of the shaft The pitcher can then be emptied 11 Unplug the unit when finished To release the motor base place your hands underneath both sides of the motor base and gently pull the unit up and...

Page 9: ...of the cup Twist the lid clockwise until it s sealed tightly 4 Turn the Single Serve Cup upside down and install onto the motor base Align the tabs on the cup with the slots on the base then rotate cup clockwise until it clicks into place When the unit is connected to power and the container is correctly locked onto the motor base press the Power symbol to turn unit on The available program button...

Page 10: ...ades Assembly attached Exercise care when handling the blade assembly as the blades are sharp 8 Unplug the unit when finished To release the motor base place your hands underneath both sides of the motor base and gently pull the unit up and towards you Refer to page 19 for storing instructions 9 To enjoy your drink on the go place the Spout Lid onto the Single Serve Cup and twist lid clockwise unt...

Page 11: ...ght from the freezer Start with a few pulses and then go to a continuous blending cycle CARE MAINTENANCE CLEANING 1 Separate all parts 2 Wash all containers in warm soapy water with a soft cloth 3 Hand Washing Wash blade assemblies in warm soapy water using a dishwashing utensil with a handle to avoid direct contact with the blades Exercise care when handling blade assemblies as the blades are sha...

Page 12: ... warranty 2 Any unit that has been tampered with or used for commercial purposes 3 SharkNinja will cover the cost for the customer to send the unit to us for repair or replacement A fee of 19 95 for return shipping costs will be charged at the time of return shipment of the repaired or replacement unit 4 Damage caused by misuse abuse or negligent handling or damage due to mishandling in transit 5 ...

Page 13: ...ove our products therefore the specifications contained herein are subject to change without notice BLENDER DUO NINJA PRO EXTRACTOR BLADES and TOTAL CRUSHING are registered trademarks of SharkNinja Operating LLC INTELLI SENSE is a trademark of SharkNinja Operating LLC For SharkNinja U S Patent information visit sharkninja com USPatents 2017 SharkNinja Operating LLC CT641_IB_MP_170707 PRINTED IN CH...

Reviews: