background image

14

CUSTOMER CARE - AU: 1800 890 840
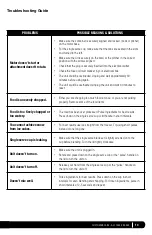
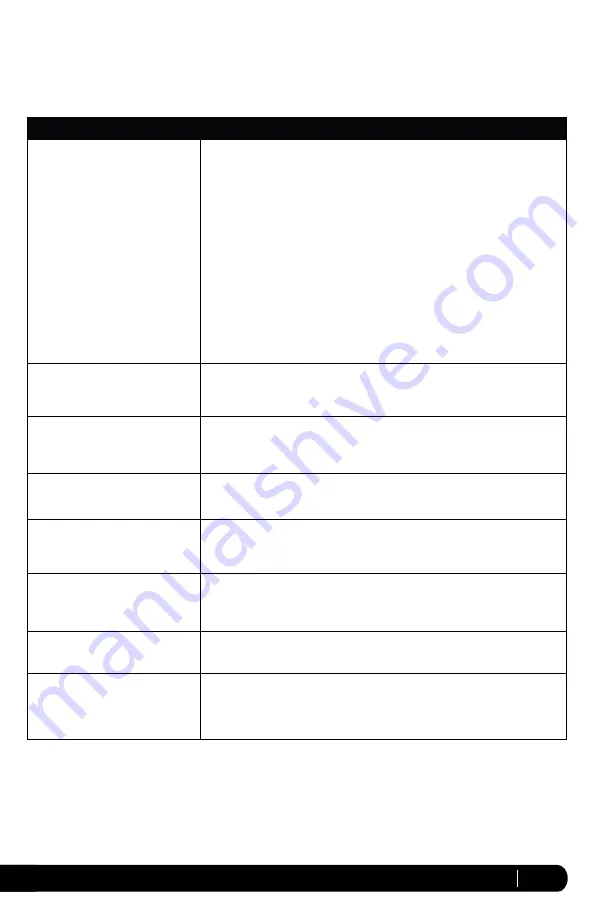
PROBLEMS

POSSIBLE REASONS & SOLUTIONS

Motor doesn’t start or 
attachment doesn’t rotate.

• 

Make sure the container is securely aligned and locked, (bowl or pticher) 
on the motor base.

• 

For the single serve cup, make sure that the tabs are seated in the slots 
and turned to the left. 

• 

Make sure the lid is securely on the bowl or the pitcher in the correct 
position with the arrows aligned.

• 

Check that the plug is securely inserted into the electrical outlet.

• 

Check the fuse or circuit breaker in your electrical box.

• 

The unit could be overloaded. Unplug and wait approximately 30 
minutes before using again.

• 

The unit could be overheated. Unplug the unit and wait 30 minutes to 
reset.

Food is unevenly chopped.

• 

Either you are chopping too much food at once, or you are not pulsing 
properly. Remove some of the food items.

Food is too finely chopped or 
too watery.

• 

The food has been over processed. Pulse ingredients for best results. 
Press down on the single serve cup or lid handle in short intervals.

You cannot achieve snow 
from ice cubes.

• 

For best results use ice straight from the freezer. Try using short pulses 
instead of one long one.

Single serve cup is leaking.

• 

Make sure that the single serve blade set is tightly screwed on to the 
cup before blending. Turn the lid tightly clockwise.

Unit doesn’t turn on.

• 

Make sure the unit is plugged in. 

• 

Rotate and press down on the single serve cup or the “pulse” handle on 
the lid to turn the unit on.

Unit doesn’t turn off.

• 

Release your hand from the single serve cup or the “pulse” handle on 
the lid to turn the unit off. 

Doesn’t mix well.

• 

Pulse ingredients for best results. Press down on the cup in short 
intervals for even blending and chopping. For frozen ingredients, pulse in 
short intervals of 2-5 seconds and repeat.

Troubleshooting Guide

Summary of Contents for Kitchen System Pulse BL200NZ

Page 1: ... BL200NZ OWNER S GUIDE Kitchen System Pulse ...

Page 2: ... the power cord to come into contact with water or any other liquid 2 DO NOT allow young children to operate the appliance or use as a toy Close supervision is necessary when any appliance is used near children 3 Never leave an appliance unattended when in use 4 Turn the appliance off and remove the power cord from the electrical outlet when not in use before assembling or disassembling parts acce...

Page 3: ... as well as utensils out of container while processing or blending to reduce the risk of severe injury to persons or damage to the appliance A scraper may be used but only when the appliance is not running 12 CAUTION The blades are not affixed to the unit They are removeable and extremely sharp When handling the blades or the chopping blades do not hold the blades but rather always hold by the sha...

Page 4: ...MODEL NUMBERS BL200NZ 30 TECHNICAL SPECIFICATIONS Voltage 220 240V 50 60Hz Power 700 Watts Bowl Capacity 1L Pitcher Capacity 1 5L Single Serving Cup Capacity 470 ml Euro Pro Ninja and Kitchen System Pulse are trademarks of Euro Pro Operating LLC Z854 ...

Page 5: ...em Pulse 7 Assembly and Use for the Single Serve Cup 8 Assembly and Use for the 1L Bowl 9 Assembly and Use for the Shredding Slicing and Grating Discs 10 Assembly and Use for the 1 5 L Pitcher 11 Suggested Uses 12 Care Maintenance 13 Troubleshooting Guide 14 Warranty 18 Thank you for purchasing the Ninja Kitchen System Pulse ...

Page 6: ...h i j p i 4 Blade Assembly 1L bowl j Spindle 1L bowl k Slicer Shredder Lid 1L bowl l Food Pusher m Shredding Slicing Disc n Grating Disc o 1 5 L Pitcher p 6 Blade Assembly 1 5L pitcher a Single Serve To Go Cup x 2 b Single Serve Blade c To Go Single Serve Lids x 2 d 1L Bowl e Storage Lid f Lid with Locking Handle g Cookie Paddle 1L bowl h Dough Blade 1L bowl q Motor Base r Power Cord not shown NOT...

Page 7: ...URES Ninja Blade Technology Pitcher Bowl and Single Serve Drink Cup BPA Free Cord storage Pulse Power Controlled blending processing juicing and kneading by using short pulses In short intervals press down on the top of the single serve drink cup or the handle of the lid and pulse to the perfect consistency Single Serve Blending Fill blend and go Blend right in the single serve drink cup and twist...

Page 8: ... attachments are removed from the containers before placing in the dishwasher PLEASE KEEP THESE IMPORTANT SAFEGUARDS IN MIND WHEN USING THE APPLIANCE CAUTION DO NOT BLEND HOT LIQUIDS IMPORTANT Always place the attachment in the Bowl or the Pitcher before adding any ingredients IMPORTANT Attachments are not interchangeable CAUTION Blades are sharp Use extreme caution when handling the blade assembl...

Page 9: ...on the top of the cup in short intervals to activate Fig 3 Fig 1 Fig 2 Assembly and Use for the Single Serve Cup Fig 3 Fig 4 Fig 5 ASSEMBLY PULSE REMOVAL 6 When you have reached your desired consistency stop the appliance by removing your hand from the single serve cup Then turn the single serve cup to the right Fig 4 and pull straight up to remove Fig 5 NOTE Do not overfill To avoid spilling do n...

Page 10: ...n for use 1 Place the motor base on a clean dry level surface such as a counter or table top 2 Align and lower the bowl onto the motor base Fig 6 Handle should be aligned slightly to the left of the LOCK symbol on the motor base 3 Rotate the container to the left as far as it will go to lock in place Fig 6 4 Holding the desired attachment by the shaft place it onto the drive gear inside the contai...

Page 11: ...UTION Shredding Slicing Disc and Grating Disc are sharp Handle with care Make sure that the appliance is unplugged from the power source before inserting or removing the shredding slicing or grating disc and before cleaning Fig 13 Or 6 Holding the lid by the feeder tube place it on top of the bowl aligning the on off switch with the bowl s handle Fig 14 7 Place food into the feeder tube Using the ...

Page 12: ...sides of the pitcher Fig 20 Fig 21 10 Make sure that the unit is unplugged when not in use IMPORTANT Make sure that the motor base is plugged in for use 1 Place the motor base on a clean dry level surface such as a counter or table top 2 Align and lower the pitcher onto the motor base Fig 16 Handle should be aligned slightly to the left of the LOCK symbol on the motor base 3 Rotate the container t...

Page 13: ...Serve 1 L Bowl Blade Assembly Onion Garlic Herbs Kneading 1L Bowl Dough Blade Bread Dough Pizza Dough Dough Mixing 1L Bowl Cookie Paddle Cookie Dough Dessert Bars Biscuits Scones Batters Blending Single Serve 1L Bowl 1 5L Pitcher Blade Assembly Smoothies Milkshakes Frozen Drinks Dips Spreads Grating 1L Bowl Grating Disc Cheese Bread Crumbs Slicing Shredding 1L Bowl Slicing Shredding Disc Vegetable...

Page 14: ...4 Re install the container onto the base and re plug the appliance into the electrical outlet 5 Proceed to use the appliance as before making sure not to exceed the recommended maximum capacities HOW TO CLEAN CAUTION Make sure that the motor base is unplugged from the power source before inserting or removing any attachment and before cleaning CAUTION DO NOT immerse the motor base into water or an...

Page 15: ...properly Remove some of the food items Food is too finely chopped or too watery The food has been over processed Pulse ingredients for best results Press down on the single serve cup or lid handle in short intervals You cannot achieve snow from ice cubes For best results use ice straight from the freezer Try using short pulses instead of one long one Single serve cup is leaking Make sure that the ...

Page 16: ...15 CUSTOMER CARE NZ 0800 002 999 Notes Or Your Favorite Recipes ...

Page 17: ...16 CUSTOMER CARE AU 1800 890 840 Notes Or Your Favorite Recipes ...

Page 18: ...17 CUSTOMER CARE NZ 0800 002 999 Notes Or Your Favorite Recipes ...

Page 19: ...n the appliance is used The product has not been misused abused neglected altered modified or repaired by anyone The product has been subjected to fair wear and tear The product has not been used for trade professional or hire purposes The product has not sustained damage through foreign objects substances or accident Your warranty does not cover Components that are subject to natural wear and tea...

Page 20: ...Printed in China Illustrations may differ from actual product BL200NZ SAA 30 E 140520 1 Z854 ...

Reviews: