background image

7

CUSTOMER CARE - NZ: 0800 002 999
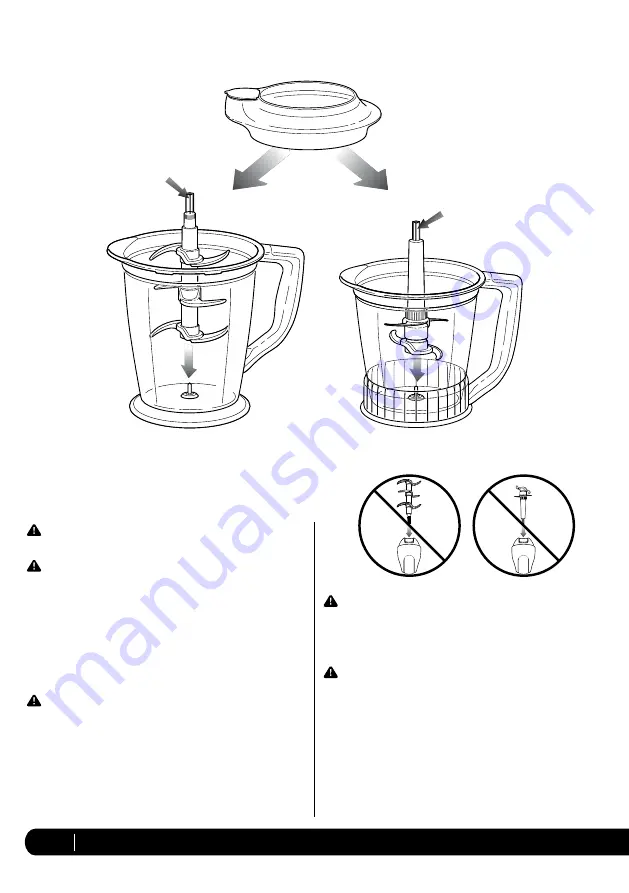
 

WARNING: DO NOT

 try to place the blade onto the power 

head and then into the Master Prep

®

 Professional Pitcher.

3

  Add the ingredients to be processed into the Master Prep

®


Professional pitcher.  

 IMPORTANT: 

Never add ingredients into the Master Prep

®


Professional pitcher before placing the blades in first.   

4

  Place the pitcher splash guard onto the top of the Master 

Prep

®

 Professional pitcher. 

(Fig. 3)

Using the Master Prep

®

 Professional Pitcher


CAUTION: 

Blades are sharp! Use extreme caution when 

handling the blades. Always hold them by the shaft.


IMPORTANT: 

Never run the appliance empty.

Place the Master Prep

®

 Professional Pitcher on a clean, dry, 

level surface.  

Holding the blade by the shaft, place it onto the spindle pin 
inside the Master Prep

®

 Professional Pitcher.   

 •  Use the Ninja

®

 6-Blade in the 1.5 LPitcher. 

 (Fig. 1)

 •  Use the Ninja

®

 4-Blade in the 1.25 L Pitcher.  

(Fig. 2)

 IMPORTANT: 

Place blade inside the container carefully as 

blades are sharp.

Shaft

Shaft

Fig. 1

Fig. 3

Fig. 2

Summary of Contents for Master Prep QB1004NZ

Page 1: ...Master Prep Professional OWNER S GUIDE QB1004NZ ...

Page 2: ...urfaces 3 DO NOT allow children to operate the appliance or use as a toy Close supervision is necessary when any appliance is used near children 4 DO NOT use with damaged cord or plug Contact Customer Service or Service Center for the repair or replacement of the line cord 5 DO NOT USE if the appliance is not working has been dropped dropped into water damaged or left outdoors 6 NO SERVICEABLE PAR...

Page 3: ... will not drape over the countertop or tabletop where it can be pulled on by children or tripped over accidentally 10 DO NOT operate the appliance for more than 15 seconds 11 DO NOT operate the appliance empty 12 Extreme caution must be used when moving an appliance containing hot food water or other liquids 13 Use this appliance on a stable work surface away from water 14 DO NOT remove the motor ...

Page 4: ...NUAL COVERS MODEL QB1004NZ 30 TECHNICAL SPECIFICATIONS Voltage 220 240V 50 60Hz Power 500 Watts Pitcher Capacity 1 25 L 1 5 L Bowl Capacity 500 ml Euro Pro Ninja and Ninja Master Prep are trademarks of Euro Pro Operating LLC Z854 SAA110120EA ...

Page 5: ...840 Contents Thank you for purchasing the Ninja Master Prep Professional Getting Started 5 Using the Master Prep Professional Pitcher 7 Using the Master Prep Professional Bowl 9 Cleaning and Maintenance 11 Troubleshooting Guide 12 ...

Page 6: ... j Pitcher Storage Lid k Bowl Splash Guard l Upper Blade m Lower Blade n Master Prep Professional Bowl with Non Slip Base o Bowl Storage Lid p Power Cord not shown a On Off Pulse Button b Power Head c Pouring Spout d Pitcher Splash Guard e Ninja 6 Blade f Master Prep Professional 1 5 L Pitcher with Non Slip Base g Spindle Pin h Ninja 4 Blade ...

Page 7: ...500 Watt Power Head NEVER allow the power head to become wet when plugged into an electrical outlet WARNING The power head should never be immersed in water or any other liquid CAUTION Make sure that the power head is unplugged from the electrical outlet and that the blades have stopped turning before attaching or removing any accessory CAUTION Blades are sharp Use extreme caution when handling th...

Page 8: ...ep Professional pitcher Fig 3 Using the Master Prep Professional Pitcher CAUTION Blades are sharp Use extreme caution when handling the blades Always hold them by the shaft IMPORTANT Never run the appliance empty 1 Place the Master Prep Professional Pitcher on a clean dry level surface 2 Holding the blade by the shaft place it onto the spindle pin inside the Master Prep Professional Pitcher Use th...

Page 9: ...for more than 15 seconds at a time 8 To stop the appliance remove your fingers from the on off pulse button 9 In order to obtain a better quality of chopping operate the appliance by using the pulse method 10 Make sure that the blades have stopped completely before removing the power head 11 If the ingredients stick to the side of the Master Prep Professional pitcher stop the appliance remove the ...

Page 10: ...arefully insert the upper blade over the lower blade rotating it until it locks onto the lower blade Fig 7 IMPORTANT Always assemble the blades inside the container WARNING DO NOT try to place the blades onto the power head and then into the Master Prep Professional bowl 4 Place the food that you want to process into the Master Prep Professional bowl IMPORTANT Never add ingredients into the Master...

Page 11: ...onal When chopping hard foods e g meat cheese cut into 1 inch cubes 5 Place the splash guard on the bowl Fig 8 6 Place the power head on top of the splash guard making sure that it is securely in place Fig 9 DO NOT attempt to operate the appliance without the safety splash guard in place 7 To start the appliance plug the power cord into the electrical outlet securely hold power head while operatin...

Page 12: ... has overheated Unplug and wait approximately 10 minutes before using again Make sure the splash guard is securely on container Make sure the power head is securely placed on splash guard Check that the plug is securely inserted into the electrical outlet Check fuse or breaker Replace fuse reset breaker Food is Unevenly Chopped Either you are chopping too much food at one time or the pieces are no...

Page 13: ...12 CUSTOMER CARE AU 1800 890 840 Notes ...

Page 14: ...13 CUSTOMER CARE NZ 0800 002 999 Notes ...

Page 15: ...product has not been misused abused neglected altered modified or repaired by anyone The product has been subjected to fair wear and tear The product has not been used for trade professional or hire purposes The product has not sustained damage through foreign objects substances or accident Your warranty does not cover Components that are subject to natural wear and tear caused by normal use in ac...

Page 16: ... Euro Pro Operating LLC 2014 Printed in China Illustrations may differ from actual product Euro Pro Master Prep and Ninja are trademarks of Euro Pro Operating LLC QB1004NZ_SAA_30_IB_ENG_140814_1 Z854 SAA110120EA ...

Reviews: