11
ninjakitchen.com
10
ninjakitchen.com
WARNING: DO NOT try to place the
upper and lower Chopping Blade
Assembly onto the Master Pod and
then into the Master Prep bowl�
1
Review warning and caution statements
above before proceeding to number 2.
2
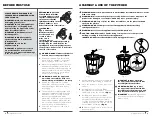
Place the Master Prep bowl on a clean,
dry, level surface.
3
Holding the Lower Chopping Blade
Assembly by the shaft, place it over
the spindle pin inside the Master Prep
bowl.
(fig� 1)
4
Carefully insert the Upper Chopping
Blade Assembly over the Lower
Chopping Blade Assembly rotating it
until it locks onto the Lower Chopping
Blade Assembly.
(fig� 2)
IMPORTANT: Always assemble the
upper and lower Chopping Blade
Assembly inside the container�
Shaft
Fig. 1
Fig. 2
WARNING: Handle the Upper and Lower Chopping Bowl Blade Assemblies with care,
as the blades are sharp�
WARNING: Remove utensils prior to processing� Failure to remove may cause the
bowl to be damaged or to shatter, which may cause personal injury�
WARNING: DO NOT try to place the Blade Assemblies onto the Master Pod and then
into the bowl�
WARNING: DO NOT attempt to operate the appliance without the safety
splashguard in place�
WARNING: DO NOT crush ice in Master Prep Bowl or damage may occur to the unit�
WARNING: Never leave the appliance unattended while in use�
CAUTION: DO NOT blend hot liquids, doing so may cause excessive pressure
buildup, resulting in risk of the user being burned�
CAUTION: Blade assembly is loose and not locked in place� Make sure to remove the Upper
and Lower Chopping Blade Assembly before emptying contents of processor bowl�
IMPORTANT: Make sure that the Master Pod is plugged in for use�
6
Review warning and caution statements
at the top of page 8 before proceeding.
7
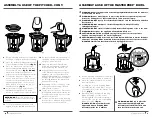
Place the pitcher splashguard onto the
top of the Master Prep pitcher.
(fig� 3)
8
Place the Master Pod on top of the
pitcher splashguard making sure that
it is securely in place.
(fig� 4)
DO NOT
attempt to operate the appliance
without the safety splashguard in place.
9
To start the appliance, plug the
power cord into the electrical outlet,
securely hold the Master Pod while
operating and press on the on/off
pulse button located on the top of
the Master Pod.
(fig� 5)
10
Hold the Master Prep
pitcher firmly
while depressing the on/off pulse
button to ensure the unit stays in place.
11
To stop the appliance, remove your
fingers from the On/Off pulse button.
12
In order to obtain a better quality of
chopping, operate the appliance by
using the “pulse” method.
13
Make sure that the Pitcher Blade
Assembly has stopped completely
before removing the Master Pod.
14
If the ingredients stick to the side
of the Master Prep
pitcher, stop the
appliance, remove the Master Pod
and the splashguard. Use a spatula to
dislodge the pieces and then replace
the splashguard and the Master Pod.
Continue processing.
15
Depending on the consistency of the
contents, use the pouring spout to
empty liquid contents.
16
For thicker consistencies, first remove
splash guard and blade assembly (by
its shaft), then empty contents of the
Master Prep® pitcher.
17
To crush ice into snow, start by using
short pulses to break up large chunks.
Continue until snow is achieved.
Fig. 3
Fig. 4
Fig. 5
ASSEMBLY & USE OF THE PITCHER – CONT�
ASSEMBLY & USE OF THE MASTER PREP® BOWL
NOTE: DO NOT
operate the appliance
continuously for more than 15 seconds
at a time.


