


12
TOLL FREE:
1-877-646-5288
www.ninjakitchen.com
13
HOW TO STORE
1
Store the
Ninja
®
Kitchen System Pulse™
.
upright with the 40-oz bowl on the
motor base, 4-Blade assembly inside and
lid on the bowl. Secure the power cord
underneath the base by wrapping the
cord around the cord wrap. Do not place
anything on top. Store the single serve
cups and the rest of the attachments
along side the appliance where they
will not be damaged and won’t cause a
hazard.
RESETTING THE MOTOR THERMOSTAT
The
Ninja
®
Kitchen System Pulse™
features
a unique safety system which prevents
damage to the unit’s motor and drive
system should you inadvertently overload
your appliance. If the appliance is being
overloaded, the motor will stop. To reset the
appliance, follow the resetting procedure
below:
1
Unplug the appliance from the electrical
outlet.
2
Remove and empty the container and
ensure that no food is jamming the
cutting blades or attachments.
3
Allow the appliance to cool for
approximately 30 minutes.
4
Re-install the container onto the base
and re-plug the appliance into the
electrical outlet.
5
Proceed to use the appliance as
before making sure not to exceed the
recommended maximum capacities.
HOW TO CLEAN
CAUTION:
Make sure that the motor
base is unplugged from the power
source before inserting or removing any
attachment and before cleaning.
CAUTION:
DO NOT
immerse the motor
base into water or any other liquid.
1
Separate/remove all parts from each
other.
2
Clean the motor base and gear shaft with
a damp cloth and wipe dry.
3
Place the bowl and single serve cups
in the dishwasher. Place the lids and
attachments on the top rack.
Use caution
when handling the blade assemblies as
the blades are very sharp.
NOTE:
You may also wash the containers
by filling
¾
of the container with warm
water and a drop of dish washing
detergent, placing the corresponding
lid on the container and pulsing a few
times. Once clean, remove the container
from the motor base. Rinse the container,
attachment and lid under running water.
Allow all the parts to dry before storing.
Please call customer service if any
servicing needs to be performed on the
appliance at 1-877-646-5288.
Care & Maintenance
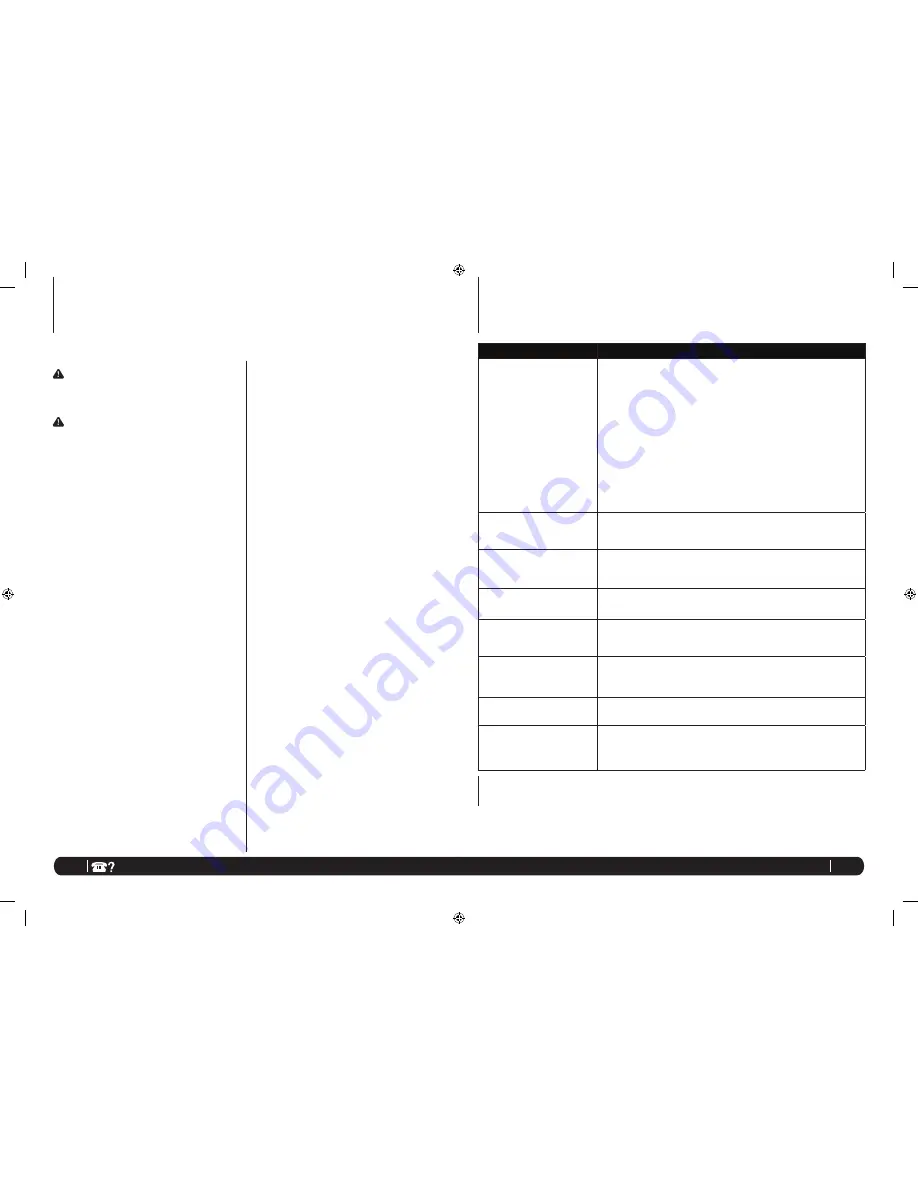
PROBLEMS
POSSIBLE REASONS & SOLUTIONS
Motor Doesn’t Start or
Attachment Doesn’t
Rotate.
• Make sure the container is securely aligned and locked,
(40-oz bowl) on the motor base.
• For the single serve cup, make sure that the tabs are
seated in the slots and turned to the left.
• Make sure the lid is securely on the container
(40-oz bowl) in the correct position with the arrows
aligned.
• Check that the plug is securely inserted into the
electrical outlet.
• Check the fuse or circuit breaker in your electrical box.
• The unit could be overloaded. Unplug and wait
approximately 30 minutes before using again.
• The unit could be overheated. Unplug the unit and wait 30
minutes to reset.
Food is Unevenly
Chopped.
• Either you are chopping too much food at once, or you
are not pulsing properly. Remove some of the food
items.
Food is Too Finely
Chopped or Too Watery.
• The food has been over processed. Pulse ingredients
for best results. Press down on the single serve cup or
40-oz. lid handle in short intervals.
You Cannot Achieve
Snow From Ice Cubes.
• For best results use ice straight from the freezer. Try
using short pulses instead of one long one.
Single serve cup is
leaking.
• Make sure that the single serve blade set is tightly
screwed on to the cup before blending. Turn the lid
tightly clockwise.
Unit doesn’t turn on.
• Make sure the unit is plugged in.
• Rotate and press down on the single serve cup or the
“pulse” handle on the 40-oz. lid to turn the unit on.
Unit doesn’t turn off.
• Release your hand from the single serve cup or the
“pulse” handle on the 40-oz. lid to turn the unit off.
Doesn’t mix well.
• Pulse ingredients for best results. Press down on the
cup in short intervals for even blending and chopping.
For frozen ingredients, pulse in short intervals of 2-5
seconds and repeat.
Troubleshooting Guide
Replacement Parts
ORDERING REPLACEMENT PARTS
To order additional parts and attachments, please visit our website:
www.ninjakitchen.com or feel free to contact customer service: 1-877-646-5288.
BL205_30_IB_ENG_110812_1.indd 12-13
11-08-12 1:51 PM


