NISIS G4 Graphic Tablet Installation Guide Rev 1.4
If you see "Explorer" listed, leave it displayed. If you see "Systray" listed, leave it displayed. All other tasks can
be ended.
You close down a Task by highlighting it, then clicking on the "End Task" button. Some tasks will end
immediately, while others may take some time before you see the screen confirming the task has ended.
Once all the tasks that you have chosen to close down, have ended, you can start the installation of your NISIS
product drivers.
When you restart your PC, all tasks that you ended, will start again as usual.
Don't forget that each time you restart your PC, background tasks are enabled again. So if you are installing
several programs, which require you to reboot your PC after each installation, you will need to temporarily end
each background task after every restart until you have completed all the installations.
Installing the G4 Graphic Tablet Drivers
Insert the Installation CD into your CD ROM Drive. The CD should automatically show the Installation screen.
If the CD does not autostart, then you can start the “Setup.exe” program manually by clicking on the Windows
“Start” button, select the “Run…” option, click on the “Browse…” button, and locate your CD ROM Drive
(usually drive “D”), and select the “Setup.exe” program, click on the “Open” button, and finally click on the
“OK” button.
Select “NISIS Tablet Driver” and follow the instructions on the screen.
If Windows shows a Digital Signature Not Found window, then select Yes and continue with the installation.
At the end of the installation, Windows will ask you to restart your PC.
Restart your PC.
You have now completed the installation of the G4 Graphic Tablet drivers.
Connecting the G4 Graphic Tablet to your PC
Ensure you have loaded the G4 Graphic Tablet Drivers
BEFORE
you connect your Graphic Tablet to your PC.
Switch off your PC.
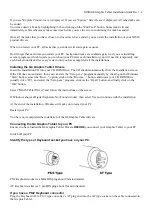
Identify the type of Keyboard socket you have on your PC.
PS/2 Keyboard socket is a Mini DIN plug about 9mm in diameter.
AT Keyboard socket is a 5 pin DIN plug about 13mm in diameter
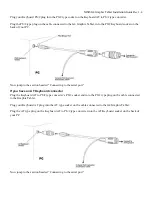
If you have a PS/2 Keyboard connector
Plug the Keyboard AT to PS/2 type converter’s AT plug end into the AT type socket on the cable connected to
the Graphic Tablet.


