background image

33

For more info, tips and advice visit nitedevil.com

Fault Finding

   C.

  Ensure that the BNC - BNC lead that you connect  


between the camera and monitor has no shorts or  


  open circuits. If you are making your own 


  lead, don’t forget the lead must have two wires  


connected to complete the circuit, Video and Ground.


D.

  Ensure all connections to both the camera and DVR  


are firm and secure.


E.

  Make sure that there are no tight bends or loops in  


the cable. The minimum bend radius for RG59 co-ax  


cable is 60mm.

See online 

Tip 300

 for our ‘

Top Tips When Installing 

Cable

’ and 

Tip 281

 for the ‘

Dos And Don’ts For 

Running Co-ax

’ at nitedevil.com.

Test monitor doesn’t display an image

Make sure the test monitor is connected to the camera’s CVBS 

test output and not the HD-SDI output. A lot of test monitors do not 

accept HD-SDI signals.

Can’t control via 2 wire RS485

If your camera seems unresponsive when attempting to control it 

via RS485 check the following.

A.


RS485 wires crossed over, try swapping around.

B.


Wrong protocol and baud rate selected.

Summary of Contents for All-In-On IR CAM380

Page 1: ...ameras Handbook Instructions Manual Ref XND HD 02 Stunning 1080p HD SDI cameras with built in NiteDevil technology Anti Vandal CAM320 All In On IR CAM380 Traditional CAM341 344 Mini Bullet CAM360 362...

Page 2: ...o one of our HD SDI DVRs and you ll have an unrivalled CCTV system We offer a variety of HD SDI cameras to suit any environment from tiny module cameras and mini bullets to external all in one IR came...

Page 3: ...m Contents Introduction 2 CAM320 Anti Vandal HD SDI Dome 4 CAM341 344 Traditional HD SDI Camera 8 CAM350 351 Covert HD SDI Modules 12 CAM360 362 Mini HD SDI Bullets 14 CAM380 External HD SDI All In On...

Page 4: ...S Resolution 1080p 25fps Lens Type 2 8 11mm Vari focal Min Illumination 0 02 Lux Sens up Input Voltage 12V DC 24V AC Dual Voltage Current Consumption 150mA 12VDC 120mA 24VDC Features 1080p at 25fps Lo...

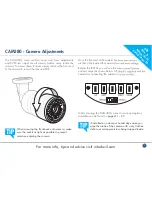
Page 5: ...mera up and down 7 Rotational Axis Turn this to rotate the camera s output image so that it is correct on the monitor 8 Left Right Axis Simply unlock these screws to adjust the left right orientation...

Page 6: ...g RG59 4 PTZ Combo Cable The power connection terminals marked in red are not polarity sensitive therefore the power can be connected either way round However the RS485 connections are polarity sensit...

Page 7: ...ause the rubber grommet may shrink or get stressed over time The wall bracket helps shield the camera to prevent rain from settling on the dome and obscuring the camera s vision It also shelters the c...

Page 8: ...Range Choice of 12V Dual Voltage or 240V 0 02 Lux Sens up Mirror Privacy Function Motion Detection A stylish high performance NiteDevil camera in a traditional style features Wide Dynamic Range and O...

Page 9: ...he 12V DC model Min 200mA PSU recommended 240V AC Power input C13 IEC Cable required RS485 terminals RS485 terminals CVBS Extra video output for set up on a test monitor CVBS Extra video output for se...

Page 10: ...re now the most popular size as they are shorter and more compact than C mount lenses Most cameras are now manufactured to accept CS mount lenses Before fitting the lens you need to verify that you ar...

Page 11: ...s G uide Starts O n Page 20 To adjust the inner focus ring you will need to first remove the lens Next loosen the small cross head screw which in turn loosens the inner focus ring as shown This is a t...

Page 12: ...unting Bracket Included NiteDevil HD SDI covert camera module with on screen display for mirror privacy motion detect functions The light sensitivity of the NiteDevil is so good that it can retain a c...

Page 13: ...fixed to virtually any surface 2 1mm 12V DC Socket HD SDI Output OSD Controller CVBS Test Output A A B B The CAM350 351 has a detachable OSD controller to prevent unauthorised access to the camera s s...

Page 14: ...ange Removable Sun Shield Anti Vandal Bracket Included The NiteDevil HD SDI mini bullet cameras are a great option when broadcast quality pictures are desired in discreet or covert applications Ideal...

Page 15: ...he camera s settings 2 1mm 12V DC Socket HD SDI Output OSD Controller CVBS Test Output The CAM360 362 is supplied with a free mounting bracket A fixing hole diagram is shown below to help when fitting...

Page 16: ...egapixel CMOS Resolution 1080p 25fps Lens Type 2 8 11mm Vari focal Min Illumination 0 Lux IRs On Input Voltage 12V DC 24V AC Dual Voltage Current Consumption 170mA IR Off 300mA IR On Features 1080p at...

Page 17: ...S485 Black HD SDI Output The CAM380 comes fitted with an adjustable cable managed bracket Below is a diagram to help when mounting the camera The CAM380 comes fitted with an adjustable cable managed b...

Page 18: ...01 To DVR or Monitor 12V DC PSU CON370 ZULUG DC Plug with Terminal Strip adaptor From Camera HD SDI Terminal Block RS485 Keyboard or Test Monitor to control OSD CAM380 Connecting The Camera Using RG5...

Page 19: ...or connecting the camera to a test monitor Tables showing the CAM380 s menu structure and options available can be found on pages 21 27 When screwing the front back onto camera make sure the seal is a...

Page 20: ...or OSD menu controller 2 RS485 control using a keyboard DVR or CCTVMate test monitor CAM320 CAM341 344 CAM380 Menu Control Buttons To access the menus using the Menu control buttons or OSD menu contr...

Page 21: ...END BRIGHTNESS 1 100 D WDR ACCE OFF LOW MIDDLE HIGH D WDR ON OFF DEFOG OFF LOW MIDDLE HIGH Menu Structure The following table shows the menu structure of the HD SDI cameras covered in this book Althou...

Page 22: ...ZE RET AGAIN 3 LEVEL 0 100 4 MODE ALL DAY NIGHT 5 BLACK MASK ON OFF 6 DEFAULT 7 RETURN RET END BACKLIGHT OFF WDR BLC HSBLC FOR HSBLC SEE ABOVE WDR 1 GAIN LOW MIDDLE HIGH 2 WDR OFFSET 0 255 3 RETURN RE...

Page 23: ...EXT 1 DELAY 0 20 2 EXT ACTIVE LOW HIGH 3 RETURN RET END NR 2DNR ON OFF 3DNR ON OFF ON 1 S LEVEL 0 100 2 E LEVEL 0 100 3 RETURN RET END 3DNR ON OFF ON 1 SMART NR ON OFF ON 1 SENSITIVITY 0 100 2 RETURN...

Page 24: ...JUST 1 SHARPNESS 0 15 2 MONITOR LCD CRT LCD 1 GAMMA USER USER Y 0 45 1 AUTO 2 ADAPT LEVEL 0 100 3 BLUE GAIN 0 100 4 RED GAIN 0 100 5 RETURN RET END CRT 1 BLACK LEVEL 30 30 2 BLUE GAIN 0 100 3 RED GAIN...

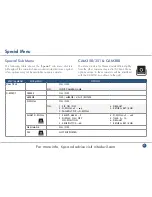
Page 25: ...OFF ON POSITION 3 SENSITIVITY 0 60 4 D ZOOM x2 x62 5 TIME 0 15 6 DEFAULT 7 RETURN RET END NEG IMAGE ON OFF DIS NOT SUPPORTED Special Sub Menu The following table shows the Special sub menu structure...

Page 26: ...DEFAULT 5 RETURN RET END PRIVACY 1 SELECT AREAR1 8 2 DISPLAY INV MOSAIC COLOUR OFF INV POSITION TOP LEFT TOP RIGHT BOTTOM LEFT BOTTOM RIGHT RET AGAIN MOSAIC POSITION TOP LEFT TOP RIGHT BOTTOM LEFT BO...

Page 27: ...6 SENS UP x2 x60 7 RETURN RET END DEFECT LIVE DPC ON OFF AUTO ON 1 LEVEL 0 100 2 RETURN RET END STATIC DPC ON OFF ON 1 START 2 LEVEL 0 60 3 SENS UP x2 x30 4 AGC 0 8 5 RETURN RET END RS485 1 CAM ID 0 2...

Page 28: ...utomatic Gain Control AGC automatically adjusts the Video amplitude under various lighting conditions to maintain a bright image You can choose For more details on menu systems and adjustments downloa...

Page 29: ...o 4 masking areas White Balance White balance is configured so that objects appear a natural colour There are various ways this can be achieved as explained below ATW Auto Tracking White Balance The w...

Page 30: ...in colour mode the IR LEDs will not turn on B W Black White The camera will permanently produce a black white image This is only recommended in areas where the light levels are always extremely low T...

Page 31: ...ow light conditions Setting the level determines how strong a filter is applied and the sensitivity sets the tolerance as to what is considered noise Smart NR Enabled will reduce noise with very littl...

Page 32: ...m B For 12V DC cameras only ever use regulated power supplies so that you can be sure that the camera is always receiving the correct voltage Step 2 Check there is a picture coming out of the CVBS tes...

Page 33: ...bends or loops in the cable The minimum bend radius for RG59 co ax cable is 60mm See online Tip 300 for our Top Tips When Installing Cable and Tip 281 for the Dos And Don ts For Running Co ax at nited...

Page 34: ...to be best in class 5 AutoPort Plug and Play for easy internet setup 6 Compact Space Saving Case slim modern design 7 Free Dynamic DNS Setup saves you time 8 Full Alarm Inputs 8 on the 8 way triggere...

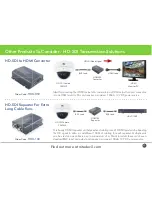
Page 35: ...I Lead HDM050 Converter HDMI Monitor TV BNC Lead HD SDI Video Signal HD SDI Repeater For Extra Long Cable Runs This handy HD SDI repeater unit helps extend cabling runs of HD SDI products by boosting...

Page 36: ...ving space on rack mount installations Order Code VID500 Our HDMI leads have 24k gold connections for great image quality 1m HDMI Lead VID501 2m HDMI Lead VID502 3m HDMI Lead VID501 4m HDMI Lead VID50...

Page 37: ...CSA for powering PTZ cameras Solid copper centre core for long runs Three cables in one saves time and money Glued foil sheath provides maximum protection against interference and prevents loose foil...

Page 38: ...est Function 29 Protocols Supported Check Video Signal Strength 12V Camera Power Function Up to 10 Hours Battery Life Network Cable Testing Monitor Output Testing 248 Learn how to crimp a BNC See onli...

Page 39: ...DC 20 Amp 1 5U rack mount power supply with 18 outputs Each output supplies up to 2A with a maximum output of 20A across all ports Order Code POW562 12V DC 20 Amp PSU With 18 Outputs Regulated 12V DC...

Page 40: ...or accompanying documents means that used electronic equipment must not be mixed with general household waste For treatment recovery and recycling please return this unit to your trade supplier or loc...

Reviews: