background image

31

7. Additional instructions for drills/screwdrivers

a) 

Use ear protection. 

The noise can damage your hearing.

b) 

Use the extra handles if provided with the power tool. 

Losing control of 

the tool can cause injuries.

c)  Brace  the  tool  properly  before  use. 

This tool produces a high output 

torque and without properly bracing the tool during operation, loss of 

control may occur resulting in personal injury.  Note: The above warning 

applies only for tools with a maximum output torque grater than 100 Nm 

measured in accordance with 19.102 (IEC62841-2-1:2017)

d) 

Hold the power tool by insulted gripping surfaces, when performing an 

operation where the cutting accessory may contact hidden wiring or its 

own  cord.  Cutting  accessory  or  fasteners  contacting  a  "live"  wire  may 

make exposed metal parts of the power tool "live" and could give the 

operator an electric shock. 

e)  Locate cables and pipes hidden in walls or ceilings. A metal detector can 

be purchased at DIY stores.

f) 

Pay attention to nails, screws and other hard items. Remove them before 

commencing work.

g) 

If possible, fix the item on which you are working in a vice or clamp.

h) 

Check that the drill bit is correctly fixed before starting your work.

i) 

Wait until the power tool stops moving before putting it away. Otherwise 

the tool can stall and get out of control.

j)  Do not touch the attachment or any part of the device directly after use. 

These components can become hot and cause burns.

k) 

If your device has not been operated for a prolonged time or if it is to be 

used at low temperatures, turn it on and let it operate without load until 

it warms up.

l) 

Take all necessary precautions if the material to be machined contains 

any toxic substance. Protect your skin against exposure and avoid inhaling 

the fumes/dust. Follow the instructions contained in the manufacturer’s 

material safety data sheet.

m)  Do not machine material that contains asbestos. Asbestos is carcinogenic.

n) 

Use only drill bits suitable for the tool and for the material to be drilled. 

Otherwise you risk incurring an injury and/or damaging your tool.

o)  Disconnect the tool from the power source before replacing the drill bit.

8. Safety instructions when using long drill bits

a) 

Never operate at higher speed than the maximum speed rating of the 

drill bit.

 At higher speed, the bit is likely to bend if allowed to rotate freely 

without contacting the workpiece, resulting in personal injury.

Summary of Contents for 12VCDRC0192-20

Page 1: ...WIERTARKO WKR TARKA AKUMULATOROWA 12 V MAX 12 V MAX CORDLESS DRILL DRIVER Model 12VCDRC0192 20...

Page 2: ......

Page 3: ...zgodne z przeznaczeniem 4 2 Dane techniczne 4 3 Zasady bezpiecznego u ytkowania 6 4 Obja nienie symboli 12 5 Budowa 13 6 Zawarto zestawu 14 7 U ytkowanie 14 8 Czyszczenie i piel gnacja 20 9 Naprawa i...

Page 4: ...ment obrotowy 20 Nm Ha as i wibracje okre lone zgodnie z norm EN 62841 1 Poziom ci nienia akustycznego LpA 75 dB A Odchylenie KpA 5 dB A Poziom mocy akustycznej LWA 86 dB A Odchylenie KWA 5 dB A Warto...

Page 5: ...wa je li odczuwasz dyskomfort zwi zany z wibracjami Mocne trzymanie urz dzenia pozwoli zmniejszy poziom wibracji Je eli poziom wibracji jest wysoki skontaktuj si z serwisem w celu naprawy Ha as wytwar...

Page 6: ...py w lub opar w c Podczas pracy elektronarz dzie nale y trzyma z daleka od dzieci i os b postronnych Przy odwr ceniu uwagi mo na straci kontrol nad narz dziem 2 Bezpiecze stwo elektryczne a Wtyczka ur...

Page 7: ...iega niezamierzonemu uruchomieniu narz dzia Nale y upewni si e w cznik wy cznik znajduje si w pozycji wy czonej przed w czeniem elektronarz dzia do sieci pod czeniem baterii podnoszeniem lub przenosze...

Page 8: ...e s zablokowane a tak e czy cz ci nie s p kni te lub uszkodzone co mog oby mie wp yw na prawid owe funkcjonowanie urz dzenia Uszkodzone elektronarz dzie nale yprzedu yciemodda donaprawy Wielewypadk ws...

Page 9: ...lwiek cz ci urz dzenia Wewn trz nie znajduj si adne cz ci kt re mog yby zosta naprawione przez u ytkownika d Nale y regularnie sprawdza przew d zasilaj cy czy nie jest uszkodzony Je li przew d jest us...

Page 10: ...substancje chemiczne kt re mog by toksyczne unika kontaktu ze sk r jak i wdychania opar w kurzu Nale y post powa zgodnie z instrukcj bezpiecze stwa producenta materia u m Nie nale y obrabia materia u...

Page 11: ...zpiecze stwo eksplozji akumulator w adnym wypadku nie powinien by rozgrzewany g W przypadku uszkodzenia ogniw akumulatora nale y go wymieni h W przypadku kontaktu z elektrolitem umy ska one miejsce wo...

Page 12: ...unkt w przyjmowania odpad w specjalnych lub sprzedawcom sprz tu elektrycznego Nale y od czy urz dzenie od r d a zasilania dla adowarki Klasa ochronno ci II w urz dzeniach tej klasy ochronno ci bezpiec...

Page 13: ...ek adnia pr dko ci obrotowej 4 O wietlenie LED 5 Przycisk w cznika z p ynn regulacj pr dko ci obrotowej 6 Antypo lizgowy uchwyt 7 Wydajny akumulator litowo jonowy o pojemno ci 2000 mAh 8 Prze cznik ki...

Page 14: ...enia lecz skontaktuj si ze sprzedawc Zachowaj opakowanie lub zutylizuj zgodnie z lokalnymi przepisami Uwaga Dla bezpiecze stwa dzieci prosz nie zostawia swobodnie dost pnych cz ci opakowania torby pla...

Page 15: ...ym nowym produkcie akumulator jest cz ciowo na adowany 7 2 Monta demonta akumulatora Demonta Naci nij przyciski blokady akumulatora 11 i poci gnij w d Monta Po wyj ciu akumulatora z urz dzenia umie go...

Page 16: ...ot w 1 Monta zdejmowanego uchwytu wiertarskiego Z ap zdejmowany uchwyt wiertarski 1 tak aby jego prz d opiera si o wn trze d oni a palce spoczywa y na pier cieniu uchwytu wiertarki 12 Odci gnij pier c...

Page 17: ...dejmowanego uchwytu wiertarskiego Ustaw pokr t o wyboru momentu obrotowego 2 na warto 12 i wci nij prze cznik kierunku obrot w 8 z lewej strony urz dzenia Mocno z ap za zdejmowany uchwyt wiertarski 12...

Page 18: ...Czym element kt ry obrabiamy jest twardszy tym stosujemy wy sze ustawienie momentu obrotowego Je li urz dzenie ma pracowa jako wiertarka nale y obr ci regulator momentu obrotowego w pozycj oznaczon sy...

Page 19: ...ze w kierunku wyznaczonym przez o wiert a Dociskaj narz dzie tylko na tyle by ko c wka wiert a mog a pobiera nowy materia Nie dociskaj narz dzia zbyt mocno mo esz przeci y silnik i zatrzyma go lub wyg...

Page 20: ...elektrycznym i oparzenia 9 Naprawa i konserwacja Urz dzenie nie zawiera cz ci serwisowanych przez u ytkownika Nie naprawiaj urz dzenia samodzielnie Zawsze zlecaj napraw fachowcowi Je li adowarka akumu...

Page 21: ...dzeniu tworzywa nadaj si do powt rnego u ycia zgodnie z ich oznaczeniem Dzi ki powt rnemu u yciu wykorzystaniu materia w lub innym formom wykorzystania zu ytych urz dze wnosz Pa stwo istotny wk ad w o...

Page 22: ...produkt pod adresem www vershold com opinie Producent Gwarant VERSHOLD POLAND Sp z o o ul wirki i Wigury 16A 02 092 Warszawa Polska Wyprodukowano w Chinach W celu reklamacji produktu nale y dostarczy...

Page 23: ...cji uprawnie z tytu u gwarancji nale y okaza prawid owo wype nion kart gwarancyjn lub paragon faktur zakupu oraz wskaza mo liwie dok adny opis wady urz dzenia w szczeg lno ci zewn trzne objawy wady ur...

Page 24: ...24 13 Deklaracja zgodno ci...

Page 25: ...N MANUAL TABLE OF CONTENTS 1 Intended Purpose 26 2 Technical Specifications 26 3 Safety Instructions 28 4 Explanation of Symbols 33 5 Overview 34 6 Package Contents 35 7 Operation 35 8 Cleaning and Ca...

Page 26: ...Nm Noise and vibration acc to EN 62841 1 Sound pressure LpA 75 dB A Tolerance KpA 5 dB A Sound power LWA 86 dB A Tolerance KWA 5 dB A The vibration emission value ah D 6 3 m s2 Measurement uncertainty...

Page 27: ...ou feel vibration related discomfort Hold the device firmly to decrease the vibration level If the vibration level is high contact a service center to have the tool repaired Noise generated by the dev...

Page 28: ...e plug in any way Do not use any plug adapter for powering tools that require protective grounding Using the original plug and matching mains socket will minimize the risk of electric shock b Avoid to...

Page 29: ...nexpected happens f Dress properly Do not wear any loose clothing or jewellery Keep your hands hair clothes and gloves away from moving parts Loose clothes jewellery or long hair can get entangled in...

Page 30: ...the charger specified by the manufacturer A charger that is suitable for one type of battery pack may create a risk of fire when used with another battery pack b Use power tools only with specificall...

Page 31: ...n a vice or clamp h Check that the drill bit is correctly fixed before starting your work i Wait until the power tool stops moving before putting it away Otherwise the tool can stall and get out of co...

Page 32: ...emperature is no higher than 40 C and no lower than 0 C f Due to the risk of explosion the battery must never be heated g If the battery cells get damaged the battery must be replaced h In case skin c...

Page 33: ...r to electrical equipment dealers Disconnect the device from the power source for charger Protection class II protection against electric shock is ensured by adequrate insulation double or enhanced th...

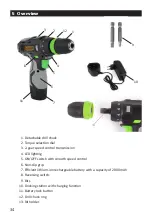
Page 34: ...speed control transmission 4 LED lighting 5 ON OFF switch with smooth speed control 6 Non slip grip 7 Efficient lithium ion rechargeable battery with a capacity of 2000mAh 8 Reversing switch 9 Bits 1...

Page 35: ...do not use the device Keep the package or recycle it in accordance with the applicable regulations Caution For the safety of children do not leave any packaging parts accessible and unattended plastic...

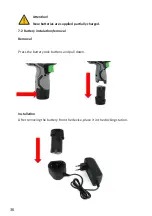
Page 36: ...w batteries are supplied partially charged 7 2 Battery instalation removal Removal Press the battery lock buttons and pull down Installation After removing the battery from the device place it in the...

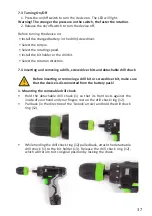
Page 37: ...Select the rotating speed Install the bit holder or the drill bit Select the rotation direction 1 Mounting the removable drill chuck Hold the detachable drill chuck 1 so that its front rests against...

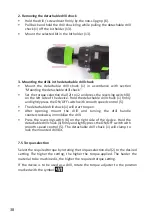
Page 38: ...cted bit in the bit holder 13 3 Mounting the drills in the detachable drill chuck Mount the detachable drill chuck 1 in accordance with section Mounting the detachable drill chuck Set the torque selec...

Page 39: ...election Use the rotation direction switch to select the rotation direction right or left When the rotation direction switch is set on the right side switch down on the left side the detachable drill...

Page 40: ...diameter the greater the force with which the tool presses against your arm Be careful not to lose control over the reaction force The torque will disable the drill at a certain load characteristic c...

Page 41: ...n accordance with the description and left to dry completely It is recommended that the device be stored in its original packaging Always keep the device in a dry well ventilated location inaccessible...

Page 42: ...s Please rate our product on our page www vershold com opinie Manufacturer Warrantor VERSHOLD POLAND Sp z o o ul wirki i Wigury 16A 02 092 Warszawa Polska Made in China Li Ion 3 Plastics contained in...

Page 43: ...to the Service present the duly completed warranty card and describe the defect in as much detail as possible including external manifestations 4 A Warranty Card without the dealer s seal signature an...

Page 44: ...44...
Reviews: