background image

23

Safe operation rules

The vibration value may change due to the tool use area and in 

some exceptional situations it may exceed the vibration emission 

value specified above.
The  specified  vibration  emission  value  has  been  measured 

according to the applicable standard and can be used for making a 

comparison with another device .

The stated vibration emission value may be used for preliminary assessment of 

exposure to hazards.
During extended operation of the device, the vibrations generated by the device 

may cause numbness of hands and shoulders. Examples of vibration prevention 

measures have been provided below:

• 

Wear gloves made of soft material

• 

Stop working if you feel vibration-related discomfort.

• 

Hold the device firmly to decrease the vibration level.

• 

If the vibration level is high, contact a service centre to have the device repaired.

Noise generated by the device may cause hearing impairment. Examples of noise 

prevention measures have been provided below:

• Wear ear protectors .
• Stop working if you feel noise-related discomfort .
• If the noise level is high or the device makes strange noises, contact a service 

centre to have the device repaired .

Never wrap the device with fabric or other materials to lower the noise level . 

If you do so, the device will not be ventilated properly. Heat generated by the 

device may then cause a risk of fire and bodily injury.

WARNING

Read all safety rules and instructions. Failure to observe safety 

regulations and instructions may result in electrical shock, fire 

and/or serious bodily injury.
Retain all the safety rules and instructions for future use.

The term “power tool” used in the rules refers to power tools powered with 

electricity from the mains (with a power cord) and to power tools powered with 

electricity from batteries (without a power cord).

Summary of Contents for SG0158-18

Page 1: ...Dane techniczne 2 3 Zasady bezpiecznego u ytkowania 3 4 Obja nienie symboli 8 5 Budowa 9 6 Zawarto zestawu 10 7 U ytkowanie 10 8 Czyszczenie i piel gnacja 15 9 Naprawa i konserwacja 16 10 Przechowywa...

Page 2: ...1 5 m s2 Dzi kujemy za zakup naszego produktu Przed rozpocz ciem pracy nale y dok adnie zapozna si z instrukcj obs ugi Przekazuj c urz dzenie osobie trzeciej nale y do czy niniejsz instrukcj Z instru...

Page 3: ...Ha as wytwarzany przez urz dzenie mo e spowodowa uszkodzenie s uchu Poni ej podane zosta y przyk ady w jaki spos b przeciwdzia a ha asowi No ochraniacze s uchu Przesta pracowa je li odczuwasz dyskomf...

Page 4: ...o osoby obs uguj cej elektronarz dzie jest uziemione c Nie wystawia elektronarz dzi na deszcz lub wilgo Wnikni cie wody do wn trza elektronarz dzia podwy sza ryzyko pora enia pr dem d Nigdy nie nale y...

Page 5: ...ie naturalnej pozycji Nale y dba o bezpieczn pozycj pracy i zawsze utrzymywa r wnowag Przez to mo liwa jest lepsza kontrola elektronarz dzia w nieprzewidzianych sytuacjach f Nale y nosi odpowiednie ub...

Page 6: ...fikowanemu personelowi przy u yciu oryginalnych cz ci zamiennych To gwarantuje e zachowane zostanie bezpiecze stwo urz dzenia 6 Dodatkowe instrukcje bezpiecze stwa dla elektrycznych pistolet w do malo...

Page 7: ...trysku w pobli u otwartego r d a ognia m PALENIE Nigdy nie pal papieros w podczas prowadzenia natrysku n ROZCIE CZANIE Zawsze stosuj si do zalece producent w farb dotycz cych ich rozcie czania przed z...

Page 8: ...pora eniowym jest zapewnione przez zastosowanie odpowiedniej izolacji podw jnej lub wzmocnionej kt rej zniszczenie jest bardzo ma o prawdopodobne Utylizacja urz dze elektrycznych i elektronicznych pat...

Page 9: ...za 5 Spust 6 Pistolet HVLP 7 Pokr t o regulacji nat enia natrysku 8 Pasek na rami 9 W cznik wy cznik 10 Kompresor 11 Przew d zasilaj cy 12 Miarka lepko ci 13 Wylot powietrza kompresora 14 Ig a do czys...

Page 10: ...ze elementy powinny znajdowa si w zestawie Uwaga Dla bezpiecze stwa dzieci prosz nie zostawia swobodnie dost pnych cz ci opakowania torby plastikowe kartony styropian itp Niebezpiecze stwo uduszenia 7...

Page 11: ...zie plastiku lub lateksu 24 28 sekund Farba na bazie wody 20 25 sekund Farba podk adowa 24 28 sekund Lakier 20 25 sekund Farba olejna 18 22 sekund Emalia 18 22 sekund Farba aluminiowa 22 25 sekund Far...

Page 12: ...ompresor na pod lo u lub przewie go przez rami za pomoc dostarczonego paska W przypadku u ycia paska upewnij si e dwie zaczepy s przyczepione do dw ch uchwyt w zaczep w na przeciwgleg oych stronach uc...

Page 13: ...trzymaj spust do momentu kiedy ciecz zacznie by rozpylana 7 Ustaw dane nat enie natrysku za pomoc pokr t a regulacji nat enia natrysku 7 Przekr pier cie w kierunku przeciwnym do ruchu wskaz wek zegara...

Page 14: ...w odleg o ci 25 30 cm od powierzchni i prowad natrysk od kraw dzi do kraw dzi lub od do u do g ry Nie prowad natrysku pod k tem gdy spowoduje to ciekanie farby po powierzchni Prowad natrysk za pomoc...

Page 15: ...go w momencie gdy z dyszy b dzie wydobywa si tylko i wy cznie rozpuszczalnik Od cz wtyczk z gniazdka sieciowego Zdejmij pojemnik na ciecz rurk zasysaj c oraz membran Nigdy nie zaczynaj albo nie przer...

Page 16: ...dzenia w oryginalnym opakowaniu Zawsze przechowuj urz dzenie w suchym wentylowanym miejscu niedost pnym dla dzieci Chroni urz dzenie przed wibracjami i wstrz sami podczas transportu Dla wygodnego prze...

Page 17: ...po dane nat enie przekr caj c pokr t o regulacji nat enia natrysku Sprawd lepko cieczy W a ciwa utylizacja urz dzenia 1 Zgodnie z dyrektyw WEEE 2012 19 UE symbolem przekre lonego ko owego kontenera n...

Page 18: ...sza ska 32 02 220 Warszawa Polska Wyprodukowano w Chinach Silnik pracuje g o niej ni zwykle Pistolet do malowania jest zanieczyszczony lub nienaoliwiony co skutkuje zablokowaniem t oka w cylindrze Roz...

Page 19: ...z tytu u gwarancji nale y okaza prawid owo wype nion kart gwarancyjn lub paragon faktur zakupu oraz wskaza mo liwie dok adny opis wady urz dzenia w szczeg lno ci zewn trzne objawy wady urz dzenia 4 K...

Page 20: ...20 14 Deklaracja zgodno ci...

Page 21: ...OF CONTENTS 1 Intended use 22 2 Technical data 22 3 Safe operation rules 23 4 Meaning of symbols 28 5 Device components 29 6 Kit contents 30 7 Operation 30 8 Cleaning and maintenance 35 9 Repair 36 1...

Page 22: ...Thank you for purchasing our product Before you start using the spray gun read the instruction manual carefully Hand this device over to a third party only together with this instruction manual Every...

Page 23: ...tact a service centre to have the device repaired Noise generated by the device may cause hearing impairment Examples of noise prevention measures have been provided below Wear ear protectors Stop wor...

Page 24: ...r use the cord in any way other than its intended use Never use the cord for carrying or hanging the device or for pulling the plug out of a socket e Keep the cord away from heat sources oil sharp edg...

Page 25: ...wer tool a Do not overload a power tool For performing a given type of work use a power tool designed for that purpose Working with a proper tool is easier and safer within its designed range of effic...

Page 26: ...OF POISONS The operator must be aware of hazards related to the sprayed material Thoroughly familiarise yourself with the markings and instructions accompanying the sprayed material Be careful if the...

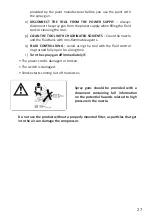
Page 27: ...n flammable agents q FLUID CONTROL RING Avoid using the tool with the fluid control ring turned fully open for a long time r Turn the spray gun off immediately if The power cord is damaged or broken T...

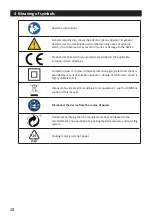
Page 28: ...ropean Union directives Protection class II in class II devices protection against electrical shock is provided by means of suitable insulation double or reinforced which is highly unlikely to fail Di...

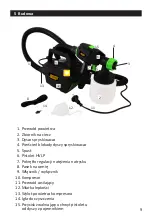
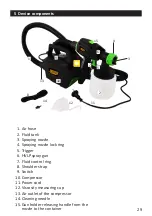
Page 29: ...k ring 5 Trigger 6 HVLP spray gun 7 Fluid control ring 8 Shoulder strap 9 Switch 10 Compressor 11 Power cord 12 Viscosity measuring cup 13 Air outlet of the compressor 14 Cleaning needle 15 Gun holder...

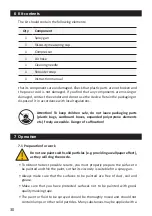
Page 30: ...g parts plastic bags cardboard boxes expanded polystyrene elements etc freely accessible Danger of suffocation 7 1 Preparation for work 7 Operation To obtain the best possible results you must properl...

Page 31: ...m based paint 22 25 seconds Chassis paint 25 35 seconds Wood impregnation agent 28 35 seconds Wood preservation agent No need to thin Wood stain No need to thin If emptying the viscosity measuring cup...

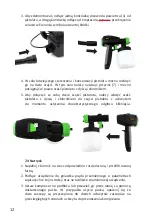
Page 32: ...nk with suitably thinned and filtered paint 2 Connect the device to the mains supplying alternating current with parameters as specified in this manual and on the data plate of the device 3 Place the...

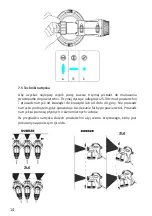
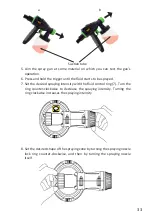
Page 33: ...he desired spraying intensity with the fluid control ring 7 Turn the ring counter clockwise to decrease the spraying intensity Turning the ring clockwise increases the spraying intensity 8 Set the des...

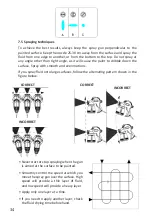
Page 34: ...rying time beforehand CORRECT INCORRECT CORRECT INCORRECT 7 5 Spraying techniques To achieve the best results always keep the spray gun perpendicular to the painted surface Keep the nozzle 25 30 cm aw...

Page 35: ...lvent Remove paint residue from the nozzle and the spray gun Reassemble the spray gun For a more thorough cleaning you can disassemble the gun by disconnecting its parts with the handle from the nozzl...

Page 36: ...t disposal of the appliance 1 According to the WEEE Directive 2012 19 UE the crossed out wheelie bin symbol shown on the left is used to label all electric and electronic devices requiring segregation...

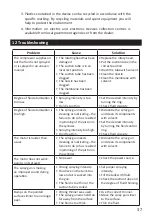
Page 37: ...scosity The motor is louder than usual The spray gun needs cleaning or lubricating the failure to do so has resulted in jamming of the piston in the cylinder Dismantle the spray gun and clean its comp...

Page 38: ...linia vershold com or call us at 48 667 090 903 Warranty and post warranty service provider QUADRA NET Sp z o o mobile 664 44 88 00 tel 61 853 44 44 e mail infolinia quadra net com www www quadra net...

Page 39: ...mit a complaint about the equipment When asserting your rights under warranty you need to present a duly completed warranty card or a purchase receipt invoice together with an as detailed as possible...

Page 40: ...40...

Reviews: