background image

Customizing Dial Action Tables

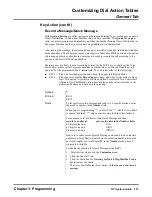
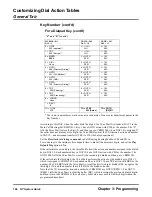
Example of a Dial Action Table


Chapter 3: Programming

NT System Guide

149

Example of a Dial Action Table 

How you set up each DAT depends on the extension or mailbox numbering in your Voice Mail
system. It also depends on how the caller will reach the Automated Attendant. For example: 
Suppose you were setting up a DAT for a Voice Mail system where the extension are numbered 
300

449, and the caller dials 0 to reach the Automated Attendant. You would set up a DAT for 

this system as follows:

In this case, your Key Actions and Key Numbers for Key 0 and TIMEOUT would read as follows:

Key 0:                   Action:      UTRF
                              Number:   300

TIMEOUT:          Action:      UTRF
                              Number:   300


However, if the Automated Attendant were not assigned to 0, it would be located at the lowest-
numbered extension in the system, which is 300 in this example.

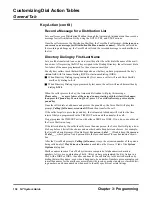
Key 0

Action:    UTRF 
Number:  0
(Unscreened transfer to the Automated Attendant at 0)

Key 1–2

Action:    UND 
Number:  None
(Undefined routing)

Key 3–4

Action:    TRF 
Number:  XXX
(Screened transfer to any extension that the caller dials)

Key 5–8

Action:    UND 
Number:  None
(Undefined routing)

Key 9

Action:    HUP 
Number:  None
(Hang up)

Key *

Action:    REC2 
Number:  IV
(Record Quick Message for any extension that the caller dials)

Key #

Action:    LOGON 
Number:  None
(Log on to any mailbox that the caller dials)

TIMEOUT

Action:    UTRF 
Number:  0
(Unscreened transfer to the Automated Attendant at 0)

Summary of Contents for NVM-NT

Page 1: ... applicable Read Chapter 3 Programming to Learn about every Voice Mail programmable option Each program description also provides the available data entry options the default setting and the Voice Mail software version to which the program is applicable Read Chapter 4 Voice Prompts to Review the Voice Mail prerecorded voice prompts You ll find this an invaluable tool if you ever need to tailor the...

Page 2: ...ange without notice and Nitsuko America has no obligation to provide any updates or corrections to this manual Further Nitsuko America also reserves the right without prior notice to make changes in equipment design or components as it deems appropriate No representation is made that this manual is complete or accurate in all respects and Nitsuko America shall not be liable for any errors or omiss...

Page 3: ...y Code 20 Basic Programming for the NT Voice Mail 21 Step 1 Modify Time and Date 21 Step 2 Assign Extensions to the Voice Mail Ports 22 Step 3 Check the Default Automated Attendant 23 Step 4 Assign Answering Schedules Tables 25 Step 5 Fill out the AST Worksheet 26 Step 6 Create and or Customize Call Routing Mailboxes 28 Step 7 Program the ASTs 29 Step 8 Modify Welcome Messages 30 Use the Default W...

Page 4: ...System Guide Advanced Setup Options for the NT Voice Mail 41 Configure a Computer at the Remote Location 41 Accessing the NT Voice Mail Modem 45 Connect the NT Voice Mail to Your LAN 46 10 100 PCI Network LAN Card 46 Status LEDs 47 LAN Parameters 47 ...

Page 5: ...king 55 Voice Prompts 55 Automated Attendant Features 57 Answering Schedule Override 57 Automatic Routing for Rotary Dial Callers 57 Call Announcing 57 Call Blocking 58 Call Parking Paging 58 Call Queuing 59 Call Waiting 59 External Extension 59 Flexible Answering Schedules 60 Flexible Call Routing 60 Transfer to an Extension Screened or Unscreened 60 Transfer to an Automatic Call Distribution Gro...

Page 6: ...Center Mailbox 68 Network Mailbox 69 Next Call Routing Mailbox 69 Security Code Default 69 Subscriber Mailbox 70 System Administrator Mailbox 70 Trunk Mailbox 70 System Messaging and Recording Options 71 Announcement Message 71 Automatic Message Erase Save 71 Broadcast Message 71 Directory Dialing Message 72 Distribution List 72 First Time Tutorial 72 Instruction Menu 72 Interactive Prompts 73 Mai...

Page 7: ...Date 82 System Version Number 82 User Features 83 Auto Forward 83 Auto Help 83 Auto Time Stamp 83 Call Announcing 83 Calling Automated Attendant 84 Calling a Mailbox 84 Call Waiting 84 Checking Deleting a Message 85 Exiting a Mailbox 85 Forwarding Calls to a Mailbox 85 Getting Recorded Help 85 Getting the Time and Date 85 Listening to Messages 86 Listening Options 86 Paging Message 87 Recording an...

Page 8: ...g SMDI 101 SMDI 101 Viewing Installation Settings 103 Installation Settings 103 Installation Settings Dialog Box 103 Customizing Answering Schedule Tables 105 Answering Schedule Tables 105 AST Trunk Mailbox Port Assignment 105 Creating and Programming ASTs 106 General Tab 108 Schedule 108 Day s or Date 108 Time 108 The Mailbox 109 Call Routing Mailbox 109 Message Center Mailbox 111 Announcement Ma...

Page 9: ...f Attempts 125 Delay before Fax Carrier Detect seconds 125 Hotel Motel 125 Snooze Alarm minutes 125 Rings per Wake Up Call 126 Caller ID 126 Insert Leading 1 126 Make Call Suffix Digits 127 Customizing Dial Action Tables 129 Dial Action Tables 129 Key Actions and Key Numbers 129 General Tab 131 Key Action 131 Undefined Routing 131 Screened Transfer to an Extension 131 Monitored Transfer 134 Unscre...

Page 10: ... FAX Documents 155 Fax Document Slot Options Dialog Box 157 Document Number 157 Notes 157 Tenant 158 Security Code Required 158 Clear Slot 158 Load DCX File 158 Fax Distribution List Options Dialog Box 160 Options 160 Tenant 160 Start Transmission 161 Document Number 161 FAX Numbers 161 Current Fax Port Dialog Box 163 Tenant 163 Extension 164 In Service 164 Allow Fax Callouts 164 Customizing Mailb...

Page 11: ...Mailbox 182 Tenant 182 Directory List 182 Announcement Mailboxes 183 Description 183 Announcement Mailboxes General Properties Page 184 General Properties Page 184 Options 184 Mailbox Type 184 Security Code 184 Name 184 Department 185 Next Call Routing Mailbox 185 Tenant 185 Directory List 185 Announcement 186 Repeat Count 186 Hang Up After 186 Call Routing Mailboxes 187 Description 187 Call Routi...

Page 12: ...e 197 Name 197 Department 198 Tenant 198 Directory List 198 Directory Dialing Mailboxes Call Handling Properties Page 199 Call Handling Properties Page 199 Options 199 Dial Action Table 199 Delay rings or seconds before Redirect Transfer 200 Directory List to Use 200 Time Limit for Dialing Commands 201 Distribution Mailboxes 202 Description 202 Distribution Mailboxes General Properties Page 203 Ge...

Page 13: ...y List 212 Number of Messages 213 Bilingual Mode 213 Guest Mailboxes Message Notification Properties Page 214 Message Notification Properties Page 214 Options 214 Message Notification Fax Callback 215 Local Callouts 215 Long Distance Calls 216 Notification Number 1 3 216 Call Type 217 Notification Mode 218 Security Code Required 218 Guest Mailboxes Messaging Properties Page 219 Messaging Propertie...

Page 14: ...ox 228 External Extension Enabled 229 External Extension Number 229 Interactive Mailboxes 230 Description 230 Interactive Mailboxes General Properties Page 232 General Properties Page 232 Options 232 Mailbox Type 232 Name 232 Department 232 Next Call Routing Mailbox 233 Tenant 233 Directory List 234 Interactive Mailboxes Interactive Properties Page 235 Interactive Properties Page 235 Interactive O...

Page 15: ...allback 247 Local Callouts 247 Long Distance Calls 248 Notification Number 1 3 248 Call Type 249 Notification Mode 250 Security Code Required 250 Message Center Mailboxes Messaging Properties Page 251 Messaging Properties Page 251 Options 251 Message Playback 252 Message List Mode 252 Auto Forwarding 253 Auto Erase Save of Messages 253 Message Retention 254 Urgent Message Return Time 254 Recording...

Page 16: ... Call Routing Mailbox 267 Tenant 268 Directory List 268 Number of Messages 269 Bilingual Mode 269 Subscriber Mailboxes Message Notification Properties Page 270 Message Notification Properties Page 270 Options 270 Message Notification Fax Callback 271 Local Callouts 271 Long Distance Calls 272 Notification Number 1 3 272 Call Type 273 Notification Mode 274 Security Code Required 275 Subscriber Mail...

Page 17: ...ansfer 285 Transfer Only Mailbox 285 Alternate Next CRMB Dial Option 286 External Extension Enabled 287 External Extension Number 288 Subscriber Mailboxes Subscriber Properties Page 289 Subscriber Properties Page 289 Options 289 Park Paging String 290 Call Waiting String 292 Call Announcing 294 System Administrator 296 Call Queuing 296 Block Auto Attendant 298 Trunk Mailboxes 299 Description 299 T...

Page 18: ...11 System Options 311 General 1 Tab 311 Mailbox Default Security Code 311 MWI Lamp Update Time 311 First Trunk Equipment No Trunk Mailbox Offset 312 First Trunk Equipment No 312 Trunk Mailbox Offset 313 Attendant Mailbox 313 Incoming Network Call Mode 313 Default Bilingual Mode 314 Tenant 314 Intertenant Messaging 314 Number of Tenants 314 Eliminate Recording Silence 315 Enabled 315 Delay before m...

Page 19: ...321 RNA 322 Busy 322 External Hold Retrieval Strings 323 RNA 323 Busy 323 Transfer Strings 324 Lamp Strings 324 On 324 Off 325 Miscellaneous Strings 325 Hang Up 325 Call Pickup 326 Ringdown 326 Off Hook Call Announce 327 Timers Tab 328 Message Length 328 Subscriber 328 Nonsubscriber 329 Call Announce 329 Timers seconds 329 Silence Limit for Recording 329 Message Backup Go Ahead Time 329 Page Meet ...

Page 20: ...ts before 341 Local Callout 341 Long Distance Callout 342 Access Digits before Network 342 Local Callout 342 Long Distance Callout 343 Access Digits before Fax 343 Local Callout 343 Long Distance Callout 344 Fax On Demand Cover Page Tab 345 From 345 Include Cover Page with Documents 345 Cover Page Text 346 Viewing and Printing Reports 347 Reports 347 Multiple Reports 347 Auto Attendant Report 349 ...

Page 21: ...Port Usage Report 366 System Options Report 367 Performing a Local Backup 369 Local Backup 369 Backup Dialog Box 370 Performing a Local Restore 373 Local Restore 373 Restore Dialog Box 373 Changing the Port Status 375 Ports In Out of Service 375 Port In Out Services Dialog Box 375 Testing Clearing Ports Immediately 377 Immediate All Ports Self Test 377 Adjusting Data Transmission Protocol 379 Seri...

Page 22: ...DTMF Duration for Dialing 389 Flash Character 390 Flash Time 390 Inter ring Delay 390 Minimum Offhook Time 390 Minimum Loop Current Off 390 Offhook Delay 390 Pause Time when dialing 390 Ring Off Interval 390 Ring On Interval 390 Silence Non silence Debounce 390 Channel Parameters Tab 391 DTMF Edge 391 DTMF Talk 391 DTMF Debounce 392 Answer Ring Count 392 No Answer Time 392 Max Answer 392 Hedge 392...

Page 23: ...meout 397 Prompt Delay 397 Welcome Delay 397 Dial Tone Wait Dur 397 Pcpm Pause Dur 398 Pcpm Wait Dur 398 Start PCPM 398 Normal Gain 398 Dial Tone String 398 Flash String 398 Agc Disable 398 Loop Drop 398 Setting up Integration Strings 399 Integration Strings for Generic System 399 Integration Strings Dialog Box 399 Using Setup Service Location 401 Setup Service Location 401 Voice Mail Service Loca...

Page 24: ... 410 Digit 411 Using the Real Trace 413 Real Trace 413 Trace Dialog Box 414 Port 415 Mailbox 415 Event 415 Time 415 Line No 415 Term Type 415 PCPM Type 416 Digit 416 Error Code 416 Trace String 416 Using the Trace Viewer 417 Trace Viewer 417 Select Query Dialog Box 417 Trace Viewer Dialog Box 419 Trace Time 420 Port 420 Mailbox 420 Trace String 420 Digit 420 Event Code 420 PCPM Type 420 Term Type ...

Page 25: ...rding an Instruction Menu 429 Recording a Directory Dialing Message 431 Recording an Announcement Message 433 Recording Mailbox Names 434 Overriding the Answering Schedule 435 Recording Music On Hold 436 Recording Interactive Prompts 437 Customizing the System Voice Prompts 439 Setting the System Time 440 Setting the System Date 441 Getting the System Version Number 442 Preparing for Power Down Sh...

Page 26: ...Table of Contents Chapter 4 Voice Prompts xxiv NT System Guide Chapter 4 Voice Prompts Voice Prompts 447 NT System Voice Prompts 447 ...

Page 27: ...talling and Configuring REMOTELY POSSIBLE 516 Installing Dialogic System Software 518 Installing Other Software 520 Seattle Labs Remote NT 520 Fax Board Driver Software 522 Windows Scripting Host 523 Microsoft Data Engine 523 MSDE Service Pack 1 524 HASP Dongle Device Driver 525 Software Program for NT Service 526 Feature Files and Dongle 527 Configuring NT Security 528 Running the VMServer Progra...

Page 28: ...Table of Contents Chapter 5 Maintenance xxvi NT System Guide ...

Page 29: ...he NT Voice Mail Installing the NT Voice Mail This section provides step by step instructions for getting your NT Voice Mail up and running fairly quickly The following paragraphs provide you with basic information for installing the hard ware for your NT Voice Mail and connecting it to a phone system It also explains how to start up the NT Voice Mail and then install a phone system from the Voice...

Page 30: ...wing equipment for installation Q A UPS uninterrupted power source and cable are recommended to maintain power during an outage Q Surge protector Q Parallel printer optional that is compatible with IBM PC XT or AT for printing reports You also need all of the equipment necessary to install the phone system including the manuals For analog integrations the Voice Mail requires 1 analog OPX 2500 set ...

Page 31: ...llation NT System Guide 3 Step 2 Program the Telephone System For the NT Voice Mail to work properly your telephone system must be equipped with compatible hardware It must also be programmed for Voice Mail See the Phone System Integration Guide for a list of the required programs ...

Page 32: ...umber of ports in your system determines if your cabinet looks like Figure 1 1 or Figure 1 2 If your system has 20 ports or less the layout of your cabinet is similar to the one shown in Figure 1 1 If your system has more than 20 ports the layout is similar to Figure 1 2 Step 3 shows you where to connect your keyboard mouse monitor and Hasp Dongle Figure 1 1 Layout of the NT Voice Mail Cabinet T2 ...

Page 33: ...e cable on the mouse into the connector designated for the mouse See Figures 1 1 and 1 2 3 Plug the monitor s cable into the 9 pin connector designated for the monitor See Figures 1 1 and 1 2 4 Plug the Hasp Dongle into the LPT1 connector Tighten with attached screws The Hasp Dongle unlocks various features It is required for the Voice Mail to operate properly T2 V5 AC Power Connector Power Switch...

Page 34: ...air corresponds to Port 1 on the Voice Mail 3 Using another 4 wire modular line cord connect L1 on the Voice Mail Interface Unit to a Station Port on the Portrait Be sure to connect L1 to the Station Port based on the Por trait Setup you have See the manual for the Portrait Phone System 4 Repeat steps 1 through 3 for each Voice Mail Port Figure 1 3 Connecting the NT Voice Mail to a Portrait Phone ...

Page 35: ...the Voice Mail Plug the other end into an to RJ11 modular jack See Figure 1 4 2 Repeat steps 1 for each Voice Mail Port Figure 1 4 Connecting the NT Voice Mail to a 28i or 124i Phone System T2 C2 AC Power Connector Power Switch LPT1 COMM 1 Keyboard Connector Mouse Connector Monitor LAN Card Modem COMM 2 Slots Port Numbers 4 3 1 2 8 7 5 6 12 11 9 10 16 15 13 14 20 19 17 18 1 2 3 4 5 Modular Jacks R...

Page 36: ...her modular line cord into Port 2 on the Voice Mail Plug the other end into an ASI or the dual ASI 3 Connect the ASI or dual ASI to the phone system Figure 1 5 shows connecting a Dual ASI 4 Repeat steps 1 through 3 for all Voice Mail Ports Figure 1 5 Connecting the NT Voice Mail to Any Phone System T2 C3 AC Power Connector Power Switch LPT1 COMM 1 Keyboard Connector Mouse Connector Monitor LAN Car...

Page 37: ...1 Plug one end of a modular line cord into the LINE connector on the Modem Card See Figure 1 6 2 Connect the other end to an analog port Figure 1 6 Connecting the NT Voice Mail Internal Modem T2 C5 AC Power Connector Power Switch LPT1 COMM 1 Keyboard Connector Mouse Connector Monitor LAN Card Modem COMM 2 Slots Port Numbers 4 3 1 2 8 7 5 6 12 11 9 10 16 15 13 14 20 19 17 18 1 2 3 4 5 To Analog Por...

Page 38: ...uter window 6 Double click the Services icon on the Control Panel window 7 On the Services window Select VMService from the scroll list and click the Start button After the Services Control message is displayed the status of VMService will read Started 8 Click the Close button on the dialog box to remove it from the screen 9 Click the X in the upper right corner of the Control Panel window and the...

Page 39: ...ystem in the NT Voice Mail 1 Click File on the menu bar to display the File menu 2 From the File menu select Install Phone System Phone Installation Wizard 1 of 5 You will see the Phone Installation Wizard 1 of 5 dialog box which displays the first of 5 pages for the Phone Installation Wizard This Wizard prompts you to enter the parameters that will make the Voice Mail compatible with the phone sy...

Page 40: ...e list select GENERIC 2 Click the button to reach the Phone Installation Wizard 2 of 5 dialog box shown below Phone Installation Wizard 2 of 5 The Phone Installation Wizard 2 of 5 dialog box displays each of the following fields Number of Voice Ports This is the maximum number of Voice Ports you plan to install in the Voice Mail system Availability All phone systems Default Depends on the number o...

Page 41: ...box 1 In the Number of Voice Mail Ports box enter the number of ports that you wish to install 2 In the Mailbox Default Security Code box enter the Security Code you want to assign to each Subscriber Mailbox 3 Click the button to reach the Phone Installation Wizard 3 of 5 dialog box shown on the next page Availability All phone systems Default None Entries Up to 6 digits 0 9 Notes Subscribers must...

Page 42: ... Mail Step 6 Install a Phone System in the NT Voice Mail System 14 NT System Guide Chapter 1 Installation Phone Installation Wizard 3 of 5 The Phone Installation Wizard 3 of 5 dialog box displays each of the following fields ...

Page 43: ...languages you must re install the Voice Mail software using the Voice Mail Software CD or diskettes See page for more information Default Compression Rate The value for Default Compression Rate specifies how the Voice Mail will compress voice messages to favor either sound quality or storage capacity In most configurations the 32kbits sec setting favors sound quality but downgrades the storage cap...

Page 44: ...Installing the NT Voice Mail Step 6 Install a Phone System in the NT Voice Mail System 16 NT System Guide Chapter 1 Installation Phone Installation Wizard 4 of 5 ...

Page 45: ...rs the same length if possi ble And if you want to create a 3 digit mailbox number that has a leading digit of 4 all mailbox numbers with the leading digit of 4 must have three digits For example if you are creating Sub scriber Mailbox 432 the only mailbox numbers that you can have with the leading digit of 4 will be 400 499 rather than 40 49 or 4000 4999 Creating Trunk Mailboxes You will need tru...

Page 46: ...But finishing the installation will result in your losing messages rerecord prompts and current configuration settings This loss does not apply to the mailbox settings you created on the Extension Range Table To check or modify any of your installation settings before you finish Click the button until you reach the setting To finish the installation 1 Click the button You see a dialog box telling ...

Page 47: ...he line for assistance Voice Mail Test 1 Dial a Voice Mail extension number from any extension Depending on which phone system is installed you will hear one of these prompts A Thank you for calling If you B Please enter your mailbox number 2 If you hear Prompt A Press wait for the Please enter your mailbox number prompt and then go to step 3 But if you hear Prompt B go directly to step 3 3 Dial t...

Page 48: ...ubscribers Extensions Mailbox Security Code To reach a Subscriber Mailbox from an extension a Subscriber must dial one of the Voice Mail extension numbers Let Subscribers know what these numbers are even when extensions have Message Waiting keys Also let Subscribers know if there is any Mailbox Default Security Code in your Voice Mail system ...

Page 49: ... so that they match the actual date and time of your location In this case use the spaces below to enter the date and time to be modified Date _______________________ Time ________________________ To modify the default date and or time settings 1 Double click the My Computer icon on the desktop 2 Double click the Control Panel icon on the My Computer window 3 Double click the icon on the Control P...

Page 50: ...o ports In the Extension Number column next to each port number fill in the number of the extension that you plan to assign to the port To assign an extension to a port 1 Click Customize on the menu bar of theVoice Mail Main Screen 2 Select Port Options on the Customize menu 3 On the General tab for each port Enter in the Extension field the number of the extension that you are assigning to the po...

Page 51: ... call entered the Voice Mail system After you assign an AST to a Trunk Mailbox or a port or both the AST will tell the Automated Attendant how to route an inbound call to the mailbox containing a timely greeting for the caller If you assign the AST to a port the Voice Mail will use your AST to answer all calls directed to that port But if you assign an AST to a Trunk Mailbox and the connected phon...

Page 52: ...e following pages 4 The Automated Attendant plays the Instruction Menu for Call Routing Mailbox_13 The default Instruction Menu is If you are calling from a Touch Tone phone please dial the extension number you wish to reach or dial 0 for assistance If you are calling from a rotary dial phone please stay on the line for assistance To modify the Instruction Menus see Step 10 on one of the following...

Page 53: ...assignments to this port But if you want the Automated Attendant to answer some trunks differently than others you assign the desired AST 1 50 to the Trunk Mailbox assigned to the trunk but only if the Voice Mail provides Trunk Mailboxes for your phone system To find out if Trunk Mailboxes are allowed see the Phone System Integration Guide To assign an AST to a port 1 Click Customize on the menu b...

Page 54: ...e for Mo Fr regular business hours Q Time of day that the mailbox should start answering the call entered as hours and minutes in the HH MM format where HH represents the hour 00 23 and MM the minutes 00 59 Q Number of the Call Routing Mailbox that will answer the call For example Suppose you are programming AST 1 If the Automated Attendant should answer calls starting at 10AM on Monday through Fr...

Page 55: ...lbox_____ Schedule 4 Day Date_____ Schedule 14 Day Date_____ Schedule 4 Time_____ Schedule 14 Time_____ Schedule 4 Mailbox_____ Schedule 14 Mailbox_____ Schedule 5 Day Date_____ Schedule 15 Day Date_____ Schedule 5 Time_____ Schedule 15 Time_____ Schedule 5 Mailbox_____ Schedule 15 Mailbox_____ Schedule 6 Day Date_____ Schedule 16 Day Date_____ Schedule 6 Time_____ Schedule 16 Time_____ Schedule 6...

Page 56: ...kend schedule in an AST For more information about Call Routing Mailboxes see Customizing Answering Schedule Tables in Chapter 3 Programming on page 105 A Call Routing Mailbox contains a Dial Action Table and 7 other programmable options The default values for these options should be fine to get your basic system up and running To review the routing options assigned to the keys in a Dial Action Ta...

Page 57: ...k the Mailbox Number box for that schedule and enter the number of the mailbox to which the schedule points 6 Press Tab to reach the Day s or Date box for the next schedule 7 Repeat steps 2 4 until you have finished adding all schedules you need on the AST 8 Click the OK button to save your new AST schedule Or to change a value in an existing AST schedule 1 From the Voice Mail Main Screen click Cu...

Page 58: ...h you may dial it at any time These are options that you have already programmed in the Dial Action Table assigned to the Call Routing Mailbox you are using You need to record an Instruction Menu for each Dial Action Table that you use in Step 9 Modify the Dial Action Tables If you program two different Dial Action Tables for example you will need to record two different Instruction Menus When you...

Page 59: ...e Play Default Messages check box This is the default setting for Play Default Messages 6 Click the OK button To record a Welcome Message 1 Log onto a System Administrator Mailbox 2 Dial the Security Code if required 3 Press S A 7 2 for the System Administrator Menu 4 Press W 9 for the Welcome Message 5 Follow the voice prompts for recording the Welcome Message 6 When finished Dial the number of t...

Page 60: ...ers For example if the extensions are 21 36 Transfer will be assigned to Keys 2 3 Undefined Routing will be assigned to Keys 4 8 If a caller presses an Undefined Routing key the Automated Attendant says That is an invalid entry and then repeats the dialing entries Action UND Number None Action TRF Number XX 2 digit extension Action TRF Number XXX 3 digit extension Key 9 Hang up Action HUP Number N...

Page 61: ... prompts in Language 1 or Language 2 Action LANG1 LANG2 Number Mailbox number Go to any mailbox that the caller dials when the dialed mailbox number starts with the digit Z Action GOTO Number XXX Log on to a mailbox and Voice Mail Action LOGON Number None Note After pressing Key Z callers must dial their mailbox numbers to logon to their mailboxes Leave a quick message in a mailbox having a Action...

Page 62: ...ble ___ Dial Action Table ___ Dial Action Table ___ Key 0 Action ____ Key 0 Number ____ Key 1 Action ____ Key 1 Number ____ Key 2 Action ____ Key 2 Number ____ Key 3 Action ____ Key 3 Number ____ Key 4 Action ____ Key 4 Number ____ Key 5 Action ____ Key 5 Number ____ Key 6 Action ____ Key 6 Number ____ Key 7 Action ____ Key 7 Number ____ Key 8 Action ____ Key 8 Number ____ Key 9 Action ____ Key 9 ...

Page 63: ... DAT programming click the OK button to save your changes To program Directory Dialing by first name or last name When you program the 5 step sequence listed below you are creating a set of pointers which link the following a DAT a Call Routing Mailbox a Directory List and a Subscriber Mailbox Guest Mailbox Message Center Mailbox or another type of named mailbox The DAT points to a Call Routing Ma...

Page 64: ... Options menu 3 Click to select the General tab 4 Assign a desired value to the Directory List and enter that value in the Directory List box 5 Click the Next button and repeat Step 4 for the next mailbox to which you are assigning the Directory List 6 Repeat Step 5 until you have assigned the Directory List to every mailbox in your Voice Mail system 7 Click the OK button to save your assignments ...

Page 65: ...ailbox numbers in your Voice Mail system Make sure that the Number for the key contains as many x s as there are digits in each Voice Mail extension mailbox number For example You would enter XX for a Voice Mail system with 2 digit mailbox numbers and XXX for a Voice Mail system with 3 digit mailbox num bers 5 Click the OK button to save your assignments Setting up a DAT for Call Transfers to Othe...

Page 66: ...les Press 2 for Accounting Press 3 for Marketing If you know the extension number of the person you are trying to reach you may dial it at any time These are options that you have already programmed in the Dial Action Table assigned to the Call Routing Mailbox you are using You need to record an Instruction Menu for each Dial Action Table that you use in Step 9 If you program two different Dial Ac...

Page 67: ... number of the Call Routing Mailbox to which the DAT is assigned Your Instruction Menu will now override the default Instruction Menu regardless of the cur rent setting for Play Default Messages To use no Instruction Menu 1 Click Customize on the menu bar and select Mailbox Options on the Customize menu 2 Select Edit on the Mailbox Options menu 3 On the Mailbox Range dialog box Enter into the Star...

Page 68: ...pose you recorded the name Joe Smith for Subscriber Mailbox 303 If a transfer to extension 303 is incomplete because that extension is busy the Automated Attendant will prompt Joe Smith is busy rather than Extension 303 is busy To record a name for a Subscriber Mailbox System Administrator 1 Log onto the System Administrator Mailbox 2 Dial the Security Code if required 3 Press S A 7 2 for the Syst...

Page 69: ...oice Mail using the Voice Mail s internal modem This set up is useful for troubleshooting and programming purposes You access the NT through a program called Remote Access Service RAS which serves as a Remote Connec tion Manager RAS is set up and configured for you at the factory It does not require any addi tional configuration The NT Voice Mail Server has been configured at the factory for a use...

Page 70: ...nnection icon You see the first page of the Make New Connection Wizard 3 Click Next Q You see the following if your modem is not connected and turned on See your Network Administrator Q Otherwise you see the following 4 In the Type a name for the computer you are dialing field enter a name for the NT Voice Mail In the above example Voice Mail Server was entered ...

Page 71: ...ick Configure to change any options for your modem When you are done click Next 6 In the Area code field enter the area code for the NT Voice Mail s modem 7 In the Telephone number field enter the phone number of the telephone line connected to the NT Voice Mail s internal modem 8 In the Country code field select the country code of the NT Voice Mail s internal modem You see 9 Click Finish You see...

Page 72: ...CTLRemote as the User Account The user account CTL Remote has already been configured for dial in per mission Verify with the NT Administrator at the site where the Voice Mail is located that this User Name has not changed 12 In the Password field enter the password for the NT Voice Mail Server The NT Voice Mail is shipped with the crossroad as the password Verify with the NT Administrator at the ...

Page 73: ... NT Voice Mail Accessing the NT Voice Mail Modem After configuring the NT Voice Mail and the remote computer it is simple to connect to Voice Mail s Internal modem To connect to the NT Voice Mail using the modem 1 From the remote computer s desktop click Start Programs Accessories Com munications Dial Up Networking 2 Double click the icon for the NT Voice Mail connection ...

Page 74: ... NVM Desktop Messaging option To connect your NT Voice to a LAN your system must be TCP IP compatible and have an ethernet connection 10 100 PCI Network LAN Card Your NT Voice Mail is equipped with a 10 100 PCI Network LAN Card that is set for auto nego tiation This allows the card to automatically detect whether you are connected to a 10 or 100 Mbps hub The card is equipped with an RJ 45 connecto...

Page 75: ...rd to a 100 Mbps hub LAN Parameters Record the following 3 LAN parameters O Server Service Number assigned to the NT Voice Mail By default the Server Service Number for the NT Voice Mail is 2000 If this number does not conflict with a Server Service Number Port Number of another computer on the LAN it is suggested that you use 2000 Using 2000 reduces the amount of programming you have to do later ...

Page 76: ... the Specify an IP address radio box 6 Ask your Network Administrator for the correct IP Address for your network and enter it in the IP address field 7 Ask your Network Administrator for the correct Subnet Mask for your network and enter it in the Subnet Mask field 8 Click the OK button You will see a dialog box telling you that you must shut down the Voice Mail and then restart the computer befo...

Page 77: ...nt to answer all lines or only some lines One common setup is to have the Automated Attendant greet an outside caller with a recorded Welcome Message which normally includes a greeting and Instruction Menu A typical Welcome Message would say Thank you for calling company ABC Please dial the extension number you wish to reach Or dial 1 for sales dial 2 for customer service After hearing the Welcome...

Page 78: ... Other phone systems require 1 Analog Station Port OPX off the phone system with DTMF decoder per Voice Mail port Direct Terminal Access 14 VGA Monitor and Keyboard Remote Terminal Access For information about the Remote Client see Remote Client later in this guide an Internal 56k Modem a dedicated phone line Window NT remote access service Dial up Networking on the Remote side Electrical Requirem...

Page 79: ...you can install with your Voice Mail system 1 Click File on the NT Voice Mail menu bar 2 Select Install on the File menu 3 Select Phone System on the Install menu You will see a list of phone systems on the Phone Installation Wizard 1 of 5 dialog box The NT Voice Mail system contains a default database that is compatible with your installed phone system This compatibility reduces the amount of tim...

Page 80: ...l Remote Tenant Service The Voice Mail can serve up to 4 phone systems where 3 of them are in remote locations One of the phone systems is designated as the Master and the others as the Slaves The Master provides the remote Slave extensions with access to Voice Mail features via Tie Lines Inbound calls to the Master can be answered by the Voice Mail Automated Attendant and then transferred to any ...

Page 81: ...uses both outgoing and incoming Tie Lines from the Slave to the Master and then back again You may not want to have the Tie Lines occupied like this during the day but you may want to terminate a trunk to the VM Master only for Night Mode calls If the table does not contain a match for the Caller ID the Automated Attendant will look at your AST assignment s Voice Mail Programming Q If several tena...

Page 82: ...he Voice Mail says To send the document to be stored press the START key on your FAX machine when you hear the tone Callers press the START key when they hear the FAX carrier tone and then they hang up About Checking and Printing FAX Messages To check for FAX Messages a mailbox users simply calls their mailboxes and presses L to lis ten If there is a FAX Message the Voice Mail plays the recorded c...

Page 83: ...red to the message sender at the other Voice Mail System Q make an immediate call to the message sender at the other Voice Mail System without first exit ing their mailboxes Q Forward the message to another mailbox For detailed information about Voice Mail Networking see the Voice Mail Networking Guide Voice Prompts The NT Voice Mail provides voice prompts to guide people in using the system The r...

Page 84: ...by mailbox basis when you configure Mailbox Options You can set up the voice prompts so that O a language plays on a specific trunk This setting overrides the system wide setting O a language is assigned to a dialpad key This setup allows callers to press a key to select a different language O a language is assigned to a Subscriber Guest or Message Center Mailbox The Voice Mail plays the assigned ...

Page 85: ... A Message Center Mailbox lets the caller leave a message without dialing codes Programming Q Customize Mailbox Options Edit Mailbox Customize Call Routing Mailbox Q Customize Dial Action Tables Assign Action and Number to TIMEOUT Q Customize Answer Schedule Tables Assign Call Routing Mailbox to AST Call Announcing Lets the Automated Attendant screen calls for Subscribers extension users First the...

Page 86: ...pplies to two types of callers Q Auto Attendant callers who transfer to the Subscriber extension Q callers who dial the Subscriber s direct line while only unanswered calls are forwarded to the Subscriber Mailbox If the Subscriber s Paging Message is ON the Voice Mail immediately parks an Automated Attendant caller and pages the Subscriber without ringing the extension However if the Sub scriber s...

Page 87: ...oes not pick up the call the NT Voice Mail lets the caller leave a message Programming Q Customize Dial Action Tables Set Action to TRF to allow screened transfers Q Customize Mailbox Options Edit Mailbox Subscriber tab Enter Call Waiting String and disable Block Auto Attendant Q Customize System Options Timers tab Set Flash Timer if the string requires one Q Call Subscriber Mailbox Dial OP 6 7 an...

Page 88: ...e time schedules If desired the Voice Mail can play one set of greetings for your Sales line another for your Marketing line and a third for the Customer Service line Or the the Voice Mail can play the same set of greetings for all lines that use a particular port Programming Q Customize Mailbox Options Edit Mailbox Create at least two Call Routing Mailboxes one for a Welcome Message and one for a...

Page 89: ...nsfer only As a result of these transfers callers do not get a chance to leave a message when the transfer is incomplete This application is typically used for transfers to FAX machines Programming Q Customize Dial Action Tables Assign an Action and Number to each dialpad key 0 9 and in the Dial Action Table DAT TIMEOUT is reserved for the action that the NT Voice Mail should perform if the caller...

Page 90: ...to TRF to allow screened transfers Q Customize Mailbox Options Edit Mailbox Lamp Logon Transfer tab Enable Forced Unscreened Transfer Interactive Messaging Script Prompting Lets the Auto Attendant act as an order taker or poll taker Before Interactive Messaging begins the System Administrator can record up to interactive prompts During Interactive Messaging the Auto Attendant asks a question and t...

Page 91: ...sion When the Automated Atten dant detects FAX carrier tone instead of the expected Touch Tone digit the Voice Mail transfers the call to the company FAX machine connected to an extension in phone system so that the FAX transmission can come through Programming Q Customize Mailbox Options Add Mailbox Create an Interactive Mailbox Q Customize Mailbox Options Edit Mailbox Customize the Interactive M...

Page 92: ...eatures The Call Routing Mailbox is the core of the Automated Attendant because it pro vides callers with secondary routing options You can assign a Call Routing Mailbox to a Subscriber Message Center Interactive or FAX Mailbox Each Call Routing Mailbox contains a Dial Action Table DAT which tells the Automated Attendant how to handle the digits dialed during an inbound call You have previously as...

Page 93: ...ng its programmed name A Directory Dialing Mailbox lets a caller name dial right away while a Call Routing Mailbox requires that a caller dial the code for name dialing before dialing the extension or mailbox name The Directory Dialing Message tells the caller what name to dial A sample message might be For customer service dial S E R V Programming Q Customize Dial Action Tables Set up Actions and...

Page 94: ...tribution Lists for scheduled FAX calls FAX Callbacks The Automated Attendant requests the caller s FAX number calls back the person at that num ber and then FAXes the document If the callback doesn t go through the NT Voice Mail will retry the call Both the amount of time that the NT Voice Mail waits before retrying and the number of retries is programmable In addition you can allow or prevent lo...

Page 95: ... appointments and meetings Programming Q Customize Mailbox Options Add Edit Mailbox Create Customize a Future Delivery Mailbox See page 206 Q Call Subscriber Mailbox Dial FD 3 3 Record Future Delivery Message Flexible Mailbox Numbering Plan Lets the System Administrator number the mailboxes to match the current extension and trunk numbering plan In the Programming Guide see also Customizing Mailbo...

Page 96: ...ld ask The NT Voice Mail stores the responses in a mailbox The System Administrator then calls that mailbox to listen to the responses Programming Q Customize Mailbox Options Add Edit Mailbox Create Customize an Interactive Mailbox See page 230 Q Call System Administrator Mailbox Dial SA 7 2 and IP 4 7 Record Interactive Prompts Message Center Mailbox Lets an Automated Attendant caller leave a mes...

Page 97: ...ated Attendant For example Once the callers enter a mailbox to leave a message the Next Call Routing Mailbox lets them re route their calls to a pre programmed destination such as the operator by pressing 0 after the beep Programming Q Customize Dial Action Tables Set up Actions and Numbers in DAT Q Customize Mailbox Options Add Edit Mailbox Create Customize a Next Call Routing Mailbox for a Subsc...

Page 98: ...m Administrator Menu to record Announcement Messages Broadcast Messages Instruction Menus Mailbox Names You can program any Subscriber Mailbox as a System Administrator Mailbox see Programming below Programming Q Customize Mailbox Options Edit Mailbox Subscriber Set System Administrator to INTRA for the whole system or to INTER for an individual tenant See page 289 Trunk Mailbox A Trunk Mailbox le...

Page 99: ...ally either erase or save each message in a Subscriber Mes sage Center or Guest Mailbox which someone has listened to all the way through Programming Q Customize Mailbox Options Edit Mailbox Messaging tab Set Auto Erase Save of Messages to Erase to have the Voice Mail delete each message OR Set Auto Erase Save of Messages to Save to have the Voice Mail keep each message Broadcast Message Plays to ...

Page 100: ...e Distribution List First Time Tutorial Plays an Announcement Message when someone logs onto a Subscriber or Guest Mailbox for the first time The NT Voice Mail allows one of two options Q Option 1 plays the Announcement Message only Q Option 2 plays the Announcement Message then explains how to record a Mailbox Greet ing Name and assign a Mailbox Security Code Programming Q Customize Mailbox Optio...

Page 101: ...303 Instead of hearing Extension 303 is busy you would hear Joe Smith is busy Programming Q Call System Administrator Mailbox Dial SA 7 2 and N 6 Record name for each mailbox See page 434 Customizing System Options Timers tab Timers seconds Silence Limit for Recording See page 329 Message Length Lets the System Administrator program the maximum length for recorded messages The Mes sage Length can ...

Page 102: ...box number sending the message as well as the total number of messages in the mailbox The NT Voice Mail also lets users select whether they want to Q receive notification calls for all messages or only messages from a specific mailbox Q have to enter their Mailbox Security Code when they receive messages at a non pager number For example Message Notification makes it easy for traveling sales repre...

Page 103: ...ove messages from the mailbox after this time expires Programming Q Customize Mailbox Options Edit Mailbox Messaging Enter a value 1 90 or I for indefinitely in the Message Retention box Message Storage Limit Sets the maximum number of messages that a mailbox can store The storage limit can range from 1 to 1000 messages This feature applies to Subscriber Guest Message Center and Future Delivery Ma...

Page 104: ... Programming below Programming Q File Install Phone System Phone Installation Wizard 3 of 5 Enable 32 kbits sec to favor sound or enable 24 kbits sec to favor storage capacity See page 121 Welcome Message Greets Automated Attendant callers The Welcome Message is commonly referred to as the company greeting The following is a typical Welcome Message Thank you for calling the XYZ Company The System ...

Page 105: ...369 Local Restore Lets the System Administrator restore to your hard drive any data that was previously stored on either a super diskette or another hard drive on the LAN by using the Database Backup proce dure described on the previous page Restoring data to your hard drive is very welcome in the unlikely event of a full system failure Local Restore replaces the De Archive and Database Restore fu...

Page 106: ...e prompts Trace Viewer Lets the System Administrator see all some or only one of the trace messages and or events recorded by the Voice Mail and then stored in the Trace Database The System Administrator can do the following by using the Trace View Q select how to display trace messages events by either port number or mailbox Q fine tune the trace string by limiting the events displayed on the tra...

Page 107: ...s starting on page 129 Q Distribution Lists lists the mailbox number name and department for each distribution list selected For more information see Customizing Distribution Lists starting on page 151 Q Fax Distribution shows the number for each FAX document on a FAX Distribution list along with any name or extension associated with the document For more information see Customizing Fax On Demand ...

Page 108: ...page 167 Q Port Options lists the Port Option settings for each selected port For more information see Customizing Port Options starting on page 303 Q Port Usage shows how each selected port has been used for incoming calls message notification calls and messages For more information see Customizing Port Options starting on page 303 Q System Options lists the System Option settings for your Voice ...

Page 109: ...proceed with system programming In the Programming Guide see Testing Clearing Ports Immediately starting on page 377 Screen Saver Prolongs the life of the Voice Mail monitor If no one touches a key on the keyboard for 60 minutes the monitor screen will go blank To restore re activate the screen press any key Shutting Down the System Ensures the integrity of the database if you need to turn off or ...

Page 110: ... the My Computer window 3 Double click the icon on the Control Panel window 4 Reset the month year and date on the Date panel at the left of the Date Time Properties window 5 To reset the time on the Time panel at the right of the Date Time Properties window Click to set the time on the scroll down window below the clock 6 To change the clock s time zone a Click the Time Zone tab b Select a time z...

Page 111: ... Mail will play the time and date when the message was left and the name or number of the message sender after it plays the message If Auto Time Stamp is turned off however a user must press T I 8 4 during or after a mes sage in order to get this information In the User s Guide see also Changing the Auto Time Stamp Option Call Announcing A user can turn Call Announcing on or off for Automated Atte...

Page 112: ... Mailbox Logon fields Time Limit seconds and Attempt Limit page 316 page 317 Q Customizing Mailbox Options Subscriber Lamp Logon Transfer tab Enable Remote Logon as Direct Logon Set First Logon In Announcement Option and First Log In Mailbox page 284 Q Customizing System Options Timers tab Set 3 Wait for Protocol Digit fields For First For Subsequent and After Last page 331 page 332 In the User s ...

Page 113: ...lbox starting on page 185 Forwarding Calls to a Mailbox Users can forward their incoming calls to their own mailboxes After the NT Voice Mail answers the call the caller can leave a message This feature should be used only if the Voice Mail is not set up with Automated Attendant In the User s Guide see also Forwarding Your Calls to Your Mailbox In the Programming see also Customizing System Option...

Page 114: ...xes Q M C 6 2 to make an Intercom call to the sender of the message If the extension number of the message sender is not known the NT Voice Mail lets you manually enter an exten sion number Q T I 8 4 to hear the time date and sender of the message Q S A 7 2 to save or E 3 to erase the message Q L 5 to listen to the next message Q R L 7 5 to reverse the listening order Q to pause listening then pre...

Page 115: ...e plays the extension user can pick up the call from any extension by dialing the Meet Me Answer Page Code for the telephone system Recording and Sending a Message There are many ways in which users can record and send a message Q After they call an extension through the Automated Attendant and can t get through Q After they make an Intercom call and can t get through Q After they call the Automat...

Page 116: ...Mailbox on page 206 In the User s guide see also Recording a Future Delivery Message Recording an Urgent Message After using the RS 7 7 command to record and send a message a Voice Mail user can press a programmed dialpad key in order to tag the message as urgent The Automated Attendant can also let outside callers leave urgent messages for a Subscriber Message Center and or Guest extension Furthe...

Page 117: ...d to their messages so there is no need to use the Check a Message You Sent feature A return receipt consists of the voice prompt The following return receipt arrived on date time from name or mailbox number followed by the message that was listened to Users can request return receipts after recording messages by any of the following methods Q RS 7 7 for Record and Send Q MF 6 3 for Message Forwar...

Page 118: ...s feature is handy whenever the user is out of the office and needs someone to cover calls In the User s Guide see also Transferring a Call to a Mailbox In the Programming see also Customizing System Options General 2 tab Greeting for Quick Msg Mailbox Transfer page 320 Customizing System Options Timers tab Wait Protocol Digit seconds page 331 Availability All NT Voice Mail systems unless otherwis...

Page 119: ...to a super diskette or another hard drive on the LAN Q return to your hard drive any items stored during the local backup Q test the functionality of your Voice Mail ports and clear any dysfunctional port Q adjust the settings for data transmission protocol such as baud rate and parity Q use Call Adaptations Options to view edit add and delete tone records from the tone table and to customize the ...

Page 120: ... provides access to most of the programmable options in the Voice Mail Toolbar provides quick access to items used for diagnostics Click ing on the icon accesses the item The Toolbar can be hidden or displayed by clicking on View Toolbar A check mark next to the word Toolbar indi cates that it is displayed Clicking View Toolbar pro vides another way to access the items on the Toolbar Display Pane ...

Page 121: ...e Status Bar for additional information that may be shown For example to see the contents of File and its submenu File To view the contents of File O Click File You see Install O From the Menu Bar click File Install You see The chart on the next page shows each Menu Bar item and any Drop down Menus In addition a page reference is also provided so that you know where to find more information ...

Page 122: ...e page 98 Toolbar See page 92 Status Bar See page 92 View Trace View See page 417 Port Activity See page 409 Message Status See page 423 Installation Settings See page 103 Answering Schedule Tables See page 105 Caller ID Tables See Callout Options See page 119 Dial Action Tables See page 129 Distribution Lists See page 151 Customize Fax On Demand Document Options See page 155 Fax Distribution See ...

Page 123: ...356 Reports Fax Ports See page 357 Mailbox Options See page 358 Dir List See page 359 Numeric List See page 360 Access Count See page 361 Call Flags See page 362 Message Usage Seepage 363 Port Options See page 365 Usage See page 366 System Options See page 367 Local Backup See page 369 Local Restore See page 373 Ports In Out Service See page 375 Tools Immediate All Ports Self Test See page 377 Ser...

Page 124: ...e actual Property Pages or tabs that are shown on the screen depend on what you are programming Click on the desired Property Page to move to a different set of programmable fields O Programmable Fields are specific options that you can change The actual fields shown depend on what you are programming O Helpful Information provides information about a particular field for which you are programming...

Page 125: ...K you return to the Voice Mail Main Screen Click this button to copy the information to another area or for a range Click this button to advance you to the next sequential number Click this button to move you back to the previous number Click this button to go to another number that you want to program After clicking this button you see a dialog box request ing the number where you want to go Clic...

Page 126: ...e your database To save your database O Click File Save When the database is saved you return to the NT Voice Mail Main Screen Exiting from the Programming Window After you finish programming and saving the Voice Mail database you can close out of the pro gramming portion of the application To exit the programming window O Click File Close You return to the computer s desktop ...

Page 127: ...he number of ports in your system depends on how many Port Voice Cards are installed and on your system s configureation You can use the port installation procedure explained in this section to install up to 24 ports To use the port installation procedure 1 Click File on the menu bar to display the File menu 2 From the File menu select Install to display the Install drop down menu shown below 3 Fr...

Page 128: ...If you entered a number within the limit for your Voice Mail model as explained in step 1 you will see a confirmation of your port installation on a dialog box similar to the one shown below 3 Click the button to remove the dialog box from your screen You will return to the Voice Mail Main window Now you are ready to customize the Voice Mail ports you have just installed For instructions see the C...

Page 129: ...Installing SMDI Chapter 3 Programming NT System Guide 101 SMDI Installation Installing SMDI SMDI Not used ...

Page 130: ...Installing SMDI 102 NT System Guide Chapter 3 Programming ...

Page 131: ...security code or default bilingual mode if any Or perhaps you have forgotten how you numbered your mailboxes or extensions No matter The Installation Settings dialog box will remind you of all this information To display your installation setting 1 Click View on the menu bar 2 Select Installation Settings on the View menu to display an Installation Settings dialog box similar to the one shown belo...

Page 132: ...Viewing Installation Settings Installation Settings Dialog Box 104 NT System Guide Chapter 3 Programming ...

Page 133: ...ere the Voice Mail system is located Q assign each AST to a port a Trunk Mailbox or both AST Trunk Mailbox Port Assignment When a call first enters the Voice Mail system the Automated Attendant tries to find a match for the Caller ID in the Caller ID Lookup table This table pairs the phone number of a known caller Caller ID with the number of an extension a mailbox or another transfer destination ...

Page 134: ...ASTs Q program customize each AST schedule to match a schedule used at your company Q assign by number the mailbox containing the appropriate greeting to each schedule Once you have programmed an AST you can assign it to a Trunk Mailbox or a port or both Then if you wish you can record a Welcome Message or Instruction Menu for each Call Routing Mail box To customize Answering Schedule Tables 1 Cli...

Page 135: ...rst four schedules Schedule 1 Morn Mo Fr 8AM Schedule 2 Aft Mo Fr 12PM Schedule 3 Eve Mo Th 5PM Schedule 4 Wkend Fr 5PM These default AST schedules are commonly used by the Automated Attendant at many businesses when answering incoming calls But if the schedules do not match the days date and or time at your company or if they do not agree with the mailbox numbering in your Voice Mail sys tem you ...

Page 136: ...d minutes when the Voice Mail will start answering calls by using the mailbox that you associate with the Schedule explained above Entries are expressed in military time which uses a 24 hour clock For more information about how mail boxes are used for ASTs see Mailbox on the next page Availability All phone systems Entries 1 20 Notes N A Entries Single day such as Mo Tu We Th Fr Sa Su Range of day...

Page 137: ...for workweek mornings to say Good morning Thank you for calling the XYZ company You can also personalize the Instruction Menu so that it matches the various departments in your company The Instruction Menu is a list of call routing options that tells callers who reach the Automated Attendant how to route their calls from the dialpad keys to their intended destinations Callers hear options such as ...

Page 138: ...y Then callers will hear options such as Press 1 for Sales Press 2 for Account ing Press 3 for Marketing If you know the extension number of the person you are trying to reach you may dial it at any time These are options that you have already programmed in the Dial Action Table assigned to the Call Routing Mailbox you are using Use No Instruction Menu Instead of using either the default Instructi...

Page 139: ...able see the instructions in Customizing Dial Action Tables starting at page 129 To record a Welcome Message and Instruction Menu enter them from the System Administrator Mailbox usually the lowest numbered extension of your phone system If you want the Call Routing Mailbox to handle any incoming FAX transmissions make sure that the Q FAX machine is connected to an extension in the phone system Q ...

Page 140: ...ler reaches the mailbox the Voice Mail will play the Welcome Message and the Instruction Menu This unique menu instructs the caller to dial either someone s name to reach that person s extension or someone s mailbox number in order to reach that person s mailbox Entries Announcement Mailbox number Notes To create and or customize an Announcement Mailbox 1 Select Mailbox Options on the Customize me...

Page 141: ...ox for that schedule and enter the appropriate single day or range of days or date 3 Click the Time box for that schedule and enter the appropriate starting time 4 Click the Mailbox Number box for that schedule and enter the number of the mailbox to which the schedule points 5 Press Tab to reach the Day s or Date box for the next schedule 6 Repeat steps 2 4 until you have finished adding all sched...

Page 142: ...he Call Routing Mailbox When the caller dials a code VM routes the call using the DAT VM looks in the AST for the schedule that handles calls on Monday at 8 A M Does Trunk Mailbox XXX have an AST No Yes Does VM have an AST Yes Is there a matching Trunk mailbox for the Trunk ID Does Voice Mail have Caller ID Lookup Table Yes Does Lookup Table have a match for the Inbound Call No No No No No Does Tr...

Page 143: ...o associate a telephone number with an extension or mailbox For example suppose the president of the company has extension 300 and he frequently receives calls from telephone number 333 1111 In the Caller I D Table you would associate 333 1111 with extension 300 so that the Automated Attendant will automatically transfer calls from 333 1111 to the president s extension You can enter up to 200 numb...

Page 144: ...yed on the General tab Caller I D Match This string is the Caller I D telephone number For example if you enter 2033785555 the Auto mated Attendant will dial the number in the Caller I D Action only if the incoming telephone num ber matches 2033785555 Availability All versions of the NT Voice Mail The phone system such as the ONYX and Nitsuko 241 384i must supply Caller I D Default None Entries No...

Page 145: ...uch as 5 to a lower numbered Caller I D Table such as 2 Click the button When you have finished creating all your Caller I D Tables Click the button to save your entries and return to the Voice Mail Main window Availability All versions of the NT Voice Mail The phone system such as the ONYX and Nitsuko 241 384i must support Caller I D Default None Entries None Caller I D number up to 16 digits Ext...

Page 146: ...Customizing Caller I D Tables General Tab 118 NT System Guide Chapter 3 Programming ...

Page 147: ... extension to each installed Voice Mail port so that Message Notification will operate properly Q Turn on Message Notification for each mailbox extension that will use this feature Message Notification Then the Voice Mail will be able to provide Message Notification by calling any of the following Q outside telephones including car phones Q radio pagers Q digital pagers To enable Callout Options f...

Page 148: ...k to select the Message Notification tab 5 Enable Message Notification Fax Callback under Options To set up the notification schedule mode and number See the Message Notification instructions in the User s Guide Also see these instructions for a more complete description of Message Notification To access Callout Options 1 Click Customize on the menu bar to display the Customize menu 2 Select Callo...

Page 149: ... mailbox Wait between RNA The Wait between RNA value sets the delay wait time in minutes before the Voice Mail will redial a notification call to an unanswered Ring No Answer non pager number Wait between Busy The Wait between Busy value sets the delay wait time in minutes before the Voice Mail will redial a callout to a busy number Number of Rings The Number of Rings value sets the number of time...

Page 150: ...wledged and Callout Report Wait between minutes The Wait between minutes value sets the delay wait time in minutes between one acknowl edged pager notification call and the next pager notification call A pager notification call is considered acknowledged when the pager user responds to it by calling their mailbox Send until Acknowledged The value for this check box determines whether Send until Ac...

Page 151: ...check box determines whether Callout Report is enabled or disabled When it is enabled the Voice Mail will generate a Message Notification report When you have finished entering values for the options on the General tab of the Callout Options dialog box Click the button to save your entries Default No Entries Enabled No Disabled Notes N A ...

Page 152: ...outs The Network Callouts option includes Wait between minutes and Number of Attempts Wait between minutes The Wait between value sets the delay wait time in minutes between two consecutive network callouts Number of Attempts The Number of Attempts value sets the number of times that the Voice Mail will redial an incomplete callout to the other networked Voice Mail Availability All phone systems D...

Page 153: ...rrier Detect seconds value sets the time in seconds delay that the Voice Mail will wait for the carrier detect tone from the recipient FAX machine The delay becomes effective as soon as the Voice Mail finishes dialing the FAX number Hotel Motel The Hotel Motel option includes Snooze Alarm Timer minutes and Rings per Wake Up Call Snooze Alarm minutes The Snooze Alarm minutes value sets the delay wa...

Page 154: ...1 The value for this check box determines whether Insert Leading 1 is enabled or disabled When it is enabled and the caller I D number is 10 digits or more the Voice Mail will dial a leading 1 before making an outgoing call to the caller I D number The Voice Mail will do so only if the recipient presses MC Make Call during or after a message that was left by someone else at that caller I D number ...

Page 155: ...u have installed Automatic Route Selection ARS you need to place pauses in this field Without the pauses the phone system would dial the caller I D number and then dial it again As an example of the Voice Mail dialing a caller I D number Suppose that a mailbox user presses MC Make Call while listening to a message from an outside number and an account code for the long distance company is needed i...

Page 156: ...Customizing Callout Options Optional Tab 128 NT System Guide Chapter 3 Programming ...

Page 157: ...Mail system After you customize a DAT you will need to do the following Q Make sure that the number of the DAT is assigned to a Call Routing Mailbox Q Assign the Call Routing Mailbox to an Answering Schedule Table AST This assignment will provide the caller with a greeting Welcome Message and Instruction Menu which is appropri ate to the day of the week the date and the time of day when the call e...

Page 158: ...ize menu You will see the General tab of the Answer Schedule Table Options dialog box When this dialog box first appears on your screen it will display Dial Action Table 1 for whatever phone system is currently installed in your Voice Mail system That phone system may be different from the one currently installed on our system when the screen shot was captured Therefore the dialog box you see on y...

Page 159: ...nsion is in Do Not Disturb or when a Subscriber Mailbox blocks Automated Attendant transfers and does not have a Next Call Routing Mailbox For more information on blocked Automated Attendant calls and Next Call Routing Mail boxes see the Subscriber Mailboxes section of the Customizing Mailbox Options chapter However the caller will not hear these voice prompts if any of the following features are ...

Page 160: ...select Mailbox Options on the Customize menu To let a Guest Subscriber or Message Center extension receive screened transfers but not messages after incomplete transfers make sure that you do both of the following Q assign the extension number to the Extension field of a Guest Subscriber or Message Center Mailbox Q enable the Transfer only Mailbox option for the mailbox To do this select Mailbox O...

Page 161: ...ting Mailbox where you want to change the value of this option 8 Click the button to save your selections and return to the CTL Logo window If the caller dials an invalid mailbox number the Voice Mail will reroute the call by using the Answering Schedule Table assigned to the port that is handling the caller s trunk If a greeting for a Guest or Subscriber Mailbox is recorded the Voice Mail will no...

Page 162: ...al string to retrieve busy screened transfers Q Transfer string dialed before the Voice Mail will dial the extension To record a name for a Subscriber Guest or Message Mailbox so that the name will play in extension status messages instead of the extension number use the System Administrator Menu in the phone system Entries MTRF Notes To block monitored transfers to a Subscriber Mailbox and or to ...

Page 163: ...l box and then immediately leave a message make sure that you do not assign an extension number to those mailboxes A caller will not hear the voice prompts described previously in Screened Transfer to an Extension if any of the following features are enabled for the Subscriber Mailbox Q Call Waiting Q Call Announcing Q Call Queuing Q Forced Unscreened Transfer Q Recorded Paging Message Park Paging...

Page 164: ...To promote dialed unscreened transfers to all two digit extensions that begin with the digit 1 enter UTRF in the Action field for Key 1 and enter XX in the Number field so that your DAT for Key 1 will read Key 1 Action UTRF Number XX If the caller dials an invalid mailbox number the Voice Mail will reroute the call by using the Answering Schedule Table assigned to the port that is handling the cal...

Page 165: ...and a beep then goes into Record Mode Q REC2 Plays the voice prompt Recording and a beep and waits for the caller to dial a digit This option is typically used when Option 2 is selected for a Subscriber s Alternate Next CRMB dial option because the outside caller is already in the Subscriber Mailbox and has heard the greeting Default Entries REC1 REC2 Notes To let a caller record a message and sen...

Page 166: ... press the pound key To enter a Q or Z press 1 To exit this directory press only the pound key Once the caller dials a valid name and presses the pound key the Voice Mail will play this prompt Calling full name extension XXX and then transfer the call If the caller forgets to press the pound key the Automated Attendant will wait for the time interval that you programmed in the TIMEOUT action and t...

Page 167: ...n the order you want the name entered for every mailbox For last name dialing enter the last name first Or for first name dialing enter the first name first To customize the minimum number of letters that a caller must dial select System Options on the Customize menu Then enter the desired value for Minimum Entry in the Directory Dialing panel of the Gen eral 2 tab of the System Options dialog box...

Page 168: ...mith such as 711 Do not use one of the company s main Call Routing Mailboxes that handles a company s incoming calls 2 Assign a given Dial Action Table to the Call Routing Mailbox For example assign DAT 70 to CRMB 711 3 Enable the Alternate Next CRMB dial option assign option 1 or 2 for Jim Smith s Subscriber Mailbox 4 If option 1 is programmed assign a key to tag urgent messages in the Dial Actio...

Page 169: ...ar Please enter your mailbox number and then Please enter your security code if any For information about further events see Go to a Mailbox on page 142 Hang up Lets a caller press a programmed dialpad key to terminate a call After the caller dials the Hang Up digit the Voice Mail will prompt Goodbye and then hang up Default Entries LOGON Notes To let a caller press the LOGON key and then a mailbo...

Page 170: ...ed Announcement message such as a movie schedule Then the Voice Mail will hang up or send the caller to the Instruction Menu Directory Dialing Mailbox will hear the Directory Dialing Message and can then dial the let ters of a mailbox owner s name to reach an extension or mailbox Interactive Mailbox will hear the Automated Attendant ask a question or request information Distribution Mailbox can re...

Page 171: ... pressed 5 to Call Routing Mailbox 812 where all voice prompts and instructions would be played to the caller in Spanish Availability Only for systems with voice prompts in two or more languages Entries LANG1 LANG2 Notes Enter in the Number field the mailbox number where the call is to be transferred To assign a language to a Subscriber Guest or Message Center Mail box select Mailbox Options on th...

Page 172: ... key the Voice Mail will tag the FAX message as Confidential and then send it FAX1U the FAX Mail prompts and then carrier tone After the caller presses the START key the Voice Mail will tag the FAX message as Urgent and then send it FAX2 only carrier tone FAX2C only carrier tone After the caller presses the START key the Voice Mail will tag the FAX message as Confidential and then send it FAX2U on...

Page 173: ...needs to know the first few letters of the mailbox owner s first name For a DIRL the Voice Mail needs to know the first few letters of the mailbox owner s last name For more information about LOGON see Log On to a Mailbox on page 141 For more infor mation about DIRFs and DIRLs see Directory Dialing by First Last Name on page 138 Z and R for Drop and Retrieve Operations Z and R are special entries ...

Page 174: ...mber The GOTO Z901 tells the Voice Mail to store Z the second digit dialed and then go to CRMB 901 If the caller dials the third digit the Voice Mail performs the action for the dialed key in DAT 11 which is assigned to CRMB 901 Each numbered key in DAT 11 has a TRF action with RRX as the number The TRF RRX tells the Voice Mail to recall the first two digits dialed RR recognize the third digit X a...

Page 175: ... dialed by callers from any other digits that the Voice Mail will always need to dial to properly complete the task The most common use of brackets is to dial a preceeding digit after extension numbers in order to force ringing during a transfer to extensions that are set for Voice Announce and not Ring This applies only to some phone systems For more information see the Phone System Integration G...

Page 176: ... played The Time Limit for Dialing Commands for the Call Routing or Dialing Directory Mailbox to which the DAT was assigned specifies the amount of time the caller has to respond to voice prompts that play in the mailbox After the specified time has passed the Voice Mail performs the TIMEOUT action It transfers the call to the TIMEOUT Key Number Entries Same as Actions and Numbers for Keys 0 9 exp...

Page 177: ...EOUT would read as follows Key 0 Action UTRF Number 300 TIMEOUT Action UTRF Number 300 However if the Automated Attendant were not assigned to 0 it would be located at the lowest numbered extension in the system which is 300 in this example Key 0 Action UTRF Number 0 Unscreened transfer to the Automated Attendant at 0 Key 1 2 Action UND Number None Undefined routing Key 3 4 Action TRF Number XXX S...

Page 178: ...Customizing Dial Action Tables Example of a Dial Action Table 150 NT System Guide Chapter 3 Programming ...

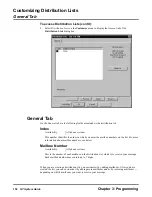
Page 179: ...e OR Q FD to record and send a message Typically you can create up to 100 distribution lists in your Voice Mail system but the upper limit for distribution lists in your Voice Mail system depends on how your system was configured by the manufacturer Each of these lists can include Subscriber Guest or Message Center Mailboxes However the total number of mailboxes on all of the distribution lists ca...

Page 180: ...in which you enter the mailbox numbers on the list For more information about mailbox numbers see below Mailbox Number This is the number of each mailbox on the distribution list which is to receive your message Each mailbox number may contain up to 7 digits When you are creating a distribution list you customize it by adding mailboxes After you have created the list you can customize it by adding...

Page 181: ...Mail will add the next index 5 Repeat steps 3 and 4 until you have finished adding all of the mailboxes you need to the list In case you have made a mistake and you want to start from scratch Click the button to erase the whole list When you have finished adding mailbox numbers to the distribution list Click the button to create another distribution list To return from a higher numbered distributi...

Page 182: ...Customizing Distribution Lists General Tab 154 NT System Guide Chapter 3 Programming ...

Page 183: ...AX machine The Voice Mail also provides up to 16 FAX distribution lists for scheduling FAX callouts Each list lets the Voice Mail fax up to 10 FAX documents to a maximum of 100 FAX numbers on the date and time you select so that you can customize how these documents will be distributed You can also customize which of 12 ports will be used for FAX callouts and which tenant will receive the callouts...

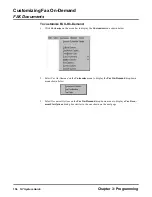
Page 184: ...stomize on the menu bar to display the Customize menu shown below 2 Select Fax On Demand on the Customize menu to display the Fax On Demand drop down menu shown below 3 Select Document Options on the Fax On Demand drop down menu to display a Fax Docu ment Slot Options dialog box similar to the one shown on the next page ...

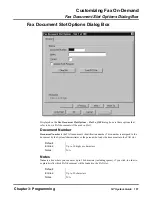
Page 185: ...lot 1 Document Number Document Number is the FAX document s identification number This number is assigned to the document by the System Administrator or the person who loads the document into the FAX slot Notes Notes is a box where you can enter up to 30 characters including spaces if you wish in order to explain briefly which FAX document will be loaded in the FAX slot Default __ Entries Up to 10...

Page 186: ...l another FAX docu ment in the FAX slot To use the Fax Document Slot Options dialog box 1 Click in the Document Number box highlight an area in the box and enter the FAX docu ment s identification number 2 If you wish click in the Notes box highlight an area in the box and enter a brief note about the FAX document that you are going to load in the FAX slot 3 In the Tenant box Enter the number that...

Page 187: ...s slot Click the button to apply your entries to the slot and then move to the dialog box for the next FAX slot 8 Repeat the 7 steps listed above for each FAX slot that you want to customize To apply your entries to the current dialog box and remain there Click the button To save your entries on the current dialog box and return to a previous dialog box Click the button To save your entries on the...

Page 188: ...On Demand drop down menu to display a Fax Distribution List Options dialog box similar to the one shown below Displayed on the Fax Distribution List Options dialog box when you first see it are the following options for Fax Distribution List 1 Options Options includes Tenant Start Transmission Date Time and Document Number Tenant The value for Tenant is the number that identifies the tenant who ha...

Page 189: ...theses To use the Fax Distribution List Options dialog box 1 In the Tenant box Enter the number that identifies the tenant who will receive the document s and press the Tab key to reach the Date box 2 In the Date box Enter the start date for FAX transmission in MM DD YY format and press the Tab key to reach the Time box 3 In the Time box Enter the start time for FAX transmission in HH MM SS format...

Page 190: ...move to the dialog box for the next distribution list 13 Repeat the 12 steps listed above for each distribution list that you want to customize To apply your entries to the current dialog box and remain there Click the button To save your entries on the current dialog box and return to a previ ous dialog box Click the button To save your entries on the current dialog box and then move to another d...

Page 191: ... on the Customize menu 3 Select Fax Ports on the Fax On Demand drop down menu to display a Current Fax Port 1 of 12 dialog box similar to the one shown below Displayed on the Current Fax Port 1 of 12 dialog box are the following options for Fax Port 1 Tenant The value for Tenant is the number that identifies the tenant who has access to the port Default 1 Entries 1 maximum number of tenants that s...

Page 192: ...he port is available for sending Voice Mail messages See Allow Fax Callouts below for information about enabling the port for FAX transmission Allow Fax Callouts The value in the Allow Fax Callouts check box determines whether or not a port will be enabled for FAX transmission When enabled the port is available to the Voice Mail for sending out requested FAX documentsas FAX callouts Default None E...

Page 193: ...rk in the Allow Fax Callouts check box 5 When you have finished entering information about this fax port Click the button to apply your entries to the port and then move to the dialog box for the next port To apply your entries to the current dialog box and remain there Click the button To save your entries on the current dialog box and return to a previ ous dialog box Click the button To save you...

Page 194: ...Customizing Fax On Demand Current Fax Port Dialog Box 166 NT System Guide Chapter 3 Programming ...

Page 195: ...ding to that particular phone system s extension numbering The Voice Mail also sets up certain types of mailboxes The number of Subscriber Mailboxes that are set up depends on the phone system that is selected In addition the number of trunk mail boxes if any that are selected depends on the type of phone system that is installed Many phone systems do not allow trunk mailboxes Regardless of the ph...

Page 196: ...owever if you use a variable length numbering plan remember that all mailbox numbers that begin with the same leading digit must all be of the same length For example you create a three digit mailbox with a leading digit of 3 All remaining mailbox numbers with a leading digit 3 must contain three digits So if you create mailbox 322 then you cannot have two digit mailbox numbers that begin with 3 s...

Page 197: ...box numbers enter the desired numbers separated by a comma such as 12 14 15 O To create a range of numbers separate the desired numbers by a hyphen such as 24 48 5 Click inside the Mailbox Type box Use the scroll list to select the desired type e of mail box Depending on your system your choices are ACD Announcement Guest Announcement Interactive Call Routing Message Center Dir Dialing Directory D...

Page 198: ...to save your selections and return you to the Voice Mail s Main Screen If your newly created mailbox was successful you will see a confirmation box similar to the one shown below 7 Click Yes to continue Or click No to cancel If you clicked Yes and your mailbox es were added successfully you see a screen similar to the following ...

Page 199: ... beginning on page 180 Announcement This section beginning on page 183 Call Routing This section beginning on page 187 Dir Dialing Directory Dialing This section beginning on page 194 Distribution This section beginning on page 202 Fax Requires the Fax Option See the supplemental documentation Future Delivery Only one is allowed This section beginning onpage 206 Guest This section beginning on pag...

Page 200: ...Mailbox Options 2 Click Edit You see 3 In the Start Number field enter the beginning mailbox number of the range of mailboxes you wish to edit 4 In the End Number field enter the ending mailbox number of the range of mailboxes you wish to edit 5 Click the box next to each mailbox type you wish to edit to select deselect it A check mark in the box indicates that the mailbox type is selected ...

Page 201: ...oxes Mailbox Option Information For This Type of Mailbox See ACD Announcement This section beginning on page 180 Announcement This section beginning on page 183 Call Routing This section beginning on page 187 Dir Dialing Directory Dialing This section beginning on page 194 Distribution This section beginning on page 202 Fax Requires the Fax Option See the supplemental documentation Future Delivery...

Page 202: ...s on the mailbox type Click on the desired Property Page to move to a different set of programmable fields O Programmable Fields are specific options that you can change for each mailbox The actual fields shown depends on the mailbox type O Helpful Information provides information about a particular field for which you are programming O Options Buttons allows you to go to different mailboxes and c...

Page 203: ...his button to copy the information for a particular mailbox to another mail box or range of mailboxes For more information see page 176 Click this button to advance you to the next sequential mailbox number Click this button to move you back to the previous mailbox number Click this button to go to another mailbox that you want to program After clicking this button you see a dialog box request ing...

Page 204: ...ng the Options Buttons cont d The Copy Button To use the Copy Button 1 A sample Mailbox Option screen is shown above for your convenience After you have pro grammed all the fields in the different Mailbox Property Pages for a particular mailbox click the Copy button You see ...

Page 205: ...e Select All Fields button You see all programming fields highlighted for each Mailbox Property Page in the Select Fields to Copy box 5 Using the scroll bar to review these fields you can do the following O To deselect a particular field press and hold the Ctrl key while clicking on the desired field The field is no longer highlighted O To deselect all fields click the Unselect All Fields button N...

Page 206: ...ze Mailbox Options 2 Click Delete You see 3 In the Mailbox field enter the number of the mailbox you wish to delete 4 In Mailbox Type use the scroll bar to select the type of mailbox you are deleting 5 Click OK to continue or Cancel to quit If you clicked OK you see a messages asking you to confirm that you are deleting mailboxes of a certain type For example ...

Page 207: ... 3 Programming NT System Guide 179 Deleting a Mailbox cont d 6 Click Yes to confirm or No to cancel If you clicked Yes you see a message stating your deletion was successful For example 7 Click OK You return to the Voice Mail Main Screen ...

Page 208: ... ACD Announcement Mailbox No ACD Mailboxes are set up at default 2 Once you determine which mailbox number to use go the Voice Mail Main Screen Customize Mailbox Options Add or Edit For information on adding or editing mailboxes Creating and Accessing Mailboxes on page 168 You see a screen similar to The ACD Announcement Mailbox Options are described on the following pages Availability NT Voice Ma...

Page 209: ...cement Mailbox The name appears on system reports Department This option identifies the department associated with the ACD Announcement Mailbox Availability All versions of the NT Voice Mail Default Depends on the phone system that is installed Entries ACD Announce Distribution Message Center Announcement Fax Network Call Routing Guest Subscriber Dir Dialing Interactive Trunk Notes When you change...

Page 210: ...to reach the opera tor Tenant This option lets you enter the tenant number associated with the ACD Announcement Mailbox Directory List Availability All versions of the NT Voice Mail Default None Entries Any Call Routing Mailbox up to 7 digits N None Notes To create the Call Routing Mailbox that should be used as the Next Call Routing Mailbox page 187 Make sure you assign a Dial Action Table to the...

Page 211: ...ist on page 360 to determine the existing Announcement Mailbox Numbers 2 Once you determine which mailbox number to use go the Voice Mail Main Screen Customize Mailbox Options Edit For information on adding or editing mailboxes Creating and Accessing Mailboxes on page 168 You see a screen similar to The Announcement Mailbox Options are described on the following pages Availability All versions of ...

Page 212: ...o listen to the announcement stored into the Announcement Mailbox a caller must dial the security code Name This option allows you to assign a name to the Announcement Mailbox The name appears on system reports Availability All versions of the NT Voice Mail Default Depends on the phone system that is installed Entries ACD Announce Distribution Message Center Announcement Fax Network Call Routing G...

Page 213: ...x that is programmed for an Extension Name Directory Availability All versions of the NT Voice Mail Default None Entries Up to 10 characters numbers letters blanks punctuation N None Notes N A Availability All versions of the NT Voice Mail Default None Entries Any Call Routing Mailbox up to 7 digits N None Notes To create the Call Routing Mailbox that should be used as the Next Call Routing Mailbo...

Page 214: ...only from a Directory Dialing Mailbox or Extension Name Directory with a Directory List to use entry of 1 100 respectively or A A Allow caller to name dial this Announcement Mailbox from any Directory Dialing Mailbox or Extension Name Directory that does not have a Directory list to use entry of N N Not allow caller to name dial this Announcement Mailbox Notes To assign a Directory List to use ent...

Page 215: ...uction Menu use the System Administrator s Menu Availability All versions of the NT Voice Mail Notes To have the Automated Attendant provide routing options to outside call ers you must assign a Call Routing Mailbox to an Answering Schedule Table AST By default the Voice Mail assigns Call Routing Mailboxes 000 001 002 to schedules 1 3 in Answering Schedule Table 1 To see at any time how Call Routi...

Page 216: ... page 360 to determine the existing Call Routing Mailbox Numbers 2 Once you determine which mailbox number to use go the Voice Mail Main Screen Customize Mailbox Options Edit For information on adding or editing mailboxes Creating and Accessing Mailboxes on page 168 You see a screen similar to The Call Routing Mailbox Options are described on the following pages ...

Page 217: ...aling Mailbox to reach this Call Routing Mailbox For more information on Directory Dialing see Directory Dialing Mailboxes on page 194 Availability All versions of the NT Voice Mail Default Depends on the phone system that is installed Entries ACD Announce Distribution Message Center Announcement Fax Network Call Routing Guest Subscriber Dir Dialing Interactive Trunk Notes When you change a mailbo...

Page 218: ...tters blanks punctuation N None Notes N A Availability All versions of the NT Voice Mail Default 1 Entries 1 4 depending on your Voice Mail Notes To enter the number of tenants use Customize System Options General 1 Tenants Number of Tenants on page 314 To enable disable intertenant messaging use Customize System Options General 1 Tenants Intertenant Messaging on page 314 Default All Entries 1 100...

Page 219: ...me Limit for Dialing Commands and Play Default Messages Dial Action Table This is the Dial Action Table DAT number associated with the Call Routing Mailbox Availability All versions of the NT Voice Mail Default DAT 1 is used by the Call Routing Mailboxes assigned to schedules 1 2 Morning Afternoon in Answering Schedule Tables ASTs 1 4 DAT 2 is used by the Call Routing Mailboxes assigned to schedul...

Page 220: ... 12 Entries 0 255 Notes A screened transfer will not ring an extension at all if The extension s Mailbox Greeting or Paging Message is on To turn it off see the User s Guide The Subscriber extension blocks Automated Attendant transfers To allow Auto Attendant transfers disable the Subscriber Mail box option called Block Auto Attendant on page 298 Status Monitor is enabled and the extension is busy...

Page 221: ...touch tone phone please dial the extension number you wish to reach or dial zero 0 for assistance If you are calling from a rotary dial phone please stay on the line for assistance Availability All NT Voice Mail Systems Default 5 seconds Entries 0 99 seconds Notes This time limit overrides Dialing Commands Time Limit in Customizing System Options See Time Limit seconds on page 316 Availability All...

Page 222: ...tion GOTO Key 7 Number XXX Key 3 Action TRF or UTRF Key 3 Number XXX 3 digit ext Notes To let callers reach a Directory Dialing Mailbox through the Automated Atten dant see Directory Dialing Mailbox on page 194 To customize the mailboxes extensions that are to be name dialed use the Name field on page 197 Make sure you enter a name for each mailbox exten sion To specify whether a mailbox or extens...

Page 223: ...ry Dialing Mailboxes are described on the following pages Be sure to record mailbox names for each mailbox extension that could be called This is necessary only if there is more than one mailbox with the same programmed name For example suppose there are two mailboxes named SALES one for truck sales and one for car sales You should record the names Truck Sales and Car Sales This way when a caller ...

Page 224: ...ailbox 541 named TRAIN For trains leaving before 4 PM dial EARLY For trains leaving after 4 PM dial LATE Dial Action Table 1 DD Mailbox 540 named FLIGHT For planes leaving before 4 PM dial DAY For planes leaving after 4 PM dial NIGHT Subscriber Extension and Mailbox 306 named HELP Announcement Mailbox 542 named DAY The plane leaves at 2 15 PM Announcement Mailbox 543 named NIGHT The plane leaves a...

Page 225: ... Directory Dialing Mailbox The name appears on system reports A caller dials this name from a Directory Dialing Mailbox to reach this Directory Dialing Call Mailbox Availability All versions of the NT Voice Mail Default Depends on the phone system that is installed Entries ACD Announce Distribution Message Center Announcement Fax Network Call Routing Guest Subscriber Dir Dialing Interactive Trunk ...

Page 226: ...t 1 Entries 1 4 depending on your Voice Mail Notes Click in the Tenant field so that the possible entries are displayed in the Information field For example if the Information field shows Range is 1 to 1 then 1 is the only possible entry for the Tenant field To enter the number of tenants use Customize System Options General 1 Tenants Number of Tenants on page 314 To enable disable intertenant mes...

Page 227: ...all Handling tab You see the following Options Programmable Options are Dial Action Table Delay rings or seconds before Redirect Transfer Directory List to Use Time Limit for Dialing Commands and Play Default Messages Dial Action Table This is the Dial Action Table DAT number associated with the Directory Dialing Mailbox Availability All versions of the NT Voice Mail Default None Entries 1 500 N N...

Page 228: ... User s Guide The Subscriber extension blocks Automated Attendant transfers To allow Auto Attendant transfers disable the Subscriber Mail box option called Block Auto Attendant on page 298 Status Monitor is enabled and the extension is busy not installed or in Do Not Disturb See Status Monitor in Customiz ing Port Options on page 306 If a screened transfer rings an extension fewer times or seconds...

Page 229: ...e amount of time a caller has to respond to voice prompts or other recorded instruc tions that play in the Directory Dialing Mailbox If the caller does not dial a code within this time limit the Voice Mail replays the voice prompt Availability All NT Voice Mail Systems Default 5 seconds Entries 0 99 seconds Notes This time limit overrides Time Limit seconds on page 316 ...

Page 230: ...box Numeric List on page 360 to determine which mailboxes are set up as Distribution Mailboxes 2 Once you determine which mailbox number to use go the Voice Mail Main Screen Customize Mailbox Options Edit For information on adding or editing mailboxes Creating and Accessing Mailboxes on page 168 You see a screen similar to The options for Distribution Mailboxes are described on the following pages...

Page 231: ...istribution Mailbox The name appears on system reports In addition a mailbox user can enter the name when recording and sending a message to the Distribution List associated with the Distribution Mailbox Availability All versions of the NT Voice Mail Default Depends on the phone system that is installed Entries ACD Announce Distribution Message Center Announcement Fax Network Call Routing Guest Su...

Page 232: ...NT Voice Mail Default None Entries Up to 10 characters numbers letters blanks punctuation N None Notes N A Availability All versions of the NT Voice Mail Default 1 Entries 1 100 N None Notes To set up the Distribution List and assign mailboxes to a particular list use Customize Distribution List See page 151 Availability All versions of the NT Voice Mail Default 1 Entries 1 4 depending on your Voi...

Page 233: ...Mail box name to send a message to the assigned Distribution List Availability All versions of the NT Voice Mail Default None Entries 1 100 Allow name dialing by Subscriber Guest Mailbox users that have a Directory List entry of 1 100 respectively or A A Allow name dialing by Subscriber Guest Mailbox users with any Directory List entry except N N Not allow name dialing Notes Make sure you enter a ...

Page 234: ...y Mailbox then create one with the new number To access the Future Delivery Mailbox 1 Use Reports Mailbox Numeric List on page 360 to determine the existing Future Delivery Mailbox Numbers 2 Once you determine which mailbox number to use go the Voice Mail Main Screen Customize Mailbox Options Edit For information on adding or editing mailboxes Creating and Accessing Mailboxes on page 168 You see a...

Page 235: ...ailbox A user must enter this security code to log onto the Future Delivery Mailbox Name This option allows you to assign a name to the Future Delivery Mailbox The name appears on system reports Availability All versions of the NT Voice Mail Default Depends on the phone system that is installed Entries ACD Announce Distribution Message Center Announcement Fax Network Call Routing Guest Subscriber ...

Page 236: ...ber of Messages This is the number of messages that the Future Delivery Mailbox can receive Availability All versions of the NT Voice Mail Default None Entries Up to 10 characters numbers letters blanks punctuation N None Notes N A Availability N A Default N A Entries N A Notes N A Availability All versions of the NT Voice Mail Default 32 Entries 1 1000 Notes To set message length see the Nonsubsc...

Page 237: ...bed on the following pages Availability All versions of the NT Voice Mail Notes For instructions on calling logging on to a Guest Mailbox see the User s Guide To let Automated Attendant callers dial a single digit code to be routed to a Guest Mailbox see Dial Action Tables on page 129 of Customizing Dial Action Tables An extension user can transfer an outside caller to a Guest Mailbox See Trans fe...

Page 238: ...ter calling into logging onto the Guest Mailbox a guest user can change the assigned this Security Code if desired Availability All versions of the NT Voice Mail Default Depends on the phone system that is installed Entries ACD Announce Distribution Message Center Announcement Fax Network Call Routing Guest Subscriber Dir Dialing Interactive Trunk Notes When you change a mailbox type the Voice Mai...

Page 239: ...x Extension This option lets you assign an extension to the Guest Mailbox Assigning an extension allows Q Automated Attendant callers to transfer to that extension and to leave messages if the transfer is incomplete Q a user to log onto the Guest Mailbox from that extension Q the Guest to have a Message Waiting Lamp indication when the mailbox receives messages See page 219 Availability All versio...

Page 240: ...nt press the star key The Voice Mail plays the Welcome Message and Instruction Menu for the Next Call Routing Mail box then lets the callers dial a code to route their call You enter the routing options in the Next Call Routing Mailbox s Dial Action Table Tenant This option lets you enter the tenant number associated with the Guest Mailbox Directory List This option determines a caller can name di...

Page 241: ...ry that does not have a Directory list to use entry of N N Not allow caller to name dial this Guest Mailbox Notes To assign a Directory List to use entry to a Call Routing Mailbox that is programmed for an Extension Name Directory see page 192 To assign a Directory List to use entry to a Directory Dialing Mailbox turn to Directory List to Use on page 200 Availability All versions of the NT Voice M...

Page 242: ...ion Properties Page Message Notification Properties Page To access the Message Notification options O Click on the Message Notification tab You see a screen similar to the following Options Programmable Options are Message Notification Fax Callback Local Callouts Long Distance Calls Notification Number Call Type Notification Mode and Security Code Required ...

Page 243: ...llowing fields Local callouts Long distance callouts Notification Number To customize the way notification callouts are sent use Customize Callout Options on page 119 To enable disable Message Notification calls for a port and to assign the Voice Mail extension to each installed port use Customize Port Options Allow Notification Wakeup on page 308 Customize Port Options Extension on page 305 For a...

Page 244: ...codes If you select Some you must enter the area codes If you enter Yes the Area Code box becomes available Enter up to 4 area codes Notes When enabled this option also allows a Guest to enter a long distance Message Notification number through the Guest Mailbox See Message Notification in the User s Guide See also the Notes in Message Notification Fax Callback on page 215 Availability All version...

Page 245: ...ion num ber Notes The Guest can enter the notification numbers and the special codesthrough the mailbox See Message Notification in the User s Guide To set the duration of the Flash if a notification number requires one use Customize System Options Timers Flash Timer on page 332 If the telephone system is programmed for voice announced Intercom calls and the desired notification number is an exten...

Page 246: ...n the word Normal next to the Notification number for which you wish to specify a Notification Mode You see a dialog box Highlight and then click on the desired Notification Mode Normal Non pager Extension or Telephone R Pager Radio Pager D Pager Digital Pager Notes Guests can enter the Notification Mode through their mailbox See Mes sage Notification in the User s Guide See also the Notes in Mess...

Page 247: ...essaging Properties Page To access the Messaging options O Click on the Messaging tab You see a screen similar to the following Options Programmable Options are Message Playback Message Listen Mode Auto Forwarding Auto Erase Save of Messages Message Retention Urgent Message Return Time Recording Conver sation Beep Ask Caller s Number and Record Reply Only ...

Page 248: ...Saved Messages These are messages that have been saved in a previous session Q Held Messages These are messages that have been partially listened to and not saved in a previous session The Voice Mail leaves these type of messages in the mailbox Q All Messages These are the new saved and held messages Availability All versions of the NT Voice Mail Default FIFO Entries Click inside the dialog box ne...

Page 249: ... Guest has completely listened to the message and exited the mailbox Availability All versions of the NT Voice Mail Default Fwd Save Entries Click inside the dialog box next to Auto Forwarding You see your choices Click on the desired entry No Auto Forwarding not allowed Fwd Save Saves message in initiator s mailbox after copying it to the partner Fwd Erase Erases message in initiator s mailbox af...

Page 250: ...t listened to it followed by a copy of the urgent message Recording Conversation Beep This option determines whether the Voice Mail plays Recording and a beep when a person records a conversation at the mailbox s extension The voice prompt and beep sound when the person presses the RECORD key Availability All versions of the NT Voice Mail Default 20 Entries 1 90 days I Indefinite the Voice Mail wi...

Page 251: ...st can use the mailbox to only record replies to messages by pressing RE while in the listen mode If this option is enabled the Guest cannot record and send messages by pressing RS nor forward a message by pressing MF in the listen mode Availability All versions of the NT Voice Mail Default Disabled The option is disabled as indicated by no check mark in the radio box Entries Clicking in the radio...

Page 252: ...ogramming Guest Mailboxes Lamp Logon Transfer Properties Page Lamp Logon Transfer Properties Page To access the Lamp Logon Transfer Properties Page O Click on the Lamp Logon Transfer tab You see a screen similar to the following Lamp Options Programmable Options are Message Wait Lamp and Access Digit Lamp String ...

Page 253: ...eone is logged on to it the Voice Mail does not flash the Message Lamp until the person exits the mailbox The Voice Mail does however play the voice prompt You have received new messages The Voice Mail plays this voice prompt if the person dials 9 to exit or returns to the Main Menu before exiting To enable Msg Wait Lamp callouts updates for a port use the Allow Lamp and Allow Notification Wake Up...

Page 254: ...0 digits including the codes below F Flash X Extension W Wait for dial tone S Wait for any type of sound P Pause the Voice Mail pauses 2 sec dial next digit M Monitored pause the Voice Mail pauses 2 sec dials next digit only if no busy reorder tone If busy reorder tone the Voice Mail terminates the call A Analyzed pause the Voice Mail pauses 4 sec dials next digit only if no busy reorder tone If b...

Page 255: ... The Voice Mail plays the Announcement Message that is recorded for the First Log In Announcement Mailbox see previous paragraph If the Announcement Message is not recorded for Option 2 the Voice Mail still explains how to use the options If users log onto their mailboxes for the first time and immediately hang up without completing the tutorial the tutorial will not play again Availability All ve...

Page 256: ...ons with FAX machines or single line extensions that should not receive messages through the Automated Attendant Availability All versions of the NT Voice Mail Default Disabled The option is disabled as indicated by no check mark in the radio box Entries Clicking in the radio box toggles between de selecting no check mark and selecting the option has a check mark Notes Enabling the Forced Unscreen...

Page 257: ...oice Mail uses this string to obtain dial tone and re transfer the call If you enable External Extension verify that the mailbox s extension number is identified in the Extension field The extension number must be the same as the mailbox number for External Extension to operate properly If you enable External Extension enter the number where you want the calls to transfer in the External Extension...

Page 258: ...se Recording Interactive Prompts on the System Administrator Menu When the interactive session is over the Voice Mail says Good bye and hangs up unless the caller reached the Interactive Mailbox through a Call Routing or Directory Dialing Mailbox In this case the Voice Mail sends the caller back to the Instruction menu for that mailbox The Voice Mail will not however send the caller back if there ...

Page 259: ...er that can be used for an Interactive Mailbox No Interactive Mailboxes are set up at default 2 Once you determine which mailbox number to use go the Voice Mail Main Screen Customize Mailbox Options Add or Edit For information on adding or editing mailboxes Creating and Accessing Mailboxes on page 168 You see a screen similar to The Interactive Mailbox Options are described on the following pages ...

Page 260: ...er also dials this name from an Extension Name Directory to transfer to this Interactive Mailbox or extension If you set up a first name last name Extension Name Directory enter the first last name first For more information see Dialing by First Last Name in Customiz ing Dial Action Tables on page 138 Department This option identifies the department associated with the Interactive Mailbox Availabi...

Page 261: ...ting Mailbox up to 7 digits N None Notes To create the Call Routing Mailbox that should be used as the Next Call Routing Mailbox see page 187 Make sure you assign a Dial Action Table to the Call Routing Mailbox To create the Dial Action Table with the desired routing options in this case using key zero Dial Action Tables on page 129 To include an explanation of what dialing 0 does in Interactive P...

Page 262: ...l this Interactive Mailbox only from a Directory Dialing Mailbox or Extension Name Directory with a Directory List to use entry of 1 100 respectively or A A Allow caller to name dial this Interactive Mailbox from any Directory Dialing Mailbox or Extension Name Direc tory that does not have a Directory list to use entry of N N Not allow caller to name dial this Interactive Mailbox Notes To assign a...

Page 263: ...es Page Interactive Properties Page To access the Interactive Properties Page O Click on the Interactive tab You see a screen similar to the following Interactive Options Programmable Options are Responses Silence Limit for Mailbox for Review Mode for and Record Incomplete Time Limit for Dialing Commands Closing Announcement Mailbox and Reference Number for Call ...

Page 264: ...conds Entries 1 25 seconds Notes This silence limit overrides the Silence limit for recording in the Timers Property Page for System Options To eliminate recording silence use Customize System Options General 1 Eliminate Recording Silence Enabled on page 315 To eliminate recording silence use Customize System Options General 1 Eliminate Recording Silence Delay before on page 315 Availability All v...

Page 265: ...nd or the closing announcement if enabled Q If the caller presses I the Voice Mail erases all the responses and lets the caller re record them starting with the first one Responses Record Incomplete This option if enabled stores an incomplete set of responses as long as the caller records at least one response Default None Entries Click in the box next to Mailbox for You see your choices After eac...

Page 266: ...e XXXX is the time in a 24 hour clock and YYYY is the identification number The Voice Mail stores the reference number with the response set To hear the refer ence number while you listen to a response set you press T I See Using the Listening Options in the User s Guide Availability All versions of the NT Voice Mail Default 5 seconds Entries 0 99 seconds Notes This option overrides the Time limit...

Page 267: ... future delivery message by pressing FD An extension user can transfer an outside caller to a Message Center Mailbox SeeTransferring a Call to a Mailbox in the User s Guide This type of transfer is allowed only if the Message Center Mailbox number falls into the extension numbering Plan of the phone system To set a limit for the mailbox logon time use Customize System Options General 1 Mailbox Log...

Page 268: ...determine a mailbox number that can be used for a Message Center Mailbox 2 Once you determine which mailbox number to use go the Voice Mail Main Screen Customize Mailbox Options Add or Edit For information on adding or editing mailboxes Creating and Accessing Mailboxes on page 168 You see a screen similar to The Message Center Mailbox Options are described on the following pages ...

Page 269: ... features After call ing into logging onto the Message Center Mailbox a user can change the assigned this Secu rity Code if desired Availability All versions of the NT Voice Mail Default Depends on the phone system that is installed Entries ACD Announce Distribution Message Center Announcement Fax Network Call Routing Guest Subscriber Dir Dialing Interactive Trunk Notes When you change a mailbox t...

Page 270: ...ension This option lets you assign an extension to the Message Center Mailbox Assigning an exten sion allows Q Automated Attendant callers to transfer to that extension and to leave messages if the transfer is incomplete Q a user to log onto the Message Center Mailbox from that extension Q Allows Message Waiting Lamp indication when the mailbox receives messages See Message Wait Lamp on page 257 A...

Page 271: ...l Routing Mail box The person hears the Welcome Message and Instruction Menu for the Next Call Routing Mailbox and can dial a code to route the call You program the routing options in the Next Call Routing Mailbox s Dial Action Table Availability All versions of the NT Voice Mail Default Call Routing Mailbox Depends on the phone system that is installed Entries Any Call Routing Mailbox number up t...

Page 272: ...en 1 is the only possible entry for the Tenant field Availability All versions of the NT Voice Mail Default All Entries 1 100 Allow caller to name dial this Message Center Mailbox only from a Directory Dialing Mailbox or Extension Name Directory with a Directory List to use entry of 1 100 respectively or A A Allow caller to name dial this Message Center Mailbox from any Directory Dialing Mailbox o...

Page 273: ...sage Center Mailbox e g You have ___ messages To listen to your mes sages Availability All versions of the NT Voice Mail Default Depends on how your system is configured Entries Depends on how your system is configured However you have a choice between two languages Click in the box to view the other selection Notes This language setting overrides the other types of bilingual language settings in ...

Page 274: ...Notification Properties Page Message Notification Properties Page To access the Message Notification options O Click on the Message Notification tab You see a screen similar to the following Options Programmable Options are Message Notification Fax Callback Local Callouts Long Distance Calls Notification Number Call Type Notification Mode and Security Code Required ...

Page 275: ...te the following fields Local callouts Long distance callouts Notification Number To customize the way notification callouts are sent use Customize Callout Options on page 119 To enable disable Message Notification calls for a port and to assign the Voice Mail extension to each installed port use Customize Port Options Allow Notification Wakeup on page 308 Customize Port Options Extension on page ...

Page 276: ...ome up to 4 area codes If you select Some you must enter the area codes If you enter Yes the Area Code box becomes available Enter up to 4 area codes Notes When enabled this option also allows a user to enter a long distance Mes sage Notification number through the Message Center Mailbox SeeMes sage Notification in the User s Guide See also the Notes in Message Notification Fax Callback on page 21...

Page 277: ...ication num ber Notes The user can enter the notification numbers and the special codes through the mailbox See Message Notification in the User s Guide To set the duration of the Flash if a notification number requires one use Customize System Options Timers Flash Timer on page 332 If the telephone system is programmed for voice announced Intercom calls and the desired notification number is an e...

Page 278: ... Double click on the word Normal next to the Notification number for which you wish to specify a Notification Mode You see a dialog box Highlight and then click on the desired Notification Mode Normal Non pager Extension or Telephone R Pager Radio Pager D Pager Digital Pager Notes The Notification Mode can be set through the Message Center Mailbox See Message Notification in the User s Guide See a...

Page 279: ... Properties Page Messaging Properties Page To access the Messaging options O Click on the Messaging tab You see a screen similar to the following Options Programmable Options are Message Playback Message Listen Mode Auto Forwarding Auto Erase Save of Messages Message Retention Urgent Message Return Time Recording Conver sation Beep and Ask Caller s Number ...

Page 280: ...listened Q Saved Messages These are messages that have been saved in a previous session Q Held Messages These are messages that have been partially listened to and not saved in a previous session The Voice Mail leaves these type of messages in the mailbox Q All Messages These are the new saved and held messages Availability All versions of the NT Voice Mail Default FIFO Entries Click inside the di...

Page 281: ...e occurs after the user has completely listened to the message and exited the mailbox Availability All versions of the NT Voice Mail Default Fwd Save Entries Click inside the dialog box next to Auto Forwarding You see your choices Click on the desired entry No Auto Forwarding not allowed Fwd Save Saves message in initiator s mailbox after copying it to the partner Fwd Erase Erases message in initi...

Page 282: ...nt has not listened to it followed by a copy of the urgent message Recording Conversation Beep This option determines whether the Voice Mail plays Recording and a beep when a person records a conversation at the mailbox s extension The voice prompt and beep sound when the person presses the RECORD key Availability All versions of the NT Voice Mail Default 20 Entries 1 90 days I Indefinite the Voic...

Page 283: ... number the mailbox user can make a call to the message sender while listening to the message by just pressing MC Make Call The Ask Caller s Number option is intended for phone systems that do not already provide a caller ID feature Availability All versions of the NT Voice Mail Default Disabled The option is disabled as indicated by no check mark in the radio box Entries Clicking in the radio box...

Page 284: ...ogramming Message Center Mailboxes Lamp Logon Transfer Properties Page Lamp Logon Transfer Properties Page To access the Lamp Logon Transfer Properties Page O Click on the Lamp Logon Transfer tab You see a screen similar to the following Lamp Options Programmable Options are Message Wait Lamp and Access Digit Lamp String ...

Page 285: ...flash the Message Lamp until the person exits the mailbox The Voice Mail does however play the voice prompt You have received new messages The Voice Mail plays this voice prompt if the person dials 9 to exit or returns to the Main Menu before exiting To enable Msg Wait Lamp callouts updates for a port use the Allow Lamp and Allow Notification Wake Up in Customizing Port Options on page 307 and pag...

Page 286: ...igits including the codes below F Flash X Extension W Wait for dial tone S Wait for any type of sound P Pause the Voice Mail pauses 2 sec dial next digit M Monitored pause the Voice Mail pauses 2 sec dials next digit only if no busy reorder tone If busy reorder tone the Voice Mail terminates the call A Analyzed pause the Voice Mail pauses 4 sec dials next digit only if no busy reorder tone If busy...

Page 287: ...t Group extension numbers extensions with FAX machines or single line extensions that should not receive messages through the Automated Attendant Availability All versions of the NT Voice Mail Default Disabled The option is disabled as indicated by no check mark in the radio box Entries Clicking in the radio box toggles between de selecting no check mark and selecting the option has a check mark N...

Page 288: ...e Mail Default None Entries N None None lets the caller use the Key 0 Action of the Next Call Routing Mailbox s Dial Action Table When the caller enters the mailbox the Voice Mail plays the Message Center s Welcome Message then a beep The beep signifies that the Voice Mail is in record mode The caller can then record a message and or dial 0 1 Option 1 Option 1 lets a caller use the routing options...

Page 289: ...t have trunk to trunk transfer capability to the destination number If you enable External Extension set the External Transfer string in System Options The Voice Mail uses this string to obtain dial tone and re transfer the call If you enable External Extension verify that the mailbox s extension number is identified in the Extension field The extension number must be the same as the mailbox numbe...

Page 290: ...ing External Extension Number cont d P Pause A Analyzed Pause S Wait for Sound Escape Not currently supported Only applies to Mitel or Norstar phone systems using Dialogic D42SX or NS cards Notes The External Extension field must be set to Yes For additional infor mation refer to the preceding description for External Extension ...

Page 291: ...oice Mail Notes To have the Automated Attendant answer a call using a Subscriber Mailbox see Subscriber Mailbox on page 113 To let Automated Attendant callers route their call to a Subscriber mailbox or extension see Screened Transfer to an Extension on page 131 To have the Automated Attendant answer a call using a Subscriber Mailbox see page 113 To let Automated Attendant callers route their call...

Page 292: ...Customizing Mailbox Options Subscriber Mailboxes 264 NT System Guide Chapter 3 Programming The Message Center Mailbox Options are described on the following pages ...

Page 293: ...s After calling into logging onto the Subscriber Mailbox a user can change the assigned this Security Code if desired Availability All versions of the NT Voice Mail Default Depends on the phone system that is installed Entries ACD Announce Distribution Message Center Announcement Fax Network Call Routing Guest Subscriber Dir Dialing Interactive Trunk Notes When you change a mailbox type the Voice ...

Page 294: ...ailbox Extension This option lets you assign an extension to the Subscriber Mailbox Assigning an extension allows Q Automated Attendant callers to transfer to that extension and to leave messages if the transfer is incomplete Q a user to log onto the Subscriber Mailbox from that extension Q Allows Message Waiting Lamp indication when the mailbox receives messages See page 282 Availability All vers...

Page 295: ...ial because the Voice Mail plays To go to the Automated Attendant press the star key The Voice Mail plays the Welcome Message and Instruction Menu for the Next Call Rout ing Mailbox then lets the caller dial a code to route their call You enter the routing options in the Next Call Routing Mailbox s Dial Action Table Q To Subscribers who forward their direct lines to their mailbox They can call the...

Page 296: ...9 To record a A Welcome Message and Instruction Menu for the Next Call Routing Mailbox and b A Welcome Message for the Message Cen ter Mailbox use the System Administrator s Menu To let the callers use the options assigned to Keys 0 9 not just Key 0 in the Next Call Routing Mailbox s Dial Action Table enable Alternate CRMB dial option See page 286 Availability All versions of the NT Voice Mail Def...

Page 297: ...ed for an Extension Name Directory see page 192 To assign a Directory List to use entry to a Directory Dialing Mailbox turn to Directory List to Use on page 200 Availability All versions of the NT Voice Mail Default 32 Entries 1 1000 Notes To set message length use Customize System Options Timers Message Length Nonsubscriber See page 329 Availability All versions of the NT Voice Mail Default Depen...

Page 298: ...fication Properties Page Message Notification Properties Page To access the Message Notification options O Click on the Message Notification tab You see a screen similar to the following Options Programmable Options are Message Notification Fax Callback Local Callouts Long Distance Calls Notification Number Call Type Notification Mode and Security Code Required ...

Page 299: ...the following fields Local callouts Long distance callouts Notification Number To customize the way notification callouts are sent use Customize Callout Options on page 119 To enable disable Message Notification calls for a port and to assign the Voice Mail extension to each installed port use Customize Port Options Allow Notification Wakeup on page 308 Customize Port Options Extension on page 305...

Page 300: ...me Allow calls to some up to 4 area codes If you select Some you must enter the area codes If you enter Yes the Area Code box becomes available Enter up to 4 area codes Notes When enabled this option also allows a user to enter a long distance Mes sage Notification number through the Message Center Mailbox SeeMes sage Notification in the User s Guide See also the Notes in Message Notification Fax ...

Page 301: ... the mailbox See Message Notification in the User s Guide To set the duration of the Flash if a notification number requires one use Customize System Options Timers Flash Timer on page 332 If the telephone system is programmed for voice announced Intercom calls and the desired notification number is an extension enter a 1 after the extension number This makes Message Notification calls ring the ex...

Page 302: ...ee a dialog box Highlight and then click on the desired Call Type Internal Local Long Dis Long Distance Notes See also the Notes in Message Notification Fax Callback on page 215 Availability All versions of the NT Voice Mail Default Normal Entries Double click on the word Normal next to the Notification number for which you wish to specify a Notification Mode You see a dialog box Highlight and the...

Page 303: ...g the Security Code provides access to the messages in the Subscriber Mailbox Availability All versions of the NT Voice Mail Default No Entries Double click on the word No next to the Notification number for which you wish to specify a Security Code You see a dialog box Highlight and then click on the desired entry No Yes Notes This option can be set through the Message Center Mailbox See Mes sage...

Page 304: ...perties Page Messaging Properties Page To access the Messaging options O Click on the Messaging tab You see a screen similar to the following Options Programmable Options are Message Playback Message Listen Mode Auto Forwarding Auto Erase Save of Messages Message Retention Urgent Message Return Time Recording Conver sation Beep and Ask Caller s Number ...

Page 305: ...t have been saved in a previous session Q Held Messages These are messages that have been partially listened to and not saved in a previous session The Voice Mail leaves these type of messages in the mailbox Q All Messages These are the new saved and held messages Availability All versions of the NT Voice Mail Default FIFO Entries Click inside the dialog box next to Message Playback You see your c...

Page 306: ... the message and exited the mailbox Notes The user can override this listen mode on a per call basis See Listening to Your Messages in the User s Guide Availability All versions of the NT Voice Mail Default Fwd Save Entries Click inside the dialog box next to Auto Forwarding You see your choices Click on the desired entry No Auto Forwarding not allowed Fwd Save Saves message in initiator s mailbox...

Page 307: ...has not listened to it followed by a copy of the urgent message Conversation Record Beep This option determines whether the Voice Mail plays Recording and a beep when a person records a conversation at the mailbox s extension The voice prompt and beep sound when the person presses the RECORD key Availability All versions of the NT Voice Mail Default 20 Entries 1 90 days I Indefinite the Voice Mail...

Page 308: ...umber the mailbox user can make a call to the message sender while listening to the message by just pressing MC Make Call The Ask Caller s Number option is intended for phone systems that do not already provide a caller ID feature Availability All versions of the NT Voice Mail Default Disabled The option is disabled as indicated by no check mark in the radio box Entries Clicking in the radio box t...

Page 309: ...Guide 281 Subscriber Mailboxes Lamp Logon Transfer Properties Page Lamp Logon Transfer Properties Page To access the Lamp Logon Transfer Properties Page O Click on the Lamp Logon Transfer tab You see a screen similar to the following Lamp Options Programmable Options are Message Wait Lamp and Access Digit Lamp String ...

Page 310: ...the Message Lamp until the per son exits the mailbox The Voice Mail does however play the voice prompt You have received new messages The Voice Mail plays this voice prompt if the person dials 9 to exit or returns to the Main Menu before exiting To enable Msg Wait Lamp callouts updates for a port use the Allow Lamp and Allow Notification Wake Up in Customizing Port Options on page 307 and page 308...

Page 311: ...s below F Flash X Extension W Wait for dial tone S Wait for any type of sound P Pause the Voice Mail pauses 2 sec dial next digit M Monitored pause the Voice Mail pauses 2 sec dials next digit only if no busy reorder tone If busy reorder tone the Voice Mail terminates the call A Analyzed pause the Voice Mail pauses 4 sec dials next digit only if no busy reorder tone If busy reorder tone the Voice ...

Page 312: ...ntry None Option 1 Option 2 Notes The Voice Mail plays the Announcement Message that is recorded for the First Log In Announcement Mailbox see previous paragraph If the Announcement Message is not recorded for Option 2 the Voice Mail still explains how to use the options If users log onto their mailboxes for the first time and immediately hang up without completing the tutorial the tutorial will n...

Page 313: ...extension num bers extensions with FAX machines or single line extensions that should not receive mes sages through the Automated Attendant Availability All versions of the NT Voice Mail Default Disabled The option is disabled as indicated by no check mark in the radio box Entries Clicking in the radio box toggles between de selecting no check mark and selecting the option has a check mark Notes E...

Page 314: ... The caller can then record a message and or dial 0 1 Option 1 Option 1 lets a caller use the routing options assigned to Keys 0 9 of the Next Call Routing Mailbox s Dial Action Table When the caller enters the mailbox the Voice Mail plays the Subscriber s Mailbox Greeting and possibly a pre recorded voice prompt or the Message Center s Welcome Message then a beep The beep signifies that the Voice...

Page 315: ...ed Action you can assign REC1 nnn to a key where nnn is the Subscriber Network or Message Center Mailbox number This sends the caller back to the Mailbox Greeting or Welcome Message Availability All versions of the NT Voice Mail Default Disabled The option is disabled as indicated by no check mark in the radio box Entries Clicking in the radio box toggles between de selecting no check mark and sel...

Page 316: ... All versions of the NT Voice Mail Default None Entries N None Extension or telephone number up to 15 digits including the following special codes F Flash W Wait for dial tone M Monitor Pause P Pause A Analyzed Pause S Wait for Sound Escape Not currently supported Only applies to Mitel or Norstar phone systems using Dialogic D42SX or NS cards Notes The External Extension field must be set to Yes F...

Page 317: ...ber Mailboxes Subscriber Properties Page Subscriber Properties Page To access the Subscriber Properties Page O Click on the Subscriber tab You see a screen similar to the following Options Programmable Options are Park Paging String Call Waiting String Call Announcing System Administrator Call Queuing and Block Auto Attendant ...

Page 318: ...ging Message is on and an Automated Attendant caller tries to reach the Subscriber extension The Voice Mail says Please Hold then parks the caller and pages the Subscriber The Voice Mail does not try to ring the extension The ON option does not apply to direct line callers 2 When the recorded Paging Message is off and an Automated Attendant caller dials the Subscriber extension The Voice Mail call...

Page 319: ...eave a message press 1 To have the person paged press 2 For other options press 3 See step 1b for a description of what happens when the caller presses 1 2 or 3 There is however one difference if a caller presses 3 the Voice Mail routes the caller using the Key 0 Action of the Subscriber s Next Call Routing Mailbox if one is assigned Default NVMF Subscriber extension FW1 To understand the string P...

Page 320: ...lbox For details see page 131 Dial port s extension number Not Used Escape Not currently supported Only applies to Mitel or Norstar phone systems using Dialogic D42SX or NS cards Notes For more information on screened transfers turn topage 131 The Voice Mail will not park and page For unscreened transfers If Auto Attendant calls are blocked If the Subscriber s Paging Message is not recorded or if ...

Page 321: ...mwas ableto fill in theExtension field Entries N None Up to 20 digits including the codes below F Flash W Wait for dial tone S Wait for any type of sound P Pause the Voice Mail pauses 2 sec dial next digit M Monitored pause the Voice Mail pauses 2 sec dials next digit only if no busy reorder tone If busy reorder tone the Voice Mail terminates the call A Analyzed pause the Voice Mail pauses 4 sec d...

Page 322: ...s press 2 If the greeting plays a caller can leave a message then hang up press for the Automated Attendant or re route their call according to the options in the Next Call Routing Mailbox for details see page 131 If the extension status message plays the caller can press 1 to leave a message or 2 to return to the Automated Attendant Instruction Menu After leaving a message the caller can hang up ...

Page 323: ...a busy extension Extension XXX is busy To leave a message press 1 For other options press 2 or the prompts for the Voice Mail Call Queuing or Call Waiting if enabled Option 3 Option 3 for ONYX only lets an extension receive Call Waiting beeps when on a Handsfree call AND Call Announcing as described in Option 2 above That is the Option 3 Handsfree extension user does not hear the Call Announcing p...

Page 324: ...t Options Extension on page 305 If the Port Option Status Monitor is enabled and the Subscriber extension is busy in Do Not Disturb or not installed the Voice Mail immediately tells the caller the extension status then says T o leave a message press 1 For other options press 2 If a caller does not record their name and or press the pound key the Voice Mail gives the caller another chance to do so ...

Page 325: ... When the Call Queuing hold timer expires for a waiting caller other than the first the Voice Mail tells the caller the following Extension XXX is still busy their place in the queue then You may continue to wait Or To leave a message press 1 For other options press 2 Pressing 1 lets the caller leave a message then use the options described in step 2 Pressing 2 returns the caller to the Automated ...

Page 326: ...if it is programmed and turned on at the exten sion If Call Waiting is not programmed and turned on the Voice Mail treats the screened transfer as it normally would by saying Extension XXX or name is busy To leave a message press 1 For other options press 2 To set the Call Queuing Hold timer use Customize System Option General 2 Call Queuing Hold Timer on page 319 To re record the Call Queuing Mus...

Page 327: ...port that answers the trunk To access Trunk Mailboxes 1 Use Reports Mailbox Numeric List on page 360 to determine the mailboxes that are assigned to Trunk Mailboxes 2 Once you determine which mailbox number to use go the Voice Mail Main Screen Customize Mailbox Options Edit For information on adding or editing mailboxes Creating and Accessing Mailboxes on page 168 You see a screen similar to The o...

Page 328: ...box such as WATS The name appears on system reports Department This option identifies the department associated with the Trunk Mailbox Availability All versions of the NT Voice Mail Default Depends on the phone system that is installed Entries ACD Announce Distribution Message Center Announcement Fax Network Call Routing Guest Subscriber Dir Dialing Interactive Trunk Notes When you change a mailbo...

Page 329: ... Mail Default Same as trunk number Entries A unique trunk number up to 7 digits N None Notes N A Availability All versions of the NT Voice Mail Default 1 Entries 1 4 depending on your Voice Mail Notes Click in the Tenant field so that the possible entries are displayed in the Information field For example if the Information field shows Range is 1 to 1 then 1 is the only possible entry for the Tena...

Page 330: ...tension field enter the ACD master number O In the Dial Action Table set up unscreened transfers UTRF to the ACD group Or for the Subscriber Mailbox that has the ACD master number enable Forced unscreened transfer O Make sure the overflow extension for the ACD master number is a Terminal Hunt Group Again the Terminal Hunt Group number must have a circuit type but no phone installed Then create a T...

Page 331: ...s Port Options Port Options are those options that you customize for each Voice Mail port To access Port Options 1 Click Customize from the menu bar to display the Customize menu shown below 2 Select Port Options on the Customize menu to display the General tab of the Port Options dialog box ...

Page 332: ... Notification calls and Mes sage Waiting Lamp updates For example if you enter a tenant number for a port the Voice Mail will use the port to send out Message Notification calls and Message Waiting Lamp updates only for mailboxes with the same tenant number as the one you entered But if you enter None the Voice Mail will use the port to send out Message Notification calls and Mes sage Waiting Lamp...

Page 333: ...u do not assign this value the Message Notifica tion and Call Announcing features may not work correctly Answering Schedule Table This is the Answering Schedule Table AST to which the Voice Mail refers when answering all trunks that use the port Availability All phone systems Default None Entries Depends on the telephone system installed None Notes N A Availability All phone systems Default 1 Entr...

Page 334: ...il will use the port to monitor the status of any extension such as busy or in Do Not Disturb DND and to report to the caller about that status For example if an extension is busy the Voice Mail would immediately tell the caller Extension 367 is busy Using this feature saves time in processing Automated Attendant screened transfers Availability All phone systems Default for each installed port Ent...

Page 335: ...rmines whether this feature will be enabled or disabled When enabled the port will be used for updating turning on or off the Message Waiting lamps at the extensions Availability All phone systems Default No Entries Enabled No Disabled Notes It is recommended that you first enable Extension discussed on page 305 Then the Voice Mail will dial the first digit of the port s extension number in order ...

Page 336: ...nerated by a port self test before the Voice Mail will be able to use the port Click the button to clear the failure For more information see the Self Test explanation on the previous page Availability All phone systems Default Depends on the telephone system installed Entries Enabled No Disabled Notes If you plan on using the internal modem it is a good idea not to use Port 1 for callouts since y...

Page 337: ...re On the Port Activities screen the Call State field shows the word Testing during the test and Failed if the port fails the test To reach this screen click the icon on the menu bar When you have finished entering all values and enabling all options which you want for Port 1 click the button to bring you to the Port Options General tab for Port 2 which you use in the same way to customize Port 2 ...

Page 338: ...Customizing Port Options General Tab 310 NT System Guide Chapter 3 Programming ...

Page 339: ... will be explained later in this section General 1 Tab The General 1 tab displays the following System Options Mailbox Default Security Code This is the Security Code assigned to each Subscriber Mailbox that you manually create after you start up the system for the first time MWI Lamp Update Time This is the time in hours and minutes when the Voice Mail will relight every MWI lamp that the Mitel p...

Page 340: ... Trunk Equipment No This is the number associated with the first installed trunk in a Mitel system Enter this num ber only when the Voice Mail installation procedure creates a range of Subscriber Mailbox numbers that overlap trunk numbers in the phone system Default None Entries HH MM where HH 00 23 MM 00 59 Notes N A Availability Only on a Mitel phone system Default None Entries Equipment number ...

Page 341: ...e Voice Mail If you choose Selected the Voice Mail will accept a network call only from a telephone number that has been programmed into a Network Mailbox If you choose All the Voice Mail will accept network calls from any other AMIS compatible Voice Mail system regardless of programming into a Network Mailbox But mailbox subscribers who receive messages from a Voice Mail system without a Network ...

Page 342: ...throught the Automated Attendant More specifically this option deter mines whether a caller on a Tenant Y trunk can call a Tenant Y extension or mailbox Number of Tenants The value for this option sets the maximum number of tenants allowed by the Voice Mail Availability For any Voice Mail system that uses voice prompts in two language modes Default English 1 Entries English 1 English 2 Notes To le...

Page 343: ...nabled check box and Delay before msec Enabled The value for this check box determines whether Eliminate Recording Silence is enabled or disabled Delay before msec The value for this option determines the amount of silence in milliseconds for the brief interval of silence that will be recorded before silence elimination begins When you have finished entering values for the options on the General 1...

Page 344: ...e Mailbox Logon option includes Time Limit seconds and Attempt Limit Time Limit seconds When someone tries to call log on to a mailbox this option sets the maximum amount of time in seconds which the Voice Mail will wait for the caller to dial a valid mailbox number and or security code before repeating the prompt Please enter your mailbox number security code Availability All phone systems Defaul...

Page 345: ... Entry The Minimum Entry value sets the minimum number of letters that a caller must dial when using a Directory Dialing Mailbox or an Extension Name Directory in a Call Routing Mailbox Play Extension Number The value for this check box determines whether Play Extension Number is enabled or dis abled When it is enabled the Voice Mail will play the extension number associated with the letters the c...

Page 346: ... the Night Mode Availability All phone systems that allow Voice Mail use of a schedule for greeting day callers and another schedule for greeting night callers Default None Entries Number of the schedule set up for the Day Mode Notes The schedule number comes from the AST assigned to the port or to the trunk mailbox if allowed The AST that answers a trunk is the AST assigned to the port handling t...

Page 347: ...ilable idle before the Voice Mail will let a caller queue for a busy Subscriber extension Miscellaneous The Miscellaneous option includes Port Self Test Timer Minutes and three ckeck boxes Greeting for Quick Msg Mailbox Transfer Sub Attendant LampControl Method and Restore Lamp On Port Self Test Timer Minutes The Port Self Test Timer Minutes value sets the time interval in minutes between two auto...

Page 348: ...or a Mitel SX 100 200 or a Mitel SX 2000 and the message lamp ports have been programmed as a Superset 4 Sub Attendant Restore Lamp On The value for this check box determines whether this feature is enabled or disabled When enabled the message lamps will be turned on again after the phone system mistakenly turns them off If your phone system is a Mitel SX 200D with software ver 1004 or higher and ...

Page 349: ...gsTab Click the Dial Strings tab on the System Options dialog box to display the Systems Options dialog box shown below The following System Options are displayed on the Dial Strings tab Hold Retrieval Strings The Hold Retrieval Strings option includes RNA and Busy Availability All phone systems ...

Page 350: ...onitored pause After a 2 sec pause the Voice Mail dials the next digit if no busy reorder Otherwise Voice Mail ends the call A Analyzed pause After a 4 sec pause the Voice Mail dials the next digit if no busy reorder Otherwise Voice Mail ends the call Escape Not currently supported Only applies to Mitel or Norstar phone systems using Dialogic D42SX or NS cards Notes N A Default Depends on the tele...

Page 351: ...pause After a 2 sec pause the Voice Mail dials the next digit if no busy reorder Otherwise Voice Mail ends the call A Analyzed pause After a 4 sec pause the Voice Mail dials the next digit if no busy reorder Otherwise Voice Mail ends the call Escape Not currently supported Only applies to Mitel or Norstar phone systems using Dialogic D42SX or NS cards Notes N A Default Depends on the telephone sys...

Page 352: ... the Voice Mail dials the next digit if no busy reorder Otherwise Voice Mail ends the call A Analyzed pause After a 4 sec pause the Voice Mail dials the next digit if no busy reorder Otherwise Voice Mail ends the call Escape Not currently supported Only applies to Mitel or Norstar phone systems using Dialogic D42SX or NS cards Notes To flag an extension as an External Extension select Mailbox Opti...

Page 353: ...ce Mail dials the next digit if no busy reorder Otherwise Voice Mail ends the call A Analyzed pause After a 4 sec pause the Voice Mail dials the next digit if no busy reorder Otherwise Voice Mail ends the call X The Voice Mail replaces the X with an extension number so that the Voice Mail will know which extension should have its lamp turned on G Number of messages in a mailbox This number appears...

Page 354: ... used by your phone system to remove a call from Hold F Flash W Wait for dial tone S Wait for any type of sound P Pause After a 2 sec pause the Voice Mail dials the next digit M Monitored pause After a 2 sec pause the Voice Mail dials the next digit if no busy reorder Otherwise Voice Mail ends the call A Analyzed pause After a 4 sec pause the Voice Mail dials the next digit if no busy reorder Othe...

Page 355: ...P is a special code Say Call Announce prompts Hello I have a call for Sub scriber s extension number or recorded mailbox name from name that caller recorded A Pauses 2 secs to see if there is still busy tone A is a Special Code Z Completes a transfer to a non busy extension For DBS only Means that the Voice Mail should dial the string that follows the after detecting a busy code at the extension F...

Page 356: ...ssage Length The Message Length seconds value sets the maximum length in seconds for Subscriber Nonsubscriber and Call Announce messages Subscriber The Subscriber value sets the maximum length in seconds for a message that an internal caller leaves in a mailbox and for any recording made after someone has called logged on to a mail box like a Welcome Message Availability All phone systems Default ...

Page 357: ...o Ahead Time and Page Meet me Page Hold Timer Silence Limit for Recording The Silence Limit for Recording value sets the maximum time in seconds that someone can be silent while recording before the Voice Mail will pause the recording and say Recording has been paused due to silence Message Backup Go Ahead Time The Message Backup Go Ahead Time value sets the maximum time interval in seconds so tha...

Page 358: ...Customizing System Options Timers Tab 330 NT System Guide Chapter 3 Programming ...

Page 359: ...ice Mail will handle the call by using the Answering Schedule Table assigned to the call s port The telephone system that is installed will determine the duration of the wait time The default value should work for most telephone systems For Subsequent The For Subsequent value sets the maximum time interval in seconds that the Voice Mail will wait for each subsequent digit after receiving the first...

Page 360: ...ing the Answering Schedule Table assigned to the call s port The tele phone system that is installed will determine the duration of the wait time The default value should work for most telephone systems Timers 1 10 msec The Timers 1 10 msec option includes Flash Timer and Hang Up Timer For these timers the value 1 represents 10 milliseconds Flash Timer The Flash Timer value sets the length of a Fl...

Page 361: ...finished entering values for the options on the Timers tab of the System Options dialog box When you have finished entering values for the options on the Timers tab of the System Options dialog box Click the button to save your entries and return to the Voice Mail Main window Default 150 Entries 1 999 Notes It is recommended that you enter a value equal to 3 times the Flash Timer value above You c...

Page 362: ...Customizing System Options Timers Tab 334 NT System Guide Chapter 3 Programming ...

Page 363: ...stance callouts Q access digits before fax local or long distance callouts If FAX On Demand has been enabled you can also customize a cover page that will be displayed in front of each fax document The cover page may consist of up to 15 lines of text Each line may contain up to 60 characters For information about FAX On Demand see the Customizing Fax On Demand section earlier in this guide To acce...

Page 364: ...Customizing Tenant Options Tenant Options Dialog Box 336 NT System Guide Chapter 3 Programming Tenant Options Dialog Box You will see a Tenant Options dialog box similar to the one shown below ...

Page 365: ...s the string that the Automated Attendant of the Voice Mail will dial after detecting FAX tone Default No entry Entries Up to 25 characters Notes N A Default None Entries Up to 20 digits None OR May include Country Code Area Code Phone Number Must begin and end with Notes N A Default None Entries Up to 20 digits or mailbox number None or may include these special codes F Flash W Wait for dial tone...

Page 366: ... The usual pager announcement says Hello I have a message for name of person or extension number to receive the message You have message count messages Remote Tenant Remote Tenant includes the Enabled check box and Access Digits Enabled The value in the Enabled check box determines whether Remote Tenant will be enabled or disabled If it is enabled the Voice Mail can perform lamping and call transf...

Page 367: ...Customizing Tenant Options General Tab Chapter 3 Programming NT System Guide 339 ...

Page 368: ...to move and click the button When finished customizing general information for the last tenant Click the button to cause the Voice Mail to apply your entries to this tenant remove the dialog box from the screen and return to the CTL Logo window OR Click the Access Digits tab on the dialog box to display the screen shown on the next page Default None Entries Up to 10 digits or characters None OR Ma...

Page 369: ...an dial a local call to do message notifications to a home phone cell phone or digital pager Default None Entries Up to 30 digits or characters None OR May include these special codes F Flash W Wait for dial tone S Wait for any type of sound P Pause Voice Mail pauses 2 sec then dials next digit M Monitored pause Voice Mail pauses 2 sec then dials next digit only if no busy reorder tone A Analyzed ...

Page 370: ...c then dials next digit only if no busy reorder tone A Analyzed pause Voice Mail pauses 4 sec then dials next digit only if no busy reorder tone Otherwise Voice Mail terminates the call Escape Not currently supported Only applies to Mitel or Norstar phone systems using Dialogic D42SX or NS cards Notes N A Default None Entries Up to 30 digits or characters None OR May include these special codes F ...

Page 371: ...2 sec then dials next digit only if no busy reorder tone A Analyzed pause Voice Mail pauses 4 sec then dials next digit only if no busy reorder tone Otherwise Voice Mail terminates the call Escape Not currently supported Only applies to Mitel or Norstar phone systems using Dialogic D42SX or NS cards Notes N A Default None Entries Up to 30 digits or characters None OR May include these special code...

Page 372: ...n to cause the Voice Mail to apply your entries to this tenant remove the dialog box from the screen and return to the CTL Logo window OR Click the Fax On Demand Cover Page tab on the Tenant Options dialog box to display the screen shown on the next page move on to an explanation about the Voice Mail s use of the Fax On Demand cover page for each tenant that shares the system provided that the FAX...

Page 373: ...acters to identify the source of the FAX document like a company or a department Include Cover Page with Documents The value in the Include Cover Page with Documents check box determines whether this feature will be enabled or disabled If it is enabled the Voice Mail will precede each FAX document it sends with the cover page that you design For details see Cover Page Text on the next page Default...

Page 374: ...pply your entries to the current dialog box and remain there Click the button To save your entries on the current dialog box and return to a previ ous dialog box Click the button To save your entries on the current dialog box and then move to another dialog box Click the button enter the tenant number where you want to move and click the button When you have finished customizing this information f...

Page 375: ... compatible printer connected to your computer and turned on Q a Windows NT printer driver installed To access the Report feature Click Reports on the menu bar to display the Reports menu Multiple Reports You can use the Multiple Reports feature to scroll through several reports displayed on your screen in the order you select them If you wish you can also print them To view and print multiple rep...

Page 376: ...d 4 To save these reports click the icon on the menu bar to display the Save As window a Scroll through the Save in list and select the place where you want to save the report b Enter a name for set of reports in the File name box c Click the Open as read only check box if you want the report to be saved so that others may view it without changing it d When finished click the button on the Save As...

Page 377: ...rts Q Mailbox by Options Directory List Numeric List Access Count or Call Flags Q Message Usage Q Ports by Options or Usage Q System Options Auto Attendant Report To view and print an Auto Attendant report by port or trunk 1 Select Auto Attendant on the Reports menu 2 On the Auto Attendant drop down menu Select Port to display an Auto Attendant report by port OR select Trunk to display an Auto Att...

Page 378: ...Dial Action Table Auto Attendant Trunk Report But if you selected Trunk you would see the Auto Attendant Trunk Report dialog box On the Auto Attendant Trunk Report dialog box 1 In the Ending Mailbox box Enter the number of the highest numbered trunk mailbox you want to see displayed 2 Click the associated check box for each mailbox type you want to see listed in the report 3 Click the button to sa...

Page 379: ... on the report 3 In the Ending AST box Enter the highest numbered AST that you wish to display on the report 4 Click the button to save your selection and display the report The Answering Schedules report shows the programmed values for schedule number day date time and mailbox number if any in the Answering Schedule Tables An asterisk appears next to the schedule that is currently in effect The r...

Page 380: ...box 2 Click the button on the dialog button to display the report Callout Report To view and print a Callout report by options or log 1 Select Callout on the Reports menu 2 On the Callout drop down menu Select Options to display a Callout report by options OR select Log to display a Callout report by log Callout Options Report If you selected Options in step 2 above you would see the Callout Optio...

Page 381: ...port used for the callout Date Time Shows the date and time of the callout Total Time Shows the duration of the callout Status Shows one of the following statuses of the callout BSY Callout number was busy REJ Message Notification or Network callout was rejected for one of the following reasons Q Message Notification recipient did not dial 1 to accept the callout OR Q Network callout could not be ...

Page 382: ...n the report 3 In the Ending DAT box Enter the highest numbered Dial Action Table that you wish to display on the report 4 Click the button to save your selection and display the report The Dial Action Table report shows you the programming for your Dial Action Tables by table number key action and number On the report Availability All phone systems U Transfer refers to an unscreened transfer Tran...

Page 383: ...o display on the report 3 In the Ending Distribution List box Enter the highest numbered Distribution List that you wish to display on the report 4 Click the button to save your selection and display the report The Distribution Lists report shows the number of every mailbox in each Distribution List It also shows the name and department associated with the mailbox if any In addition the report spe...

Page 384: ...ted Documents above in step 2 you would see the FAX DOCUMENT DATABASE report For each slot in the database the report specifies the document number number of the ten ant through which the document is available and document type The report also specifies whether the fax document has been loaded on the hard disk The report further specifies whether a security code has been programmed for the documen...

Page 385: ... Fax port whose options you would like to see listed on the report 2 In the Ending Fax Port box Enter the number of the last Fax port whose options you would like to see listed on the report 3 Click the button to display a report about the following options for each fax port in your Voice Mail system Default Entries N A Notes Doc is currently the only document type displayed and 1 is the default t...

Page 386: ...t Mailbox Options Report If you selected Options above in step 2 you would see the Mailbox Options Report dialog box Availability All phone systems Options to display a Mailbox report by Options OR Directory List to display a Mailbox report by type and Directory List OR Numeric List to display a Mailbox report by number OR Access Count to display a Mailbox report by the number of times a given mai...

Page 387: ...ng Mailbox number The report also displays the mailbox types that you selected above Mailbox Directory List Report If you selected Directory List in step 2 you would see the Mailbox Dir List Report dialog box On the Mailbox Dir List Report dialog box 1 In the Starting Mailbox box Enter the number of the lowest numbered mailbox you want to see displayed 2 In the Ending Mailbox box Enter the number ...

Page 388: ...ed mailbox you want to see displayed 2 In the Ending Mailbox box Enter the number of the highest numbered mailbox you want to see displayed 3 Click the associated check box for each mailbox type you want to see listed in the report 4 Click the button to save your entries and display the report The Mailbox Numeric List report lists by ascending numerical order all of the mailboxes in the selected r...

Page 389: ...tton to save your entries and display the report The Mailbox Access Count report shows how many times a mailbox has been accessed since the last time the report was reset The count applies to Subscriber Guest Announcement Call Routing Directory Dialing and Interactive Mailboxes The report shows the extension type name and access count for every mailbox in the range you selected The type of mailbox...

Page 390: ...utton to save your entries and display the report The Mailbox Call Flags report shows the status of the call handling features for a mailbox The report also shows the mailbox type and the following fields for each mailbox number Greeting shows whether or not the mailbox greeting is recorded If it is recorded the report shows whether the greeting is on or off Page Greeting shows whether or not a Pa...

Page 391: ...ghest numbered mailbox you want to see displayed 3 Click the associated check box for each mailbox type you want to see listed in the report 4 Click the button to save your entries and display the report The Message Usage report shows the amount of disk space used by the messages in each mailbox in the selected range The report also shows the name and the following fields for each mailbox number A...

Page 392: ...otal Messages at the bottom of page 2 shows the total number of messages in all mailboxes displayed on pages 1 and 2 Free Messages shows how many more messages can be recorded in the Voice Mail system Free Pointer is used for diagnostic purposes to indicate a storage location for the next message Disk Space Available for Messages shows the percentage of empty disk space that can be used for record...

Page 393: ...e Starting Port box Enter the first port that you wish to display on the report 4 In the Ending Port box Enter the last port that you wish to display on the report 5 Click the button to save your selection and display the report For each port in your Voice Mail system the Port Option report shows the options and their cur rently programmed values Port options include In Service Allow Lamp callouts...

Page 394: ...n step 3 the Port Usage report would show how the Voice Mail ports have been used up to the time you asked for the report If there are no entries the report will read Port Usage Report empty For each port the report displays the following fields Tenant currently shows 1 because the system supports only one tenant Lamp Update count shows how many times the port has been used for Message Waiting Lam...

Page 395: ...Option report shows the current settings for each System Option in your Voice Mail system To view and print a System Options report Select System Options on the Reports menu Availability All phone systems Default Entries N A Notes To set the value for any System Option on this report select System Options on the Customize menu ...

Page 396: ...Viewing and Printing Reports System Options Report 368 NT System Guide Chapter 3 Programming ...

Page 397: ... so by your Network Administrator Q FAX documents Q Feature Files for options such as Fax On Demand Fax Mail or Desktop Messaging Q Voice messages Q FAX messages Q the system database containing all your Voice Mail programming and recordings If you are backing up these items onto a super diskette you will need one that contains no data files To perform the local backup procedure 1 If using a super...

Page 398: ...lick to select the check box for each item you want to back up 5 If you clicked to select the Voice Messages check box a Click to select the check box for the type of voice message you want to back up New Held and or Saved b Decide whether you want to back up the voice messages in all mailboxes in your Voice Mail or only those in certain mailboxes Then Click to select the Backup All Mailboxes chec...

Page 399: ...he Voice Mail will insert your selection in the Save To box on the Backup dialog box 8 Click the button on the Backup dialog box The Voice Mail will copy your selection s onto the diskette When finished the Voice Mail will display the message Backup complete 9 When you see the Backup complete message displayed on your screen Remove the diskette if any from the A drive label the diskette with the n...

Page 400: ...Performing a Local Backup Backup Dialog Box 372 NT System Guide Chapter 3 Programming ...

Page 401: ...Performing a Local Backup section earlier in this guide You will need either the super diskette containing the data files you want to restore or access to the LAN hard drive where these files are stored To perform the local restore procedure 1 If you are using a backup diskette insert it into the A or B drive of your computer If not omit these step and continue with step 2 2 Click Tools on the men...

Page 402: ...e files are stored on a diskette OR select the directory where the files are stored Click the OK button The Voice Mail will insert your selection in the Select Source File box on the Restore dialog box 7 Click the button on the Restore dialog box The Voice Mail will copy the files you selected from the source file to the hard drive When finished the Voice Mail will display the message Restore comp...

Page 403: ...d calls You can now change the status of an installed port from Out of Service to In Service or from In Service to Out of Service To change the status of an installed port 1 Click Tools on the menu bar to display the Tools menu Port In Out Services Dialog Box 2 From the Tools menu select Ports In Out of Service to display the Port In Out Services dialog box shown below 3 To change the port status ...

Page 404: ... cont d 4 To change the port status from In Service to Out of Service Double click the current port status OR Click the current port status and then press N 5 Click the button so the Voice Mail will apply your change to the port status 6 Click the button on the dialog box to finish using this feature and return to the Voice Mail Main window ...

Page 405: ...ate All Ports Self Test 1 Click Tools on the menu bar to display the Tools menu 2 From the Tools menu select Immediate All Ports Self Test You will display a dialog box confirming that the self test is beginning on all ports 3 Click the button on the dialog box The Voice Mail will immediately perform a functionality test of all your ports To see the results of this port self test Click the icon on...

Page 406: ... on the menu bar 4 From the Tools menu select Immediate Clear All Ports Failure You will display a dialog box confirming that all ports have been cleared 5 Click the button on the dialog box 6 Perform the Immediate All Ports Self Test again see the instructions on the previous page When the test is complete and every Voice Mail port in your system shows the On Hook state Click the X in the upper r...

Page 407: ...he Serial Communications Ports tool to adjust certain aspects of your protocol for data transmission over the two serial ports To access the Serial Communications Port tool 1 Click Tools on the menu bar to display the Tools menu 2 From the Tools menu Select Serial Communication Ports to display the Com Port Selection 1 of 2 dialog box shown on the next page ...

Page 408: ...f 2 Dialog Box You can change the current setting for any of the following items on this dialog box Baud Rate The value for Baud Rate specifies the speed in terms of the number of bits per second at which the data is transmitted over the phone line Availability All phone systems Default 9600 Entries 300 1200 2400 4800 9600 19200 Notes N A ...

Page 409: ...tation to the parity bit If a transmission error is detected a flag can be set and retransmission may be requested If you set Parity to No no parity check will be performed If you set Parity to Even the parity bit will be set at 0 if the number of 1s in the data bits is even and set to 1 if the number of 1s is odd If you set Parity to Odd the parity bit will be set at 1 if the number of 1s in the ...

Page 410: ...rinted at 9600 baud which is several times faster than the printer can print The computer sends the data to be printed Any data that cannot be printed immediately is stored temporarily in the small buffer of the printer When this buffer is full the printer sends the XOFF signal to the computer telling it to stop sending data But when the buffer is ready to receive again the printer sends the XON s...

Page 411: ...om Port Selection 2 of 2 Dialog Box The Com Port Selection 2 of 2 dialog box shows the same Serial Communications parameters as those shown on the Com Port Selection 1 of 2 dialog box When you have finished changing values on the dialog box Click the button to save your changes and return to the Voice Mail Main window ...

Page 412: ...Adjusting Data Transmission Protocol Com Port Selection 2 of 2 Dialog Box 384 NT System Guide Chapter 3 Programming ...

Page 413: ...have a Dialogic card installed in your Voice Mail system You can also use these options to customize the values of the Global Channel and Call Parameters on the card which control how the Voice Mail operates with your phone system To access Call Adaptation Options 1 Click Tools on the menu bar to display the Tools menu 2 From the Tools menu Select Call Adaptation Options to display a dialog box si...

Page 414: ... remove records from this table All of these parameters are available to any NT Voice Mail system that has a Dialogic card installed Besides ID the Tone tab displays these parameters Freq1 The value in Hertz for Freq1 identifies the first frequency associated with the tone Dev 1 Freq2 The value in Hertz for Freq2 identifies the second frequency associated with the tone Default Entries Depends on t...

Page 415: ...s not reached the Voice Mail will not correctly identify or recognize the tone OffDev The value in Hertz for OffDev identifies the amount of deviation above or below OffTime which the Voice Mail will accept as a valid OffTime value RepCnt The value for RepCnt is the number of times that the cadence on off pattern must be repeated before the Voice Mail will recognize the tone and then report its id...

Page 416: ... next parameter you want to change 4 Repeat these steps until you have finished making changes to your tone records To add a new tone record to the tone table 1 Click the button After all your tone records the Voice Mail will add a tone record whose ID is 255 similar to the one shown below 2 Change the 255 to the next consecutive ID number For example if your last tone record s ID is 4 you would c...

Page 417: ...e Mail manufacturer Global Parameters Tab After you click the General Parameters tab you will see a dialog box tab that is similar to the one shown below The Global Parameters tab displays these parameters DTMF Interdigit Delay The value for this parameter determines the delay between digits for the DTMF dial out In most phone systems the default value is 10 which represents 100 ms and values repr...

Page 418: ...e value for this parameter determines the minimum duration of the delay in milliseconds before the Voice Mail will post an off hook event Pause Time when dialing The value for this parameter determines the duration of the pause P during outdialing It is used in programming the dial string Values are entered in increments of 10 ms The recommended range of values is 50 through 400 Ring Off Interval ...

Page 419: ...election for the DTMF detection edge DTMF Talk The value for this parameter determines the minimum duration in milliseconds that DTMF tone must be present during message playback before the Voice Mail will detect and recognize DTMF Standard DTMF tones are supposed to last at least 50 milliseconds But if the DTMF source is pro ducing tones of a shorter duration than this value the Voice Mail may no...

Page 420: ... of the Greeting A 1 entry indicates Rising Edge A 2 entry indicates Falling Edge The default value is 2 Low Glitch The value for this parameter determines the maximum duration of a silence period that the Voice Mail will ignore This value is used to eliminate false silence periods High Glitch The value for this parameter determines the maximum duration of a non silence period that the Voice Mail ...

Page 421: ...Mail will wait between two consecutive ringback signals before it recognizes that the call has been connected IntFlag The value for this parameter determines how the Intercept Mode flag is set to enable or disable SIT Frequency Detection Positive Voice Detection PVD and or Positive Answering Machine Detection PAMD Click the Channel Parameters 2 tab to move on to the rest of the Channel Parameters ...

Page 422: ...e Call Analysis returns a con nect to the application The default value is 10 Max Silence The value for this parameter determines the duration in milliseconds of silence no signal that the Voice Mail will allow immediately after Cadence Detection begins If this value is exceeded the Voice Mail will return a No Ringback The default value is 4000 Max Sound The value for this parameter determines the...

Page 423: ...o the one shown below The Call Parameters 1 tab displays these parameters CallProgDly The value for this parameter determines the minimum time interval that the Voice Mail will wait before beginning the PCPM analysis for making calls into the integrated PBX This value repre sents increments of 55 milliseconds so that a setting of 1 would cause the Voice Mail to wait 55 milliseconds MonPauseDur The...

Page 424: ...rogrammed for unscreened transfers and the phone system requires a brief pause before going onhook to com plete this transfer then you can raise this value to equal the time needed In some phone systems this delay is required so that the proper integration will be sent when the call returns to the Voice Mail The recommended range of values is 1 through 73 where 1 55 ms ConversationLength The value...

Page 425: ...he Voice Mail will wait before prompting the caller who dialed in This value is entered in multiples of 55 milliseconds so that a setting of 1 would cause the Voice Mail to wait 55 milliseconds Welcome Delay The value for this parameter determines the length of the delay between the caller dialing in and the Voice Mail answering the call by playing a welcome message This field is useful for any sy...

Page 426: ...n order to produce a dial tone In most phone systems the default is a W Wait But if you have already changed the UseSoundAsDialTone on the Call Parameters 1 tab to use sound as dial tone you must change this value to an S Sound Then in System Parameters programming change every instance of a W to an S Flash String The value for this parameter determines which string must be dialed in order to perf...

Page 427: ...to install a specific phone system instead You can use the Integration Stringsfor Generic System fea ture to set up the integration strings as shown in the new phone system s Integration Guide To reach the Integration Strings for Generic System feature 1 Click Tools on the menu bar to display the Tools menu Integration Strings Dialog Box 2 From the Tools menu select Integration Strings For Generic...

Page 428: ...et Q Disconnect Q Undefined To set up the integration strings by using this dialog box 1 Turn to the integration strings section in the Phone System Integration Guide 2 For each function enter the corresponding integration string shown in the guide a Select the function name from the scroll list to the right of the Integration String box where you plan to enter the string b Enter the integration s...

Page 429: ... you are at a workstation and you want to see a different Voice Mail on the network where you plan to perform maintenance programming and or service operations You can use the Setup Service Location feature to reach the other machine To use the Setup Service Location feature 1 Click Tools on the menu bar to display the Tools menu ...

Page 430: ... a Double click the general location of the Voice Mail Service you want to see b Double click the name of the machine you want to see at that location The Voice Mail will display the name of that machine in the Selected Machine Name box c Double click the name of the Voice Mail drive where the service resides The Voice Mail will display the name of the drive in the Selected Drive Name box 4 Click ...

Page 431: ...d then stored in the historical database called the Trace Database You can also use the Options tool to adjust certain options related to what is or is not displayed on the Voice Mail dialog boxes and windows that you see when you are programming the system To access the Options tool 1 Click Tools on the menu bar to display the Tools menu 2 From the Tools menu Select Options to display the Options...

Page 432: ...me circumstances the programmer would see displayed in a box on the screen An invalid entry has been made Days to keep trace messages The value for this parameter specifies the number of days that the Voice Maill will keep all trace messages before overwriting them Autosave A check mark in the Autosave check box enables this parameter When Autosave is enabled the Voice Mail will save all programmi...

Page 433: ...t Invalid Field check box enables this parameter When the Auto Correct Invalid Field is enabled the Voice Mail will automatically correct an invalid field entry After the programmer has exited the field the Voice Mail will change the entry to the last value in the valid range for the field For example if the valid range for the field is 1 through 3 and the pro grammer has entered 300 the Voice Mai...

Page 434: ... be displayed in the color you selected Event Codes Filter for Trace Database A Trace Database contains the history of your Voice Mail events From the scroll list below Event Codes Filter for Trace Database on the Options dialog box you can choose the event or events of special interest to you which will be recorded into the Trace Database To choose one or several events for recording Click to sel...

Page 435: ...Click the button to save your option changes OR Click the button to cancel the Options function You will return to the Voice Mail Main window To see an historical trace of the events selected in the scroll list Click the icon to display a Select Query dialog box similar to the one shown below For information about how to use this dialog box see the Using the Trace Viewer section starting on page 4...

Page 436: ...e Mail pro cesses calls Click the icon on the menu bar to display a real time trace of the selected events similar to the one shown below For information about using this dialog box see the Using the Real Trace section starting on page 413 To return to the Voice Mail Main window Click the X in the upper right corner of the Trace window ...

Page 437: ... following Q using the to view your Trace historical database Q using the to see all some or only one of the trace messages and or events as they are happening Q changing system programming Q customizing all of the items that you can select from the Customize menu shown below In addition you can switch back and forth between your Port Activities list and any of the functions listed above without l...

Page 438: ...ed Mailbox shows which mailbox is active using the port if any Tone Type shows the type of tone that identifies the call entering the port Prompt shows the prompt playing on the port Default OnHook Entries OnHook Incoming Hang Up Notes N A Default Idle Entries Idle GetDG get digit Play SNDDG send digit PCPM Notes N A Default 0 Entries 0 Number for active mailbox Notes N A Default No entry Entries ...

Page 439: ... Guide 411 Digit shows any digits dialed on the port To close the Port Activities list Click the X in the upper right corner of the dialog box You will return to the Voice Mail Main window Default No entry Entries Depends on caller dialed digits Notes N A ...

Page 440: ...Using Port Activities 412 NT System Guide Chapter 3 Programming ...

Page 441: ...ls You can also display a real trace while you are doing any of the following Q using to monitor your port activities Q using the to view your Trace historical database Q changing system programming Q customizing all of the items that you can select from the Customize menu shown below In addition you can switch back and forth between a real trace and any of the functions listed above without losin...

Page 442: ...o select from the Event Code scroll list the event s you want to see displayed on the trace or click the button to select all of the codes on the list Your selection in this step should include only those events you selected for recording in Options on the Tools menu 2 To see the event s displayed by port number Click to select the preferred setting from the Port Number scroll list 3 Or to see the...

Page 443: ...the source code inside the Real Trace pro gram for use by CTL personnel only Term Type The value for this parameter specifies why the Voice Mail stopped performing voice processing functions The table below briefly explains what each Term Type means DISCONNECT PULSE Forward disconnect pulse received GLOBAL TONE Tone table tone detected CONTINOUS SOUND Too much continous sound detected NO DIAL TONE...

Page 444: ...l only Trace String The value for this parameter provides more information about the event you selected To close the real trace and thus remove the Trace dialog box from the screen Click the X in the upper right corner of the dialog box You will return to the Voice Mail Main window BUSY Busy tone detected NOANSWR Outbound call detected no answer NORING Outbound call no tone detected CONNECT Outbou...

Page 445: ...ecified You can use the Trace Viewer to see all some or only one of the trace messages and or events recorded by the Voice Mail and then stored in the Trace Database For instructions see the Adjusting Options section starting on page 403 To access the Trace Viewer Click the icon on the menu bar or select Trace Viewer on the View menu Select Query Dialog Box You will display a Select Query dialog b...

Page 446: ...tring contains box 5 At the right of the first From box Click the down pointing arrow and then click to select the start date on the pop up calendar displayed for the current month To select a previous month click the left pointing arrow in the upper left corner of the displayed pop up calendar until you reach the month containing the desired start date 6 Click the scroll list on the second From b...

Page 447: ...Using the Trace Viewer Trace Viewer Dialog Box Chapter 3 Programming NT System Guide 419 Trace Viewer Dialog Box You will display a Trace Viewer dialog box similar to the one shown below ...

Page 448: ...ller from the telephone dialpad Event Code The value for this parameter is the numeric value that corresponds to the trace string displayed to the left of it For example Event Code 29 corresponds to the DSP_GetBoardType 256 trace string as shown in the Trace Viewer dialog box on the previous page PCPM Type When the Term Type is GLOBAL TONE the value for PCPM Type is the last tone type that the Voi...

Page 449: ...nnect pulse received GLOBAL TONE Tone table tone detected CONTINOUS SOUND Too much continous sound detected NO DIAL TONE Dial string W produced no dial tone QUANTITY OF DIGITS Specific number of DTMF digits detected TERMINATION DIGIT A termination DTMF digit detected NORMAL Function completed normally TIMEOUT Total time too long DIGIT TIMEOUT Time between digits too long SILENCE Too much continous...

Page 450: ...ry that you specified 3 Click the X in the upper right corner of the dialog box to remove the Trace Viewer dialog box from the screen and return to the Voice Mail Main window To rephrase your query Click the button You will see the Select Query dialog box again You can now select different criteria for a new trace After your query selection what will be displayed on the Trace Viewer dialog box wil...

Page 451: ...box in your Voice Mail system To access the Message Status list 1 Click Report on the menu bar select Mailbox on the Report menu and select Numeric List on the Mailbox drop down menu 2 Click the button on the Mailbox Numeric List Report dialog box to display a numerical list of the mailboxes in your Voice Mail system similar to the list shown below 3 Click the icon on the menu bar or select Messag...

Page 452: ... To use the Select Mailbox Number dialog box 1 Enter the mailbox number s that you want to see in the box You can enter one mailbox number or a group of mailbox numbers where adjacent numbers are separated by commas such as 103 106 109 110 or a range of mailbox numbers where the starting number is separated from the ending number by a hyphen as shown in the dialog box above 2 Click the button to s...

Page 453: ...umber of messages not yet heard by the mailbox owner Latest Message The value for this parameter is the date and time when the most recent message was left in the mailbox To remove the Trace Viewer dialog box from the screen Click the X in the upper right corner of the dialog box to return to the Voice Mail Main window Default No entry Entries Mailbox almost full N Mailbox has new messages Notes N...

Page 454: ...Using Message Status Message Status Dialog Box 426 NT System Guide Chapter 3 Programming ...

Page 455: ... dial Sys Admin Mailbox number If requested dial security code For more information on calling a mailbox see the User s Guide 2 Press S A 7 2 for System Administrator Menu 3 Press B R 2 7 for BRoadcast Message 4 Follow the voice prompts Availability All versions of the NT Voice Mail Notes An intertenant System Administrator Mailbox lets you record a Broadcast Message for any tenant An intratenant ...

Page 456: ... master extension If requested dial Sys Admin Mailbox number If requested dial security code From outside using the Voice Mail Dial Auto Attendant number Wait for greeting Press Dial Sys Admin Mailbox number If requested dial security code For more information on calling a mailbox see the User s Guide 2 Press S A 7 2 for System Administrator Menu 3 Press W 9 for Welcome Message 4 Follow the voice ...

Page 457: ...elcome Message Instruction Menu then the Directory Dialing Message If the person does not dial anything or makes a mistake the Voice Mail repeats the Directory Dialing Message not the Instruction Menu Availability All versions of the NT Voice Mail Notes Since you must record a Directory Dialing Message for a Directory Dialing Mailbox to explain the caller s dialing options you may not wish to reco...

Page 458: ...ress S A 7 2 for System Administrator Menu 3 Press I 4 for Instruction Menu Mailbox 4 Follow the voice prompts Notes To convert a Subscriber Mailbox into a System Administrator Mailbox use Customize Mailbox Options Edit Add Subscriber on page 296 To create Call Routing and Directory Dialing Mailboxes use the Play Default CR option for a Call Routing Mailbox determines whether the Voice Mail plays ...

Page 459: ...default recording listed on the next page If you erase a customized Directory Dialing Message the Voice Mail will revert back to using the default one To set the length of the Instruction Menu use the Customize System Options Timers Message Length Subscriber on page 328 Other points to remember when you customize a Directory Dialing Message are as follows Since it is not necessary to press the pou...

Page 460: ... 3 Press D D 3 3 for Directory Dialing Mailbox 4 Follow the voice prompts Notes To convert a Subscriber Mailbox into a System Administrator Mailbox use Customize Mailbox Options Edit Add Subscriber on page 296 To create and customize Directory Dialing and Call Routing Mailboxes see page 168 To set the length of the Directory Dialing Message use Customize Sys tem Options Timers Message Lenth Subscr...

Page 461: ...box From any extension Get intercom dial tone Dial Voice Mail master extension If requested dial Sys Admin Mailbox number If requested dial security code From outside using the Voice Mail Dial Auto Attendant number Wait for greeting Press Dial Sys Admin Mailbox number If requested dial security code For more information on calling a mailbox see the User s Guide 2 Press S A 7 2 for System Administr...

Page 462: ...sing the Voice Mail Dial Auto Attendant number Wait for greeting Press Dial Sys Admin Mailbox number If requested dial security code For more information on calling a mailbox see the User s Guide 2 Press S A 7 2 for System Administrator Menu 3 Press N 6 for Mailbox Name 4 Follow the voice prompts Availability All versions of the NT Voice Mail Notes You cannot record a name for a Future Delivery or...

Page 463: ...equested dial Sys Admin Mailbox number If requested dial security code From outside using the Voice Mail Dial Auto Attendant number Wait for greeting Press Dial Sys Admin Mailbox number If requested dial security code For more information on calling a mailbox see the User s Guide 2 Press S A 7 2 for System Administrator Menu 3 Press S O 6 for Answering Schedule Override 4 Follow the voice prompts ...

Page 464: ...4 for Music On Hold 4 Follow the voice prompts Availability All versions of the NT Voice Mail Notes For more information on Call Queuing see Subscriber Mailboxes Call Que ing on page 296 An intertenant System Administrator Mailbox lets you record Music On Hold for any tenant An intratenant System Administrator Mailbox lets you record Music On Hold only for the tenant associated with the System Adm...

Page 465: ... Administrator Mailbox From any extension in the Voice Mail Get intercom dial tone Dial the Voice Mail master extension If requested dial Sys Admin Mailbox number If requested dial security code From outside using the Voice Mail Dial Auto Attendant number Wait for greeting Press Dial Sys Admin Mailbox number If requested dial security code For more information on calling a mailbox see the User s G...

Page 466: ...dd Subscriber on page 296 If for example you use the insert option to insert a new prompt for prompt 3 the Voice Mail renumbers the existing prompts starting with the old prompt 3 The old prompt 3 gets renumbered as prompt 4 the old prompt 4 gets renumbered as prompt 5 etc If for example you use the erase option to erase prompt 3 the Voice Mail renumbers all the existing prompts starting with prom...

Page 467: ... From any extension in the Voice Mail Get intercom dial tone Dial Voice Mail master extension If requested dial Sys Admin Mailbox number If requested dial security code From outside using the Voice Mail Dial Auto Attendant number Wait for greeting Press Dial Sys Admin Mailbox number If requested dial security code For more information on calling a mailbox see the User s Guide 2 Press S A 7 2 for S...

Page 468: ...requested dial Sys Admin Mailbox number If requested dial security code From outside using the Voice Mail Dial Auto Attendant number Wait for greeting Press Dial Sys Admin Mailbox number If requested dial security code For more information on calling a mailbox see the User s Guide 2 Press S A 7 2 for System Administrator Menu 3 Press T I 7 2 for TIme 4 Follow the voice prompts Availability All ver...

Page 469: ...ested dial Sys Admin Mailbox number If requested dial security code From outside using the Voice Mail Dial Auto Attendant number Wait for greeting Press Dial Sys Admin Mailbox number If requested dial security code For more information on calling a mailbox see the User s Guide 2 Press S A 7 2 for System Administrator Menu 3 Press D T 3 8 for DaTe 4 Follow the voice prompts Availability All version...

Page 470: ...ail master extension If requested dial Sys Admin Mailbox number If requested dial security code From outside using the Voice Mail Dial Auto Attendant number Wait for greeting Press Dial Sys Admin Mailbox number If requested dial security code For more information on calling a mailbox see the User s Guide 2 Press S A 7 2 for System Administrator Menu 3 Press S V 7 8 for System Version number 4 Foll...

Page 471: ... greeting Press Dial Sys Admin Mailbox number If requested dial security code For more information on calling a mailbox see the User s Guide 2 Press S A 7 2 for System Administrator Menu 3 Press P D 7 3 for Prepare for Power Down 4 Follow the voice prompts Availability All versions of the NT Voice Mail Notes If there is activity in the system when you start the shutdown the Voice Mail gives you th...

Page 472: ...n The System Administrator Menu lets the System Administrator erase all messages in a Subscriber Guest or Message Center Mailbox To erase all messages in a mailbox 1 Call your mailbox 2 Press SA for the System Administrator Menu 3 Press EM to erase all messages in a mailbox 4 Follow the voice prompts Availability All versions of the NT Voice Mail ...

Page 473: ...nistrator Menu lets the System Administrator delete a mailbox s security code This applies to Subscriber Message Center Guest Announcement and FAX Mailboxes To delete a mailbox s security code 1 Call your mailbox 2 Press SA for the System Administrator Menu 3 Press DS to delete the security code 4 Follow the voice prompts Availability All versions of the NT Voice Mail ...

Page 474: ...Using the Options on the System Administration Menu Deleting Security Codes 446 NT System Guide Chapter 3 Programming ...

Page 475: ...ng digit 6 ___ 1 6 Used as a trailing digit 7 ___ 2 7 Used as a trailing digit 8 ___ 2 8 Used as a trailing digit 9 ___ 4 9 Used as a trailing digit 10 ___ 5 10 Used as a trailing digit 11 ___ 6 11 Used as a trailing digit 12 ___ 7 12 Used as a trailing digit 13 ___ 8 13 Used as a trailing digit 14 ___ 9 14 Used as a trailing digit 15 ___ 10 15 Used as trailing digits 16 ___ 11 16 Used as trailing...

Page 476: ...recorded press L 5 To erase the message and record a new one press E 3 To send the message press the POUND key or hang up 30 31 The message has been sent 31 32 That is an invalid entry 32 33 ___ Mailbox _______ 33 Calling Mailbox 420 34 You have reached the recording limit 34 35 Start recording at the tone When you are done press the POUND key or hang up 35 36 There is a problem with the system di...

Page 477: ...A N 2 6 For mailbox names press N 6 To erase all messages in a mailbox press E M 3 6 To delete the security code of a mailbox press D S 3 7 For answering schedule override press S O 7 6 For Music On Hold press M H 6 4 For interactive prompts press I P 4 7 For system prompt customization press P C 7 2 To set the system time press T I 8 4 To set the system date press D T 3 8 To hear the system versi...

Page 478: ...r messages press L 5 To record and send a message press R S 7 7 To check on a message you sent press C M 2 6 To record a greeting for your mailbox press G 4 To record a name for your mailbox press R N 7 6 To record and send a future delivery message press F D 3 3 To record a paging message press P G 7 4 For mailbox options press O P 6 7 To hear the time and date press T I 8 4 For system administra...

Page 479: ...enter the mailbox numbers to receive this message up to ten To use mailbox names to specify the recipients press N 6 To erase the message press the STAR key twice 106 107 Enter another mailbox number or do one of the following To mark this message as Urgent for the previous mailbox press U 8 To mark this message Confidential for the previous mailbox press C 2 To request a return receipt for the pr...

Page 480: ...p to the beginning and listen press B B 2 2 To go forward then continue listening press G 4 To pause while listening press the STAR key To continue listening after a pause press the STAR key To turn the volume up press V U 8 8 To turn the volume down press V D 8 3 To restore the volume to normal press V N 8 6 To exit the listen mode press the POUND key 124 125 These are the options you have while ...

Page 481: ...o record a new broadcast message press R 7 To erase the broadcast message press E 3 To exit this feature press the POUND key 132 133 There is no broadcast message To record a broadcast message press R 7 To exit this feature press the POUND key 133 134 There is _______ 134 There is one caller waiting ahead of you 135 The broadcast message has been erased 135 136 To listen to the welcome message for...

Page 482: ...r which left that message is not known 146 147 To record a reply press R E 7 3 147 148 If you wish you can record a comment at the tone and press the pound key when you are done Otherwise press only the POUND key 148 149 That number is restricted 149 150 Enter the mailbox number of the message recipient you wish to check on 150 151 All of your messages have been listened to 151 152 _______ message...

Page 483: ...ecause the destination mailbox did not accept the message 172 Enter the hour you wish notification to begin You must enter a two digit number followed by an A 2 for AM or a P 7 for PM For example Eight AM would be entered as 0 8 A To skip to the next setting press the STAR key To exit press the POUND key 172 173 Enter the hour you wish notification to end You must enter a two digit number followed...

Page 484: ...C 2 To exit press the POUND key 185 186 Please enter the override mailbox number 186 187 Please enter the tenant number for the broadcast message 187 188 These are the options you have while listening to a message To record a reply press R E 7 3 To have the message forwarded press M F 6 3 To make a call to the sender of the message press M C 6 2 To exit the listen mode press the POUND key To hear ...

Page 485: ... To exit this feature press the POUND key twice 191 192 Please enter the mailbox number for the Welcome Message 192 193 The announcement message has been erased 193 194 Welcome to the Main Menu of features To listen to your messages press L 5 To record and send a message press R S 7 7 To check on a message you sent press C M 2 6 To record a greeting for your mailbox press G 4 To record a name for ...

Page 486: ... _______ caller waiting ahead of you 215 There is one caller waiting ahead of you 216 Recording has been paused To continue recording press the STAR key To end recording press the POUND key For a complete list of recording options press 0 216 217 _______ callers waiting ahead of you 217 There are two callers waiting ahead of you 218 You have reached the recording limit To listen to the message you...

Page 487: ...ur mailbox To save the message press S A 7 2 To listen to the next message press L 5 To exit the listen mode press the POUND key For a complete list of listening options press 0 228 229 The message has been saved To erase the message press E 3 To listen to the next message press L 5 To exit the listen mode press the POUND key For a complete list of listening options press 0 229 230 To listen to th...

Page 488: ...ts 253 ___ 23 253 Used as trailing digits 254 ___ 24 254 Used as trailing digits 255 ___ 25 255 Used as trailing digits 256 ___ 26 256 Used as trailing digits 257 ___ 27 257 Used as trailing digits 258 ___ 28 258 Used as trailing digits 259 ___ 29 259 Used as trailing digits 260 ___ 30 260 Used as trailing digits 261 ___ 31 261 Used as trailing digits 262 ___ 32 262 Used as trailing digits 263 ___...

Page 489: ...answering schedule override off press O 6 To change the override mailbox press C 2 To go to another tenant press the POUND key To exit this feature press the POUND key twice 282 283 The paging message is ON 283 284 The paging message is OFF 284 285 The message has not been recorded because it is too short 285 286 You have not entered enough letters 286 287 double beep tone 287 288 _____press _____...

Page 490: ...lbox press the POUND key To exit this feature press the POUND key twice 302 303 To record prompt number one press R 7 To go to another interactive mailbox press the POUND key To exit this feature press the POUND key twice 303 304 Please note the reference number for your call is _______ 304 number for your call is 4321 305 Please enter the mailbox number for the interactive prompts 305 306 To sele...

Page 491: ... press S V 7 8 To prepare the system for power down press P D 7 3 To exit this menu press the POUND key 315 316 30 seconds of silence 316 317 There is no Welcome Message recorded for that mailbox 317 318 There is no Instruction Menu recorded for that mailbox 318 319 The message has been copied 319 320 The message is being copied Please wait 320 321 Please enter the number of the mailbox containing...

Page 492: ...re press the POUND key 331 332 The message will be delivered on _______ 332 delivered on the 25th of June 333 To listen to the Directory Dialing Message press L 5 To record a new Directory Dialing Message press R 7 To copy the Directory Dialing Message from another mailbox press C 2 To erase the Directory Dialing Message press E 3 To go to another Directory Dialing Message mailbox press the POUND ...

Page 493: ...irm system shutdown 345 346 All Voice Mail ports are idle 346 347 Activity has been detected in the Voice Mail system To allow the activity to cease before shutting down press A 2 To shut down immediately press I 4 To cancel the shut down press the POUND key 347 348 Starting shut down Please stay on the line until notified that shutdown is complete 348 349 Shut down of the Voice Mail system has be...

Page 494: ... pressing P 7 will enter a non monitored pause into the dial string Similarly you may press or to enter the star or pound keys into the string To skip to the next setting press only the STAR key To exit this feature press only the POUND key 362 363 This message arrived on _____ 363 arrived on the tenth of March 364 _____ an unknown caller 364 The message is from an unknown caller 365 Please enter ...

Page 495: ... nineteenth of December 390 _____ the Twentieth _____ 390 Date it the twentieth of December 391 _____ the Twenty first _____ 391 Date it the twenty first of December 392 _____ the Twenty second _____ 392 Date it the twenty second of December 393 _____ the Twenty third _____ 393 Date it the twenty third of December 394 _____ the Twenty fourth _____ 394 Date it the twenty fourth of December 395 ____...

Page 496: ...22 Time now 12 20 PM 423 _____ one _____ 423 Time now 1 00 PM 424 _____ two _______ 424 Time now 2 00 PM 425 _____ three _____ 425 Time now 3 00 PM 426 _____ four _____ 426 Time now 4 00 PM 427 _____ five _____ 427 Time now 5 00 PM 428 _____ six _____ 428 Time now 6 00 PM 429 _____ seven _____ 429 Time now 7 00 PM 430 _____ eight _____ 430 Time now 8 00 PM 431 _____ nine _____ 431 Time now 9 00 PM...

Page 497: ...press only the POUND key 451 452 I m sorry You did not enter a complete extension number 452 453 You entered extension number _____ 453 You entered Extension Number 222 454 Your FAX order will be sent shortly Thank you for calling 454 455 To receive the documents you have requested press the START key on your FAX machine when you hear the tone 455 456 Ready 456 457 A security code is required to c...

Page 498: ...s of the person s name then press the POUND key To enter a Q or Z press 1 To cancel this directory selection press only the POUND key 472 Please enter 2 or more letters 473 You may enter the names of up to ten mailboxes to receive this message To enter a mailbox name press N 6 To specify recipients by their mailbox numbers press N To erase the message press the STAR key twice 473 474 Analyzed Dial...

Page 499: ...essage notification group is enabled and it is active from ____ 489 it is active from 10 AM 490 The Third notification group is enabled To disable the Third group press D T 3 8 To exit press the POUND key 490 491 Please select the message notification group that you would like to review or modify For the First notification group press F 3 For the Second notification group press S 7 For the Third n...

Page 500: ...513 You have 2 new messages and 1 saved message 514 You have no messages 514 515 You have one new message _____ 515 and 3 held messages 516 You have one new message 516 517 You have one held message _____ 517 and 1 saved message 518 You have one held message 518 519 You have one saved message 519 520 _____ new messages _____ 520 You have new messages and 1 saved message 521 _____ new messages 521 ...

Page 501: ...it the listen mode press the POUND key For a complete list of listening options press 0 533 534 The message has been saved To erase the message press E 3 To listen to the next new message press L 5 To exit the listen mode press the POUND key For a complete list of listening options press 0 534 535 The message has been saved To erase the message press E 3 To listen to the next held message press L ...

Page 502: ...igits 560 ___ 60 560 Used as trailing digits 561 ___ 61 561 Used as trailing digits 562 ___ 62 562 Used as trailing digits 563 ___ 63 563 Used as trailing digits 564 ___ 64 564 Used as trailing digits 565 ___ 65 565 Used as trailing digits 566 ___ 66 566 Used as trailing digits 567 ___ 67 567 Used as trailing digits 568 ___ 68 568 Used as trailing digits 569 ___ 69 569 Used as trailing digits 570 ...

Page 503: ... POUND key 600 601 Auto Time Stamp is OFF To turn Auto Time Stamp ON press O 6 To exit this feature press the POUND key 601 602 Auto Forward is OFF To turn Auto Forward on press O 6 To exit this feature press the POUND key 602 603 Auto Forward is ON 603 604 The Auto Forward recipient is mailbox number _____ 604 mailbox number 355 605 To turn Auto Forward OFF press O 6 To change the Auto Forward ma...

Page 504: ...ss I 4 to re enter the number Or to cancel this mailbox selection and choose a different recipi ent press the STAR key 616 617 These are the options you have while listening to a recording To back up then continue listening press B 2 To back up to the beginning and listen press B G 2 4 To go forward then continue listening press G 4 To pause while listening press the STAR key To continue listening...

Page 505: ...ess V D 8 3 To restore the volume to normal press V N 8 6 To exit your mailbox press X 9 619 620 These are the options you have while recording a message To back up then continue listening press B 2 To back up to the beginning and listen to the recording press B G 2 4 To pause while recording press the STAR key To continue recording after a pause press the STAR key To erase the message you recorde...

Page 506: ...n plural form Two billion 636 One ____ 636 One hundred twenty 637 One ____ 637 One thousand twenty five 638 _____ at _____ 638 Needed only for Spanish The 5th of May at 10 00 639 The first hard disk in your voice mail system has failed Hard disk mirroring has been turned off Please replace the first hard disk with a functioning one and turn on hard disk mirroring 639 640 The second hard disk in yo...

Page 507: ...ess the POUND key 649 650 The message will be erased when you exist your mailbox To listen to the next message press L 5 To exit the listen mode press the POUND key For a complete list of listening options press 0 650 651 The guest you are trying to reach is not available Please leave a private message at the tone or press 0 to ring the hotel operator 651 652 Please enter the time for your Wake up...

Page 508: ...ess O P 6 7 To exit press X 9 To ring the hotel operator press 0 666 667 To listen to your messages press L 5 667 668 _____ notifying you only of Urgent messages _____ 668 669 These are the options you have while listening to a message To hear the time date and sender of the message press T I To save the message press S A 7 2 To erase the message press E 3 To listen to the next message press L 5 T...

Page 509: ...ked as Confidential 674 675 Start recording your Urgent message at the tone When you are done press the POUND key or hang up 675 676 Start recording your Confidential message at the tone When you are done press the pound key or hang up 676 677 The message has been marked as Confidential 677 678 The message has been marked as Urgent 678 679 The following Urgent message was returned to you because t...

Page 510: ...ird Notification Group press T 8 For none press the STAR key Or to exit without changing the original order press the POUND key 693 694 For the Second Notification Group press S 7 For the Third Notification Group press T 8 For none press the STAR key Or to exit without changing the original order press the POUND key 694 695 For the First Notification Group press F 3 For none press the STAR key Or ...

Page 511: ...ication calls Enter a string of up to 30 digits then press the POUND key To enter special dialing codes press the STAR key followed by the desired code letter For example pressing P will enter a non monitored pause into the dial string Similarly you may press or to enter the STAR or POUND keys into the string To exit this feature press only the POUND key 703 704 The delay time in minutes before th...

Page 512: ...agers is 222 717 Enter a string of up to 12 digits then press the POUND key To clear the Digital Pager Callback string press 0 Or to exit this feature press the POUND key 717 718 No Message Notification callback number for digital pagers has been programmed Enter a string of up to 12 digits then press the POUND key Or to exit this feature press the POUND key 718 719 During a message notication cal...

Page 513: ... this feature press only the POUND key 729 730 There is currently no limit on periods of recorded silence To limit recorded silence enter a value from 2 to 30 tenths of a second for the longest allowable period of recorded silence Then press the POUND key To exit this feature press only the POUND key 730 731 Please enter the number 1 or 2 or 3 of the Dial Action Table you wish to work on Or to ret...

Page 514: ...0 ___ Go to the caller dialed Mailbox 750 Key 1 is Go to the caller dialed Mail box 751 ___ Go to Mailbox ___ 751 Key 1 is Go to Mailbox 222 752 ___ Transfer to the caller dialed extension 752 Key 1 is Transfer to the caller dialed extension 753 ___ Transfer to Extension ___ 753 Key 1 is Transfer to Extension 321 754 ___ Unscreened transfer to the caller dialed extension 754 Key 1 is Unscreened tr...

Page 515: ... workday begins for this department enter the new time now You must enter a two digit number for the hour then a two digit number for the minute followed by an A 2 for AM or a P 7 for PM For example Noon would be entered as 1 2 0 0 P To erase the mid workday starting time press the STAR key To exit this feature press the POUND key 767 768 There is no mid workday starting time programmed for this d...

Page 516: ...ay For example Monday would be entered as M O 6 6 Or to exit this feature press the POUND key 774 775 To specify the day on which the workweek for this department ends enter it now by pressing the first two letters of the day For example Friday would be entered as F R 3 7 Or to exit this feature press the POUND key 775 776 If you are sure that you want to restore the default Department Schedule Ta...

Page 517: ...mpt following a completed non pager notification call press O K 6 5 To set the time to wait before the next callout attempt following a Ring No Answer non pager notification call press N A 6 2 To set the time to wait before the next callout attempt following a Busy notification call press B Y 2 9 To set the limit for the number of notification call attempts press C L 2 5 To set the limit for the n...

Page 518: ...7 8 To select a mid workday time to change call routing for the selected department press A T 2 8 To specify the ending time of each workday in the selected department press E T 3 8 To define the days in the workweek press D W 3 9 To exit this feature press the POUND key twice 796 797 Welcome to the Main Menu of features To listen to your messages press L 5 To record and send a message press R S 7...

Page 519: ...ll previously recorded messages will be erased when the data compression rate is changed 807 808 WARNING All Voice Mail parameters will be reset to their default values if the system is reinstalled Also all previously recorded messages will be erased Your security code is required in order to initiate reinstallation 808 809 System Installation parameters may not be modified from this mailbox Only ...

Page 520: ... mailbox press only the POUND key To exit this feature press the POUND key twice 824 825 The Announcement mailbox is currently programmed to hang up after playing its message To disable the Hang Up option press D 3 To go to another Announcement Mailbox press the POUND key To exit this feature press the POUND key twice 825 826 The Hang Up option for this Announcement mailbox is currently disabled T...

Page 521: ...r a new Department Schedule Table number from 1 through 4 or press the STAR key for NONE Then press the POUND key Or to go to another mailbox press only the POUND key To exit this feature press the POUND key twice 837 838 This Trunk mailbox is not currently using a Department Schedule Table Enter a Department Schedule Table number from 1 through 4 Then press the POUND key Or to go to another mailb...

Page 522: ...currently permitted to use outside lines for Message Notification calls To limit the mailbox to internal numbers press I 4 To go to another mailbox press the POUND key To exit this feature press the POUND key twice 849 850 This mailbox is currently limited to using only internal numbers for Message Notification calls To allow outside lines to be used press O 6 To go to another mailbox press the PO...

Page 523: ...for the next notification callout following a busy attempt is ____ 863 following a busy attempt is 10 864 Enter a new delay time from 1 to 999 minutes then press the POUND key Or to exit this feature press only the POUND key 864 865 The trunk access dial string for long distance notification calls is ___ 865 notification calls is 321 866 Enter a string of up to 30 digits then press the POUND key T...

Page 524: ... press the POUND key 871 872 The Second Message Notification Call Type is LONG DIS TANCE To change it to INTERNAL press I N 4 6 To change it to LOCAL press L O 5 6 To leave the call type unchanged press the STAR key To exit this feature press the POUND key 872 873 The Third Message Notification Call Type is INTERNAL To change it to LOCAL press L O 5 6 To change it to LONG DISTANCE press L D 5 3 To...

Page 525: ...s the POUND key twice 877 878 unused 878 879 To return to the Initialization Menu press only the POUND key 879 880 The Voice Mail is currently configured for connection to phone system number ____ 880 phone system number 4 881 The Voice Mail is currently configured for connection to phone system type ____ 881 phone system type 20 882 ____ and will optimize data compression to favor message sound q...

Page 526: ... Belgian and go to Mailbox 222 This represents the language of choice in a polyglot nation 902 ____ Use Dutch and go to mailbox ____ 902 Key 1 is Use Dutch and go to Mailbox 222 903 ____ Use Swiss and go to mailbox ____ 903 Key 1 is Use Swiss and go to Mailbox 222 This represents the language of choice in a polyglot nation 904 ____ Use Japanese and go to mailbox ____ 904 Key 1 is Use Japanese and ...

Page 527: ...om number of the guest who is to receive the Wake up call 920 921 Please enter the time for the Wake up call You must enter a two digit number for the hour then a two digit number for the minute followed by an A 2 for AM or a P 7 for PM For example 8 05 AM would be entered as 0 8 0 5 A To re enter the time if you make a mistake press the STAR key To exit this feature press the POUND key 921 922 Th...

Page 528: ...ailbox Options menu To record a Greeting for your mailbox press G 4 To record a Name for your mailbox press N 6 To change your security code press S 7 To exit this menu press the POUND key 942 943 Welcome to the Mailbox Options menu To record a Greeting for your mailbox press G 4 To record a Name for your mailbox press N 6 To exit this menu press the POUND key 943 944 To add room numbers to the di...

Page 529: ...be checked out 960 961 Enter the room number to be moved 961 962 What is the new room number 962 963 Room ___ 963 964 ___ will be moved to ___ 964 965 The move has been completed 965 966 ___ is already checked in 966 Room 302 is already checked in 967 The Wake up call has failed 967 968 Any messages for that guest will be erased if the check in is repeated To continue the check in process press C ...

Page 530: ...ure press the POUND key 977 978 Please leave a private message at the tone or press 0 to ring the hotel operator 978 979 Please enter the network mailbox number then press the POUND key Or to exit this feature press the STAR key 979 980 If the mailbox number is correct press C 2 If it is incorrect press I 4 to re enter the number To exit this feature press the STAR key 980 ...

Page 531: ...ence explained in the Windows NT Server Version 4 0 sec tion on the next page whenever any of the following must be reloaded Q Windows NT Server Q Peripheral device drivers Q Remote Access Server Q Utilities Q Voice Mail Server Since the NT Voice Mail is shipped from the factory as a turn key product this procedure is required only if the hard drive needs to be replaced However if you are only upd...

Page 532: ...capacity in one partition with NTFS by temporarily installing the new hard disk as a second drive formatting it with the NT Disk Administrator program move the hard disk to the computer on which you are installing the Voice Mail soft ware and then start the NT setup procedure However skip the hard disk formatting step because the hard disk is already formatted Q For the setup the Windows NT server...

Page 533: ... the next screen 7 On the window asking about the desired hard drive partitioning a Press C for Create the Partition b Enter 4095 for size of the partition c Press the Enter key d Press the Enter key again to install VoiceSupport uses the maximum NTFS partition size allowed for the C drive which is 4 GB and uses the NTFS format 8 To proceed with formatting Select Format the partition using the NTF...

Page 534: ...for This computer will participate on a network and Wired to a network will remain unchanged 24 At the window asking if you want to install the Internet Information Server IIT Remove the check from the Install Microsoft Internet Information Server box and click the button 25 At the window prompting you for information about the Network Adapter card a Click the Start Search button b If the Network ...

Page 535: ...the button This window allows the installer to examine the network bindings for the installed services and rearrange their priorities if required 34 On the window telling you that it is ready to start the network Click the button 35 On the window asking you whether the computer you named in an earlier step should be a member of a workgroup or a domain Enter the proper response after onsulting the ...

Page 536: ...e boot sequence to CD ROM C A 3 Insert the Windows NT Installation CD ROM into the CD ROM drive 4 Exit the BIOS setup program The computer will boot from the CD ROM and the Windows NT setup will begin 5 After Windows NT is installed change the BIOS setup so that the boot sequence is C CD ROM A The Logon Information window will be displayed Now you can logon to the system as the Administrator After...

Page 537: ...r of the drive where the modem driver is located and click the button OR Click the button to locate the inf files and click the button 7 On the next screen Select the name of the modem that is installed in the computer and click the button 8 On the next screen Click the radio button for Selected Ports Select COM2 Click the button 9 On the Location Information window Select from the scroll down lis...

Page 538: ...nd click the button 6 On the Locate File window Double click the NT40 folder and then the S3 file 7 Click the button on the Install From Disk window 8 Click the button on the Change Display window 9 On the Change Display window Double click the line that contains the driver for the installed video adapter such as Trio64V DX The diskette label shows the name of your VGA adapter Click the Yes button...

Page 539: ...RAS Device dialog box will be displayed The modem installed in the driver installation earlier in this procedure should appear in the RAS Compatible Devices window 10 Click the button on the dialog box 11 Click the Network button on the Remote Access Setup dialog box 12 On the Network Configuration window Make sure that the NetBEUI and TCP IP check boxes are checked Click the Configure button at r...

Page 540: ...er Service Pack 5 1 Insert the NT Service Pack 5 CD ROM in the CD drive The Autostart program should display an installation instruction document 2 Click the Install Service Pack 5 hyperlink line in the left column 3 If you see a Confirm File Open dialog box Click the button 4 Uncheck the Backup files necessary to uninstall this service pack at a later time check box 5 Check the Accept the License...

Page 541: ...e Windows Explorer 4 01 SP1 Active Setup for Windows Desktop Update window Click the No radio button for Windows 95 Standard Interface and click the button 9 On the Active Channel Selection window Select from the scroll down list the country where the Voice Mail system is located and click the button 10 Click the button on the Destination Folder window 11 Wait for the files to be copied when you s...

Page 542: ...res check box Click the DialIn button 4 On the DialIn Information window Check the Grant dialin permission to user check box and click the button 5 Click the Groups button 6 On the Group Memberships window Select Administrators in the Not Members of list and click the button 7 Click the button on the New User window and then close the window 8 Click User on the menu bar and select Exit on the User...

Page 543: ...ome window Click the button 11 On the License Agreement window Click the Yes button to continue 12 Click the button to accept the default value for Destination Location 13 To install all of the components of the InstaNT suite Click the Typical radio button 14 Click the Next button to accept the default Program Folder Setup will copy the files from the CD 15 On the Information dialog box that says ...

Page 544: ...g connection on startup Do not check the check box for Allow multiple instances Click the button 7 Select the Yes button on both the dialog box warning you about hiding the application window and on the Confirm dialog box 8 If you see a dialog box that says Your system must be restarted Restart now Select the No button You will restart the system later 9 Click File on the menu bar and select Edit ...

Page 545: ... the right arrow key to dehighlight this comman line press the space bar once to insert a space after the quotation mark ending the string and enter logoff so that the command line will look like this C program files raxco instanNT remotely possible rp32u exe logoff Then click the button The hidden REMOTELY POSSIBLE program will now shut down To restart the Remotely Possible Configuration Screen 1...

Page 546: ...he button 4 On the Registration window Enter your initials in the Name box and your company name in the Company box Click the button 5 On the Setup Options window Click the COMPACT 22 MByte button 6 Click the button on the Destination Location window the Program Group Folder window and the Setup Options Summary window The Installation program will copy files from the CD ROM onto the hard disk 7 On...

Page 547: ... 41H board window Select d0000 for Address To set D41DInterrupt to 5 Highlight D41DInterrupt and select 5 from the Value list on the Edit info box Click the button 6 If there is more than one D 41H board the remaining boards must be added and then config ured Give a unique name to each board that is added and configured but all boards must use the same D41Dinterrupt number 7 Click to select the MI...

Page 548: ...en asked to check for a new version 6 On the Contact Information window Enter your name in the Name box Enter your e mail address in the Email box Enter your phone number including the area code in the Phone box Click the button 7 Click on the Register radio button and click the Enable button Enter your Serial Number in the Serial Number box Enter Authorization Code and Autho rization Code box Cli...

Page 549: ...e button 4 Click on the Seattle Lab RemoteNT icon 5 On the Security Alert window Click the In the future do not show the warning for this zone check box Click the Yes button 6 Click on the RemoteNT icon right below the Click on a product to administer line 7 Click the Fullscreen icon on the toolbar to maximize the displayed screen The Welcome page will display several setup options across the top ...

Page 550: ... question on the displayed DOS window as follows and press the Enter key after each entry or to select the default value 4 When prompted to press any key to continue Press the space bar How many fax voice channels do you want to support 16 default What interrupt line will the ISA fax board use 10 What DMA channel will the ISA fax board use 1 not used Kernel buffer size 8192 default Kernel interrup...

Page 551: ...og box asking if you want to create this folder Click the Yes button 5 Read the instructions on the next Setup dialog box Click the button Microsoft Data Engine To install the Microsoft data engine 1 If the Setup menu is not displayed Click the button and select Run On the Run dialog box Enter e setup in the Open box and click the button 2 Select MSDE on the Setup menu and click the button The fil...

Page 552: ...alog box Enter e setup in the Open box and click the button 2 Select MSDE Service Pack 1 on the Setup menu and click the button 3 Click the button on the Welcome window 4 On the Software License Agreement window Read the agreement and click the Yes button 5 On the Connect to Server window Select the SQL Server authentication button leave the Password box alone and click the button There will be a ...

Page 553: ...tup menu and click the button 3 When asked if you wish to continue Click the Yes button The files will be copied to the hard drive 4 Click the Yes button when asked if you want to continue the setup 5 On the HASP Device Driver Status window Click the button 6 On the Setup Option window Click the Typical icon for the setup type 7 Click the button on the ConfirmYour Selection window The files will b...

Page 554: ...ic prompt says 7 7 9 On the Select VM Disks window For each disk listed select the letter of the drive you want to use from the scroll list or select None if you don t want to use one of the four listed disks The Voice Mail can use up to 4 hard disks to store Voice Mail messages For Second Select D drive from the scroll down list if the first hard drive was partitioned into both a C drive and a D ...

Page 555: ...ected 14 Remove all floppy disks and CD ROMS from the drives Click the button Feature Files and Dongle Both the the feature files and the dongle must be installed in order for the Voice Mail Service pro gram to run Since the specific feature files and the specific serialized dongle are linked to each other they must both be installed on the same computer To install the feature files and dongle 1 I...

Page 556: ...e box VMServer is the name used by CTL Enter crossroad the password user by CTL in the Password box Enter crossroad in the Confirm Password box Uncheck the User Must Change Password at Next Logon check box Check the Password Never Expires check box Click the Groups button 4 On the Groups Membership box Select Administrators on the Not Members of list Click the button and then the button 5 On the N...

Page 557: ...am 6 To configure this program Click the button Select Run Enter DCOMCNFG in the Open box Click the button 7 On the Distributed COM Configuration Properties window Select the Default Protocols tab select TCP IP Protocol and click the MoveUp button twice to move TCP IP Protocol to the top of the list This is needed if the Voice Mail GUI is running on a Windows 95 computer 8 Select the Applications ...

Page 558: ...k the Add button and the Show Users button select VmServer on the scroll down list click the button again and then the button to add the user account name that the VMService is running This is the same user account as you entered into the Voice Mail item in the Service Control Panel Note that your account must have configuration permission to make these changes 17 Click to select the Identity tab ...

Page 559: ...and allowing full access to that drive by the Voice Mail s domain account If you are running the configuration GUI on a client computer that is not the computer on which the Voice Mail Service is running and if you wish to view reports the account name of the user of the client computer must be given access permission to the share name of the c disk drive of the Voice Mail computer The account nam...

Page 560: ... the Services window Scroll down the list select VMService and click the Start button The Status for VMService should change to Started 4 Close the Services and Control Panel windows 5 Double click the VoiceSupport NT Configuration Program icon on the desktop 6 On the Voice Mail Service Location window Click the box near the WORKGROUP icon Click the box near the VOICESUPPORT icon Click the c drive...

Page 561: ...e Mail Service must run in a user account in the domain and the client that wants the backup must give permission to the user account of the Voice Mail Service This is done by giving a share name such as c drive to the disk drive on the client computer and allowing full access to that drive by the Voice Mail s domain account as follows 1 Double click the My Computer icon on the desktop 2 Right cli...

Page 562: ...of the domain to which the Voice Mail Server belongs from the List Names From list Click the button Select Full Control from the Type of Access list Click the button 8 On the Access Through Share Permissions window the New Share window and the C Properties Click the button 9 Close the My Computer window To allow multiple users to access Voice Mail database at same time To protect the integrity of ...

Page 563: ...ns are in the wrong place or missing run the supplied program VSCLIENT PROGRAMS 40COMUPD EXE in order to install the latest version of ComCt132 dll The client computer must be logged into a user account in the domain which allows access to the Voice Mail Service running on the Voice Mail server The client user account must be a member of the predefined domain group VMServiceGroup in a predefined d...

Page 564: ...on 8 Right click the C icon 9 On the drop down menu Select Sharing 10 On the C Properties window Select the Sharing tab Click the Shared As radio button Enter C DRIVE in the Share Name box and click the button 11 On the Add Users window Select VMServer from the scroll down Name list Click the Full Access button and then the button 12 Close the My Computer window 13 Insert the NT Installation CD RO...

Page 565: ...account Now to continue to enable backup restore 1 Double click the My Computer icon on the desktop 2 Double click the Control Panel icon on the My Computer window 3 On the Control Panel window Double click the Passwords icon 4 On the Passwords Properties window Click to select the Remote Administration tab 5 On the Remote Administration tab Click the button 6 On the Choose Administrators window S...

Page 566: ... override this protection do the following from the Client Computer 1 Click the button Select Run 2 On the Run window Click the button 3 On the Browse window Double click the Program Files folder Double click the CTLInc folder Double click the NT Configuration Program folder Select All Files from the Files of type list Double click the VMDBUnlock icon 4 Click the button on the Run windowand the Re...

Page 567: ... running on the Voice Mail server The client user account must be a member of the predefined domain group VMServiceGroup in a predefined domain name For the domain name see the second bullet in Step 9 of the Installing Service Software Program on page 526 The user must use this account name in that domain to log in Then the client will have access to the Voice Mail program on the server after you ...

Page 568: ...ense Agreement dialog box Read the message on the dialog box and click the button The Install Type dialog box will now be displayed 7 On the Install Type dialog box Click to select the Upgrade radio button and then click the button 8 On the Select Components dialog box a Click to insert a in the Fax Feature check box to enable the Fax On Demand software only if a Fax board is installed in your Voi...

Page 569: ...utton 6 On the Disk Administrator window Right click the cross hatched Free Space area and select Create Extended on the drop down menu 7 On the Create Extended Partition window Click the button to accept the maximum default size 8 On the Disk Administrator window Right click the cross hatched Free Space area and select Create on the drop down menu 9 On the Create Logical Drive window Click the OK...

Page 570: ... Mail system Click the Schedule button 3 Click to select the Daily tab 4 On the Daily tab Select a time for disk defragmentation to begin when the Voice Mail system is not fully loaded with traffic such as 2 AM Then click the button for the schedule 5 On the Raxco PerfectDisk NT window Click the button to save the changes to the profile 6 On the Confirm dialog box Click the Yes button 7 Click File...

Page 571: ...203 926 5444 Customer Service FAX 203 926 5454 Technical Service 203 925 8801 Discontinued Product Service 900 990 2541 Technical Training 203 926 5430 Emergency Technical Service After Hours 203 929 7920 Excludes discontinued products Nitsuko Canada Division of Nitsuko America 165 Matheson Blvd East Unit 4 6 Mississauga Ontario L4Z 3K2 TEL 905 507 2888 FAX 905 507 2971 ...

Reviews: