Customizing Mailbox Options
170
NT System Guide
Chapter 3: Programming
Creating and Accessing Mailboxes (cont’d)
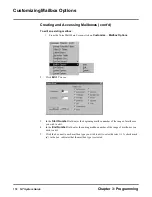
6.
Click
OK
button to save your selections and return you to the Voice Mail’s Main Screen.
If your newly created mailbox was successful, you will see a confirmation box similar to
the one shown below:
7.
Click
Yes
to continue. Or, click
No
to cancel. If you clicked
Yes
, and your mailbox(es)
were added successfully, you see a screen similar to the following:
Summary of Contents for NVM-NT
Page 28: ...Table of Contents Chapter 5 Maintenance xxvi NT System Guide ...
Page 130: ...Installing SMDI 102 NT System Guide Chapter 3 Programming ...
Page 146: ...Customizing Caller I D Tables General Tab 118 NT System Guide Chapter 3 Programming ...
Page 156: ...Customizing Callout Options Optional Tab 128 NT System Guide Chapter 3 Programming ...
Page 182: ...Customizing Distribution Lists General Tab 154 NT System Guide Chapter 3 Programming ...
Page 338: ...Customizing Port Options General Tab 310 NT System Guide Chapter 3 Programming ...
Page 358: ...Customizing System Options Timers Tab 330 NT System Guide Chapter 3 Programming ...
Page 362: ...Customizing System Options Timers Tab 334 NT System Guide Chapter 3 Programming ...
Page 367: ...Customizing Tenant Options General Tab Chapter 3 Programming NT System Guide 339 ...
Page 396: ...Viewing and Printing Reports System Options Report 368 NT System Guide Chapter 3 Programming ...
Page 400: ...Performing a Local Backup Backup Dialog Box 372 NT System Guide Chapter 3 Programming ...
Page 440: ...Using Port Activities 412 NT System Guide Chapter 3 Programming ...
Page 454: ...Using Message Status Message Status Dialog Box 426 NT System Guide Chapter 3 Programming ...

