4
INSTRUCTIONS FOR
THIS TOOL
About Your Tool
WARNING
●
Wear protective glasses and a dustproof mask
Operation generates chips and dust particles, etc.
which may cause eye and/or respiratory injury.
Always use PPE (Personal Protective Equipment)
for eye and respiratory protection.
●
Always turn off the air supply and disconnect the
air supply hose beforehand whenever replacing
Abrasive Papers.
●
Be sure to keep hands clear of moving parts.
●
Air pressure at the sander inlet must not exceed
0.6 MPa.
●
Always replace damaged, bent or severely worn
Pads.
Do not use a Pad that has been subjected to an
Abrasive Paper failure.
●
Avoid grinding at pad edge or banging pad edge
against work material or other object, as this can
shorten tool life.
1. USAGE
This tool is for sanding workpieces using Abrasive
Paper.
2. CHECK THE CONTENTS OF THE PACKAGE
Check the contents and make sure that the tool
does not have any damage which may have
occurred during transportation. The contents should
correspond to the list as follows. In case of damage/
missing parts, please contact the sales agent from
whom you purchased the tool.
FS-100C
Package Contents
Qty
Check
FREE SANDER FS-100C
1set
Air Hose H Ass'y
1set
Bushing R1/4 x NPT1/4
1
Abrasive Paper #180
5
Abrasive Paper #240
5
Instruction Manual
1
Declaration of Conformity
1
Caution for Use
1
FS-50A
Package Contents
Qty
Check
FREE SANDER FS-50A
1set
Air Hose H Ass'y
1set
Bushing R1/4 x NPT1/4
1
Abrasive Paper #180
5
Abrasive Paper #240
5
Instruction Manual
1
Declaration of Conformity
1
Caution for Use
1
3. AIR SUPPLY
3-1. Air Pressure
Adjust air pressure with the air regulator to the
appropriate level for the pneumatic tool used.
Air pressure that is too low will stop the tool from
operating at full capacity.
Air pressure that is too high may cause damage to
the tool.
3-2. Air Line
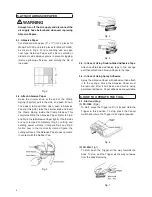
(Fig.1)
Use a 9.5 mm (3/8") I. D. connecting hose between
the compressor and the tool.
Drained water, etc., if flown into the tool, could
cause tool failure. Install an air filter between the
compressor and the tool.
ג͚
ͺ͑͟͵͟
Fig. 1
3-3. Lubrication
Install an oiler between the compressor and the tool.
Use the machine oil ISO VG-10. Failure to lubricate
as required may result in damage to the tool. Use of
oil that is too thick will reduce the performance of the
tool.
4. PREPARATIONS
4-1. Thread Size of Hose Fitting
The product comes with a metal fitting with
Rc(metric) thread. Connect the Bushing R thread x
NPT thread included as standard accessories, if you
would like to have American NPT thread instead.
Summary of Contents for FS-100C
Page 11: ......


