background image

16

EN

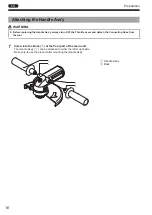
Attaching the Handle Ass'y

 WARNING

Before replacing the Handle Ass'y, always turn OFF the Throttle Lever and detach the Connecting Hose from 

the tool.

Screw into the Boss (

2

) at the front part of the main unit

The Handle Ass'y (

1

) can be attached to either the left or right side.

Make sure to use the product after mounting the Handle Ass'y.

1

2

1
2

1

 Handle Ass'y

2

 Boss

Preparation

TQ15277-0̲MYG-70̲en.indb   16

2017/08/07   13:23:45

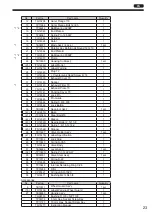
Summary of Contents for MYTON MYG-70

Page 1: ...et Rc 3 8 1 Based on the ISO15744 measurement standard 2 Based on the 3 axes combined value measurement standard of the ISO28927 1 of the hand held tool frequency correction vibration acceleration effective value Please read manual carefully before you attempt to use your tool so that you may use it properly and safely Keep the manual handy so you can use it whenever necessary Due to continuous pr...

Page 2: ...l den danske distributør for instructions manualer Polish Prosze pytac swojego dealera lub dystrybutora o instrukcje obslugi w jezyku localnym 中文 請向當地供應商或經銷商詢問中文使用說明書 The following Safety notations are used throughout the manual to highlight safety precautions for the user and for the tool WARNING Indicates a potentially hazardous situation which if not avoided by following the instructions given ...

Page 3: ... approved safety equipment such as those dust masks that are specially designed to filter out microscopic particles Contents Precautions on Use Make sure to follow the instructions given 2 General Power Tool Safety Warnings 2 General Pneumatic Tool Safety Warnings 5 Safety Warnings for PNEUMATIC GRINDER 5 Product Specific Safety Rules 10 1 Application 12 2 Checking Inside the Package 12 3 Part Nam...

Page 4: ...collector can reduce risk caused by dust When loud noise is generated in the workplace wear a hearing protection Do not overreach Keep proper footing and balance at all times Be on your guard when working Do not use the tool when you are tired When you use the tool be sure about the handling method how to work and pay sufficient attention to the surrounding environment Never touch the tip of movin...

Page 5: ... Perform inspection before using the tool Before using the tool check for loose screws on the tool and for damage on the protective cover or other parts and make sure that the tool operates normally and demonstrates prescribed functions Check the position adjustment and tightening status of moving parts parts damage attachment status and all other locations for issues that could affect operation F...

Page 6: ...ections Sufficiently check for damage on accessories or other parts that the tool operates normally and that work can be performed appropriately If there are accessories or parts that have been damaged or could hinder work request repair from the retailer where you purchased the tool or the nearest NITTO service member store Request repair from a dedicated store For repair or replacement of parts ...

Page 7: ...ctricity to touch the tool CAUTION Handle the tool with care Rough handling could cause accidents or malfunctions Do not exert an impact on the tool by throwing or dropping it Handle the Connecting Hose with care Do not carry the tool by holding the Connecting Hose and do not pull the Connecting Hose to remove it Safety Warnings for PNEUMATIC GRINDER The following warnings are those required to be...

Page 8: ...not kept away from the tool and its accessories Operating Hazards WARNING Avoid contact with the rotating spindle and mounted wheel to prevent cutting of hands and other body parts Use of this tool can expose the operator s hands to hazards including cuts abrasions and burns Wear suitable gloves to protect hands Operators and maintenance personnel shall be physically able to handle the bulk weight...

Page 9: ...the abrasive product is correctly mounted and tightened before use and run this tool at no load speed for at least 1 minute in a safe position stop immediately if considerable vibration or other defects are detected and determine the cause of these defects Prevent the spindle end from touching the bottom of the hole of cups cones or plugs with threaded holes intended to be mounted on machine spind...

Page 10: ...lations Working with certain materials creates emissions of dust and fumes causing a potentially explosive environment Noise Hazards WARNING Exposure to high noise levels can cause permanent disabling hearing loss and other problems such as tinnitus ringing buzzing whistling or humming in the ears Therefore risk assessment and implementation of appropriate controls for these hazards are essential ...

Page 11: ...n is generally greater when the grip force is higher Use blotters when using the bonded abrasive product The vibration emission value in this manual is measured in accordance with ISO standards Since the real value may change depending on the work condition please use this tool with measurements in the actual condition Please don t operate beyond the time set by the region where the tool is used A...

Page 12: ...no abnormalities such as cracking chipping or excessive wear Do not use the tool if there is a slight abnormality such as a Grinding Wheel containing moisture damage loss etc of the display label Use our genuine Outer Flange Do not use Outer Flanges that are damaged bent or severely worn out Also do not use a substitute flange or flat washer Check that the Grinding Wheel is suitable for the Outer ...

Page 13: ...ake air pressure during operation of this tool should not exceed 0 6 MPa Do not abruptly operate or stop the tool When starting be sure to open the Throttle Lever or Valve Ring gradually When performing any work before attaching the Grinding Wheel be sure to use a tachometer to check the no load rotation speed of the tool Make sure the Valve Ring of the main unit is at the maximum rotation positio...

Page 14: ...u open the package box check the contents of the package and also check for any damage that may have occurred during transportation If an abnormality is found request service from the retailer where you purchased the tool or the nearest NITTO service member store Package content and accessories Quantity Check 1 MYG 70 main unit 1 2 Wheel Guard Ass y 1 3 Handle Ass y 1 4 6 mm Hex Socket Screw Key 1...

Page 15: ...13 EN 3 Part Names 1 2 3 4 5 6 7 1 Spindle Lock Button 2 Handle Ass y 3 Throttle Lever 4 Bushing 5 Wheel Guard 6 Driving Flange 7 Outer Flange ...

Page 16: ... 8 between the Compressor 1 and the tool 8 Compressed air exits the Compressor and cools and moisture condenses Some moisture could condense inside the Connecting Hose and get inside the tool causing a malfunction Install the Air Filter 2 and Lubricator 4 between the Compressor and the tool Machine oil Install a Lubricator between the Compressor and the tool and be sure to use machine oil ISO VG 1...

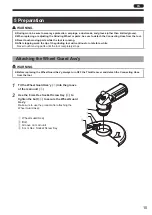
Page 17: ...ue to rotate for a while Never touch moving parts until the tool completely stops Attaching the Wheel Guard Ass y WARNING Before replacing the Wheel Guard Ass y always turn OFF the Throttle Lever and detach the Connecting Hose from the tool 1 Fit the Wheel Guard Ass y 1 into the groove of the main unit 3 2 Use the 6 mm Hex Socket Screw Key 4 to tighten the bolt 2 to secure the Wheel Guard Ass y Ma...

Page 18: ...the Throttle Lever and detach the Connecting Hose from the tool 1 Screw into the Boss 2 at the front part of the main unit The Handle Ass y 1 can be attached to either the left or right side Make sure to use the product after mounting the Handle Ass y 1 2 1 2 1 Handle Ass y 2 Boss Preparation ...

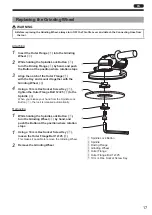
Page 19: ...ing Wheel 4 4 Using a 10 mm Hex Socket Screw Key 7 tighten the Outer Flange Bolt 12 25 6 to the Spindle 2 When you release your hand from the Spindle Lock Button 1 the lock is released automatically 1 2 3 4 5 6 7 1 Spindle Lock Button 2 Spindle 3 Driving Flange 4 Grinding Wheel 5 Outer Flange 6 Outer Flange Bolt 12 25 7 10 mm Hex Socket Screw Key Removing 1 While holding the Spindle Lock Button 1 ...

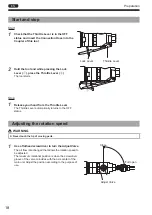
Page 20: ...m the Throttle Lever The Throttle Lever automatically returns to the OFF status Adjusting the rotation speed WARNING Never touch the tip of moving parts 1 Use a flathead screwdriver to turn the Adjust Valve The air flow rate changed that allows the rotation speed to be adjusted The maximum rotational position is when the screwdriver groove of the valve coincides with the axis center of the main un...

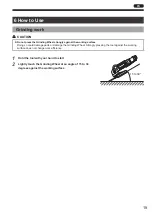
Page 21: ...ing surface Doing so could damage parts or damage the Grinding Wheel Strongly pressing the tool against the working surface does not change work efficiency 1 Hold the tool with your hand to start 2 Lightly touch the Grinding Wheel at an angle of 15 to 30 degrees against the working surface 15 to 30 ...

Page 22: ...rnings WARNING Avoid moisture and store the Grinding Wheel in a dry place When storing or handling observe the following items Do not expose to moisture Do not drop Do not expose to impacts Do not throw Do not step on Do not roll Maintenance and Inspection WARNING For maintenance and inspection be sure to detach the connecting hose from the tool Use genuine parts Never touch moving parts while the...

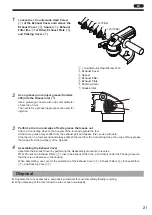
Page 23: ...he Coupler of the tool and operate the tool At that time grease may scatter from the exhaust part and Grease Inlet so use with care Stop the tool in a few seconds and always detach the tool from the Connecting Hose then wipe off any grease that seeps from the periphery of the Spindle 4 Assembling the Exhaust Cover Assemble the Exhaust Cover by performing the disassembly procedure in reverse MYG 70...

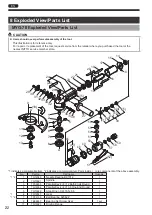
Page 24: ...25 27 26 28 29 30 31 32 32 33 34 35 36 37 44 38 39 46 48 49 50 57 51 58 59 53 54 55 56 9 10 40 41 47 52 42 43 45 A A 1 indicates a consumable item 2 indicates a commercial item Parts inside are components of the above assembly No Part no Part name Quantity 1 2 1 TQ12088 Needle Bearing BK1012 1 2 TQ15021 Spindle 1 3 TP09933 Parallel Key 4 4 12 Both Ends Round 1 4 TQ14906 Parallel Key 4 4 13 3 One E...

Page 25: ...de 1 37 TQ14864 Spring 0 6 6 9 8 1 38 TQ14866 Lock Button 1 39 TB10092 Governor Ass y 1 set 40 TQ12813 Base 1 41 TP01566 Steel Ball Ø6 3 42 TQ12067 Sleeve 1 43 TQ12090 Needle Roller 2 5 13 8 1 44 TQ12069 Spring 1 4 15 5 14 2 1 45 TQ12068 Stopper 1 46 TB10397 Valve Holder Ass y 1 set 47 TQ15276 Label Specification 1 48 TP17452 Lock Ring 1 49 TP17445 O ring S 35 5 1 50 TQ12662 Valve Body 1 51 TB0866...

Page 26: ......

Page 27: ......

Page 28: ... Lobby D Singapore 408564 Tel 65 6227 5360 Fax 65 6227 0192 NITTO KOHKI CO LTD Bangkok Representative Office M A Business Center Q House Convent Bldg 38 Convent Rd Silom Bangrak Bangkok 10500 Thailand Tel 66 2632 0307 Fax 66 2632 0308 NITTO KOHKI CO LTD India Liaison Office 3rd Floor Building No 9 A DLF Cyber City Phase III Gurgaon Haryana 122002 India Tel 91 124 454 5031 Fax 65 6227 0192 NITTO KO...

Reviews: