background image

7

side facing the Plate D by adjusting the Head, but 

impossible on the upper side facing the Plate C. For 

making a radius tangential line cutting on the upper 

side, conduct in a following manner.

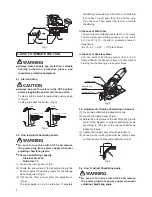
(1) Place the tool on workpiece with Plate C on upper 

surface of workpiece and Plate D on side surface, 

as indicated in Fig.9. Then, turn the Eccentric Ring 

to adjust the Indexable Inserts to cut properly side 

surface, and conduct the first cut. (see Fig.10)

(2) Next, placing Plate C onside surface and Plate D 

on upper surface, conduct the second cut.

(3) In this case, slight seam may be left in center of 

chamfered surface. (Fig.11)

Upper Surface

Side Surface

Plate C

Plate D

Fig.9

T

angential

Line

Side

First cut

Surface

Uppe Surface

R

Fig.10                                     Fig.11

5-9. How To operation the Dust Box

WARNING

● 

Be sure to turn the switch OFF and remove the 

power plug from power supply whenever setting 

up the tool.

● 

The Dust Box is much heated right after the 

operation. Always wear gloves in handling the 

Dust Box.

CAUTION

● 

Frequently throw away the chips in the dust box 

before pilling up. If the tool is operated with the 

dust box filled with the chips, it badly affects 

finishing surfaces shorten the life of Indexable 

Insert.

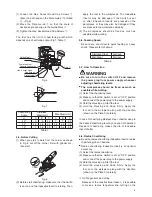
Hold the motor firmly, and throw away the chips by 

opening the lid. (Fig.12)

Chip

Fig.12

5-10. Restart Prevention Function

If the power is failed or the tool is accidentally 

unplugged from the power supply while in operation, 

the restart prevention function will be automatically 

activated when the power is restored. The restart 

prevention function will keep the motor of the tool 

from running even if the power is recovered or you 

put in the plug again.

To resume work, turn off the switch and then turn it 

on once again.

5-11. Kick Back Stop

When a big shock is given to the cutter during 

operation, the motor will stop automatically to protect 

the operator and the tool.

Chamfering can only be resumed once the switch is 

turned on again.

5-12. How To Chamfer Outer Diameter

WARNING

● 

Be sure to turn the switch OFF and remove the 

power plug from power supply whenever the 

accessories are attached or removed.

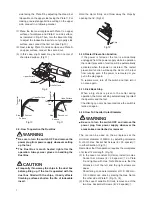
The tool can be used on the workpieces at the 

minimum diameter of 300mm by adjusting dimension 

A of both Hex. Socket Set Screws (8

25 special)


in either direction. (Fig.13)

Remember that this operation requires the workpieces 

of at least 12mm length. (Fig.14)

(1) In the case of constant R (Circle), install two Hex. 

Socket Set Screws (8

25 special)

on Plate 

D and tighten with Hex. Nuts. Make sure that the 

dimension A of the left and the right screws are 

equal.


Chamfering on an outer diameter of O.D. 200mm – 

O.D. 300mm can done by placing the Hex. Nut on 

the other side of Plate D. (Fig.13, 14)

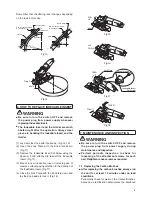
(2) In the case of variable R (Oval), remove one of the 

two Hex. Socket Set Screws (8

25 special)

.

Side

Second cut

Surface

Uppe Surface

Tangential

Line

T

angential

Line

R

R

Summary of Contents for EMB-0307B

Page 1: ...d Motor 10 1 m s2 knob 4 9 m s2 Due to continuous product development improvement the specifications and configurations in this document are subject to change without prior notice Manufactured by NITTO KOHKI Co Ltd 2 9 4 Nakaikegami Ohta ku Tokyo 146 8555 Japan TEL 81 3 3755 1111 FAX 81 3 3753 8791 E mail overseas nitto kohki co jp URL www nitto kohki co jp Keep the manual handy so you can use it ...

Page 2: ...anual de instrucces ih linguagen local Italian Per Manuale Istruzioni in lingua locale Vi preghiamo di rivolgervi al rivenditore o distributore Dutch Vraag uw handelaar om een nederladstalige gebruiksaanwijzing Swedish Be er lokala Åtreförsäljare eller distributör om manualer pá svenska Danish Venligst henvend Dem til den danske distributør for instructions manualer Polish Prosze pytac swojego dea...

Page 3: ...at any protective cover or guard is securely in place other parts are free from damage and that the tool runs as it should Check that moving parts are properly adjusted for positioning and tightened that parts are free from damage and properly mounted and that all other parts are in good condition for normal operation Should you find any damage to the protective cover or other part replace it in a...

Page 4: ...act the sales agent through which you have purchased your tool or Nitto Kohki Co Ltd directly for a replacement DISPOSAL When a tool is taken permanently out of service it is advised that the tool is disassembled degreased and parts separated by material and recycled locally in the appropriate manner GENERAL POWER TOOLS WARNING Always use power source per specifications on the nameplate Never conne...

Page 5: ...o not use the worn or damaged Indexable Insert If the unit is exposed under sub zero temperature for a prolonged period of time it may take some time to start up This does not mean that the unit is broken Once the unit has warmed up it can be used again 1 USAGE This tool is for chamfering workpieces with a Indexable Insert 2 CHECK THE CONTENTS OF THE PACKAGE Check the contents and make sure that t...

Page 6: ...t the tool at a chamfering level about 0 5 smaller than the desired one Try a test cut Then adjust the tool for accurate chamfering In the case of Mild Steel You can select chamfering levels from 0 to 7C freely The maximum chamfering capacity for one cut is 4C For 4C to 7C chamfer a workpiece twice or three times Ex 7C 4C 5 5C 7C Total 3 times In the case of Stainless Steel You can select chamferi...

Page 7: ...avoid quick feeding or heavy shock Please refer to Table 2 Stainless Steel 3cm sec Mild Steel 2cm sec Table 2 5 7 How To Operation WARNING Be sure to turn the switch OFF and remove the power plug from power supply whenever adjusting chamfering levels The workpieces should be fixed as much as possible while working 1 Select the chamfering level 2 Make sure that the Switch is set at OFF position and...

Page 8: ...he power is failed or the tool is accidentally unplugged from the power supply while in operation the restart prevention function will be automatically activated when the power is restored The restart prevention function will keep the motor of the tool from running even if the power is recovered or you put in the plug again To resume work turn off the switch and then turn it on once again 5 11 Kic...

Page 9: ...ection of the IndeXable Insert Fig 17 5 Close the Lock Plate with the Knob laid down and lay the Knob aside to lock it Fig 18 PULL UP Knob Fig 15 LAY DOWN Fig 16 OPEN Lock Plate Indexable Insert Indexable Insert Set Screw Fig 17 CLOSE PUSH Fig 18 7 MAINTENANCE AND INSPECTION WARNING Be sure to turn the switch OFF and remove the power plug from power supply during maintenance and inspection Perform...

Page 10: ...w Fig 19 Correct Wrong The spring is placed incorrectly The lead wire is placed incorrectly Fig 20 8 CONDITION FOR USE Burn out chips suggest that either the feed speed is too slow or the Indexable Insert has worn out Change the cutting conditions or check the conditions of the Indexable Insert 9 ORDERING SERVICE PARTS For further operational and handling information or for replacement of parts an...

Page 11: ...e Tool Improper service and repair can cause accidents and severe injuries Never attempt to modify the Tool Never attempt service or repair the Tool yourself 1 2 3 4 5 6 7 8 9 10 11 12 13 14 15 16 17 18 19 20 21 22 23 24 25 26 27 28 29 30 31 32 33 34 35 36 37 38 39 40 42 43 44 41 45 46 47 48 49 50 51 86 52 53 54 55 56 57 47 58 59 60 61 62 63 64 65 66 67 63 64 66 65 68 69 70 71 72 73 74 75 76 77 78...

Page 12: ...e Bearing HK0808 1 44 TB07982 Lock Button Ass y 1set 45 TQ03840 Label Caution 1 46 TQ04210 Air Deflector Ring 1 47 TQ04203 Ball Bearing 608LU 1 48 TP16785 Gum Ring A 1 No Part No Description Qty Price 49 TQ04214 Retaining Ring 1 50 TQ12612 Pan Head Tapping Screw 4 25 4 53 TB07984 Armature Ass y 230V 1set 54 TQ04200 Fan 1 55 TP06386 Ball Bearing 607ZZ 1 56 TQ11753 Protective Cover 1 57 TQ11752 Magne...

Page 13: ......

Page 14: ... kohki cn NITTO KOHKI Co Ltd Bangkok Representative Office 38Q House Convent Bldg 7th Floor Unit 7A Convent Rd Silom Bangkok 10500 Thailand Tel 66 2 632 0307 Fax 66 2 632 0308 http www nittobkk com eng_index htm EC DECLARATION OF CONFORMITY We hereby declare that the following our product conforms with the essential health and safety requirements of EEC Directives Product䋺 ELECTRIC CHAMFERING TOOL...

Reviews: