background image

10 


Attention: 

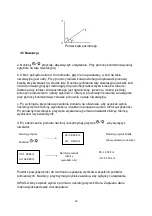
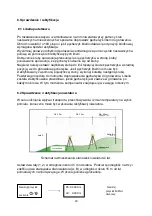
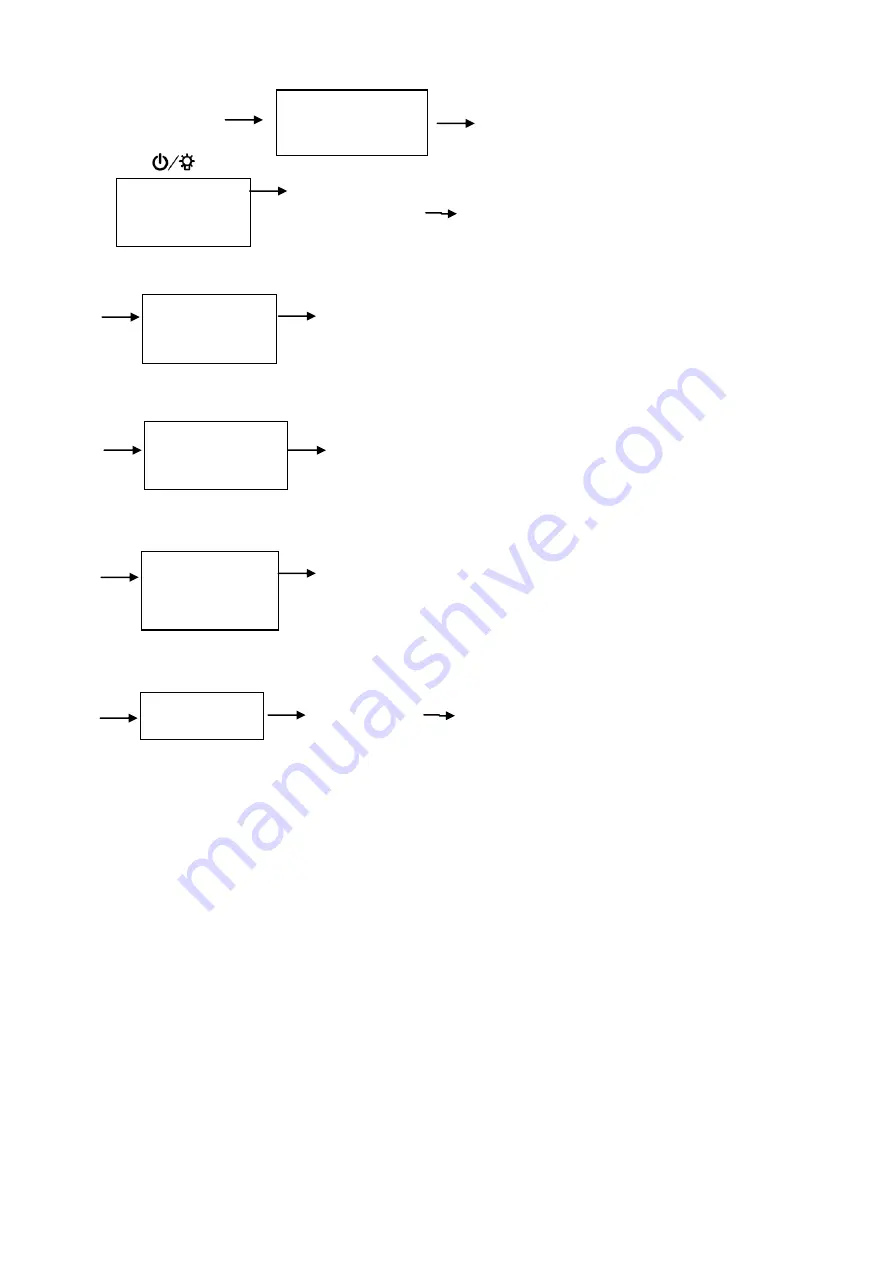
1.Make sure that the circular bubble is on the center before measurement.                      

2.During the calibration, if there is no reading after  pressing MEAS key, check if the 

distance  between  the  instrument  and  the  staff  is  right.  The  position  must  not  be 
changed.  For  example,  when  the  required  distance  between  instrument  and  staff  is 
30m (a deviation within ±5m is acceptable), there will be no reading if the distance is 
not within 25m to 35m. 

7. Data Storage, Deletion and Export 

7.1  Data  Storage: 

The 

[REC]

  key  must  be  pressed  each  time  if  the  data  of  leveling 

surveying are to be stored, or the data will be deleted automatically. 

7.2 Data Deletion: 

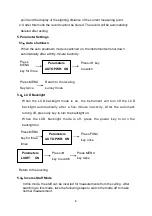
Press the

 [MENU]


key for several times until the phrase “Upload” 

appears  on  the  screen.  Then  press  the

  [FUNC]


key  and  the  phrase  “Erase”  will 

appear.  Afterwards  press  the

  [

H]


key  and  there  the  option  “yes/no”  will  be 

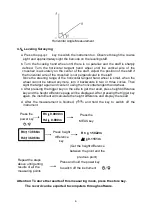
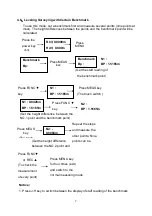
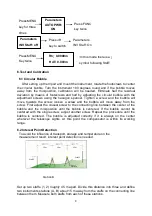
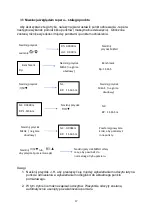
Press the 

Power key  


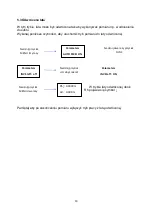
Rh

0.0000m 

Hd

 0.000m 

Press MENU  

key twice 

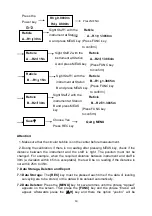
Reticle 

A

→R1

30m 

Sight Staff 1 with the  

instrument at Station 

A and press MEAS key 

Reticle 

A

→R1

1.3868m 

Reticle 

A

→R2

15m 

Sight Staff 2 with the  

instrument at Station  

A and press MEAS key 

Reticle 

A

→R2

1.3864m 

Reticle 

B

→R1

15m 

Sight Staff 1 with the  

instrument at Station  

B and press MEAS key 

Reticle 

B

→R1

1.3865m 

(Press FUNC key  

to confirm) 


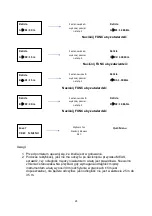
(Press FUNC key  

to confirm) 


(Press FUNC key  

to confirm) 


Reticle 

B

→R2

30m 

Sight Staff 2 with the  

instrument at Station  

B and press MEAS 
key 

Reticle 

B

→R2

1.3865m 

(Press FUNC key  

to confirm) 


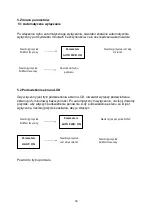
Save


Y:REC  
N:MENU 

Choose Yes 

Press REC key 

Quit

MENU 

Summary of Contents for EL-32

Page 1: ...1 ...

Page 2: ...2 ...

Page 3: ...ments of various kinds of construction surveying topographic surveying agricultural surveying and leveling surveying There is also a self compensating design which can improve work efficiency This instrument is totally enclosed It is IP55 certified demonstrating almost complete protection from particles and a good level of protection against water The instrument can be used at temperatures between...

Page 4: ...ircular bubble 16 Eyepieces 17 Display 3 2 Charging and Using the Battery a Connect the charger to the Power Communication connector on the side of the instrument and plug the adapter into the 220 volt AC outlet b A flashing battery symbol indicates that the battery is being charged complete four blocks indicate that the battery is fully charged c Disconnect the charger when the charging is comple...

Page 5: ...ripod as well as possible Extend the tripod legs to a comfortable height for observation Tightly screw the instrument to the head plate Make sure that the instrument is fully charged before measuring 4 2 Leveling Screw the footscrew to level the instrument until the circular bubble is centered At this point the sightline is horizontal The circular bubble can be observed directly through the image ...

Page 6: ...ing the horizontal tangent hand wheel c After pressing the trigger key on the side to get the result press height difference key and the height difference page will be displayed After pressing the trigger key again the instrument will calculate the height difference and display the result d After the measurement is finished press and hold the key to switch off the instrument Attention To store the...

Page 7: ...e touch switch Benchmark Bp 1 5165m Get the staff reading of the benchmark point N1 BP 1 5165m Press MEAS key The touch switch N1 0 0428m BP 1 5165m Press FUNC key N2 BP 1 5165m N1 BP 1 5165m Get the height difference between the NO 1 point and the benchmark point Press MEAS key The touch switch N2 0 0084m BP 1 5165m Repeat the steps and measure the other points Nine points can be measured at most...

Page 8: ...nute inactivity After the automatic turning off press any key to turn the backlight on When the LCD backlight mode is off press the power key to turn the backlight on 5 3 Inverse Staff Mode In this mode the staff can be inverted for measurements from the ceiling After switching to this mode take the following steps to switch the mode off to make normal measurement Press MENU key for three times Pa...

Page 9: ...tered with the single screw adjust another screw Repeat the procedure until the bubble is centered The bubble is adjusted correctly if it is always on the center wherever the telescope sights At this point the compensator is within its working range 6 2 Interest Point Detection To avoid the influence of transport storage and temperature on the measurement result interest point detection is needed ...

Page 10: ... Press the MENU key for several times until the phrase Upload appears on the screen Then press the FUNC key and the phrase Erase will appear Afterwards press the H key and there the option yes no will be Press the Power key Rh 0 0000m Hd 0 000m Press MENU key twice Reticle A R1 30m Sight Staff 1 with the instrument at Station A and press MEAS key Reticle A R1 1 3868m Reticle A R2 15m Sight Staff 2...

Page 11: ...arefully wiping wet instrument Take the wet instrument out of the container to allow the moisture to evaporate Do not leave wet instrument in the container Keep the container clean and dry Storage When the instrument has to be stored for long periods take it out of the container to an airy place in order to avoid mould on the lens Store the instrument in a dust free airy and low humidity environme...

Page 12: ...njustified complaints in accordance with the effective price lists Warranty repairs shall be carried out only and exclusively based on purchase document with serial number of the laser Under the warranty the Warrantor shall not be liable for the consequences of defects that is damage caused to people third parties property lost profits etc 2 The warranty shall be terminated if the following is fou...

Page 13: ...ład kompensacji w celu zwiększenia efektywność pracy Posiada certyfikat IP55 co zapewnia niemal pełną ochronę przed kurzem i dobry poziom ochrony przed wodą Niwelatorem można pracować w temperaturze od 20 C do 50 C 2 Instrument 2 1 Budowa instrumentu 1 Kolimator 2 Rączka do przenoszenia 3 Luneta 4 Przycisk wyzwalania pomiaru 5 Pierścień ustawiania ostrości 6 Leniwka koła poziomego 7 Koło poziome z...

Page 14: ...nij i przytrzymaj przycisk przez mniej niż dwie sekundy aby włączyć lub wyłączyć podświetlanie wyświetlacz LCD 2 Gdy podświetlenie wyświetlacza LCD jest włączone urządzenie wyłączy podświetlenie po 5 minutowej bezczynności Po automatycznym wyłączeniu naciśnij dowolny przycisk aby włączyć podświetlenie ponownie 3 Jeśli tryb podświetlenia LCD jest wyłączony naciśnij przycisk zasilania aby włączyć po...

Page 15: ...rzykręcić niwelator do głowicy statywu Przed pomiarem upewnij się że przyrząd jest w pełni naładowany 3 2 Poziomowanie Przy pomocy śrub nastawczych spoziomuj instrument doprowadzając libellę pudełkową do górowania W tym momencie oś optyczna lunety jest pozioma Pęcherzyk libelli można obserwować bezpośrednio przez pryzmat na obudowie niwelatora 3 3 Ogniskowanie i celowanie Wyceluj lunetę na kawałek...

Page 16: ...kolimatora wycelować ponownie na łatę niwelacyjną c Po wciśnięciu przycisku wyzwolenie pomiaru na obudowie aby uzyskać wynik naciśnij przycisk różnicy wysokości a na ekranie pojawie się okno różnicą wysokości Po ponownym wciśnięciu przycisku wyzwolenie pomiaru niwelator obliczy różnicę wysokości i wyświetli wynik d Po zakończeniu pomiaru naciśnij i przytrzymaj przycisk aby wyłączyć niwelator Powtó...

Page 17: ...o 2 W tym trybie nie można zapisać odczytów Wszystkie odczyty zostaną automatycznie usunięty po zakończeniu pomiaru Naciśnij przycisk zasilania Rh 0 0000 m Hd 0 000 m Naciśnij przycisk MENU Benchmark Bp Naciśnij przycisk MEAS na górze obudowy Benchmark Bp 1 5165 Naciśnij przycisk N1 BP 1 5165 m Naciśnij przycisk MEAS na górze obudowy N1 0 0428 m BP 1 5156 m Naciśnij przycisk N2 BP 1 5165 m Naciśni...

Page 18: ...inutowej bezczynności Po automatycznym wyłączeniu naciśnij dowolny przycisk aby włączyć podświetlenie ponownie Gdy podświetlenie ekranu LCD jest wyłączone naciśnij przycisk zasilania aby je włączyć Powrót do trybu pomiaru Naciśnij przycisk MENU trzy razy Parameters AUTO PWR ON Naciśnij przycisk H aby zmienić Naciśnij przycisk MENU dwa razy Powrót do trybu pomiaru Naciśnij przycisk MENU trzy razy P...

Page 19: ...do łaty odwróconej W trybie łaty odwróconej obok Rh pojawia się symbol Pamiętaj aby po zakończeniu pomiaru wyłączyć tryb pracy z łatą odwróconą Naciśnij przycisk MENU trzy razy Parameters AUTO PWR ON Parameters INV Staff off Naciśnij przycisk H aby zmienić Parameters INV Staff ON Naciśnij dwa razy przycisk FUNC Naciśnij przycisk MENU dwa razy Rh 0 0000 m Hd 0 000 m ...

Page 20: ...belli nie może być zrektyfikowany za pomocą pojedynczej śruby wykonaj korektę następną śrubą Powtarzaj procedurę do momentu doprowadzenia pęcherzyka do górowania Libella została zrektyfikowana prawidłowo jeżeli pęcherzyk jest zawsze w górowaniu po każdym obrocie W tym momencie kompensator znajduje się w zasięgu roboczym 6 2 Sprawdzenie i rektyfikacja niwelatora W celu uniknięcia wpływu transportu ...

Page 21: ...dź czy odległość między niwelatorem a łatą jest prawidłowa Nie wolno zmieniać stanowiska Na przykład gdy wymagana odległość między instrumentem a łatą wynosi 30m odchylenie w granicach 5m jest dopuszczalne nie będzie odczytów jeśli odległość nie jest w zakresie 25 m do 35 m Reticle A R1 30 m Ze stanowiska A wykonaj pomiar na łatę 1 Reticle A R2 15 m Ze stanowiska A wykonaj pomiar na łatę 2 Reticle...

Page 22: ...danymi 8 Konserwacja Czyszczenie Przetrzyj obudowę niwelatora Wydmuchaj kurz z obiektywu i wytrzyj soczewkę czystą bawełnianą ściereczką używając niewielkich ilości etanolu w razie potrzeby Nie należy używać benzyny lub wody Nie dotykaj obiektywu dłońmi Starannie wycieraj mokry instrument Zawsze wyjmuj mokry instrument z pojemnika aby umożliwić wilgoć odparowanie Nie zostawiaj mokrego instrumentu ...

Page 23: ...nostki m Podział koła poziomego 360o Luneta Rozdzielczość 3 Pole widzenia 1o 20 Kompensator Typ Tłumienie magnetyczne i mechanizm wahadłowy Zakres kompensacji 15 Dokładność kompensacji 0 3 min Dokładność ustawienia 0 4 Zapis danych Wewnętrzny 1000 rekordów Interfejs Micro USB Czułość libelli 8 2 mm Zasilanie Wymienny akumulator 2200 mAh Czas pracy 20 godzin Waga 1 9 kg Norma IP IP 55 Temperatura p...

Page 24: ... seryjnym urządzenia W ramach gwarancji Gwarant nie ponosi odpowiedzialności z tytułu skutków usterek tj szkód wyrządzonych ludziom zniszczenia cudzej własności strat w zyskach itp 2 Gwarancja traci ważność w przypadku stwierdzenia przekroczenia norm użytkowania sprzętu uszkodzeń powstałych w wyniku użytkowania sprzętu niezgodnie z instrukcją obsługi uszkodzeń mechanicznych dokonywania przez użytk...

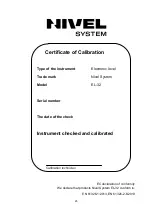
Page 25: ...tronic level Trade mark Nivel System Model EL 32 Serial number The date of the check Instrument checked and calibrated Calibration technician EC declaration of conformity We declare that products Nivel System EL 32 conform to EN 61326 1 2013 EN 61326 2 6 2013 ...

Page 26: ...26 WARNING The device contains a rechargeable batteries which must be recycled and should be disposed in accordance with the requirements ...

Page 27: ...27 ...

Page 28: ...28 ...

Reviews: