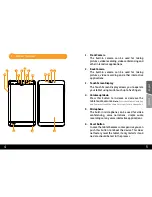
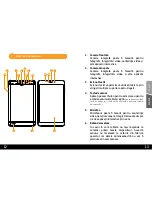
background image

6

7

7.  Headset Jack 


The stereo jack (3.5mm) connects the tablet’s 

audio out signal to amplified speakers or 

headphones. Using this jack automatically 

disables the built-in speaker.

8. 

Micro USB   


Connect the USB data cable to the tablet and to 

another system (notebook PC or desktop) for 

data transmission between the two. For charging 

the internal battery pack connect the power cable 

and the power adaptor to the micro USB port. 

To prevent damage to your tablet and battery 

pack always use the bundled power adapter.  

WARNING:


Do not

 connect a mobile HDD to the 

micro USB


port or any other larger consumer as it might damage your 

tablet.

9.  Micro SD Card 


Insert a Micro SD card with a maximum capacity 

of 32GB into this slot.

10.  Power Button 


The power button switches the device on or 

off. Hold the button for two seconds in order to 

power on the tablet. When Hector 8 is powered 

on, press the power button to put the tablet into 

sleep mode or wake it up from sleep mode. Hold 

the power button for 0.5 seconds to display the 

shutdown dialog box or hold the power button 

for 8 seconds to directly shootdown the tablet. 

11.  Loudspeaker 


The built-in speaker located on the back of 

the tablet allows you to hear audio without 

additional attachments. Audio features are 

software controlled.

12.  Earpiece Speaker 


The built-in speaker located on the front of 

the tablet allows you to hear audio without 

additional attachments. This speaker helps you 

hear better a  phone conversation. Audio features 

are software controlled.

13.  3G Sim Card 


Insert a standard GSM SIM Card in this slot.

14.  Light Sensor  


The Light sensor helps the tablet to auto-adjust 

the brightness.

15.  Proximity Sensor  


The proximity sensor is able to know how close 

an object is to the sensor and when it senses that 

the device is close to the ear, it switches off the 

screen so that you do not accidentally touch the 

touchscreen and also helps save battery.

Engli

sh

Română

Summary of Contents for Hector 8 SYTB-8QADY4H-BJ01B

Page 1: ...Hector 8 User Manual Manual de utilizare v 1 Before using this product carefully read all product documentation and retain it for future reference SYTB 8QADY4H BJ01B...

Page 2: ...thousands of applications in one place no matter if you wish to read play or learn The Hector 8 tablet is equipped with a Quad Core Cortex A7 1 3 GHz processor that makes apps run extra fast Let the...

Page 3: ...p down Press this button to increase or decrease the tablet audio volume Note Press the Volume Down key and Power button at the same time to perform a screenshot 5 Microphone The built in microphone c...

Page 4: ...powered on press the power button to put the tablet into sleep mode or wake it up from sleep mode Hold the power button for 0 5 seconds to display the shutdown dialog box or hold the power button for...

Page 5: ...rging time might be longer if you choose to use other sources such as a laptop or computer Hector 8 will charge faster if it is not in use When you first open the Hector 8 its battery will not be full...

Page 6: ...vrei s cite ti s te joci sau nve i lucruri noi Tableta Hector 8 are la baz un processor Quad Core A7 ce ruleaz la 1 3 GHz i 1 GB de memorie DDR Aceast configura ie faciliteaz rularea rapid a aplica i...

Page 7: ...a patru degete 4 Tasta de volum Ap sa i pe acest buton pentru a cre te sau pentru a sc dea volumul tabletei NOT Ap sa i concomitent tasta de volum jos i butonul de alimentare pentru a realiza un scree...

Page 8: ...Hector 8 este pornit ap sa i butonul de alimentare pentru a plasa unitatea n repaus sau pentru a o scoate din starea de repaus Pentru a afi a caseta de dialog de oprire ine i ap sat butonul de aliment...

Page 9: ...Reciclarea materialelor va ajuta la conservarea resurselor naturale Utiliza i doar adaptorul de alimentare inclus n cutia tabletei Utilizarea unui alt adaptor de alimentare sau a unui alt cablu de ali...

Page 10: ...e listed standards the above mentioned products were found in compliance with the R TTE 1995 5 EC Directive Also tested and compliance with the requirements of EN62209 and Council Recommendation 1999...

Page 11: ......

Reviews: