59
D Fault troubleshooting
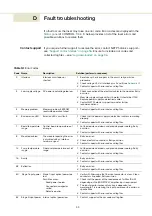
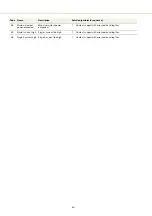
If a fault occurs the laser may raise an error code. Error codes are displayed in the
below provides a list of the laser errors and
possible solutions to resolve them.
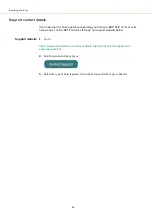
Contact support
If you require further support to resolve the error, contact NKT Photonics support –
see
“Support contact details” on page 56
. Ensure to include error codes and
collected log files – see
.
Table 14
Error codes
Code Name
Description
Solution (perform in sequence)
2
Interlock
Interlock circuit open or
shorted.
1.
Resolve any shorts or opens in the circuit, retry emission
procedure.
2.
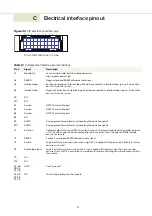
Check voltage ≥ 5V at interlock pins 3 and 4 (see
3.
Contact support with error code and log files.
3
Low supply voltage
DC power input voltage too low.
1.
Check connection of the electrical cables to the modules. Retry
emission.
2.
Measure supply voltage with multi-meter. It should be >11.5V.
Replace power supply and electrical cables.
3.
Contact NKT Photonics support service for further
recommendations.
4
Memory problem
Memory problem, EEPROM
read/write operation failed.
1.
Contact support with error code and log files.
6
Bad emission LED
Emission LED circuit fault.
1.
Check that the power supply and electrical cables are working
properly.
2.
Contact support with error code and log files.
7 Board
temperature
range
Control board temperature out
of range.
1.
Let the module cool down and provide proper cooling. Retry
emission.
2.
Contact support with error code and log files.
8
Module disabled
The module reporting the error
is disabled with an interbus
hardware signal.
1.
Retry emission.
2.
Check electrical connections. Retry emission.
3.
Contact support with error code and log files.
12
Pump temperature
range
Fiber pump temperature out of
range.
1.
Let the module cool down and provide proper cooling. Retry
emission.
2.
Contact support with error code and log files.
16
Sanity
1.
Retry emission.
2.
Contact support with error code and log files.
48
Reflection
1.
Retry emission.
2.
Contact support with error code and log files.
60
Stage 1 input power
Stage 1 input optical power too
low.
Possible causes:
•
Seed power too low
•
Connector damaged or
soiled.
•
Defective optics
1.
Verify with fiberscope that the input connector is clean. Clean
connectors if needed. Retry emission.
2.
Check that the power of the seed exceeds 1 mW or 10 mW
depending on the BOOSTIK LC amplifier input requirement.
3.
The input monitor response function is dependent on
wavelength. Try increasing the input power over the minimum
specification.
4.
Contact support with error code and log files.
62
Stage 2 input power Internal optical power low.
1.
Contact support with error code and log files.
Summary of Contents for Koheras BOOSTIK LC
Page 1: ...Item 800 631 01 Koheras BOOSTIK LC PRODUCT GUIDE Narrow linewidth laser amplifier ...
Page 8: ...8 ...
Page 10: ...10 ...
Page 14: ...14 ...
Page 28: ...Polishing 28 ...
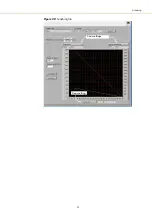
Page 51: ...51 Graphing Figure 39 Graphing tab X axis setting Y axis settings ...
Page 52: ...Graphing 52 ...
Page 58: ...58 2 ...
Page 66: ...66 ...
Page 67: ......
Page 68: ...1 Koheras BOOSTIK LC Product Description Revision 1 1 10 2021 W 10456 ...


