iTerm Rack Kit Installation Guide
06/01/06 Rev 1.0
Page 7 of 10
SECTION
4
Configuration
The terminal is delivered largely pre-configured. This section describes configuration for console serial or network connections.
Refer to the reference manual for details.
•
Switch on the terminal using the power switch located at the rear of the unit.
•
Raise the screen, and if the screen power LED is not lit, use the power button at the bottom of
the column of buttons located at the edge of the screen.
•
Hold down the ALT key and then depress the Esc key to enter Setup Mode.
•
Adjust the screen's brightness with the controls and - located at the edge of the
screen.
•
If the screen image is not centered correctly, activate LCD auto-setup by pressing the ‘Select’
button (located second from bottom) at the edge of the screen. This should only be done when
displaying the terminal setup screen.
To navigate the setup menus, use a function key to enter a setup menu, and then use the arrow keys
to highlight the field to be changed. Use the space key to change the value of a parameter. Use F12
to return to the top level menu, and F12 again to leave setup mode. You will be prompted at this
point if the setup parameters are to be saved for future sessions.
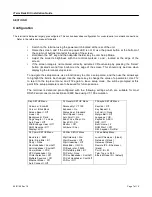
The terminal is delivered pre-configured with the following settings which are suitable for most
RS232 serial console connections at 9600 baud using VT-100 emulation.
Disp SETUP Menu
Columns = Econ-80
Cursor = Blink Block
Screen Saver = Off
Lines = 24
Background = Dark
Page Length = 1 x Lines
Auto Page = Off
Width change clear = Off
ANSI Reverse = Off
Display= LCD
F2 General SETUP Menu
Personality = VT 100
Enhance = On
Status Line = Standard
Scroll Speed = Jump
Auto Scroll = On
End of Line Wrap = On
Rcvd CR = CR
Monitor = Off
Attribute = Char
F3 Keybd SETUP Menu
Keyclick = Off
Key Repeat = 5
Xmt Limit = None
Margin Bell = Off
Language = US
Keycode = ASCII
NRC = Off
Bell Volume = 2
NUM Start = Off
DEL Keypad = Dot/Del
F4 Comm SETUP Menu
Baud rate = 9600
Data / Stop Bits = 8/1
Parity = None
Rcv Hndshake = Xon/Xoff
Xmt Hndshake = Xon/Xoff
Comm Mode = FDX
XPC Handshake = On
Printer Selection = Off
Multiple Sessions = Off
Ethernet Mode = Off
Auto Connect = Off
F5 Misc SETUP Menu
Wprt Intensity = Dim
Wprt Reverse = Off
Wprt Underline = Off
Block End = US/CR
Ptr Baud rate = 38400
Ptr Data/Stop Bits = 8/1
Ptr Parity = None
Ptr Rcv Hndshake = Xon/Xoff
Ptr Xmt Hndshake = Xon/Xoff
Ptr Rcv = Off
F9 Lan Setup Menu
Local IP Address = {blank}
Netmask = {blank}
Gateway = {blank}
Remote IP 0..B Address =
{blank}
Port 0...B = 23
Term Type = vt100
Ethernet Node ID =
(default}


