10
INSTALLING AND REMOVING DISK BRUSHES/PADS
NOTE
According to the conditions of the floor to choose the appropriate brush
disc or pad driver for cleaning.
CAUTION!
Before manually installing or uninstalling the brush disc or pad driver,
ensure that all switches of the machine are off. Protective gloves must be
worn during operation to avoid injury by debris.
NOTE
The machine has the function of automatic loading and unloading of
brush disc/ pad driver. It is not recommended to manually install/ remove
the brush disc or pad driver. Specific steps are as follows:
1
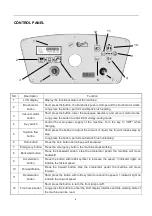
. Turn the key switch to "ON" position (the brush disk and squeegee assembly will automatically return
to the original position).
2. Put the brush disk/ pad driver under the brush deck and place it in the center.
3. Long press the "brush motor button", the brush motor indicator flashes, the brush deck is lowering and
the brush motor rotates until the brush/pad is locked by the buckle. Release the "brush motor button", the
brush loading is completed, the brush motor stops, and the front push rod is lifted.
4. Long press the "solution flow button" to enter the automatic brush unloading mode. When three
indicator lights flash, you can release the button, and the controller will automatically complete the brush
unloading process and the solution flow indicator lights stop flashing.
5. Manually loading/unloading the brush/pad. Align the brush/pad driver with the central axis, manually
rotate the brush/pad counterclockwise for installing. Removing the brush/pad by rotating contrariwise.
WARNING!
Do not operate the machine until the brush/pad is well-installed.
ATTACHING SQUEEGEE ASSEMBLY
1. Turn the key switch to "ON" position.
2. Press the "Vacuum motor button", the squeegee assembly will be automatically lowered to the
ground.
3. Unscrew the two knobs on the squeegee assembly and lock it into the groove on the squeegee holder.
4. Tighten the knobs on the squeegee assembly and connect the vacuum hose to the squeegee.


