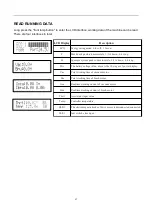
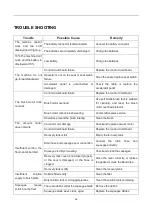
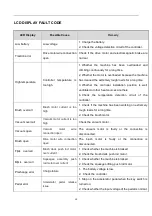
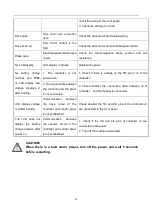
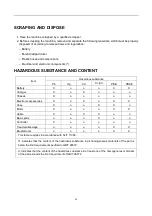
background image


15 


CAUTION! 

Keep the battery fully charged to extend the service life of the battery. 


CAUTION! 

Charge the battery as soon as possible when the battery is low, otherwise 

the service life of the battery will be shortened. Check the battery at least 

once a week. 


1.  Move the machine to designated charging area. 

2.  According to the type of the battery, choose the appropriate charger for charging. 

3.  Connect the charger connector to the socket under the seat of the machine, and then connect the 

charger plug to the power supply. 

4. 

After charging the battery, disconnect the charger plug from the power supply, and then disconnect 

the connector from the machine.


CLEANING DISK BRUSH/ PAD 


CAUTION! 

Wear  protective  gloves  when  cleaning  the  brush/pad  in  case of the  injury 

by the sharp debris. 


1.  Remove the brush disk/ pad driver from the machine, as shown in the previous chapter. 

2.  Clean the brush disk (pad driver) and brush (pad) with cleaning solution and water. 

3.  Check the condition of the brush/pad for wear, and replace it if necessary. 

CLEANING SOLUTION FILTER 

1.  Turn off the water tap of the solution tank. 

2.  Remove the filter cover and clean the filter, then fit it back in place. 

3.  Turn on the water tap of the solution tank and check if the filter is properly installed without leakage. 


SQUEEGEE CLEANING AND STORAGE


NOTE 

The squeegee must be clean and its blades must be in good conditions in 

order to achieve better scrubbing. 


CAUTION! 

Summary of Contents for NR530

Page 1: ...er Scrubber WARNING Do not operate the rider scrubber before reading and understanding the operator manual NOTE Please check product type and parameters of your scrubber in this manual as well as on t...

Page 2: ...ATTERIES 9 EMERGENCY STOP 9 INSTALLING AND REMOVING DISK BRUSHES PADS 10 ATTACHING SQUEEGEE ASSEMBLY 10 SOLUTION TANK FILLING 11 START AND STOP OF MACHINE 11 DRAINING TANKS 12 DRAINING SOLUTION TANK 1...

Page 3: ...ly followed otherwise our company shall not be liable for any losses arising therefrom HOW TO KEEP THE MANUAL The Manual must be kept near the machine inside an adequate case or bag away from liquids...

Page 4: ...accessories for the machine TRANSPORTING AND UNCRATING Carefully check machine for signs of damage Report damages at once to carrier Record the damages on paper to reserve the right for compensation A...

Page 5: ...and radiating illuminating and burning objects During charging lead acid battery may emit hydrogen gas which may cause explosion Must keep the charging environment well ventilated and away from naked...

Page 6: ...tation when temperature is below 0 C 32 F The water in the recovery tank and hoses may freeze and cause serious damage to the machine If spare parts need be replaced order ORIGINAL spare parts from an...

Page 7: ...t lamp 6 Charging socket 7 Filter 8 Liquid level hose 9 Rear wheel 10 Solution tank level hose 11 Drain hose 12 Recovery tank 13 Control panel 14 Accelerator pedal 15 Drive unit 16 Solution tank drain...

Page 8: ...m automatic brush unloading 6 Horn button Press the horn button and a beep will be issued 7 Emergency button Press the emergency button the machine stops working 8 Backward button Press the backward b...

Page 9: ...rush speed rpm 180 200 Solution Recovery tank capacity L 70 70 Brush pressure kg 35 Cleaning path mm 530 Turning radius mm 1300 Gradeability 10 Clean productivity theoretical actual m h 3180 2120 Insu...

Page 10: ...8 ELECTRICAL WIRING DIAGRAM M1 Drive motor M2 Vacuum motor M3 Brush motor M4 Motor for squeegee system M5 Motor for brush system...

Page 11: ...n close the recovery tank in case of hand pinching EMERGENCY STOP If there is any emergency during machine operating press the emergency button on the control panel then all functions of machine will...

Page 12: ...motor rotates until the brush pad is locked by the buckle Release the brush motor button the brush loading is completed the brush motor stops and the front push rod is lifted 4 Long press the solutio...

Page 13: ...r and vacuum motor start running 3 According to the cleaning demand the solution liquid flow can be adjusted through the solution flow button on the control panel three different flows are available T...

Page 14: ...assembly 3 Move the machine to the designated drainage area 4 Drain the recovery tank through the drain hose then rinse the recovery tank with clean water WARNING When the recovery tank is full pleas...

Page 15: ...13 INITIAL USE After the first 8 hours of use check if the fastening and connecting parts of the machine are loose and check for visible damage and leakage...

Page 16: ...vice center Check Item Daily after use Weekly Semi annually Yearly Charge battery Clean squeegee Clean brush pad Clean solution tank and recovery tank Check seal of tanks Check squeegee replace it if...

Page 17: ...connect the connector from the machine CLEANING DISK BRUSH PAD CAUTION Wear protective gloves when cleaning the brush pad in case of the injury by the sharp debris 1 Remove the brush disk pad driver f...

Page 18: ...dge is intact If the top edge is worn replace the blade according to the following procedures 2 Loosen the buckle release pressure strip from the retainers and remove the retaining strip Replace the w...

Page 19: ...6 is up B Squeegee system push rod motor state 1 3 is down 4 6 is up Pwr The battery voltage value above is the 10 stages of power display Vac Total working time of vacuum motor Bru Total working tim...

Page 20: ...ector Brush motor carbon brush wearing Contact after sales service Obstacles prevent the brush rotating Clean the brush The vacuum motor does not work Vacuum motor damage Check and replace vacuum moto...

Page 21: ...high 1 Check if the machine has been working on extremely rough roads for a long time 2 Check the brush motor Vacuum overcurr Vacuum motor current is too high Check the vacuum motor Vacuum open Vacuum...

Page 22: ...J2 of the controller 2 The signal cable between the controller and the panel is not connected 2 Check whether the connection cable between J3 of controller and J8 of panel is connected LCD display vol...

Page 23: ...Battery X o o o X X Charger X o X o o o Chassis X o o o o o Electronic accessories X o X o X X Hose X o o X X o Motor X o o o X X Cable X o X X o o Basic parts o o o X o o Controller X o o o o o Treat...

Reviews: