background image

26

Speed Scrub 350 9016424 (09-2017)

OPERATION


   MACHINE OPERATION

FOR SAFETY: Do not operate machine, unless 
operator manual is read and understood.

  PRE-OPERATION CHECKLIST
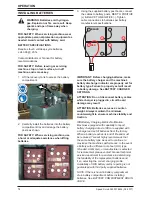
 

Check the battery 

fl

 uid. Fill as necessary.


Machines with Smart-Fill Automatic Battery 
Watering option: Check the automatic battery 
watering tank. Fill with distilled water as 
necessary.


Check the battery charge level. Charge as 
necessary.


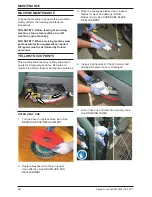
Check brushes for wear and damage. Remove 
wire, string, or twine wrapped around the main 
scrub brushes.


Check scrub head skirt for damage and ensure 
skirt is properly positioned on scrub head.


Clean the squeegee water trap.


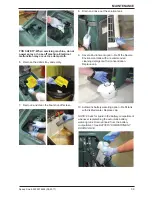
Check the squeegee vacuum hose for debris 
or blockage.


Check the squeegees for damage and wear.


Con

fi

 rm the recovery tank is drained and 

cleaned.


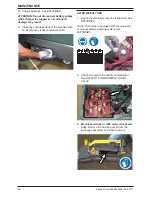
Check the recovery tank cover seal for wear 
and damage.


Clean the recovery tank debris tray.


Clean the 

fl

 oat shut off screen.
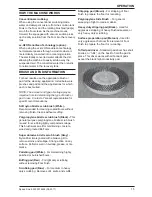
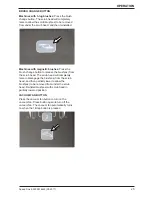
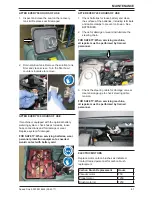
 

ec-H2O

 Scrubbing: Con

fi

 rm all conventional 

cleaning agents/restorers are drained and 
rinsed from the solution tank.


ec-H2O

 Scrubbing: Con

fi

 rm the solution tank 

is 

fi

 lled with clear cool water only.


Machines with SE (Severe Environment) 
option: Check detergent tank level. Fill 
detergent tank as necessary.


Check steering for proper operation.


Check the horn.


Check maintenance records to determine 
maintenance requirements.
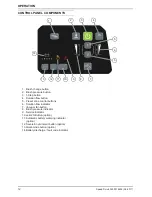
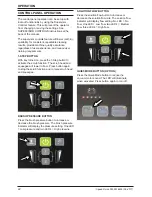
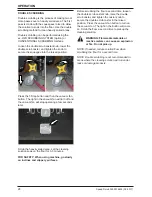
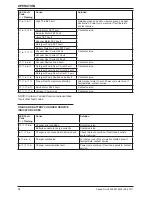
OPERATING MACHINE

For control panel operating instructions, see 
CONTROL PANEL OPERATION.

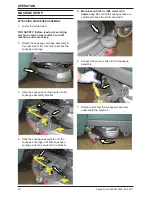
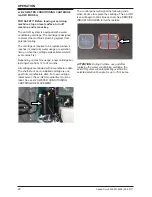
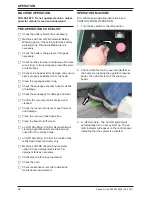
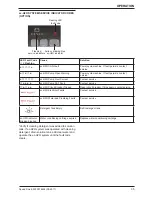
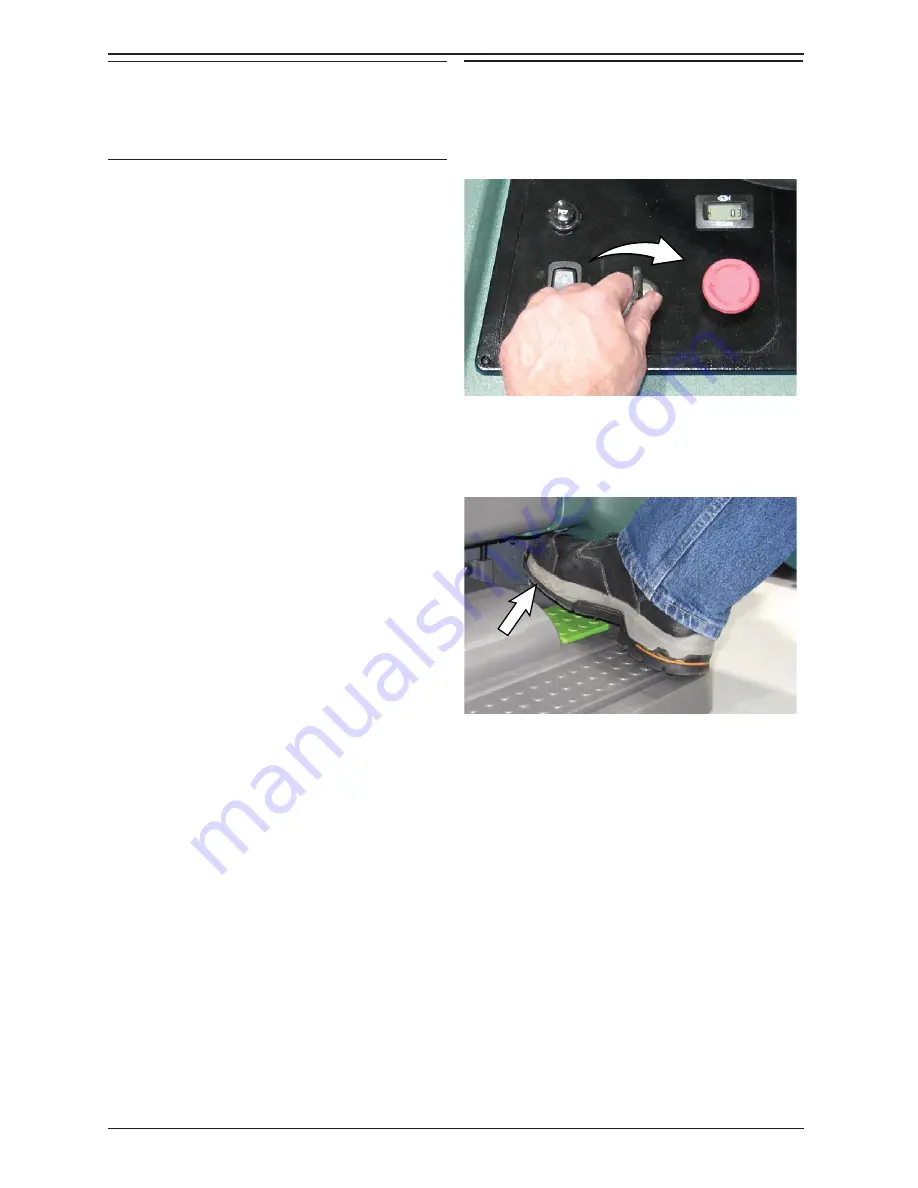
1.  Turn the key switch to the ON position.

2.  Position both feet on the operator platform so 

the heals are pressing the operator presence 
pedal. The right foot is OFF the green go 
pedal.

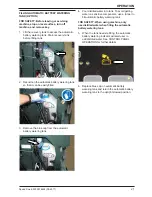
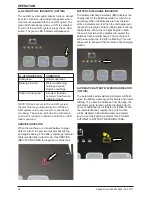
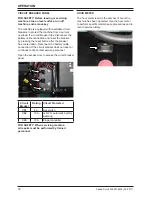
3.  ec-H2O models - The ec-H2O system will 

automatically turn on at key start up. The ec-
H2O indicator will appear on the control panel 
indicating that the system is activated.

Summary of Contents for SPEED SCRUB 350

Page 1: ...language Operator Manuals visit www nobles com manuals Hygenic Fully Cleanable Recovery Tank Tennant True Parts IRIS a Tennant Technology Smart Fill Automatic Battery Watering Insta Click Magnetic Di...

Page 2: ...com opensource Specifications and parts are subject to change without notice Original Instructions copyright 2017 TENNANT Company All rights reserved INTENDED USE The Speed Scrub 350 stand on rider fl...

Page 3: ...While Operating Machine 29 Circuit Breaker PaneL 30 Hour Meter 30 Draining Tanks 31 Draining Recovery Tank 31 Draining Solution Tank 32 Service Indicator Codes 33 On Board Battery Charger Service Ind...

Page 4: ...350 9016424 09 2017 CONTENTS Storing Machine 58 Freeze Protection 58 Machine Troubleshooting 60 General Machine Dimensions Capacties Performance 62 Supervisor Controls 65 Entering The Supervisor Cont...

Page 5: ...5 Speed Scrub 350 9016424 09 2017 CONTENTS...

Page 6: ...arm IRIS Telemetry This machine may be equipped with technology that automatically communicates over the cellular network If the machine will be operated where cell phone use is restricted because of...

Page 7: ...ng on machine Do not use incompatible battery chargers as this may damage battery packs and potentially cause a fire Inspect charger cord regularly for damage Do not plug in charger if prongs are wet...

Page 8: ...ep sparks and open flame away when charging Located on bottom of recovery tank WARNING LABEL Spinning brush Keep hands away Located on top of scrub head WARNING LABEL Magnetic Field Hazard Magnetic pa...

Page 9: ...9 Speed Scrub 350 9016424 09 2017 SAFETY...

Page 10: ...10 Speed Scrub 350 9016424 09 2017 OPERATION MACHINE COMPONENTS 13 1 2 4 5 6 3 7 8 9 12 14 16 17 18 24 19 20 21 22 23 10 11 15 25 26 27 28 29 30...

Page 11: ...ver 16 Recovery tank drain hose 17 Battery compartment 18 Automatic battery watering tank option 19 Severe Environment detergent tank option with ec H2O option only 20 Detergent mixing ratio knob opti...

Page 12: ...utton 3 1 Step button 4 Solution flow button 5 Preset zone control buttons 6 Solution flow indicator 7 Vacuum fan button 8 Brush pressure indicator 9 Service indicator 10 ec H2O Button option 11 Autom...

Page 13: ...ion Fast scrub speed Horn Slow scrub speed Solution flow Direction forward reverse Automatic battery watering option Key Off Circuit breaker Key On Brush pressure Vacuum fan Battery charge Change brus...

Page 14: ...achine s battery discharge indicator are properly set for battery type Failure to properly set will result in battery damage See BATTERY CHARGER SETTINGS ATTENTION Do not disconnect battery cables whi...

Page 15: ...ub brush White Recommended for cleaning coated floors without removing finish Cleans without scuffing Polypropylene bristle scrub brush Black This general purpose polypropylene bristle scrub brush is...

Page 16: ...e of the machine to access the squeegee carriage 3 Align the squeegee carriage pins into the squeegee assembly bracket 4 Slide the squeegee assembly onto the squeegee carriage until both squeegee carr...

Page 17: ...ad to the pad driver before installing the driver Secure pad with center lock 3 Machines with magnetic brushes or pad drivers Position the brush under the scrub head and lift the brush up onto the scr...

Page 18: ...ional Scrubbing Fill solution tank with water not to exceed 60 C 140 F Pour a recommended cleaning detergent into the solution tank according to mixing instructions on the container ATTENTION For Conv...

Page 19: ...evere Environment tank and add a recommended cleaning detergent at full concentration Do not add water WARNING Flammable materials can cause an explosion or fire Do not use flammable materials in tank...

Page 20: ...irst Depending on machine usage a new cartridge can last anywhere from 12 to 24 months All cartridges are labeled with a manufacture date The shelf life of an un installed cartridge is one year from m...

Page 21: ...emove the blue cap from the automatic battery watering tank 4 Pour distilled water into tank To avoid getting water on sensitive components use a funnel to fill automatic battery watering tank FOR SAF...

Page 22: ...ep button to activate the scrub function The scrub head and squeegee will lower to floor Press button again to stop the scrub function and to raise scrub head and squeegee BRUSH PRESSURE BUTTON Press...

Page 23: ...ime to turn off To alert user when Severe Environment tank is empty the bubbles icon will blink for 15 seconds If button is pressed when tank is empty the bubbles icon will continue to blink for 15 se...

Page 24: ...shing The battery discharge indicator lights will also flash a fault code See SERVICE INDICATOR CODES to diagnose machine fault BATTERY DISCHARGE INDICATOR The battery discharge indicator BDI displays...

Page 25: ...brush change button to release the brush es from the scrub head The scrub head will completely raise to disengage the brush es from the scrub head and then partially lower to allow the brush es to be...

Page 26: ...he recovery tank cover seal for wear and damage Clean the recovery tank debris tray Clean the float shut off screen ec H2O Scrubbing Confirm all conventional cleaning agents restorers are drained and...

Page 27: ...ot is not pressing the green go pedal The machine will not accept input from the forward reverse switch if the lights are rapidly flashing NOTE The forward reverse switch must be pressed to reset dire...

Page 28: ...e vacuum fan will stop operating a few seconds later Scrub the heavily soiled area Let the cleaning solution soak on the floor for 3 5 minutes FOR SAFETY When using machine go slowly on inclines and s...

Page 29: ...erhangs Drive slowly through doorways and narrow openings especially with the dual disk model as squeegee extends behind width of machine 6 Avoid turning machine on inclines and ramps 7 When draining...

Page 30: ...e breaker has cooled down Reconnect the battery cable connection If the circuit breaker does not reset or continues to trip contact service personnel Open the access door to access the circuit breaker...

Page 31: ...drain hose from the hook hold the hose nozzle near the drain remove the cap from the hose and drain the recovery tank NOTE When using a bucket to drain the machine do not use the same bucket to fill t...

Page 32: ...on level surface turn off machine and remove key 2 To drain remaining water from solution tank pull the solution tank level hose from the solution tank 3 Rinse solution tank with clean water Firmly re...

Page 33: ...rvice Detergent Pump Open Warning Contact service Propel Breaker Tripped Fault Disconnect battery and reset circuit breaker If issue persists contact service Propel Motor Open Fault Contact service So...

Page 34: ...nt Pump Over Current 1 Fault Detergent Pump Shorted Load Fault Contact service Propel Over Temperature Warning Allow propel motor to cool Power cycle machine If fault persists contact service Scrub Mo...

Page 35: ...rrent Contact service ec H2O Pump FET Fault Contact service ec H2O Circuit Breaker Tripped Reset circuit breaker If trips again contact service ec H2O Electrical Faults Contact service ec H2O Water an...

Page 36: ...36 Speed Scrub 350 9016424 09 2017 MAINTENANCE MAINTENANCE MAINTENANCE CHART 1 2 3 4 5 6 7 8 9 10 11 12 13 14...

Page 37: ...arge if necessary Weekly O 7 Battery cells Check electrolyte level DW O 7 Battery compartment Check for liquid O 6 Squeegee assembly drip trap reservoir dual disk model Check Clean 50 Hours O 2 Recove...

Page 38: ...l YELLOW TOUCH POINTS This machine features easy to find yellow touch points for simple service items No tools are required to perform these maintenance operations AFTER DAILY USE 1 Turn pad over or r...

Page 39: ...8 Drain and rinse out the solution tank 9 Severe Environment option Refill the Severe Environment tank with a recommended cleaning detergent at full concentration Replace cap 10 Automatic battery wat...

Page 40: ...hine with an all purpose cleaner and damp cloth AFTER WEEKLY USE 1 Check the electrolyte level in all batteries See BATTERIES NOTE If machine is equipped with the automatic or manual battery watering...

Page 41: ...eded Avoid contact with battery acid AFTER EVERY 200 HOURS OF USE 1 Check batteries for loose battery and clean the surface of the batteries including terminals and cable clamps to prevent corrosion S...

Page 42: ...ntact with battery acid MAINTENANCE FREE BATTERIES Maintenance free Sealed AGM batteries do not require watering Cleaning and other routine maintenance is still required FLOODED WET LEAD ACID BATTERIE...

Page 43: ...batteries check the battery electrolyte level weekly before charging For models equipped with the automatic battery watering system check if the automatic battery water tank needs refilling Add distil...

Page 44: ...ARD BATTERY CHARGER below IRIS MODELS For models equipped with capability to report battery charging data via IRIS Tennant recommends using the same battery type If a different amp hour or battery typ...

Page 45: ...Sonnenschein 80 150 AH The CAN BUS setting dial position 0 is the software setting that is programmed to match battery type supplied with machine When the dial is manually changed to a different sett...

Page 46: ...atering system Do not add water to batteries before charging the electrolyte level will expand and may overflow when charging 2 After charging batteries check the battery electrolyte level indicators...

Page 47: ...ing tank The automatic battery watering indicator will also alert user to add distilled water when tank is empty See CONTROL PANEL OPERATION for further details BATTERY COMPARTMENT DRAIN VALVE Use the...

Page 48: ...ding on the operator presence pedal until the scrub head has moved through the entire range of motion Process will be paused if the operating presence pedal is released Step back onto the operator pre...

Page 49: ...on the brush drive hub 6 Ensure the scrub head skirt is properly positioned on the scrub head 7 Repeat procedure for the other brush or pad driver if machine is equipped with dual brush scrub head 8...

Page 50: ...1 Stop the machine and lower the scrub head FOR SAFETY Before leaving or servicing machine stop on level surface turn off machine and remove key 2 Rotate the squeegee assembly to the right side of th...

Page 51: ...ur knobs 9 Position the squeegee assembly bracket near the squeegee carriage and align the squeegee carriage pins into the squeegee assembly bracket 10 Slide the squeegee assembly onto the squeegee ca...

Page 52: ...y to the right side of the machine 3 Disconnect the vacuum hose from the squeegee assembly 4 Squeeze the squeegee retainer lever and remove the squeegee assembly from the machine 5 Fully loosen the tw...

Page 53: ...eegee assembly bracket near the squeegee carriage and align the squeegee carriage pins into the squeegee assembly bracket 10 Slide the squeegee assembly onto the squeegee carriage until both squeegee...

Page 54: ...tails Depending on machine usage on average a new cartridge can last anywhere from 12 months for heavy machine usage to 24 months for light machine usage ATTENTION During first time use and after repl...

Page 55: ...hts are moving back and forth quickly press and release the solution flow button located on ec H2O module The three indicator lights will then blink three times to indicate timer has been reset Repeat...

Page 56: ...o the jack stand so both the jack stand and floor jack are supporting the weight of the machine 6 When finished with maintenance use floor jack to raise machine from jack stand remove the jack stand f...

Page 57: ...em Immediately after pushing the machine remove the screw driver from between the electronic brake lever and the hub NEVER operate the machine with the brake disabled FOR SAFETY Do not operate machine...

Page 58: ...ir circulation 6 If storing machine in freezing temperatures proceed to FREEZE PROTECTION NOTE To prevent potential machine damage store machine in a rodent and insect free environment FREEZE PROTECTI...

Page 59: ...es Models equipped with ec H2O system Turn machine on and set the solution flow rate to high and operate ec H2O scrubbing to cycle antifreeze through system Turn machine off when antifreeze is visible...

Page 60: ...eries Battery charger fault detected See SERVICE INDICATOR CODES Faulty charger Replace charger Faulty power supply cord Replace power supply cord Machine will not propel Forward reverse light flashin...

Page 61: ...nk Low solution flow rate set Increase solution flow rate Clogged solution tank filter Clean filter Plugged solution supply line Flush solution supply line ec H2O pump does not prime Restart machine a...

Page 62: ...bbing 9 Ramp incline for transporting GVWR 9 Ramp incline for loading empty tanks 18 Solution flow rate Low 0 15 gpm 0 57 L min Med 0 35 gpm 1 32 L min High 0 50 gpm 1 89 L min ec H2O solution flow ra...

Page 63: ...63 Speed Scrub 350 9016424 09 2017 SPECIFICATIONS MACHINE DIMENSIONS 500 mm 20 in Single Disk Model 727 mm 28 6 in 673 mm 26 5 in 1397 mm 55 in 1 245 mm 49 in...

Page 64: ...64 Speed Scrub 350 9016424 09 2017 SPECIFICATIONS 600 mm 24 in Dual Disk Model 780 mm 30 7 in 1397 mm 55 in 673 mm 26 5 in 1 245 mm 49 in...

Page 65: ...isor ENTERING THE SUPERVISOR CONTROL MODES 1 Park the machine on a level surface and turn the key to off O position 2 Press and hold the brush pressure button while turning the key on Release button w...

Page 66: ...the Severe Environment button press area on panel as shown The button is hidden The speed selection is displayed by the battery discharge indicator LED s The red LED represents the lowest speed The fa...

Reviews: