OPERATION
TrailBlazer
Series (11–01)
11
TROUBLESHOOTING
1. If the vacuum will not operate, check:
a. The power supply cord at the wall outlet.
b. The power supply cord at the vacuum.
c. That the switch is in the “on” position and
functioning properly.
2. If the pigtail (18” power cord) is getting warm,
check to see that the extension cord does not
exceed a length of 50 feet at 16 gauge or 100 feet
at 14 gauge. Longer cords will overheat and
damage the vacuum.
3. If the exhaust that comes out of the bottom of the
vacuum is warmer than usual, check and/or clean
all four filters.
4. If the power switch fails, check the circuit breaker.
If that is not the problem, see an authorized
servicing dealer.
5. If loss of suction occurs:
a. Check that debris is not plugging the hose,
wand, and/or floor tool.
b.
Check and/or clean both micro and cloth
filters.
c. Check that the hose cuffs are fitting tightly on
the hose and are not cracked.
d. Check that the cap is properly attached to the
body.
FILTER MAINTENANCE
TRAILBLAZER
AND TRAILBLAZER
LITE
MODELS
WARNING: To reduce the risk of fire, electric
shock or injury unplug unit from wall outlet when
not in use and before servicing.
1. Check the Micro filter EACH and EVERY time you
start and finish vacuuming. A clogged and dirty
filter restricts airflow and results in reduced suction
and overheating.
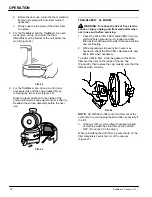
2. While vacuuming throughout a building, stop every
two hours or as needed to shake out the Micro
filter (Figure 21). Replace with new Micro filter
when necessary.
FIG. 21
NOTE: Lift both Micro filter and cloth filter out at the
same time to avoid ripping the Micro filter, especially if
it is full.
3. Once a month (or more often if necessary) hand
or machine wash the cloth filter and let it LINE
DRY. (Do not put it in the dryer).
4. Once a month (or more often if necessary) clean
the dome filter, located inside the vacuum
underneath the Micro and cloth filters
(Figure 22).
FIG. 22
a.
Pull the top piece of the dome filter off and
remove the foam media (Figure 23). Shake it
out, rinse it and let it air dry thoroughly.
FIG. 23


