background image


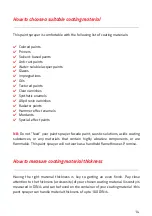
How to get the best results


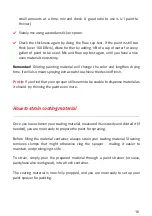
Cover everything you do not wish to get paint on with protective material.


This could be plastic or canvas sheeting,

tarpaulin, secured paper drop cloth or


something similar. Whatever you use, make sure you cover 

EVERYTHING.  


Use painter’s tape (the blue type) as opposed to conventional masking tape.


It is far less sticky and much easier to remove without taking the paint off. 


To mask a hanging light fixture, simply pull a plastic bag over it and secure it


with plastic ties or masking tape.  


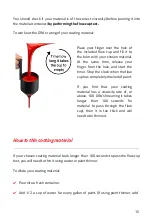
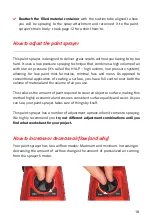
We’ve said it before but will say it again, before you begin spraying, do a quick


test

on a scrap piece of material to ensure that your spray pattern, width,


coating material, and air volumes are all as you want and need them.  


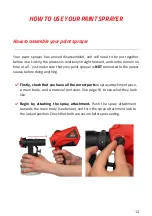
Get comfortable using the sprayer before pulling the trigger to get used to


its weight and to practice your spraying technique. 
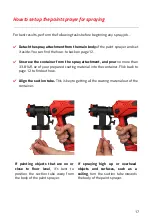
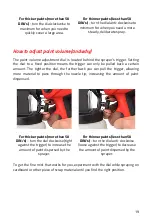
 

When spraying,

hold the sprayer upright and maintain a constant distance of


about 12 inches perpendicular to the surface or object being sprayed.  


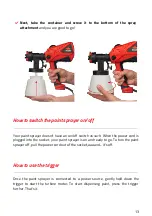
Move the paint sprayer evenly using either lateral (side to side) or vertical


(up and down)

movements

. Try to keep the sprayer pointed straight at the


surface being covered and try not to fan the gun as you spray. Don’t be


tempted to twist your wrist as you spray, as this will cause an uneven finish


and waste both your coating material and your precious time.  


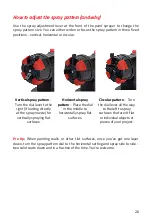
Pay particular attention to the position of the sprayer at the beginning and


end of each spray pass - if you don't keep the distance constant and flare out


at the beginning or end, the spray pattern will start wide, then narrow and


finally end wide causing an uneven finish - not what you want.  


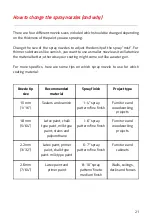
To ensure an even amount of paint on the surface,

overlap each spray pass by


50 percent. To do so, aim the sprayer so that the tip points at the edge of the


previous pass.  


23 

Summary of Contents for NPS-100

Page 1: ...Paint Sprayer Instruction Manual We ve tried to make this manual useful simple and understandable Please read it carefully and keep it safe for future reference...

Page 2: ...1...

Page 3: ...ow to set up the paint sprayer for spraying 17 How to adjust the paint sprayer 18 How to increase or decrease airflow and why 18 How to adjust paint volume and why 19 How to adjust the spray pattern a...

Page 4: ...ry com pages instructions or by letting us know to wecare nocry com So let s get to it shall we Only use your paint sprayer and its accessories for spraying paint onto inanimate objects Would you use...

Page 5: ...g the internal pipes Do not use your paint sprayer if it doesn t work as it should Get it repaired or replaced before using Should you have any problems or concerns about anything anything at all and...

Page 6: ...idents are much more likely to happen in dirty unorganized or poorly lit workspaces accidents that are easily avoided with basic upkeep Secure any movable workpiece s you re working on A workpiece sec...

Page 7: ...ing your paint sprayer Personal safety Eye ear and respiratory protection is a must when operating your paint sprayer Do not underestimate the power of personal safety equipment Common sense is the be...

Page 8: ...ty standards Read the instructions before starting to use this paint sprayer Wear safety goggles when using this paint sprayer Use respiratory protection when using this paint sprayer Use hearing prot...

Page 9: ...TECHNICAL SPECIFICATIONS Model NoCry NPS 100 DINS Paint Sprayer Voltage 100 130V AC 50Hz Power consumption 5A Atomizing output 1 7A Flow 40 57fl oz min Maximum viscosity 100 DIN s 8...

Page 10: ...d spray attachment 3 5 lbs PACKAGE CONTENTS THEIR PURPOSES Repetition is the mother of all learning so Please remember to unplug your paint sprayer before doing any work on it That includes changing a...

Page 11: ...tomized coating material via the sprayer nozzle Learn how to get the best results on page 23 1 Material container 33 814fl Oz Plastic container that holds material coating Attaches to the spray attach...

Page 12: ...d paint out of your spray nozzle We d really recommend you thoroughly clean your paint sprayer after every use we ve left some tips on how to best do it on pages 25 1 Cleaning brush Whereas the pin is...

Page 13: ...ke sure that your paint sprayer is NOT connected to the power source before doing anything Firstly check that you have all the correct parts a spray attachment piece a main body and a material contain...

Page 14: ...itch as such When the power cord is plugged into the socket your paint sprayer is on and ready to go To turn the paint sprayer off pull the power cord out of the socket aaaand it s off How to use the...

Page 15: ...o not feed your paint sprayer facade paint caustic solutions acidic coating substances or any materials that contain highly abrasive components or are flammable This paint sprayer will not work as a h...

Page 16: ...clock when the flow cup has completely drained of paint If you find that your coating material has a viscosity rate of or above 100 DIN s meaning it takes longer than 100 seconds for material to pass...

Page 17: ...sh Pro tip If you find that your sprayer still seems to be unable to dispense material as it should try thinning the paint even more How to strain coating material Once you have chosen your coating ma...

Page 18: ...ent and pour no more than 33 814fl oz of your prepared coating material into the container Flick back to page 12 to find out how Align the suction tube This is key to getting all the coating material...

Page 19: ...nal application of coating a surface you have full control over both the volume of material and the volume of air you use This reduces the amount of paint required to cover an object or surface making...

Page 20: ...a certain amount The tighter the dial t he further back you can pull the trigger allowing more material to pass through the nozzle tip increasing the amount of paint dispensed For thicker paints more...

Page 21: ...at the spray nozzle for vertically spraying flat surfaces Horizontal spray pattern Place the dial in the middle to horizontally spray flat surfaces Circular pattern Turn the dial lever all the way to...

Page 22: ...ics here are some tips on which spray nozzle to use for which coating material Nozzle tip size Recommended material Spray finish Project type 1 5 mm 1 16 Sealers and varnish 1 4 spray pattern fine fin...

Page 23: ...ct a screwdriver or the back of the included cleaning brush works great to remove the sprayer nozzle tip 3 Give the sprayer nozzle tip a quick clean using your cleaning pin 4 Insert your new nozzle ti...

Page 24: ...its weight and to practice your spraying technique When spraying hold the sprayer upright and maintain a constant distance of about 12 inches perpendicular to the surface or object being sprayed Move...

Page 25: ...the project unplug the paint sprayer If the break is going to be a long one Air out your working environment open the window door etc Quick clean the nozzle openings with quick dry or two component c...

Page 26: ...the two tiny dents either side of the suction tube and any other hard to reach nook and cranny with the included cleaning pin There should be no dried paint still lodged in the nozzle check back to pa...

Page 27: ...n between cleanings try to keep all safety devices air vents and the motor housing as far away from dirt and dust as possible How to clean the air filter Your air filter has a two year lifespan We rec...

Page 28: ...n your fingers around the rim of the spray attachment pushing the seal upwards Pro tip The ventilation hose and suction tube parts are only partially solvent resistant so it s best to wipe them down r...

Page 29: ...nozzle or needle are soiled Clean them with the included pin The spray attachment is incorrectly assembled Reassemble according to instructions on page 12 The spray nozzle cap is loose Tighten the spr...

Page 30: ...applied Reduce the material volume The distance is too small Increase the distance Excessive paint mist overspray The distance to the object is too large Reduce the distance to the object Too much co...

Page 31: ...d PAINT SPRAYER LIABILITY This product is covered by an EU directive valid since 01 01 1990 specifying that the manufacturer is only liable for products if all the parts originate from the manufacture...

Page 32: ...al please separate any such product from other waste types and recycle it responsibly at your local facilities Check with your local authority recycling centre or retailer for recycling advice Don t j...

Page 33: ...ct us at wecare nocry com Our customer care team will be happy to help and start the free procedure to determine whether your product is defective NoCry s warranty applies to ONLY products being sold...

Page 34: ...f you have any questions or concerns let us know by emailing wecare nocry com We d also love to connect with you via social media You can find us on Instagram Facebook and Pinterest by searching NoCry...

Page 35: ...34...

Page 36: ...w what went wrong by sending us an email at wecare nocry com We ll be on the case right away If you re happy with your purchase why not spread the word to others who are looking for a paint sprayer AN...

Reviews: