background image

12

Manual de instrucciones

Certifíquese de que la máquina no pueda articularse iinadvertida y espontáneamente para la posición 
de trabajo, y nunca se posicione en la zona de articulación de la máquina, mucho menos entre el 
tractor y la máquina.

No articule la máquina en la posición de corte a no ser en el área de trabajo.
1- Posicione la máquina y el tractor en lugar plano, de modo que estén nivelados.
2- Verifique si los tambores están girando libremente.
3- Baje la segadora hasta unos 10 cm del suelo y retire el buje de traba (5).

4- Tire de la cuerda (2) haciendo soltar el buje traba (3), destrabando el cabezal. Luego, mueva la 
máquina a la posición de trabajo.
5- Monte el dispositivo de seguridad (1) en el buje (4) y coloque el buje de traba (5).

Preparación para el trabajo

CUIDADO

Durante la preparación, el toma de fuerza debe estar desacoplado.

Summary of Contents for SN-165

Page 1: ...Drum Mower Segadora de tambores SN 165 Instructions Manual Manual de Instrucciones ...

Page 2: ......

Page 3: ...ual This information is extremely important to identify your machine in cases when you need technical support or replacement parts Nogueira S A is always at your disposal to answer any questions or doubts and supply efficient and permanent technical support The images displayed in this manual are only for illustrative purposes Thus to facilitate your viewing the images show cutaway or the safety s...

Page 4: ...ctions must be abided by for both machine configurations Introduction 03 Environmental conservation 05 Safety 05 Safety adhesive labels 09 Purpose 11 Coupling to the tractor 11 Operating preparation 12 Mowing 13 Adjusting the mowing height 13 Transporting the machine 14 Maintenance 14 Replacing the blade holder 16 Lubrication 16 Belt tightening 17 Safety device 17 Technical specifications 18 Addit...

Page 5: ...dents while operating it We have developed safety shielding and eliminated dangerous situations Remember keeping people healthy and their physical integrity must always be considered to the upmost We have prepared this manual to make your familiar with your mower and so that you can use it correctly and safely We recommend carefully reading it before operating the machine the first time If you hav...

Page 6: ...en nearby Dress appropriately for operating the machine Keep long hair tied up and do not wear loose fitting clothing Remove rings chains and any other objects which can become stuck in the moving parts or mechanisms Wear personal protective equipment PPE while operating the machine Exposure to noise for prolonged period can cause hearing damage or loss Wear earplugs and safety glasses Never try t...

Page 7: ...can descend without any reason or due to leakage in the system and cause an accident Do not place the machine on cement blocks hollow tiles or other supports which can crush from a prolonged weight load Do not work under a machine lifted by only jacks always use a safe support base Always check the terrain before starting your mowing job Mark any dangerous places or obstacles which may impose a ha...

Page 8: ...ding the maximum height and width for transport Pay close attention to the height of the load especially when going under overpasses and bridges Never leave the tractor when the machine is turned on Stop the motor disconnect the power take off engage the parking brake and remove the ignition key Using this equipment for applications not mentioned in this manual and considered as unacceptable and u...

Page 9: ...9 SN 165 Safety adhesive labels E n g l i s h ...

Page 10: ...10 Instructions Manual Safety adhesive labels ...

Page 11: ...own in figure 2 Place both parts parallel and mark the place for cutting the ends leaving 25 millimeters of play Remove the driveshaft from the machine and cut it Fasten the hydraulic arms rigidly the chains of bars so that the Drum Mower is placed in the correct position Adjust the hydraulic amrs so that the drums are aligned in the correct operating position fig 03 This adjustment must be done i...

Page 12: ...ating area 1 Place the machine and the tractor on a flat place so that they are level 2 Check if the drums are freely turning 3 Lower the Drum Mower to about 10 centimeters from the ground and remove the locking pin 5 4 Pull the rope 2 making the locking pin release 3 unlatching the head Afterwards move the machine into the operating position 5 Assemble the safety device 1 to the pin 4 and place t...

Page 13: ...int CAUTION In order to avoid wasting fodder never tilt the machine backwards 2 In case you are working on sloped terrains the Drum Mower must always on the higher side NOTE When working on rocky terrain it is possible to reduce the pressure on the machine applied to the ground by assembling the spring to the lower hole This way it decreases the wear on the drum blades 5 Before beginning the mowin...

Page 14: ...is in the transport position lower the support base 10 fastening it to the cotter pin 8 Lower the machine until the ground and disengage it from the tractor BEWARE Disconnect the power take off the tractor motor and remove the key from the ignition before performing any adjustment maintenance or cleaning job on the machine Also remember that suspended equipment on the hydraulic supports is not com...

Page 15: ...nch 29 and then check for good fastening of the blade Clean the scraps of fodder in this area and then check for proper fastening of the blade holder pins CAUTION The blade holder pins must be routinely inspected Check if the pin diameter is equal to 7 mm as shown in the below figure If they are smaller than this measurement the blade holders must be replaced Mowing exerts a considerable load on t...

Page 16: ...driveshaft using good quality grease thus you will make the equipment work smoothly and last longer TRANSMISSION GEARBOX The DRUM MOWER is delivered from the factory with the transmission gearbox 13 lubricated by 5 5 Kg of grease Generally it is necessary to only lubricate once a year When doing repairs use only good quality grease and never mix brands or different types Replacing the blade holder...

Page 17: ...ng and consequently belt slippage Likewise the belts will slip when the tension is too loose Changing the oil after 50 mowing hours Safety device 1 Belt tightening The Drum Mower is equipped with a safety device 1 that will be activated whenever an obstacle is hit this makes the machine go around it If this occurs you should immediately stop the tractor and engage in reverse gear When going in rev...

Page 18: ... 420 Kg Number of blades 6 Number of drums 2 Application slanted above 25 degrees Application slanted below 25 degrees Rotation of the power take off 540 RPM Connection to three points categories I and II Power in the power take off beginning at 23 kw Mowing capacity up to 2 h p hr Maximum mowing speed 10 Km h Maximum transport speed 15 Km h ...

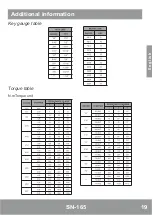
Page 19: ...19 SN 165 Key gauge table Torque table N mTorque unit Additional information E n g l i s h ...

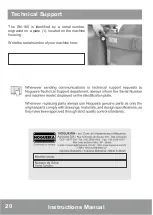
Page 20: ...20 Instructions Manual The SN 165 is identified by a serial number engraved on a plate 1 located on the machine housing Write the serial number of your machine here 1 Technical Support ...

Page 21: ......

Page 22: ......

Page 23: ...máquina una plaqueta de identificación con su número de serie de fabricación Anote este número en el certificado de garantía en este manual Esta información será muy importante para la identificación de su máquina en caso de asistencia o reposición de piezas Nogueira S A estará siempre a su disposición para responder a cualquier consulta ofreciéndole asistencia técnica eficaz y permanente Las imág...

Page 24: ...e seguridad deberán ser tenidas en cuenta para ambas configuraciones de la máquina Introducción 03 Medio ambiente 05 Seguridad 05 Adhesivos de seguridad 09 Aplicación 11 Acoplamiento al tractor 11 Preparación para el trabajo 12 Corte 13 Ajuste de la altura del corte 13 Transporte 14 Mantenimiento 14 Substitución de los porta cuchillas 16 Lubricación 16 Tensión de las correas 17 Dispositivo de segu...

Page 25: ...ón Desarrollamos protecciones de seguridad y eliminamos situaciones de riesgo Recordamos que la preservación de la salud y de la integridad física de las personas debe estar siempre en primer lugar Preparamos este manual para que usted conozca su SN 165 y así pueda utilizarla de manera más correcta y segura Recomendamos que la lea atentamente antes de utilizar la máquina por primera vez Si surge a...

Page 26: ...a máquina Prenda el cabello largo y no use ropas demasiado holgadas Sáquese anillos cadenitas y demás elementos que puedan prenderse en las piezas o mecanismos en movimiento Use equipo de protección individual EPI al operar la máquina La exposición prolongada al ruido puede causar daño o pérdida de la audición Use protectores auriculares y gafas de seguridad Nunca intente limpiar o retirar restos ...

Page 27: ...arrastrase por sí solos o debido a pérdidas y resultar en accidentes No apoye la máquina sobre bloques de cemento ladrillos huecos u otros soportes que puedan desmoronarse bajo el efecto de cargas prolongadas Nunca trabaje debajo de una máquina soportada solo por un cricket Utilice siempre un apoyo seguro Haga el reconocimiento del terreno antes de iniciar el trabajo Demarque lugares peligrosos o ...

Page 28: ...a altura y el ancho máximos permitido para el transporte Esté atento en cuanto a la altura de transporte especialmente en viaductos Nunca abandone el tractor con la máquina encendida Pare el motor desconecte el toma de fuerza accione el freno de estacionamiento y retire la llave del arranque antes La utilización de este equipamiento en aplicaciones no mencionadas en este manual es considerada como...

Page 29: ... pies a los tambores sin tener la seguridad de que están completamente parados El contacto con los discos de corte en movimiento puede causar heridas graves No se acerque a la máquina antes de su paralización completa Recuerde que las partes rotativas no paran inmediatamente después del apagado Algunas partes son casi imperceptibles cuando están en movimiento y usted podrá no verlas Al acoplar la ...

Page 30: ...de cartón o madera La penetración de fluido en la piel puede causar infecciones y gangrena No utilice el cardán sin la protección de seguridad Mantenga distancia durante el funcionamiento El contacto con el cardán en movimiento puede provocar un grave accidente Al operar la máquina use equipo de protección individual EPI La exposición prolongada al ruido sin protección puede provocar pérdida audit...

Page 31: ... del cardán proceda como en la figura 2 Coloque ambas partes en paralelo y marque el lugar del corte en las extremidades dejando una holgura de 25 milímetros Retire el cardán de la máquina y realice el corte Fijar los brazos del hidráulico de manera rígida por cadenas o barras para que la segadora quede en la posición correcta Regule el hidráulico de modo que los tambores queden alineados en posic...

Page 32: ...abajo 1 Posicione la máquina y el tractor en lugar plano de modo que estén nivelados 2 Verifique si los tambores están girando libremente 3 Baje la segadora hasta unos 10 cm del suelo y retire el buje de traba 5 4 Tire de la cuerda 2 haciendo soltar el buje traba 3 destrabando el cabezal Luego mueva la máquina a la posición de trabajo 5 Monte el dispositivo de seguridad 1 en el buje 4 y coloque el...

Page 33: ...l tercer punto del tractor ATENCIÓN Para evitar pérdidas de forraje nunca incline la máquina hacia atrás 2 En caso de trabajo en terrenos inclinados la segadora siempre debe quedar del lado superior NOTA Si trabaja en terreno pedregoso es posible disminuir la presión de la máquina sobre el suelo montando el espiral en el orificio inferior De esta forma se disminuye el desgaste de las cuchillas y d...

Page 34: ...namiento Estando la máquina en posición de transporte baje el pie de apoyo 10 fijándolo con el contrabuje 8 Baje la máquina hasta el suelo y desacóplela del tractor CUIDADO Desconecte el toma de fuerza el motor del tractor y retire la llave del arranque antes de iniciar cualquier servicio de regulado mantenimiento o limpieza en la máquina Recuerde también que equipamientos suspendidos en soportes ...

Page 35: ... cuchilla Limpiar el área de restos de forrajes y comprobar el buen estado y la buena fijación de los bujes de los porta cuchillas ATENCIÓN Los bujes de los porta cuchillas deben ser regularmente inspeccionados Verifique si el diámetro del buje equivale a 7 mm figura abajo Si estuviere por debajo de esta medida los porta cuchillas deben ser reemplazados El trabajo de corte representa una carga con...

Page 36: ...lizando grasa de buena calidad así obtendrá un funcionamiento suave y también prolongará la durabilidad de su equipamiento CAJADE TRANSMISIÓN La segadora sale de fábrica con su caja de transmisión 13 lubricada con 5 5 kg de grasa En general es necesaria solo una lubricación anual En caso de reparación poner solamente grasa de buena calidad y nunca mixturar marcas o tipos diferentes Substitución de...

Page 37: ... otro lado las correas también pueden patinar si hay tensión insuficiente Con aceite cada 50 horas de trabajo Dispositivo de seguridad 1 Tensión de las correas La segadora está equipada con un dispositivo de seguridad 1 que será activado al tocar un obstáculo permitiendo que la máquina se desvíe del mismo Si ocurre esto se debe parar inmediatamente el tractor y activar la marcha atrás Al andar hac...

Page 38: ...Kg Número de cuchillas 6 Número de tambores 2 Aplicación con inclinación arriba 25 grados Aplicación con inclinación abajo 25 grados Rotación en el toma de potencia 540 RPM Acople a los tres puntos categorías I y II Potencia en el toma de fuerza a partir de 23 kw Producción hatsa 2 ho a h Velocidad máxima de trabajo 10 Km h Velocidad máxima de transporte 15 Km h ...

Page 39: ...19 SN 165 Informaciones Adicionales Tabla de medidas de las llaves Tabla de Torques Unidad de par de apriete en N m E s p a ñ o l ...

Page 40: ...nicaciones o requerir auxilio de la asistencia técnica Nogueira siempre informe el número de serie y el modelo de la máquina presentes en la plaqueta de identificación Al substituir piezas utilice siempre artículos orinales Nogueira Solamente las piezas originales son fabricadas de acuerdo con los diseños materiales y especificaciones de proyecto pasando por un estricto estándar de calidad 1 Asist...

Page 41: ...iones realizadas por personas no auto rizadas por el fabricante 4 4 Empleo de piezas o componentes no originales 4 5 Uso de tractor con potencia superior a la máxima recomendada en el Manual de Instrucciones 4 6 Presentación de Notas Fiscales de compra rasuradas o adulteradas 5 Las reclamaciones sobre eventuales defectos durante el período de la garantía deberán ser presentadas a los revendedores ...

Page 42: ...ara toda su línea de máquinas Para mayor información consulte el sitio www nogueira com br o póngase en contacto con el Servicio de Atención al Cliente a través del teléfono 55 19 3813 9226 TÉRMINO DE RECIBO INSTRUCCIONES PARA EL REGISTRO EN EL SITIO 1 Llene el TÉRMINO DE RECIBO con la información solicitada y firme 2 Dispare el TÉRMINO DE RECIBO completado y la factura de venta 3 Acceder al sitio...

Page 43: ......

Page 44: ...m Impl Máquinas Agrícolas S A St R Fernando de Souza 533 Distrito Industrial CEP 13877 775 Tel Phone 19 3638 1500 Fax 19 3638 1556 nogueira nogueira com br www nogueira com br CNPJ 08 510 974 0001 27 Revisão 1 4071017 ...

Reviews: