background image

2

 Foreword

This manual provides all the specific information you need to fa

-

miliarize  yourself  with  and  correctly  operate  your  unit.  Read  it 

very carefully when you purchase the instrument and consult it 

whenever you have doubts regarding use and before performing 

any maintenance operations.


Safety precautions


Environmental protection

 measures

Information regarding the environment for cus-

tomers within the European Union. European 

Directive EC 2002/96 requires that units bearing 

this  symbol  on  the  unit  and/or  on  the  packag

-

ing  be  disposed  of  separately  from  undifferenti

-

ated urban wastes. The symbol indicates that the 

product must not be disposed of with the normal 

household  wastes.  The  owner  is  responsible 

for disposing of this product and other electrical and electronic 

equipment  through  specific  waste  collection  facilities  indicated 

by the government or local public agencies. Correct disposal and 

recycling help prevent any potentially negative impact on the en

-

vironment and human health. To receive more detailed informa-

tion regarding disposal of your unit, we recommend that you con

-

tact the competent public agencies, the waste collection service 

or the shop where you purchased the product.

 Introduction

START S0 XL is a new generation electronic circuit board with 

times  count  and  digital  deceleration.  It  has  been  built  to  meet 

many needs: for sliding gates, swinging and roller systems. Its 

reduced size makes it suitable for use it in all motors that are 

designed for internal electronics.

Using the unit improperly and performing repairs or modifications

personally  will  void  the  warranty.  Nologo  declines  any  respon

-

sibility for damages due to inappropriate use of the product and 

due to any use other than the use the product was designed for.

Nologo  declines  any  responsibility  for  consequential  damages 

except civil liability for the products.


Small dictionary

START

START control

Vac

Vac (alternate current)

Vdc

Vdc (direct current)

NC

Normally closed

NO

Normally open

Contact

Isolated contact

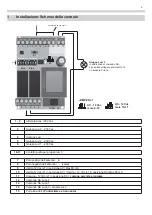
1

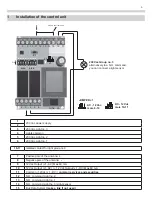
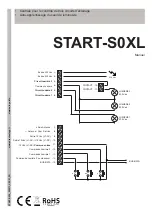
Installation of the control unit

3

2

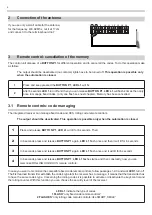
Connection of the antenna

4

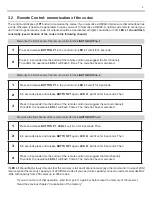
Remote control: 

3

cancellation of the

 mEmoRy

3.1

code MANAGING

3.2

mEmoRIzATIoN 

of the CODES

5

4

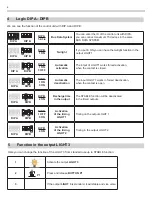
Logic DIP A - DIP B

6

5

Function in the output LIGHT 3

6

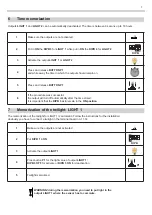
Time memorization

7

7

Memorization of the twilight: LIGHT 1

8

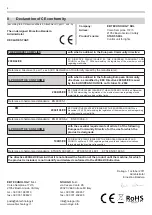
Declaration of CE conformity

8

Index


Technical caracteristics

Power supply

Vac

230

Operating temperature

0

C min/Max

20°C÷+60°C 

EN 600068-2-1

EN 600068-2-2

Level Waterproof

IP

45

Box

abs

Dimensions

mm

 b67 x h110 x t32

Summary of Contents for START-S0XL

Page 1: ...3 Comune Luci Gruppo Luci 2 6 5 4 3 2 1 Ingresso 230 Vac da rete Ingresso 230 Vac da rete Gruppo Luci 1 230 Vac LUCE 3 230 Vac CONTATTO CONTATTO 17 16 15 14 13 12 11 10 9 8 7 Out 12Vac J1 AC 12Vdc J1 DC 12 Vdc J1 DC Comune ingressi Comando Luci 2 Comando Luci 1 Comando Luci 3 o sensore luce BUS DATI Antenna Out 12 Vac J1 AC Antenna Com Servizi BUS DATI LUCE 2 230 Vac LUCE 1 230 Vac N A N A N A ...

Page 2: ...to il prodotto Introduzione La START S0XL è una scheda elettronica della nuova genera zione con conteggio dei tempi in digitale Nel progetto sono state adottate le più avanzate tecniche per ga rantire la massima immunità nei confronti dei disturbi la migliore flessibilità d uso e la più vasta scelta di funzioni disponibili In caso di utilizzo scorretto di riparazioni o modifiche apportate personal...

Page 3: ...A 10 Uscita 12 Vac J1 in posizione AC Uscita 12 Vdc J1 in posizione DC Max 60 mA 11 Comune 12Vdc J1 in posizione DC comune servizi e sicurezze 12 Comando NA Luce 2 13 Comando NA Luce 1 14 Comando NA Luce 3 sensore luce 15 Porta Bus dati Ponticellare se non usato Gruppo Luci 3 In alternativa al comando NA è possibile collegare al morsetto 14 un sensore di luce Ponticellare se non usato 8 9 10 11 12...

Page 4: ...ssa cosi la gestione dei codici Rolling code HCS compatibili 3 1 Radiocomandi Attivazione della gestione dei codici La ricevente incorporata nella centrale START S0XL può gestire oltre ai codici fissi anche i codici rolling code HCS vediamo quindi come è possibile gestire i seguenti codici Le uscite della centrale devono essere disattivate quindi nessun contatto attivo eventuali luci collegate dev...

Page 5: ...on si è sicuri che l operazione di apprendimento codici sia andata correttamente a buon fine ripartire dal punto 1 ma non prima di aver resettato la memoria della ricevente radio integrata nella centrale Per far questo è importante partire dal capitolo precedente Cancellazione della memoria 1 Premere e rilasciare il PULSANTE P1 sulla scheda il LED L1 rimarrà acceso fisso per 6 secondi Poi di segui...

Page 6: ...a la funzione PASSO PASSO su uscite temporizzate Facendo cosi ricaricare il tempo in caso di pressione del pulsante DIP B 1 OFF 3 ON Attivazione Temporizzazione LUCE 1 Viene attivata la temporizzazione sull uscita LUCE 1 DIP B 4 ON Attivazione Temporizzazione LUCE 2 Viene attivata la temporizzazione sull uscita LUCE 2 1 2 3 4 1 2 3 4 1 2 3 4 1 2 3 4 1 2 3 4 DIP A DIP B 1 2 3 4 DIP A DIP B 1 2 3 4 ...

Page 7: ... ore DIP B 1 2 3 4 1 2 3 4 1 2 3 4 1 2 3 4 7 Apprendimento SOGLIA di LUCE per CREPUSCOLARE L apprendimento della soglia di luce per l uscita LUCE1 avviene in maniera automatica vediamo ora come è possibile impostarla tramite alcuni semplici passaggi E ovvio che occorre installare sui morsetti 11 14 un sensore di luce 1 Assicurarsi che tutte le uscite siano disattivate 2 Porre in ON il DIPB 1 3 Att...

Page 8: ...le norme armonizzate EN 60335 1 EN 60335 2 97 2004 108 CE DIRETTIVA 2004 108 CE DEL CONSIGLIO del 15 dicembre 2004 per il riavvicinamento delle legislazioni degli Stati membri relative alla compatibilità elettromagnetica Riferimento alle norme armonizzate EN 61000 6 2 EN 61000 6 3 EN 50336 IL PRODOTTO E CONFORME ai requisiti essenziali richiesti dall articolo 3 dalla seguente direttiva comunitaria...

Page 9: ... Light common Group of lights 2 6 5 4 3 2 1 230 Vac Input 230 Vac Input Group of lights 1 230 Vac LIGHT 3 230 Vac CONTACT CONTACT 17 16 15 14 13 12 11 10 9 8 7 Out 12Vac J1 AC 12Vdc J1 DC 12 Vdc J1 DC Comm Services Light 2 Light 1 Light 3 Light Sensor BUS DATA SYSTEM Antenna Out 12 Vac J1 AC Antenna Comm Services BUS DATA SYSTEM LIGHT 2 230 Vac LIGHT 1 230 Vac N O N O N O ...

Page 10: ...n service or the shop where you purchased the product Introduction START S0 XL is a new generation electronic circuit board with times count and digital deceleration It has been built to meet many needs for sliding gates swinging and roller systems Its reduced size makes it suitable for use it in all motors that are designed for internal electronics Using the unit improperly and performing repairs...

Page 11: ... Max 60 mA 10 12 Vac Output J1 AC 12 Vdc Output J1 DC Max 60 mA 11 Common 12Vdc J1 DC common services and securities 12 N O command Light no 2 13 N O command Light no 1 14 N O command Light no 3 Light sensor 15 Bus Data System make a link if not used 230 Vac Group no 3 alternatively to a N O command you can connect a light sensor make a link if not used 8 9 10 11 12 13 14 15 16 17 1 2 3 4 5 6 FUSE...

Page 12: ...can memorize ROLLING CODE HCS remote controls 3 1 Remote controls code managing The integrated receiver can manage fixed code and HCS rolling code remote controls The output should be deactivated This operation is possible only when the automation is closed LED L1 indicate the type of codes 1 FLASH only fixed code remote controls 2 FLASHES only rolling code remote controls like SMART SMILE 3 Remot...

Page 13: ...ty from 200 codes up to 3000 codes If you are not sure of that operation start from point 1 again but before reset the memory of the receiver Read the previous chapter Cancellation of the memory 1 Press and release button P1 in the control unit LED L1 will lit for 6 seconds 2 In 6 seconds press and release BUTTON P1 again LED L1 will lit on for 6 seconds Then 3 Press in 6 seconds time the button o...

Page 14: ...on will be deactivated in the timed outputs DIP B 1 OFF 3 ON Activation of the timing LIGHT 1 Timing on the output LIGHT 1 DIP B 4 ON Activation of the timing LIGHT 2 Timing in the output LIGHT 2 1 2 3 4 1 2 3 4 1 2 3 4 1 2 3 4 1 2 3 4 DIP A DIP B 1 2 3 4 DIP A DIP B 1 2 3 4 1 2 3 4 1 2 3 4 1 2 3 4 1 2 3 4 1 2 3 4 1 2 3 4 1 2 3 4 DIP A DIP B 1 2 3 4 1 2 3 4 1 2 3 4 1 2 3 4 1 2 3 4 1 2 3 4 1 2 3 4 ...

Page 15: ...automatically deactivated The time is between 6 secons up to 18 hours DIP B 1 2 3 4 1 2 3 4 1 2 3 4 1 2 3 4 7 Memorization of the twilight LIGHT 1 The memorization of the twilight for LIGHT 1 is automatic Follow the instructions for the installation obviously you have to connect a twilight in the terminal board no 11 14 1 make sure the outputs are not activated 2 Put DIPB 1 in ON 3 Activate the ou...

Page 16: ...PEAN COUNCIL on December 15 2004 harmonizing the legislation of the member countries regarding electromagnetic compatibility Reference to harmonized standards EN 61000 6 2 EN 61000 6 3 IL PRODOTTO E CONFORME with the essential requirements of article 3 of the following European Community Directive for the use for which the product is designede 1999 5 CE EC DIRECTIVE 1999 5 ISSUED BY THE EUROPEAN P...

Page 17: ...n Lumière Circuit Lumière 2 6 5 4 3 2 1 Entrée 230 Vac Entrée 230 Vac Circuit Lumière 1 230 Vac LUMIERE 3 230 Vac CONTACT CONTACT 17 16 15 14 13 12 11 10 9 8 7 Sortie 12Vac J1 AC 12Vdc J1 DC 12 Vdc J1 DC Commun entrée Commande Lumière 2 Commande Lumière 1 Commande Lumière 3 ou crépuscul BUS DATA Ame Antenne Sortie 12 Vac J1 AC Antenne Com Service BUS DATA LUMIERE 2 230 Vac LUMIERE 1 230 Vac N O N ...

Page 18: ...une carte électronique de nouvelle génération avec compte des temps en digitale Dans le project on a adoptés les técniques plus innovatives pour garantir aucune interference la meilleur fléxibilité d utilisation et une grande gamme des fon ctionnements disponibles Champs d application START S0XL peut gérer maximum 3 circuits de lumière séparés sous une tension de 230 Vac Légende START Commande Vac...

Page 19: ...position AC Sortie 12 Vdc J1 en position DC Max 60 mA 11 Commun 12Vdc J1 en position DC commun services sécurité 12 Commande NO Lumière 2 13 Commande NO Lumière 1 14 Commande NO Lumière 3 sonde crépusculaire 15 Entrée Bus data Faire un pont si non utilisé Circuit Lumière 3 Dépend de la commande NA il est possible de brancher à la borne 14 une sonde crépusculaire Faire un pont si non utilisé 8 9 10...

Page 20: ... LED L1 clignote 2 fois et clignote lentement cela signifie que l on peut programmer les codes Rolling code HCS 3 1 Emetteurs Gestion des codes Le récepteur intégré dans l armoire START S0XL peut gérer des codes fixes et des codes Rolling code HCS Les sorties de l armoire sont désactivées aucun contact activé toutes les lumières sont éteintes La programmation est possible seulement quand l automat...

Page 21: ...registrement des codes ait été bien fait il faut recommencer depuis l étape 1 mais avant il faut effacer la mémoire du récepteur intégré Il est important de lire le chapitre précédent Effacement de la mémoire 1 Appuyer et relâcher la touche P1 sur la carte la LED L1 reste allumée fixe pendant 6 secondes 2 Pendant ces 6 secondes appuyer et relâcher encore la touche P1 sur la carte la LED L1 reste a...

Page 22: ... désactivée sur les sorties tempo risées Relance le temps de pause quand on appuie sur le bouton DIP B 1 OFF 3 ON Activation temporisation LUMIERE 1 Activation de la temporisation sortie LUMIERE 1 DIP B 4 ON Activation temporisation LUMIERE 2 Activation de la temporisation sortie LUMIERE 2 1 2 3 4 1 2 3 4 1 2 3 4 1 2 3 4 1 2 3 4 DIP A DIP B 1 2 3 4 DIP A DIP B 1 2 3 4 1 2 3 4 1 2 3 4 1 2 3 4 1 2 3...

Page 23: ...2 3 4 1 2 3 4 1 2 3 4 7 Apprentisage SEUIL de la LUMINOSITE CREPUSCULAIRE La mémorisation du seuil pour la sortie LUMIERE1 est automatique Il faut la programmer comme suit et il faut aussi brancher aux bornes 11 14 une sonde crépusculaire cellule photo électrique 1 S assurer que les sorties soient désactivées 2 Placer sur ON le DIPB 1 3 Activer la sortie LUMIERE 1 4 Appuyer le bouton P1 sur l armo...

Page 24: ... 1 EN 60335 2 97 2004 108 CE DIRECTIVE 2004 108 CE DUL CONSEIL du 15 décembre 2004 concernant le rapprochement des lois des Etats membres concernant la compatibilité electromagnétique Référence aux normes harmonisées EN 61000 6 2 EN 61000 6 3 EN 50336 LE PRODUIT EST CONFORME aux requetes essentiels de l article 3 de la directive communautaire suivante pour l utilisation à laquelle les produits son...

Reviews: